Thingiverse

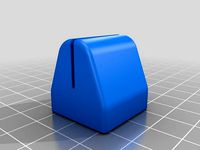
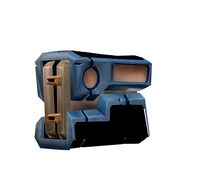
SWD1 KIT Z-AXIS FOR WANHAO DUPLICATOR I3 / MONOPRICE MAKER SELECT by ShadowWeaver2067
by Thingiverse
Last crawled date: 3 years ago
This is a Remix on two separate designs found here on Thingiverse that inspired me.
First inspiration from the basic concept of AzzA's thick printed blocks.
I modeled in Inventor a complete revision of the front and Top connectors that extend out to make the rods parallel to the y axis.
Second inspiration was from TyphonPS's design with levelers.
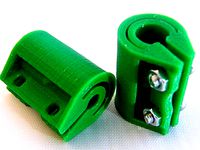
The Mid feet and Rear Feet are redesigns on the concept by TyphonPS, that incorporates levelers in the bases of the yaxis blocks and the zaxis towers.
While only some similarities exist between both of the other two creations, these parts are completely rebuilt in inventor and checked against the Wanhao I3 Duplicator as to fit.
The Front and Rear Y axis braces that run along the front plate can be used from AzzA's kit as I have not recreated those parts for my own design as of yet but will be in the future with modifications to support changes on the Wanhao.
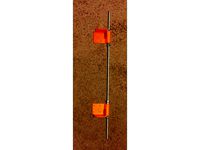
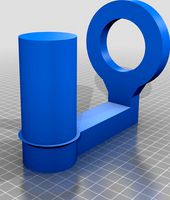
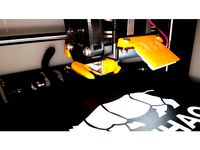
This Z axis mod was designed to eliminate the need to completely remove the Top Z-Axis bolts which could lead to getting the z-axis top frame out of square and causing issues for new Installers. By using the top 2 screw brace it allows a new unskilled modder to install the z-axis brace without completely disassembling the machine.
Additional Parts Needed
2) 5/16 Threaded Rod @ 375mm long
or 8mm Threaded Rod @ 375mm long
4) 5/16 Nylock Nuts - Replace with 8mm Nuts if using 8mm Rod
4) 5/16 Standard Nuts
26)M3 x 10mm Socket Cap Screws
6) 1/4-20 nuts
6) 1/4-20 Elevator bolts 1" long
6) 1" Dia x 1/8th thick Rubber pads (added to bottom of elevator bolts)
Installation process.
Ensure Threaded rods are between 370mm and 380mm in lengths.
Remove 3) M3x5 screws on front of y axis on one side, Mount New Bracket and replace with 3) M3x10mm and on the inside of the Y install 1) M3 x 10mm on Internal Brace. Repeat for opposite side. Then repeat for rear blocks minus the internal screw.
Remove 2) M3 x5mm screws on the bottom of each z-axis tower and install the center feet with 2) M3x10mm screws each ctr foot.
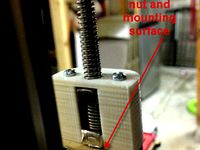
Install 6) 1/4-20 nuts in the blocks for the elevator bolts, then install 6 Elevator bolts
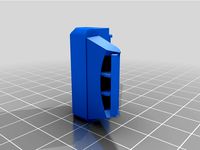
Install threaded rods in the two front base blocks, 5/16 Nylocks run up before inserting into base and install 5/16 nut in base tube and thread rod into 5/16 nut. Slide printed cover over 5/16 nylock nut and slide an additional printed cover inverted next. Then Thread a standard 5/16 nut to fit in 2nd cap. Finally Install top z axis sleeve on threaded rod and cap off with 5/16 Nylock flush with end of threaded rod.
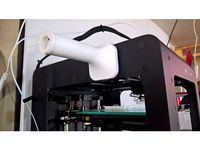
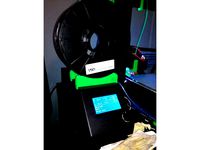
Install the top z axis sleeve to the bottom two screws on the top z axis tower connector screws. Adjust and level Machine accordingly.
First inspiration from the basic concept of AzzA's thick printed blocks.
I modeled in Inventor a complete revision of the front and Top connectors that extend out to make the rods parallel to the y axis.
Second inspiration was from TyphonPS's design with levelers.
The Mid feet and Rear Feet are redesigns on the concept by TyphonPS, that incorporates levelers in the bases of the yaxis blocks and the zaxis towers.
While only some similarities exist between both of the other two creations, these parts are completely rebuilt in inventor and checked against the Wanhao I3 Duplicator as to fit.
The Front and Rear Y axis braces that run along the front plate can be used from AzzA's kit as I have not recreated those parts for my own design as of yet but will be in the future with modifications to support changes on the Wanhao.
This Z axis mod was designed to eliminate the need to completely remove the Top Z-Axis bolts which could lead to getting the z-axis top frame out of square and causing issues for new Installers. By using the top 2 screw brace it allows a new unskilled modder to install the z-axis brace without completely disassembling the machine.
Additional Parts Needed
2) 5/16 Threaded Rod @ 375mm long
or 8mm Threaded Rod @ 375mm long
4) 5/16 Nylock Nuts - Replace with 8mm Nuts if using 8mm Rod
4) 5/16 Standard Nuts
26)M3 x 10mm Socket Cap Screws
6) 1/4-20 nuts
6) 1/4-20 Elevator bolts 1" long
6) 1" Dia x 1/8th thick Rubber pads (added to bottom of elevator bolts)
Installation process.
Ensure Threaded rods are between 370mm and 380mm in lengths.
Remove 3) M3x5 screws on front of y axis on one side, Mount New Bracket and replace with 3) M3x10mm and on the inside of the Y install 1) M3 x 10mm on Internal Brace. Repeat for opposite side. Then repeat for rear blocks minus the internal screw.
Remove 2) M3 x5mm screws on the bottom of each z-axis tower and install the center feet with 2) M3x10mm screws each ctr foot.
Install 6) 1/4-20 nuts in the blocks for the elevator bolts, then install 6 Elevator bolts
Install threaded rods in the two front base blocks, 5/16 Nylocks run up before inserting into base and install 5/16 nut in base tube and thread rod into 5/16 nut. Slide printed cover over 5/16 nylock nut and slide an additional printed cover inverted next. Then Thread a standard 5/16 nut to fit in 2nd cap. Finally Install top z axis sleeve on threaded rod and cap off with 5/16 Nylock flush with end of threaded rod.
Install the top z axis sleeve to the bottom two screws on the top z axis tower connector screws. Adjust and level Machine accordingly.
Similar models
thingiverse
free

CR-10/CR-10S Frame Brace by tito114
...
edit 1 2018-04-07:
new files uploaded with correct rear angle for threaded rod.
screw holes adjusted to put in screws easier.
thingiverse
free
Wanhao I3 top brackets for tall prints - (5/16-8mm) by jpasternack
...hao i3 top brackets for tall prints - (5/16-8mm)
install z braces to use this top bar. - https://www.thingiverse.com/thing:921948
thingiverse
free
5mm to 8mm Z axis shaft coupler by mrice
...ible shaft couplers on z axis rods, for 5mm motor shafts and 8mm threaded rods. use two m3x10mm screws and nuts to tighten down.
thingiverse
free

Ender 5 Y Axis Brace 1/4" threaded rod
...ender 5 y axis brace 1/4" threaded rod
thingiverse
modified version for 1/4" threaded rod.
thingiverse
free

Maker Select V2/Wanhao Simple Z-Brace
...ng
qty 4: 5/16 nuts
i printed mine 100% infill for max strength. it doesn't take much time at all to make all the components.
thingiverse
free

Wanhao Duplicator I3 Z brace with adjustable feet (Hardware store special) by TyphonPS
...-(2) 3/8-16unc threaded rods x 16" long
-(28) m3-.05 x 16mm cap head screws
-(6) 7/8" od, 11/16" id (-115) o-rings
thingiverse
free

Turnbuckle Bracket by jnsanders1983
...6 nut per brace
2 - m5 x 10 mm per brace
2 m5 2020 series drop in t nuts per brace
use 5/16 threaded rod cut to necessary length.
thingiverse
free
Updated: Z-axis Anti-backlash 1/4-16 Acme Threaded Modification by wesner0019
... the driving nut while the bottom nut provides the anti-backlash.
also uses either 3mm or 4-40 threaded bolts at 1.5 inches long.
thingiverse
free

Wanhao i3 Y-Axis Brace with pulley bracket by TheGroveUK
...k
thingiverse
wip
using 8mm threaded rod, this design simply adds a bracket for the pulley improving the stability of the y-axis
thingiverse
free

Y axsis 8mm threaded rod bloick by nanosekund
...rod bloick by nanosekund
thingiverse
a simple 8mm threaded rod y axis block with nut insert that i made for my 3d printer build.
Shadowweaver2067
thingiverse
free

Black Widow Dual Power Supply Control Box by ShadowWeaver2067
...good luck and message if you have any questions or possible needs. i will get back to you each evening when i get home from work.
thingiverse
free

Elevator Bolt Wrench, 7mm by Finktrain
...for wanhao duplicator i3 / monoprice maker select by shadowweaver2067. ...
thingiverse
free

SWD2 Rear - Clean by tcalmighty
...first layer adhesion. all credit goes to original maker: shadowweaver2067 set scale to 10% for most...
thingiverse
free

Black Widow Z-Axis G2T Belt Relocation by ShadowWeaver2067
...puts it close to the top of the search to make it easier for your friends to find.
sincerely, shadowweaver2067
aka anthony harmon
thingiverse
free

1/4in Elevator Bolt Thumb Wheel by mrsim0ns
...the elevator bolts i'm using for leveling feet on shadowweaver2067#39;s awesome z-axis mod for wanhao i3 duplicator. it fits...
thingiverse
free

SWD2 KIT Z-AXIS REAR MOUNT FOR WANHAO DUPLICATOR I3 / MONOPRICE MAKER SELECT by ShadowWeaver2067
...reciation for making your printer a rock solid printing monster drop me a dime or two here..https://www.paypal.me/shadowweavr2067
thingiverse
free

Duplicator Z axis brace top cover filament guide tubing mod by Plastic_Innovations
...from the z-axis mod for wanhao i3 duplicator by shadowweaver2067 and wanhao duplicator i3 filament guide tube adapter by...
thingiverse
free

SWD3 KIT Z-AXIS REAR MOUNT FOR WANHAO DUPLICATOR I3 PLUS / MONOPRICE MAKER SELECT PLUS by ShadowWeaver2067
...reciation for making your printer a rock solid printing monster drop me a dime or two here..https://www.paypal.me/shadowweavr2067
thingiverse
free

Z extension of Z brace by redxeth
...remixes). anyway, here's my version of the merge of shadowweaver2067#39;s z-axis rear mount and azza's z-extensions. my first thing...
Monoprice
thingiverse
free

Display frame for Monoprice MP10
...display frame for monoprice mp10
thingiverse
display frame for monoprice mp10
thingiverse
free

Bridge covers Monoprice MP10
...bridge covers monoprice mp10
thingiverse
bridge covers monoprice mp10
thingiverse
free
Monoprice Coin by Peyton_Guyot
...monoprice coin by peyton_guyot
thingiverse
print this!
thingiverse
free
Voxel Monoprice spool holder by avalero
...voxel monoprice spool holder by avalero
thingiverse
voxel monoprice spool holder
thingiverse
free
Monoprice select mini knob by BramRausch
...monoprice select mini knob by bramrausch
thingiverse
this is a replacement knob for the monoprice select mini.
thingiverse
free

Monoprice 3d printer hook by dmitriyf
...monoprice 3d printer hook by dmitriyf
thingiverse
this is an attachment to monoprice select 3d printer v2
thingiverse
free
monoprice ultimate spool mount by death4u
...older by danmannert to monoprice ultimate 3d printer. it clips into the slot on the top of the printer for the optional enclosue.
thingiverse
free
Monoprice Mini Delta Foot
...a foot for a monoprice mini delta. it helps to increase airflow under the printer. it also helps to reduce the volume of the fan.
thingiverse
free
Monoprice Select Mini Fan Guard
...y fan protection. this is an essential upgrade.
used it on the monoprice select mini pro (from www.3dprinthings.be).
perfect fit!
thingiverse
free

Monoprice Cable Tie Mount
... but had to cut down the straps a bit to make them work. designed a quick mount that fits the full strap, item 6457 on monoprice.
Wanhao
thingiverse
free
Wanhao Logo Plate / Wanhao Logo Schild by JMDesigns
...wanhao logo plate / wanhao logo schild by jmdesigns
thingiverse
wanhao logo plate / wanhao logo schild
thingiverse
free
Wanhao logo by nebtio
...wanhao logo by nebtio
thingiverse
wanhao logo
thingiverse
free
Wanhao keychain by Rein3003
...wanhao keychain by rein3003
thingiverse
a keychain with the logo of wanhao
thingiverse
free
Wanhao Di3 v2 Light / Wanhao Di3 v2 Beleuchtung by JMDesigns
...wanhao di3 v2 light / wanhao di3 v2 beleuchtung by jmdesigns
thingiverse
wanhao di3 v2 light / wanhao di3 v2 beleuchtung
thingiverse
free
TUSH For Wanhao by wtmi1992
...tush for wanhao by wtmi1992
thingiverse
the ultimate spool holder, modified for the top of the wanhao control box. fits snug.
thingiverse
free
fanduct wanhao d12 by theopoilmek
...fanduct wanhao d12 by theopoilmek
thingiverse
fanduct pour wanhao d12
thingiverse
free
Wanhao i3 Marlin by johan21
...wanhao i3 marlin by johan21
thingiverse
marlin for wanhao i3 rampsboard 1.4.
thingiverse
free
Wanhao Duplicator i3 by imagineering4
...wanhao duplicator i3 by imagineering4
thingiverse
these are the stl files for the improvements to the wanhao duplicator i3, v2
thingiverse
free

Wanhao D6 filament guard
...wanhao d6 filament guard
thingiverse
this is a filament guard for wanhao d6 machine to avoid the filament unrolling
thingiverse
free
Wanhao Duplicator i3 Model by Hilde3D
...wanhao duplicator i3 model by hilde3d
thingiverse
wanhao duplicator i3 model
Duplicator
turbosquid
$10

duplicate
...
turbosquid
royalty free 3d model duplicate for download as on turbosquid: 3d models for games, architecture, videos. (1566034)
turbosquid
$20

Wonderful duplicate kids room
...ul duplicate kids room for download as skp, 3ds, fbx, and obj on turbosquid: 3d models for games, architecture, videos. (1609462)
archive3d
free

Copier 3D Model
...hine duplicating machine
copier n160808 - 3d model (*.gsm+*.3ds) for interior 3d visualization.
3d_export
$30

connect four set
...ate objects that can be disassembled. includes one red and one black checker which can be duplicated to the standard 42 checkers.
3ddd
$1
Черепица
...del
- put it in your scene and duplicate
- level of detail can be edited
- open with 3ds max 2010-2013 or import in your program.
3d_export
$27

Dividing Cell / Ovule 3D Model
...al microbe blob ovum fiction science ovule duplication divide dividing
dividing cell / ovule 3d model duchampmodels 9691 3dexport
3d_ocean
$16

Folding Chair
...tubing. designed to be good low poly at a distance and mesh smooth pretty well and light weight for duplicating a lot. package...
3d_export
$8
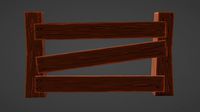
wooden fence
... one post separate so the fence can be duplicated and extended. created in blender 3.0 file format fbx with texture painted maps.
3d_export
$8
wooden fence
... one post separate so the fence can be duplicated and extended. created in blender 3.0 file format fbx with texture painted maps.
3d_ocean
$2

DNA Strands Of 5 Types
... strands that can be multiplied and can be made long chains by duplicating them and can be easily applied materials and textures.
I3
3d_export
$10

suv i3
...suv i3
3dexport
suv i3 2013 series
3d_ocean
$89

BMW i3 2012
...y, in real units of measurement, qualitatively and maximally close to the original. model formats: - *.max (3ds max 2008 scanl...
cg_studio
$99

BMW i3 20143d model
...
cgstudio
.3ds .c4d .fbx .lwo .max .obj - bmw i3 2014 3d model, royalty free license available, instant download after purchase.
cg_studio
$99

BMW i3 20123d model
...tudio
.3ds .c4d .fbx .lwo .max .mb .obj - bmw i3 2012 3d model, royalty free license available, instant download after purchase.
cg_studio
$99

BMW i3 20143d model
...tudio
.3ds .c4d .fbx .lwo .max .mb .obj - bmw i3 2014 3d model, royalty free license available, instant download after purchase.
humster3d
$75

3D model of BMW i3 2014
...
buy a detailed 3d model of bmw i3 2014 in various file formats. all our 3d models were created maximally close to the original.
humster3d
$40

3D model of Kitchen Set I3
...uy a detailed 3d model of kitchen set i3 in various file formats. all our 3d models were created maximally close to the original.
3d_ocean
$30

Kitchen set i3
...ensils oven plates shelves sink table ware
kitchen set i3 include 3d models: cooker, oven, sink, cupboards, table, chair, plates.
3d_ocean
$89

BMW i3 2014
...y, in real units of measurement, qualitatively and maximally close to the original. model formats: - *.max (3ds max 2008 scanl...
cg_studio
$99

BMW i3 Concept 20113d model
...i3
.3ds .c4d .fbx .lwo .max .obj - bmw i3 concept 2011 3d model, royalty free license available, instant download after purchase.
Select
3ddd
$1

TUBADZIN SELECT
...max 2014, 2011.
fbx 2014, 2013, 2011,
obj
_____________________________________http://www.tubadzin.pl/en/collection/324
3ddd
$1
Плитка Selection
... supergres , плитка
плитка selection - supergres ceramiche
turbosquid
$15

Christmas Selection
...royalty free 3d model christmas selection for download as fbx on turbosquid: 3d models for games, architecture, videos. (1696333)
turbosquid
$39

Vases selection
... available on turbo squid, the world's leading provider of digital 3d models for visualization, films, television, and games.
turbosquid
free

SELECTIVE RACKING SYSTEM
...yalty free 3d model selective racking system for download as on turbosquid: 3d models for games, architecture, videos. (1282512)
turbosquid
$10
Hansgrohe ShowerTablet Select
...ee 3d model hansgrohe showertablet select for download as max on turbosquid: 3d models for games, architecture, videos. (1336955)
turbosquid
$29

Chill selectional sofa
...odel chill selectional sofa for download as max, obj, and fbx on turbosquid: 3d models for games, architecture, videos. (1465691)
3ddd
free

Lunaria - Nova, ASA Selection
... asa selection , dried flowers
ветка лунарии в вазе nova, asa selection
3ddd
$1
inno SELECT SLIM chair
...inno select slim chair
3ddd
inno
high detailed inno select slim chair
turbosquid
$29

Select Chaise Lounge
... available on turbo squid, the world's leading provider of digital 3d models for visualization, films, television, and games.
Kit
turbosquid
$3

Bathroom Kit Baño kit
... available on turbo squid, the world's leading provider of digital 3d models for visualization, films, television, and games.
turbosquid
$19

Kit
... available on turbo squid, the world's leading provider of digital 3d models for visualization, films, television, and games.
3d_export
$20

Drift Kit
...drift kit
3dexport
turbosquid
$40

BitCoin Kit
...urbosquid
royalty free 3d model bitcoin kit for download as on turbosquid: 3d models for games, architecture, videos. (1519068)
turbosquid
$9

Industrial kit
...osquid
royalty free 3d model industrial kit for download as on turbosquid: 3d models for games, architecture, videos. (1144117)
turbosquid
$6

Kit Vases
...
turbosquid
royalty free 3d model kit vases for download as on turbosquid: 3d models for games, architecture, videos. (1285114)
turbosquid
free

Survival Kit
...rbosquid
royalty free 3d model survival kit for download as on turbosquid: 3d models for games, architecture, videos. (1637721)
turbosquid
$50

Ninja Kit
...rbosquid
royalty free 3d model ninja kit for download as fbx on turbosquid: 3d models for games, architecture, videos. (1672364)
turbosquid
$35

Brushes Kit
...osquid
royalty free 3d model brushes kit for download as max on turbosquid: 3d models for games, architecture, videos. (1216721)
turbosquid
$19
Medical kit
...osquid
royalty free 3d model medical kit for download as fbx on turbosquid: 3d models for games, architecture, videos. (1486089)
Axis
3ddd
$1

Мария Axis
...
3ddd
кухня , классическая , axis
модель кухни.
3d_export
$22

Axis robot 6-axis robotic arm
...ing parts drawings, standard parts purchased parts list, can be produced directly according to the drawings, welcome to download!
3ddd
free

Versatile Axis
...ddd
nexus , плитка
http://bvtileandstone.com/ceramic-porcelain/versatile-axis/
3d_export
$19

robot 2 axis
...robot 2 axis
3dexport
robot 2 axis
turbosquid
$40

Axis R5F
... available on turbo squid, the world's leading provider of digital 3d models for visualization, films, television, and games.
turbosquid
$40

Axis S5F
... available on turbo squid, the world's leading provider of digital 3d models for visualization, films, television, and games.
turbosquid
$30

Axis Athlon
... available on turbo squid, the world's leading provider of digital 3d models for visualization, films, television, and games.
turbosquid
$10

Linear Axis
... available on turbo squid, the world's leading provider of digital 3d models for visualization, films, television, and games.
3d_export
$15

drawing axis
...drawing axis
3dexport
simple rendering of the scene file
3ddd
$1

versatile axis ARC
...versatile axis arc
3ddd
versatile , плитка
versatile axis arc red dot design award
Z
3d_export
$5

nissan z
...nissan z
3dexport
nissan z
3ddd
$1

Vase Z
...vase z
3ddd
vase z
3ddd
$1

полотенцесушить Z
...полотенцесушить z
3ddd
полотенцесушитель
полотенцесушить z
design_connected
free

Z-Chair
...z-chair
designconnected
free 3d model of z-chair designed by karman, aleksei.
design_connected
$11

Z Lamp
...z lamp
designconnected
phillips z lamp computer generated 3d model. designed by kalff, louis.
3d_export
$5

Dragon balls z
...dragon balls z
3dexport
dragon ball z
turbosquid
$20

Fighter Z
...
turbosquid
royalty free 3d model fighter z for download as on turbosquid: 3d models for games, architecture, videos. (1292563)
turbosquid
$9

Pen Z
...pen z
turbosquid
free 3d model pen z for download as obj on turbosquid: 3d models for games, architecture, videos. (1686775)
turbosquid
free

z chair
...z chair
turbosquid
free 3d model z chair for download as max on turbosquid: 3d models for games, architecture, videos. (1410230)
turbosquid
$5

Letter Z
...urbosquid
royalty free 3d model letter z for download as max on turbosquid: 3d models for games, architecture, videos. (1408540)
Maker
3d_ocean
$17

Coffee Maker
...coffee maker
3docean
breakfast coffee drip electric maker morning
detailed coffee maker and a plug.
3ddd
$1

coffee maker
...coffee maker
3ddd
кофемашина
coffee maker
3d_export
$10

chapati maker
...chapati maker
3dexport
it is a indian traditional chapati maker
archibase_planet
free
Coffee maker
...aker
archibase planet
percolator coffee-machine coffee maker
coffee maker - 3d model (*.gsm+*.3ds) for interior 3d visualization.
archibase_planet
free
Coffee maker
...aker
archibase planet
percolator coffee-machine coffee maker
coffee maker - 3d model (*.gsm+*.3ds) for interior 3d visualization.
archibase_planet
free

Coffee maker
...aker
archibase planet
percolator coffee-machine coffee maker
coffee maker - 3d model (*.gsm+*.3ds) for interior 3d visualization.
archibase_planet
free

Сoffee maker
...er
archibase planet
coffee maker percolator coffee-machine
сoffee maker n020112 - 3d model (*.3ds) for interior 3d visualization.
archibase_planet
free

Coffee maker
...aker
archibase planet
coffee maker percolator coffee-machine
coffee maker - 3d model (*.gsm+*.3ds) for interior 3d visualization.
3ddd
$1

Juice Maker
...juice maker
3ddd
соковыжималка
fully detailed kenwood juice maker
archibase_planet
free

Coffee maker
...hibase planet
coffee maker percolator coffee-machine
coffee maker n140611 - 3d model (*.gsm+*.3ds) for interior 3d visualization.