Thingiverse
Superfly Extruder - A Compact BMG Conversion by mustcode
by Thingiverse
Last crawled date: 2 years, 11 months ago
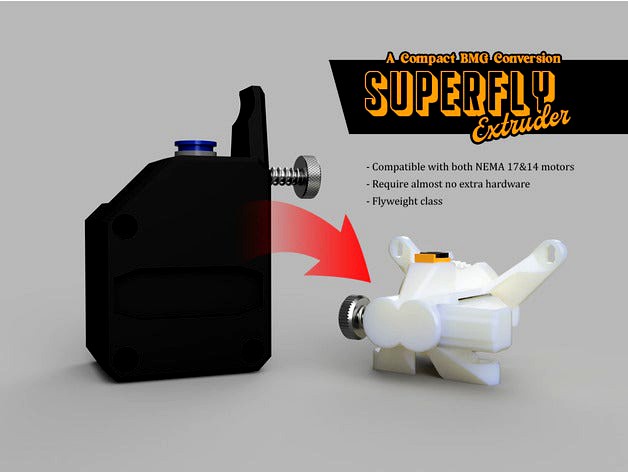
Superfly Extruder
A Compact BMG Conversion
*Update (10th May 2021) - Added a higher strength tensioner, more suitable for high-speed printing, see details in "Printed Parts"
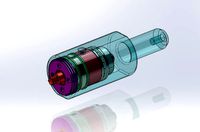
The Superfly is a compact extruder designed to reuse the excellent dual drive gears of the beloved BMG extruder. As with the BMG, the Superfly is a dual-drive geared extruder with a 3:1 gear ratio. It is designed with the following characteristics in mind:
compact and lightweight
short filament path
balanced center of gravity
easy to source hardware
support both NEMA 17 and round NEMA 14 motors
easy to print
Please see the project GitHub Page for more detailed information on the Superfly including additional assembly instructions and images
Parts
You will need the following parts of your BMG:
the drive shaft with the large plastic gear attached
the drive gear, this is the gear that is on the drive shaft
the idler gear, its shaft, and the two needle bearings inside, these are the parts that were on the BMG's tension arm
2 x MR85 bearings that the drive shaft runs on
Thumbscrew and spring (the washer is optional)
The motor gear, if you're planning on using a motor without a gear pre-installed
In addition to the BMG parts, you will also need the following hardware:
an M3 nut for securing the thumbscrew
4 x M3 screws for mounting (6mm-12mm depending on your motor and mounting needs).
If you're going to be running a reverse-bowden, you'll also need:
an embedded bowden collet (the type commonly used on a V6 heatsink)
4mm OD PTFE tubing
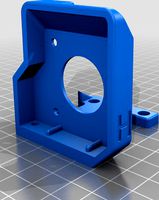
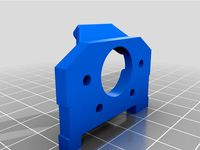
Printed Parts
There are only 4 parts that you need to print:
The main housing holds the drive gear assembly and one of the MR85 bearings
The back housing holds the other MR85 bearing and keep the drive gear assembly in the main housing
The tensioner holds the idler gear pressed to the drive gear with the tension from the spring and thumbscrew
The tensioner_high-tension is an alternate version of the tensioner that can provide stronger tension. The difference is that the regular tensioner has a hard-stop just before the gear pushes the filament in too deep to prevent over-tightening, while the high-tension version removes the stop and allow the thumbscrew to pull on the tensioner with more force. Please be aware that over-tightening the thumbscrew can damage the filament and/or your printed parts.
The motor spacer is an optional part designed to go between the main housing and the motor to allow you to use motors with shaft longer than 15mm.
Additionally, some variations of the drive shaft are known to be a bit long and may protrude beyond MR85 bearing at the back. If this is the case for your drive shaft, then you will need a spacer to make sure that the shaft is not pushing against the motor's body.
Finally, if you are using a NEMA 14 motor and you prefer to save weight than adding a spacer, you can grind away the protruding portion of the drive shaft, this is commonly done on other similar round NEMA 14 based extruder like the Sherpa Mini
Printing Recommendations:
All parts are printable in under 3 hours and should be an easy print for most modern printers. The following are some recommendations to help increase your chance of success:
The main housing should be printed "face down" as oriented in the STL, the model is designed to minimize supports in this orientation.
Supports are only needed for the main housing where the two motor mount holes are. Other overhangs and bridges are very printable.
Raft should be enabled for the main housing unless you're very confident in your bed-adhesion.
The tensioner should be printed with plenty of walls and infill to make sure that it doesn't break under stress.
As with most mechanical prints, your printer should be capable of producing parts with decent dimensional accuracy. If you found that your printed parts are too tight, try the "extra_clearance" version of the main housing instead
A Compact BMG Conversion
*Update (10th May 2021) - Added a higher strength tensioner, more suitable for high-speed printing, see details in "Printed Parts"
The Superfly is a compact extruder designed to reuse the excellent dual drive gears of the beloved BMG extruder. As with the BMG, the Superfly is a dual-drive geared extruder with a 3:1 gear ratio. It is designed with the following characteristics in mind:
compact and lightweight
short filament path
balanced center of gravity
easy to source hardware
support both NEMA 17 and round NEMA 14 motors
easy to print
Please see the project GitHub Page for more detailed information on the Superfly including additional assembly instructions and images
Parts
You will need the following parts of your BMG:
the drive shaft with the large plastic gear attached
the drive gear, this is the gear that is on the drive shaft
the idler gear, its shaft, and the two needle bearings inside, these are the parts that were on the BMG's tension arm
2 x MR85 bearings that the drive shaft runs on
Thumbscrew and spring (the washer is optional)
The motor gear, if you're planning on using a motor without a gear pre-installed
In addition to the BMG parts, you will also need the following hardware:
an M3 nut for securing the thumbscrew
4 x M3 screws for mounting (6mm-12mm depending on your motor and mounting needs).
If you're going to be running a reverse-bowden, you'll also need:
an embedded bowden collet (the type commonly used on a V6 heatsink)
4mm OD PTFE tubing
Printed Parts
There are only 4 parts that you need to print:
The main housing holds the drive gear assembly and one of the MR85 bearings
The back housing holds the other MR85 bearing and keep the drive gear assembly in the main housing
The tensioner holds the idler gear pressed to the drive gear with the tension from the spring and thumbscrew
The tensioner_high-tension is an alternate version of the tensioner that can provide stronger tension. The difference is that the regular tensioner has a hard-stop just before the gear pushes the filament in too deep to prevent over-tightening, while the high-tension version removes the stop and allow the thumbscrew to pull on the tensioner with more force. Please be aware that over-tightening the thumbscrew can damage the filament and/or your printed parts.
The motor spacer is an optional part designed to go between the main housing and the motor to allow you to use motors with shaft longer than 15mm.
Additionally, some variations of the drive shaft are known to be a bit long and may protrude beyond MR85 bearing at the back. If this is the case for your drive shaft, then you will need a spacer to make sure that the shaft is not pushing against the motor's body.
Finally, if you are using a NEMA 14 motor and you prefer to save weight than adding a spacer, you can grind away the protruding portion of the drive shaft, this is commonly done on other similar round NEMA 14 based extruder like the Sherpa Mini
Printing Recommendations:
All parts are printable in under 3 hours and should be an easy print for most modern printers. The following are some recommendations to help increase your chance of success:
The main housing should be printed "face down" as oriented in the STL, the model is designed to minimize supports in this orientation.
Supports are only needed for the main housing where the two motor mount holes are. Other overhangs and bridges are very printable.
Raft should be enabled for the main housing unless you're very confident in your bed-adhesion.
The tensioner should be printed with plenty of walls and infill to make sure that it doesn't break under stress.
As with most mechanical prints, your printer should be capable of producing parts with decent dimensional accuracy. If you found that your printed parts are too tight, try the "extra_clearance" version of the main housing instead
Similar models
thingiverse
free
Powerless Nema 17 Upgrading Power With MK8 Gear Extruder by Blueman92
... nema17
m5x55 bolt
m5x40 bolt
m5 nuts
m5 washers
5mm diameter 10mm pin
15mmx6-7 mm diameter tension spring
tfe tube and connector
thingiverse
free

Compact direct drive extruder (Superfly remix) by NikNakTak
...skills, you can contact me and i will modify my design to meet your needs.
as always your comments and/or suggetions are welcome.
thingiverse
free

NEMA 17 pulley and motor mounts by SE21
...f the drive motor (depends on where you mount it).
please note that the motor mount is currently designed for 2020 with m5 bolts.
thingiverse
free

RepRapPro extruder drive. NEMA14. by mbasov
...s reprappro stop selling separate parts and sell only "parts kits". i understand business is business but it's sad.
thingiverse
free

0.25" nema17 nema stepper motor spacer by Resident_genius
... simple 0.25" thick spacer for a nema 17. allowed me to use a long shaft motor in a spot where i needed a short shaft motor.
thingiverse
free

DanO's BIg O Extruder by The_Great_Dano
...oice.
have a beer for a job well done.
please allow 2-4 hrs of use to break-in for smoothe action. (realign and retighten bolts)
grabcad
free

M3D Promega
...t have printed and it does work. using longer nema14 with longer motor shaft. stub shaft has to be made to extend to drive gear
thingiverse
free

C Extruder for MK8 gear and J-head by LordM
...ou can use the same bearings, spring and tension screws.
the plate is flexible having oval holes to be fixed on the x-carriage.
thingiverse
free

Alpha Direct Drive Extruder by engineglue
...upply list; this is a minimal design. you can use m4 bolts and nuts to mount it. it mounts to a standard aluminum mounting plate.
thingiverse
free

BMG Extruder gear by Htokgoz
...bmg extruder gear by htokgoz
thingiverse
bmg extruder shaft gear
Mustcode
thingiverse
free

BIQU B1 Universal Hotend Mount by mustcode
...ou can get models for the rest of the hotend from biqu's support or facebook group if you need them, but it is not necessary.
thingiverse
free

Cafelat Robot Tamp Level Checker by mustcode
...ve their tamping technique, but i guess you could use it as a handle for the stock tamper if you find it easier to tamp that way.
thingiverse
free

Hydra V6 Remix for BIQU B1 by mustcode
...ed to clear some space for the cable, or wait for a remix ;)
step files are included. please make improvement and happy printing!
thingiverse
free

BIQU B1 BMG extruder mount for Hydra V6 system by Empse
...system by empse thingiverse this is an addition to mustcode#39;s remix, which has two mounting holes in a different...
thingiverse
free
BIQU B1 BMG extruder mount for Hydra V6 system by Empse
...system by empse thingiverse this is an addition to mustcode#39;s remix, which has two mounting holes in a different...
thingiverse
free
Compact direct drive extruder (Superfly remix) by NikNakTak
...this is reworked version of the superfly extruder by mustcode i loved the idea, but it didn't worked for...
Superfly
thingiverse
free

SaabCoffe by superfly
...ext and logo outline exported as dxf, ready to use in openscad.
saabcoffe.scad - openscad file, used vit the two dxf-files above.
thingiverse
free

SwedCoffe by superfly
...e exported as dxf, ready to use swedcoffe.scad - openscad file, used vit the two dxf-files above.
swedcoffe.stl - ready to print!
sketchfab
$20

Nike Mercurial Superfly 7 Cleats Blue
... cleanup, rizomuv
- nike mercurial superfly 7 cleats blue - buy royalty free 3d model by mama's sneaker stop (@mamasneakers)
thingiverse
free

Superfly extruder remix for numa motor in square position by reQu1em
...by requ1em
thingiverse
remix of the superfly extruder to allow for the numa motor to be held squarely as opposed to at an angle.
thingiverse
free
Superfly on ender with e3d mount by cptnmidnight
...y cptnmidnight
thingiverse
untested so far. made this for a friend that has install fysetc aluminum mount for e3d on his ender 3
renderosity
$35

VB SuperShaders for Poser11 SuperFly Bundle
...me of the settings form the supershaders included in this set. some tips are also disseminated throughout the tutorial.</p>
3dcadbrowser
free
Superfly Go Kart 3D CAD Model
...3d object can be downloaded in .step, .iges, .max, .obj, .3ds, .fbx, .dxf, .lwo, .stl, .wrl, .ma, .dae, .x and .asc file formats.
renderosity
$21

VB SuperShaders for Poser11 SuperFly Vol.1
...me of the settings form the supershaders included in this set. some tips are also disseminated throughout the tutorial.</p>
renderosity
$7

PBR Fancy SuperFly Styles for LF Ruffian Boots
...ac.<br />
____________________________<br />
<br />
© copyright 2019 kerstin weihe (karanta)</p>
renderosity
$21

VB SuperShaders for Poser11 SuperFly Vol.2
...me of the settings form the supershaders included in this set. some tips are also disseminated throughout the tutorial.</p>
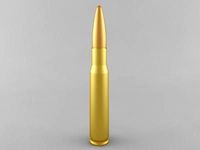
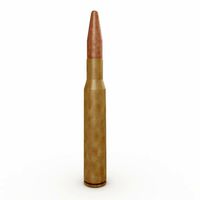
Bmg
turbosquid
$3

.50 BMG
... available on turbo squid, the world's leading provider of digital 3d models for visualization, films, television, and games.
turbosquid
$2

.50 BMG
... available on turbo squid, the world's leading provider of digital 3d models for visualization, films, television, and games.
turbosquid
$25
50 BMG Cartridge
...e 3d model 50 bmg cartridge for download as 3ds, max, and obj on turbosquid: 3d models for games, architecture, videos. (1303035)
turbosquid
$30

Sniper 50 bmg
... available on turbo squid, the world's leading provider of digital 3d models for visualization, films, television, and games.
turbosquid
free

Cal 50 BMG
... available on turbo squid, the world's leading provider of digital 3d models for visualization, films, television, and games.
cg_studio
$25
.50 BMG Cartridge3d model
...odel
cgstudio
.3ds .max .obj .wrl - .50 bmg cartridge 3d model, royalty free license available, instant download after purchase.
3d_export
$5
50 caliber BMG round 3D Model
...d 3d model
3dexport
50cal caliber 50 round bullet bmg cartridge browning rifle
50 caliber bmg round 3d model csw92 27660 3dexport
3d_export
$22
.50 BMG Cartridge 3D Model
...ectile rifle round pistol cartridge m2 hb 127x99mm nato browning barrett m82a1
.50 bmg cartridge 3d model plutonius 8091 3dexport
turbosquid
free
LAR Grizzly .50 BMG Sniper
... available on turbo squid, the world's leading provider of digital 3d models for visualization, films, television, and games.
3d_export
$8
cartrige m50 bmg
...aterials are logically named<br>the main format is in 3ds max 2009.<br>satisfcation garranteed..<br>thank you !
Conversion
3ddd
$1

Conversation Seat
...шетка
the conversation seat made in englandhttp://www.squintlimited.com/products/the_conversation_seat/gold
+ max 2011
3d_export
$10

Converse 3D Model
...converse 3d model
3dexport
converse shoe pc unix mac
converse 3d model electropainter17075 38067 3dexport
turbosquid
$100

converse-shoe
...quid
royalty free 3d model converse-shoe for download as c4d on turbosquid: 3d models for games, architecture, videos. (1398427)
turbosquid
$10

Conversation Furniture
... available on turbo squid, the world's leading provider of digital 3d models for visualization, films, television, and games.
turbosquid
$7

Converse Allstars
... available on turbo squid, the world's leading provider of digital 3d models for visualization, films, television, and games.
design_connected
$16

Conversation Club Chair
...conversation club chair
designconnected
donghia conversation club chair chairs computer generated 3d model. designed by n/a.
design_connected
$27

Hemicycle Conversation Chair
...rsation chair
designconnected
ligne roset hemicycle conversation chair computer generated 3d model. designed by nigro, philippe.
3d_export
$24

Converse keds 3D Model
...converse keds 3d model
3dexport
converse all star ked shoe clothes sports
converse keds 3d model vermi1ion 26201 3dexport
3ddd
$1

Converse All-Star Shoes
...converse all-star shoes
3ddd
кеды , обувь
converse all-star shoes
design_connected
$18

CONVERSE Jack Purcell Sneakers
...converse jack purcell sneakers
designconnected
converse jack purcell sneakers computer generated 3d model.
Compact
3d_export
$5

compact freezer
...compact freezer
3dexport
the compact freezer is product about refrigeration machine
3d_ocean
$8
Compact Cassette
...
80s album analog audio cartridge cassette compact digital electronics lp mp3 music play record sound tape vinyl
compact cassette
design_connected
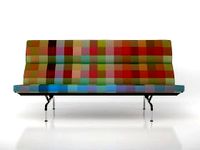
$20
Eames Compact
...eames compact
designconnected
herman miller eames compact computer generated 3d model. designed by eames, charles.
3d_ocean
$2

Compact Disc
...compact disc
3docean
album audio cd compact disc dvd laser disc movie music
a cd
3d_export
$10

land compacter
...land compacter
3dexport
turbosquid
$1

Compact knife
...quid
royalty free 3d model compact knife for download as obj on turbosquid: 3d models for games, architecture, videos. (1557900)
3d_export
$12
compact rotary broach
...compact rotary broach
3dexport
compact tool for drilling hexagonal holes in lathes!
turbosquid
free
Lada Compact
... 3d model lada compact for download as max, max, max, and fbx on turbosquid: 3d models for games, architecture, videos. (1623122)
turbosquid
$59
Compact Truck
... available on turbo squid, the world's leading provider of digital 3d models for visualization, films, television, and games.
turbosquid
$50
Compact kitchen
... available on turbo squid, the world's leading provider of digital 3d models for visualization, films, television, and games.
Extruder
3ddd
$1

Extruded Chair
...extruded chair
3ddd
extruded , tom dixon
inspired by tom dixon extruded chair
turbosquid
$15

Extruded Table
... extruded table for download as blend, dae, fbx, obj, and stl on turbosquid: 3d models for games, architecture, videos. (1634137)
turbosquid
$2

3D Printer Extruder
...d
royalty free 3d model 3d printer extruder for download as on turbosquid: 3d models for games, architecture, videos. (1537359)
turbosquid
$1

Zombie extruded text
...oyalty free 3d model zombie extruded text for download as obj on turbosquid: 3d models for games, architecture, videos. (1322198)
turbosquid
$4

Extruder conical screw
...el extruder conical screw for download as sldpr, ige, and stl on turbosquid: 3d models for games, architecture, videos. (1524433)
turbosquid
$50

3d PRINTER - Extruder
... available on turbo squid, the world's leading provider of digital 3d models for visualization, films, television, and games.
turbosquid
$15

Extruded Table 2
...xtruded table 2 for download as blend, dae, fbx, obj, and stl on turbosquid: 3d models for games, architecture, videos. (1621846)
turbosquid
$10

Maya Extrude Tool
... available on turbo squid, the world's leading provider of digital 3d models for visualization, films, television, and games.
3d_export
$5

world earth extrude map
...world earth extrude map
3dexport
3ddd
$1

Simply Elegant Extruded Tree Coffee Table Design
...ble by link studios. the silhouette of a tree is visible at one angle, extruded from the surface to create the support structure.