Thingiverse

Stardew Valley Chicken by MrFoolishFox
by Thingiverse
Last crawled date: 3 years, 5 months ago
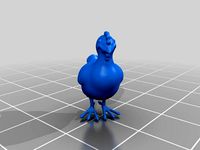
This is a little Stardew Valley chicken and base that I made for my girlfriend on Valentine's day.
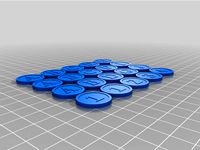
It was designed so you could print it in colour with a single nozzle and several colour changes, and no supports. I've included a picture of the heights to do colour changes for a full-colour chicken! I made a blue chicken from Shanes 8 heart event, but you could just as easily print this in normal chicken colours, or all in one colour! You do need to print at 0.2mm for the colour changes to work nicely (you could print at 0.1mm and double the number of layers for each colour but it wouldn't make the final product look better)
There's two versions of the chicken, one with a blank back, and the other with a heart embedded. When I printed this I also put my name, I didn't include that version, you can easily import this STL into Fusion 360 or similar and emboss your own name if you would like to have a name on it. I used the 'Vladimir Script' font in Fusion 360 for the name you can see in picture 4.
For a full-colour blue chicken you'll need to do:
0.0 - 2.8mm light blue filament
3.0 - 3.2mm pink filament
3.4 - 3.6mm purple filament
3.8 - 4.0mm yellow filament
4.2 - 4.4mm dark blue filament
I ended up merging the pink and purple layers because I ran out of purple filament, but it still came out fine. I had a load of 3D pen sample filament which helped me not have to buy full rolls of each of these colours, but I would NOT recommend doing this as 3D pen filament is much lower quality than proper filament, and I had a nightmare getting this to print because of stringing and layer adhesion issues.
I'd recommend using PrusaSlicer to slice this simply because it makes the colour changing process much easier. The only thing you'll need to check is whether your printer supports the M600 gcode (colour change gcode), which seems to be supported on Marlin 2.0 upwards from a brief google, so if you're on an older Ender machine then you may need to do a firmware update.
There is a guide on Prusa's website here: https://help.prusa3d.com/en/article/color-change_1687
It's possible to set up in Cura or other slicers, but would likely be a lot more fiddly.
For the base, you may need to scale it slightly, this size worked for me on my Prusa MK3s, but you may need 102% scaling of the base to make the chicken fit. Very easy to print a few test pieces in different sizes until you find one that works for you.
Please do post any makes of this, I would love to see them!
Happy printing!
Similar models
thingiverse
free

Stardew Valley Chicken
...stardew valley chicken
thingiverse
just a quick stardew valley chicken i made in tinkercad in 15 minutes
(from
thingiverse
free

Stardew Valley Chicken Keychain by gumbo632
...stardew valley chicken keychain by gumbo632
thingiverse
the chicken icon from stardew valley.
thingiverse
free

Customizable pen holder by Sir_Joe
...away from one level to another (without removing the part already printed from the print bed)
you can customizable with your name
thingiverse
free

Simple pen holder with indent by EmEmily
...encil holder could be printed in one colour or you could do a colour change for the indent.
please add a picture if you print it!
thingiverse
free

Keychain Cow Stardew Valley by Totofox
...e your filament. i made a 2.5 mm base and 0.2 mm for each color. so you need to stop at 2.5, 2.7, 2.9 and 3.1.
that's all :)
thingiverse
free

Fusion Cup PvP Badge
...without a multicolour printer.
the zip files contain the mini bases for printing these for the trophies i have designed as well.
thingiverse
free

Splint by tuskagav000
...s straps, and that is pretty much it. it is a work in progress so if you do plan on printing it, you may want to change it a bit.
thingiverse
free
Gloomhaven Legible Scenario Aid token by PeachyBun
...d
print gloomhaven_aidtokenstoprim.stl (colour 1) with z-hop. make sure this part is lifted 2mm off the print bed in your slicer.
thingiverse
free
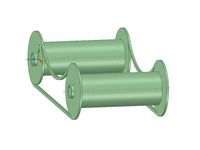
Filament stand / rollers
... bearings(zz or not).
to make this you will need to print all elements twice - i have attached my gcode (for example).
good luck.
thingiverse
free

Filament inker by timreeves
...ay with running the holder up and down the filament before it gets to the hot end to soak more ink in and get some darker layers.
Stardew
thingiverse
free
Stardew Valley Chicken
...stardew valley chicken
thingiverse
just a quick stardew valley chicken i made in tinkercad in 15 minutes
(from
thingiverse
free

Stardew Hero Trophy by araccun
...dew hero trophy by araccun
thingiverse
my version of stardew hero trophy
model can be exported to fusion360 to embbed text on it
thingiverse
free
Stardew Valley Chicken Keychain by gumbo632
...stardew valley chicken keychain by gumbo632
thingiverse
the chicken icon from stardew valley.
thingiverse
free

Krobus Stardew Valley by Smoore77
...krobus stardew valley by smoore77
thingiverse
thingiverse
free

Stardew Valley Chicken
...ardew valley chicken
thingiverse
this thing was made with tinkercad. edit it online https://www.tinkercad.com/things/bjtmyxfrvrb
thingiverse
free

Stardew Valley Hero Trophy, The Original
...w valley hero trophy! available now! no need to gather fruit, nuts or fish in the snow at midnight on a tuesday.
get yours today!
thingiverse
free

Stardew Valley Card and Tile organizer by KG204
...verse
a card and tile organizer for the stardew valley boardgame, can help organize almost everything except for the small cards
thingiverse
free

Stardew Valley Board Game Organizers by MSilby
...pload again.
a few organizers for the board game stardew valley, that should fit in the box nicely with the existing oem inserts.
thingiverse
free

Stardew Valley - Junimo Succulent Holder by KaceyOrtiz
...t holder modeled based on junimos from stardew valley.
assembled using loctite superglue gel control. works a treat.
everything
thingiverse
free

Stardrop from Stardew Valley by Nacoji
...parate colors and then slotted together. i recommend you print the leaves on its side with the slot facing up. made in tinkercad.
Valley
thingiverse
free

Yosemite Valley by cepeza
...yosemite valley by cepeza
thingiverse
yosemite valley
thingiverse
free

Yosemite Valley by Jgxironman
...yosemite valley by jgxironman
thingiverse
yosemite valley topo. work in progress
thingiverse
free

Yosemite Valley by townmath
...yosemite valley by townmath
thingiverse
yosemite valley from el capitan to half dome.
thingiverse
free
Stardew Valley Chicken
...stardew valley chicken
thingiverse
just a quick stardew valley chicken i made in tinkercad in 15 minutes
(from
thingiverse
free

Valley Faucet Handle by jordouellet
...valley faucet handle by jordouellet
thingiverse
this is a replacement for valley faucets. include cross handle and front cap.
thingiverse
free

Yosemite Valley Bookmark by fake_tissues
...e valley bookmark by fake_tissues
thingiverse
the topography of the yosemite valley squashed down to a convenient bookmark size.
thingiverse
free

Willamette Valley Topography by kf7ser
...topography by kf7ser
thingiverse
as a fun little geography project i created a 3d topography for (most of) the willamette valley
thingiverse
free
Stardew Valley Chicken Keychain by gumbo632
...stardew valley chicken keychain by gumbo632
thingiverse
the chicken icon from stardew valley.
thingiverse
free

Monument Valley by Darknightp
...r para mantener el equilibrio.
sus dimensiones son:
alto: 111.5 mm
ancho : 45 mm x 49 mm
espero que os guste.
¡a quemar plástico!
thingiverse
free

Yosemite Valley by gluetolf
... 2006. filtered lidar dem for yosemite valley. ncalm. geospatial dataset-1048555. patched and resampled to 2m and 10m resolution.
Chicken
thingiverse
free

Chicken by Danielesko30
...chicken by danielesko30
thingiverse
this is a chicken! :)
thingiverse
free
chicken by EdisonM
...chicken by edisonm
thingiverse
its a chicken
thingiverse
free

chicken by Aldosharofi
...chicken by aldosharofi
thingiverse
it a chicken with an egg and heart.
thingiverse
free
Chicken by Scintilla
...chicken by scintilla
thingiverse
a quick model of a chicken i made for fun.
thingiverse
free
Chicken by ModelerMaster
...chicken by modelermaster
thingiverse
i have decided to make this chicken for children 12 and under to play with.
thingiverse
free

chicken the secind by Smirnog
...chicken the secind by smirnog
thingiverse
chicken
thingiverse
free

Chicken by Skiler_Pierce
...chicken by skiler_pierce
thingiverse
i'm gonna print it and glue it together to make an actual chicken
thingiverse
free

chicken park by max7th
...chicken park by max7th
thingiverse
chicken park
thingiverse
free

adler - chicken by Syzguru11
...adler - chicken by syzguru11
thingiverse
adler - chicken
thingiverse
free

Chicken Container by 3Dsection
...chicken container by 3dsection
thingiverse
a chicken container !