Thingiverse
Stacking Ikea Lack Printer Enclosure by hackoholic
by Thingiverse
Last crawled date: 3 years, 1 month ago
Updated 9/26/2019
Added two more STL's for the Magnet Mounts to cover 2mm and 3mm plexiglass.
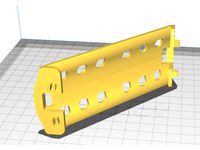
Features:
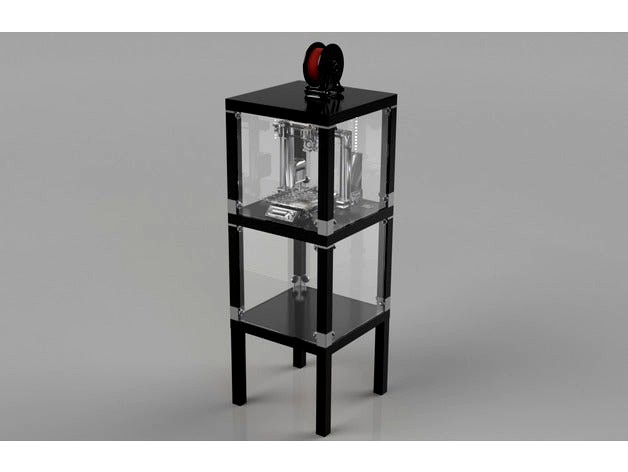
Stackable design for easy setup/teardown and printer access
(8) Clear Acrylic panels create two enclosed areas for temperature control or enclosed storage
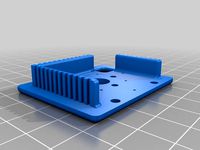
Panels are held on with neodymium magnets for easy removal
Efficient design is strong yet hollow to save filament
Designed to allow each section to be lifted off without having to remove acrylic panels
This is my take on the Ikea Lack Printer enclosure. It is not the first design on Thingiverse and it certainly won't be the last. This version boasts a modular design that lets you easily stack your tables and dismantle with ease. The stackable design also means you can quickly and easily remove the top cover for easy access to your printer. The 8 removable acrylic panels are held on with neodymium magnets for easy removal while also providing a closed in area for better temperature control when printing plastics like ABS. My design also allows the acrylic panels to remain in place while lifting off the sections which further simplifies the setup and take down of this enclosure.
When first searching for a printer enclosure for my new Prusa i3 MK2S, I found the brilliant design by LKM (https://www.thingiverse.com/thing:1843235) which uses super cheap Ikea Lack tables for the main structure. It also used 3D printed parts to extend the legs and provide mounts for clear plastic sides to attach and enclose the printing area. I also found thebeetleuk's clever design (https://www.thingiverse.com/thing:2212749) which allowed the tables to be easily and securely stacked but also removable for easy access to the printer.
Like I do with some of my designs, I started with these two ideas and simply made some tweaks and modifications to make them my own.
Mainly, I wanted the acrylic sheets to sit nicely inside the table legs to give more of a picture frame appearance while still maximizing the interior space as much as possible. I designed my own magnetic mounts to use standard magnets found at Home Depot. These mounts have small, built in handles to allow you to easily grip and remove a panel if needed. Then I hollowed out the nesting leg pieces and optimized the wall thickness to be both solid and strong without the need for printer generated infill. Since I designed most of the interior as open, the biggest benefit was not wasting unneeded plastic to fill in these areas.
To finish it off, I of course found lots of great accessories here on Thingiverse such as:
The spool holder - https://www.thingiverse.com/thing:943563
The filament guide - https://www.thingiverse.com/thing:2114888
The feet - https://www.thingiverse.com/thing:2076126
and the cable grommet - https://www.thingiverse.com/thing:2225786
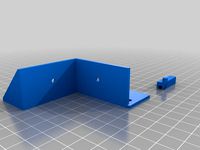
I also sourced some cheap RGBW LED strips (https://www.amazon.com/gp/product/B01HD37U6S/ref=oh_aui_search_detailpage?ie=UTF8&psc=1) to light the build area. I put three 400mm strips of these above the build area and then two 400mm strips down the front legs. To mount these on the legs, I designed some 45 degree mounting strips which snap together in section lengths designed to match the LED pitch of my 60 LED/m strips. https://www.thingiverse.com/thing:2782466
Added two more STL's for the Magnet Mounts to cover 2mm and 3mm plexiglass.
Features:
Stackable design for easy setup/teardown and printer access
(8) Clear Acrylic panels create two enclosed areas for temperature control or enclosed storage
Panels are held on with neodymium magnets for easy removal
Efficient design is strong yet hollow to save filament
Designed to allow each section to be lifted off without having to remove acrylic panels
This is my take on the Ikea Lack Printer enclosure. It is not the first design on Thingiverse and it certainly won't be the last. This version boasts a modular design that lets you easily stack your tables and dismantle with ease. The stackable design also means you can quickly and easily remove the top cover for easy access to your printer. The 8 removable acrylic panels are held on with neodymium magnets for easy removal while also providing a closed in area for better temperature control when printing plastics like ABS. My design also allows the acrylic panels to remain in place while lifting off the sections which further simplifies the setup and take down of this enclosure.
When first searching for a printer enclosure for my new Prusa i3 MK2S, I found the brilliant design by LKM (https://www.thingiverse.com/thing:1843235) which uses super cheap Ikea Lack tables for the main structure. It also used 3D printed parts to extend the legs and provide mounts for clear plastic sides to attach and enclose the printing area. I also found thebeetleuk's clever design (https://www.thingiverse.com/thing:2212749) which allowed the tables to be easily and securely stacked but also removable for easy access to the printer.
Like I do with some of my designs, I started with these two ideas and simply made some tweaks and modifications to make them my own.
Mainly, I wanted the acrylic sheets to sit nicely inside the table legs to give more of a picture frame appearance while still maximizing the interior space as much as possible. I designed my own magnetic mounts to use standard magnets found at Home Depot. These mounts have small, built in handles to allow you to easily grip and remove a panel if needed. Then I hollowed out the nesting leg pieces and optimized the wall thickness to be both solid and strong without the need for printer generated infill. Since I designed most of the interior as open, the biggest benefit was not wasting unneeded plastic to fill in these areas.
To finish it off, I of course found lots of great accessories here on Thingiverse such as:
The spool holder - https://www.thingiverse.com/thing:943563
The filament guide - https://www.thingiverse.com/thing:2114888
The feet - https://www.thingiverse.com/thing:2076126
and the cable grommet - https://www.thingiverse.com/thing:2225786
I also sourced some cheap RGBW LED strips (https://www.amazon.com/gp/product/B01HD37U6S/ref=oh_aui_search_detailpage?ie=UTF8&psc=1) to light the build area. I put three 400mm strips of these above the build area and then two 400mm strips down the front legs. To mount these on the legs, I designed some 45 degree mounting strips which snap together in section lengths designed to match the LED pitch of my 60 LED/m strips. https://www.thingiverse.com/thing:2782466
Similar models
thingiverse
free
LACK 3D printer enclosure supports with parameters by dhallgb
... the handle from here https://www.thingiverse.com/thing:1554480
magnetic closure using magnets glued to swing side of front door.
thingiverse
free

Legs Link for Ikea Lack Enclosure by mala04
...rinter enclosure...https://www.thingiverse.com/thing:2730703
it allows to create a higher enclosure by linking two feet together.
thingiverse
free

18mm magnet holder by arc333jd
...to acrylic. 3m super strength adhesive or something of similar strength works well for adhering the other magnet to...
thingiverse
free

Ikea Lack Webcam Holder by llama_zen
...owing c525 webcam mount https://www.thingiverse.com/thing:1554378.
the fusion360 files can be found here: https://a360.co/2wd2d1r
thingiverse
free

Quick-Detach LACK-top 12V Power Connector by alahosky
...ver my under-mount filament spool in https://www.thingiverse.com/thing:2614686, and a quick-detach 12-volt power connector below.
thingiverse
free

Ikea Lack Plexiglass Bracket by gjs31
...e plexiglass making it easily removable. will try upgrade later to incorporate magnetic mounting.
m3 screw to attach to lack leg.
thingiverse
free

Lulzbot Enclosure Right Side Panel by DrazzticAction
...t of all the laser cut panels and printed parts, please feel free to contact me.
enjoy,
jim rasmussen
tabsynth design works llc
thingiverse
free

Lulzbot Enclosure Left Side Panel by DrazzticAction
...aser cut the panels, i've also put together a kit with everything you need.
blue skies,
jim rasmussen
tabsynth design works
thingiverse
free

Magnetic bracket for doors and enclosures by IWannaMakeStuff
...nclosure: http://www.thingiverse.com/thing:2012384
andrewar's door handle keep closed: http://www.thingiverse.com/thing:36465
thingiverse
free

IKEA "Lack" enclosure for original Prusa i3 MK2 MMU (+ Upgrades) by Bravehartk2
...lic glass plates magnet mounts (acrylic_glass_magnet_mount.stl and magnet_mount.stl) to make two of the acrylic plates detachable
Hackoholic
thingiverse
free

FT Spear Latch by hackoholic
...st added a few of my own touches to verris' original design to make it a little easier to snap in and out the latches (keys).
thingiverse
free
Barbie Clothes Hanger by hackoholic
...t;.
i've included three designs. a plain hanger, barbie's hanger and ken's hanger (or kendal's for that matter).
thingiverse
free

Cadet Throttle Drill Jig by hackoholic
...o print. the mini version can just be slid to your own guide marks if you prefer to save time or adjust his original dimensions.
thingiverse
free

modified thigh and spring OpenCat Nybble DIY" by hackoholic
... case in belly
add neck hold servo for better position
update 23/12/2019
fix some size
note : this desing is only for sg90 servos
thingiverse
free

Cadet Throttle Board Cover by hackoholic
...for toggle switches, fake fuses and master rocker switches. i'll post my arduino joystick sketch once i finalize everything.
thingiverse
free

Cadet Pedals Bearing Washers by hackoholic
...n print four of the stand along washers and insert them around the four built in bearing spacers protruding from the other parts.
thingiverse
free

Barbie Spring Board by hackoholic
...ngiverse.com/thing:2574942
this is a nice, fairly scale size spring board that goes with the pommel horse and is semi functional.
thingiverse
free
Firewall for Swappable Power pod (mirrored) by hackoholic
...n the opposite lower corner if your motor wiring requires it.
also re-oriented so it matches the proper orientation for printing.
thingiverse
free

45 Degree LED Mount by hackoholic
...d to fit these leds found on amazon. https://www.amazon.com/gp/product/b01hd37u6s/ref=oh_aui_search_detailpage?ie=utf8&psc=1
thingiverse
free
Body (Belly Plate) for the "OpenCat Nybble DIY" (by hackoholic) by yujungchang
....stl does not fit for me. the plastic shell from the mg90 is blocking 1/3 of the holes, so the belly plate can't be inserted.
Lack
3d_export
$5

LACK LACK Coffee table white 90x55 cm IKEA
..., white, 90x55 cm ikea<br>https://www.ikea.com/ru/ru/p/lack-lakk-zhurnalnyy-stol-belyy-50449907/?ysclid=l8zshj49w6656165430
turbosquid
$4

Ikea Lack
... available on turbo squid, the world's leading provider of digital 3d models for visualization, films, television, and games.
3ddd
$1

IKEA Lack Coffee Table
... кофейный
ikea lack coffee tablehttp://www.ikea.com/gb/en/catalog/products/00104291
turbosquid
$5

IKEA Lack Table
...ack table for download as blend, blend, unitypackage, and fbx on turbosquid: 3d models for games, architecture, videos. (1623135)
turbosquid
$10

Ikea Lack Set
... available on turbo squid, the world's leading provider of digital 3d models for visualization, films, television, and games.
turbosquid
$3

IKEA Lack Library
... available on turbo squid, the world's leading provider of digital 3d models for visualization, films, television, and games.
turbosquid
$1

IKEA LACK TABLE
... available on turbo squid, the world's leading provider of digital 3d models for visualization, films, television, and games.
turbosquid
free

IKEA Lack Shelf
... available on turbo squid, the world's leading provider of digital 3d models for visualization, films, television, and games.
turbosquid
$9

Ikea Table 5 Lack
... available on turbo squid, the world's leading provider of digital 3d models for visualization, films, television, and games.
turbosquid
$5

IKEA Lack Side Table
... available on turbo squid, the world's leading provider of digital 3d models for visualization, films, television, and games.
Enclosure
3d_export
free

electrical enclosure
...l enclosure where electrical devices like (relays, contactors, busbars ) are kept in order to protect from hazardous environment.
turbosquid
$100

GPU Enclosure
...yalty free 3d model gpu enclosure for download as obj and stl on turbosquid: 3d models for games, architecture, videos. (1381061)
3d_export
$5

Electrical Enclosure
...ed. also has tower lights attaced on the top.<br>file format that are available:<br>.step<br>.obj<br>.stl
archive3d
free

Enclosure 3D Model
...closure 3d model
archive3d
shower enclosure-acquarius- 3d model for interior 3d visualization.
archive3d
free

Enclosure 3D Model
...enclosure 3d model
archive3d
shower enclosure-omega- 3d model for interior 3d visualization.
archive3d
free

Enclosure 3D Model
...enclosure 3d model
archive3d
shower enclosure-vega - 3d model for interior 3d visualization.
archive3d
free

Enclosure 3D Model
...enclosure 3d model
archive3d
shower enclosure-zenith - 3d model for interior 3d visualization.
turbosquid
$20

shower enclosure
... available on turbo squid, the world's leading provider of digital 3d models for visualization, films, television, and games.
turbosquid
$14

Dumpster Enclosure
... available on turbo squid, the world's leading provider of digital 3d models for visualization, films, television, and games.
turbosquid
$25

3d printer enclosure
... model 3d printer enclosure for download as ipt, skp, and fbx on turbosquid: 3d models for games, architecture, videos. (1634310)
Stacking
3d_ocean
$12

Box Stacks
...n
barrel box box stack shards
this is model of box stack with texture that equipped with its shards around the box to add detail.
3ddd
$1
Triptych Stacks
...sa
triptych stacks
современный светильникhttp://curiousaandcuriousa.co.uk/index.php/home/chandeliers1/hayward-gallery1
3ddd
$1

Stacking D
...stacking d
3ddd
leucos
stacking
manufacturer leucos
designer rockwell group
3d_ocean
$5

Stack of Dollars
... realistic stack
ready to render! textured photorealistic dollars are animated. stack of dollars are falling down over and over…
3d_export
$5

dollar stack
...dollar stack
3dexport
turbosquid
$16

Stack of Wood
...quid
royalty free 3d model stack of wood for download as max on turbosquid: 3d models for games, architecture, videos. (1360320)
3d_ocean
$5

Money Stacks
... formats: c4d (textured) – obj (untextured) texture type: standard engine materials poly count per stack: 120 important: this ...
turbosquid
$5

stack machine
...lty free 3d model stack machine for download as ige and sldas on turbosquid: 3d models for games, architecture, videos. (1226834)
turbosquid
$19

Stack of Barrels
...3d model stack of barrels for download as blend, fbx, and obj on turbosquid: 3d models for games, architecture, videos. (1472525)
turbosquid
$6

Brick Stack
...y free 3d model brick stack for download as 3ds, max, and obj on turbosquid: 3d models for games, architecture, videos. (1239828)
Ikea
3ddd
$1
IKEA
...ikea
3ddd
ikea , стеллаж
ikea
3ddd
$1
IKEA
...ikea
3ddd
ikea
кухня ikea
3ddd
$1

IKEA
...ikea
3ddd
ikea
осторожно, тяжелая модель
ikea
3ddd
$1
IKEA
...ikea
3ddd
ikea
5 зеркал от ikea
3ddd
$1
IKEA
...ikea
3ddd
ikea , бойа
ikea светильник потолочный
3ddd
$1
IKEA
...ikea
3ddd
ikea , барный
bar stool ikea
3ddd
$1

IKEA
...ikea
3ddd
ikea , зубная щетка , косметика
ikea
3ddd
free
IKEA
...ikea
3ddd
ikea , трюмо
дамский столик ikea.
3ddd
$1
IKEA
...3ddd
ps , декоративный набор , ikea
ikea decor
3ddd
$1

Ikea
...ikea
3ddd
ikea , lagra
модель лампы от ikea
Printer
archibase_planet
free

Printer
...inter
archibase planet
printer laser printer pc equipment
printer n120614 - 3d model (*.gsm+*.3ds) for interior 3d visualization.
archibase_planet
free

Printer
...rchibase planet
laser printer office equipment computer equipment
printer - 3d model (*.gsm+*.3ds) for interior 3d visualization.
turbosquid
$100

Printer
...er
turbosquid
royalty free 3d model printer for download as on turbosquid: 3d models for games, architecture, videos. (1487819)
turbosquid
$3

Printer
...turbosquid
royalty free 3d model printer for download as max on turbosquid: 3d models for games, architecture, videos. (1670230)
turbosquid
$1

printer
...turbosquid
royalty free 3d model printer for download as max on turbosquid: 3d models for games, architecture, videos. (1595546)
turbosquid
$1

printer
...turbosquid
royalty free 3d model printer for download as max on turbosquid: 3d models for games, architecture, videos. (1595105)
turbosquid
$10

Printer
...id
royalty free 3d model printer for download as max and 3dm on turbosquid: 3d models for games, architecture, videos. (1607146)
turbosquid
$7

Printer
...royalty free 3d model printer for download as ma, ma, and obj on turbosquid: 3d models for games, architecture, videos. (1644580)
turbosquid
$30

Printer
... available on turbo squid, the world's leading provider of digital 3d models for visualization, films, television, and games.
turbosquid
$20

Printer
... available on turbo squid, the world's leading provider of digital 3d models for visualization, films, television, and games.