Thingiverse
Spring Thunder - Shell Ejecting Foam Dart Blaster (WIP) by GDop26
by Thingiverse
Last crawled date: 3 years ago
Please download the files individually to ensure you got the correct files. Some people are having trouble using the download all from thingiverse.
Facebook group: https://www.facebook.com/groups/SpringThunder/
Assembled blasters available here: https://www.etsy.com/shop/GDop26
Custom colored blasters available from our friends at frontlinefoam: https://frontlinefoam.com/product/spring-thunder/
Hardware kits available here: https://www.shellingtonblasters.com/product-page/spring-thunder-hardware-kit-model-5
Shells Here: https://www.thingiverse.com/thing:3210080
Stocks: https://www.thingiverse.com/thing:3129063
Sling Point: https://www.thingiverse.com/thing:3144712
Assembly Guide: https://www.shellingtonblasters.com/assembly-guide
Troubleshooting guide: https://www.shellingtonblasters.com/trouble-shooting-guide
~~~~ Updates ~~~~~~
(12-12-2020) New Plunger Head uploaded that takes the 311 sized O-ring as its shock padding.
R12_V1 is the new version that takes the O-ring
R11_V2 is the old one that takes the old shock pad
(11-26-2020) Uploaded a STEP file of the standard triple Rival Ball Buckshot shell. It is traditionally found with the rest of the shell files, but it makes sense to also include its download here.
(9-9-2020) Since transfer bars are 3d printed as a standard now, I have also uploaded their STLs here for anyone to print.
(8-22-2020) Big updates with the model 6 version of this blaster platform. I've been building testing the version for a few months now, so I think it's ready for public release now. The primary changes were made to improve durability of the firing mechanism and improve tolerances and ease of building.
Plunger Head - The Nylon rod was replaced with a threaded rod and 3D printed composite fitted with a harder stainless steel washer. The washer replaces the machined nylon surface, which improves its hardness significantly to greatly decrease the rate of wearing on the firing mechanism. The use of the threaded rod with the 3d printed plunger assembly also improves sizer tolerances for a more consistent build. The entire assembly also happens to be about 9% lighter. Not sure if this has much of an effect on performance, but my understanding is that you want as light of the plunger head as possible for the fastest spring movement.
Bolt - Simplified assembly by removing nuts and screws for securing the plunger tube. It's a little more complicated in a different way. Instead of securing the plunger tube using screws, it is now held in by crimping/bending the aluminum tubing onto the 3d prints to literally hold onto it. Removal is harder, but assembly and fabrication of parts are much easier, which also improves the consistency of how I fabricate them.
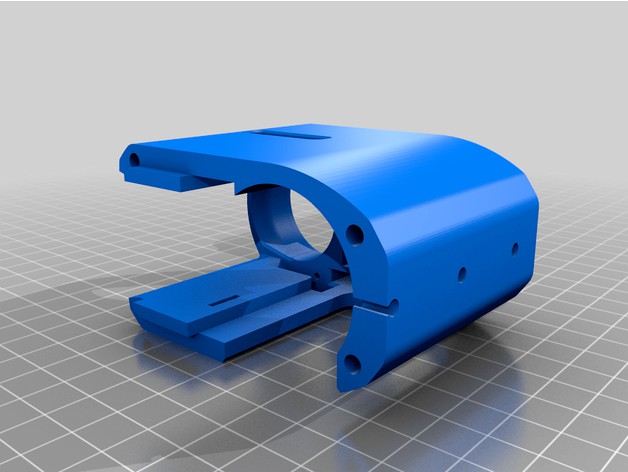
Smaller changes include the Ejection Ports A and B - I removed the pin holes and replaced them with 3d printed alignment tabs. These were optional in the past to assist with keeping the parts aligned. But with the 3d printed tabs, you won't need to manually insert these pins anymore. Which technically also makes the blaster lighter haha.
(5/19/2020) Thingiverse keeps moving the thumbnail around making it harder to find this posting. I manually moved it back, hopefully it stays that way.
(2/9/2020) A few much needed updates following many months of testing and a couple hundred successful builds, leaving this update ready to pass. As well as some parts that I've forgotten to update for a long while. Sorry to all the people who've ordered and built kits for these last couple of months.
Plunger Seal - Divots added to allow the bolt assembly work with the longer 1/2" screws
Shell Latch - this is a pretty big update, as the part has previously been unchanged for nearly 2 years of the project's development. The part was shifted by a bit to be more reliable with its activation by requiring less force to open while still retaining its holding power.
Back Plate - Added open slots for much easier installation of stocks and rear accessories.
(9/1/2019) Picatinny rail added, or rather I realized it was missing so now it's back.
(8/28/2019) Apparently the shell carrier was also missing. It's back and nothing is different about it I think.
(8/26/2019) Missing parts added
Apparently the back plate has been missing for some time, so I re-added it.
Bolt - revised with a larger groove for its sealing O-ring to make it easier to install. Its extractor cavity has been extended to better hold onto its extractor assembly. Its pivot pin hole has been expanded by about 0.010" to fit the assembly more easily.
(6/2/2019) Model 5 Released
Major update
New Bolt: Model 5 introduces a redesigned bolt that allows shells without o-rings to be used effectively. This needs a rebuilt bolt and some new hardware and an updated assembly guide will be provided in the coming days. This was created to allow users to more easily create their own shells with less involved labor. Additionally, this bolt is backwards compatible with old shell designs allowing for shells with either O-rings installed or not.
In addition to the new O-ring set up, this update introduces a couple other significant improvements.
Extractor Durability: The extractor was redesigned to bend less during jams. This used to cause the spring to overbend and loose its spring back ability, now it bends 50% less which extends its life and resistance to being bent too far during jams.
Tapped Rails: A response to overwhelming complaints over the difficulty in installing rails, the top holes have been narrowed to allow picatinny rails to directly screwed into the plastic for low load applications. The hex nut cavities were untouched to be used for high stress and loads such as sling points.
Minor Updates
Shell Carrier: Much needed chamfers were added to relive the part of sharp edges.
Carrier Roller Chamfer: This was added to reduce cleanup needed for assembly.
Ejection Port: Relief angles were added to reduce supports needed. Pin slots were extended to improve pin retention for the shell latches.
Mounting Holes: Added to support future accessories
Plunger Bolt Seal: Seal screw assembly reduced to QTY 1 as second screw was deemed redundant. Very low loads are experienced here. Additionally, fewer fasteners used reduces points of leakages in the plunger tube assembly.
Handle: Single print handle available, reducing labor and improving print quality for those with larger printers.
Model 4 Files are saved in a zip for those with older models looking to repair. Though I recommend you switch to the model 5.
(5/5/2019) Extractor Durability Upgrade
New extractor will be more resistant to over bending by the spring. This should extend the life and function of the extractor.
(3/22/2019) Missing Files Added
A user pointed out that I missed the shell align file, so that was added.
I also uploaded the previous version's files for anyone looking to repair an old build. These can be found in the Model 3 zip.
(3/10/2019) Big Assembly Update
Okay, a little later than I'd thought but it's finally here. I rebuilt the assembly guide the correct way so I can actually make changes and updates to it later on and I uploaded the new files that I've been making blasters with for the past month or so, so I definately know they work.
Here's the new assembly guide, packed with accurate part descriptions this time: Assembly Guide: https://imgur.com/a/rTDnmiZ
Here's also a changelog of the updated 3D printed parts.
In General - Chamfers added to all edges to help with elephant footing. This shouldn't be very noticeable but will help with the buldge created by elephant's foot as well as reducing support needed.
Bolt & Shell Align - These have faced the biggest change. Instead of press fitting 2 tiny spring pins, this is now held is with a single common screw (to the BOM) and a dab of loctite. This removes an item from the BOM and makes the assembly generally easier.
Ejection Port A - An angled relief cut was added to help the shell align and bolt move past it more easily. Entire port was widened in general.
Ejection Port B - The ejector slot was reconfigured to require less or no support to print.
Trigger - pin hole was tapered to help the pin retain better. Chamfers added to reduce support needed.
Pump Grip - A cavity for a captive nut was added to comply with the new action bars. These look better and are also stronger than previous designs. The angled grip slots also take the support out of the prints while approaching a more cosmetic appeal.
Handle Frame B - Priming indicator windows were added to both sides, so you can see if the blaster is primed by glancing from the side. An additional mounting hole (optional) was added to the bottom to allow more accessories and cosmetic options to be installed.
Handle Frame A - Reduced support needed for this part.
(2/6/2019) STEP files of the Dart slug was added so you can freely make your own variations of the ST shell.
All new shells can be found on the shell page provided in the links at the top of the description. Outdated were removed from this page except for the base Buckshot shell.
(1/27/2019) A big update is coming soon, including significant hardware changes to improve the ease of assembly. New assembly guide coming too.
For now, 2 new part files to fix some issues and add features.
Ejection_Port_A - Relief added to improve the feeding, as a vertical lip was removed because it was causing the shells to sometimes jam while feeding. Chamfers were also added to help combat elephant footing and to improve the general smoothness of the operation. Some dimensions were decreased to allow for even looser print tolerances while still allowing proper function.
Barrel_Coupler - One of the holes for adding picatinny rails is now complete and no longer just aesthetic. You can now attach a rail point here. Also same as above, chamfers were added to aid in the elephant foot issue.
(12/11/2018) Nothing huge, just added a barrel frame option with the entire "SPRING THUNDER" as a single piece for seamless embossed printing. It's here as
BarrelFrame_R10_V1BC. It's the BC unit. Also if you'd like to check out for more general news and updates, there's a facebook group for anyone to join. Shameless self promotional plug: https://www.facebook.com/groups/SpringThunder/
(11/21/2018) Lots of new updates, so new that I'm going to need to revise the assembly guide.
Bolt - Decreased ledge to improve ease of assembly of extractor and plunger tube. Plunger tube assembly is immensely easier now. You just twist it on instead of pressing it. This reduces assembly difficulty while also imposing less force on the sealing O-rings allowing for a cleaner fit.
Handles - widened cavity for the captive nuts for ease of assembly of the trigger guard. This was way too tight for no reason before.
Rear Spring Guide - Thickened backend to reduce depriming catching and removed the Shock Washer part from BOM. This is to be made with 3mm top/bottom solid infill.
Shock Washer - removed from assembly, one less part to print.
Ejection Port A - Widened front chambering slot to reduce interference with bolt assembly.
(11/11/2018) Shell officially release: https://www.thingiverse.com/thing:3210080
(10/8/2018) I know it seems like updates are suddenly rampant, but I'm trying to release more parts and support for the project now that the userbase is growing. Anyways, I made and released picatinny mounted Sling Points here: https://www.thingiverse.com/thing:3144712
Which by the way, because they're using the picatinny system, you can use this attachment on your airsoft guns or possibly even a real gun if you really felt like it.
Expect an assembly update later this week. I made a change that reduces the part count by 1 while saving assembly time.
(10/2/2018) Model 4 Files Officially released - Along with its own signature on the side of the blaster. Page for the shells coming soon. Added some updated pictures.
New Plunger head - redesigned for a tighter seal yet looser fit to give more power per shot at the cost of over 30 hours of redesign from me. This can be printed at 1.2mm walls with 1.5mm top/bottom fill and 20% infill.
(9/30/2018) Stocks Revised & Released - https://www.thingiverse.com/thing:3129063
(8/25/2018) Model 4 Released - Found inside the new file "Zip 4.1_Frame"
New model features better accessory mounting system. Instead of super gluing rails, they are mounted via 6-32 screws with captive nuts. This allows non permanent mounting that is load bearing. This leaves the option to have made semi-permanent using blue loctite or very permanent with red loctite.
Other changes include
upgraded chambering by adding a spiralized chamfer to help catch offcentered shells.
side mounting holes near ejection port
widened action bar slots for decreasing priming friction
(7/28/2018) Accessories coming soon
I'm going to start uploading the STLs for the various accessories for the Spring Thunder. Starting with stock, shell variants, shell mounts (picatinny and molle), and all on their own pages for organization purposes.
Also some new part updates coming in soon.
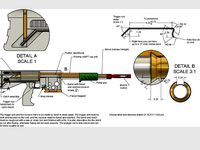
(6/26/2018) Massive Durability Upgrade & Exploded View/Assembly Guide
Made a huge change over the past week that improved the blaster's resistance to damage caused by dry firing by 16x, theoretically speaking. In practice, this meant I was able to dry fire the Spring Thunder 75 times in 3 minutes without seeing any damage.
In addition, here're the 3D parts that have been modified in the download files.
Shell_latches: Improved the ease of chambering rounds
Plunger_bolt_seal: Adjusted to function with new shock pads
Magazine_follower reupload: Turns out I had the wrong one uploaded. May still work, but not the one I normally use.
Here's the assembly guide with Exploded views and BOM: https://www.reddit.com/r/Nerf/comments/8ukdk6/spring_thunder_assembly_guide_v2_boms_exploded/
(6/21/2018) Hardware kit news & upcoming shells
The first hardware kit has shipped and we are working together to build the assembly guide in the best way possible and to work out all of the 2nd hand assembly details.
As for hardware kits, there will be several % levels available, each with fewer machined parts for their respective price points. For example, a 100% Hardware kit will have all hardware machined and is a drop in kit with the 3D printed parts and are starting at $100. Then a 20% kit will have only the laser cut sheet metal parts (this is the lowest I can go as my supplier gives me laser cut parts for cheaper than raw stock from the local hardware store) with all other parts only cut to length or approximate length with no other features machined in. The 20% kit will be the cheapest hardware kit available at probably around $40 to $50. Then all the levels in between will scale up with machined parts and prices. I will work on the exact details and how the ranges will work. Any suggestions are encouraged.
Additionally, the following parts have been updated:
Ejection_Port_A: Changed dimensions to allow easier fit checking
Ejector: Removed assembly steps
Bolt: Changed to accept standard 5/64" x 1" roll pins instead of cut to length 3/32" rod
Shell_Aligner: Increased acceptable tolerances for proper action. It's harder to break this now. It's also smoother and quieter in action.
PRail_Standard: Increased lengths of alignment pegs for better grip and added alignment holes on the sides for better daisy chaining of tactical railing.
Stay tuned, soon a lot of new shells are going to be uploaded. Perhaps onto a different page to keep it better organized. Some accessories being released also.
Here's Drac's short video review of the blaster: https://www.youtube.com/watch?v=uYp-iRkI4Gk
(6/6/2018) - Assembly Guide
I'm putting the assembly guide together. Come check it out and leave a comment if you'd like any clarifications or questions on it: https://docs.google.com/document/d/1xWQniR2GeUr-HgtQ9y3Q4QqNVudxlNn7RjYhra7oPgc/edit?usp=sharing
(6/4/2018) - Added Shells (Rival Buckshot, Elite Slug, MEGA Slug and Boomco Flechettes)
(5/24/2018) - NEWEST FILES RELEASED AT LAST
Forget all the weird issues with patents and intellectual property nonsense, I'm just releasing all of the current production files. These are for the new model 3 and its point revisions. I'm not going to be releasing the complete fabrication guide for a long time, but instead I'll begin working on the assembly & calibration guide if you want to get the cheaper $100 kit. Also a lot of people seem to think that building it from scratch will be easy or even fun, it's not, it's literally hell on earth. It takes me about 15 hours to completely put the thing together from scratch and calibrate to be battle ready. There's a reason why I outsource these machined parts now. So god bless whoever's soul who wishes to still build this from scratch.
I'll try to release hardware kits and assembly guides in the next month, but I'm moving to a new state and starting my first real job next week, so things are going to be nuts.
(5/8/2018)
Bad news guys, due to unforeseen problems the fabrication guide and STLs will be on hold indefinitely until I can figure out how to sustain this project in the long run. Fully assembled blasters are still for sale, but I will not be selling any hardware kits until this is all sorted out. Hopefully I'll arrive at a solution within a month's time.
I still want to release everything, but I need to sort this out first.
(4/29/2018)
Okay boys and girls, mass production is beginning. The first batch of 20 is now underway. The parts list, hardware fabrication guide, assembly guide and operations guide will all also be released by May 29th. Thanks for all the support so far.
Otherwise follow this page for future diy updates, including the eventual addition of a complete fabrication guide with parts lists, cut sheets and all.
(4/24/2018)
If you'd like to be put down for an order you can join this mailing list: https://docs.google.com/forms/d/e/1FAIpQLSdwvyDUVh74UPaP7Q_HdkaSJ23LQNGnuR1ySjkEExrPdiFE7g/viewform
(4/23/2018 URGENT UPDATE)
These files will work but are outdated, so don't print anything until I post the updated files sometime after my finals are over.
Facebook group: https://www.facebook.com/groups/SpringThunder/
Assembled blasters available here: https://www.etsy.com/shop/GDop26
Custom colored blasters available from our friends at frontlinefoam: https://frontlinefoam.com/product/spring-thunder/
Hardware kits available here: https://www.shellingtonblasters.com/product-page/spring-thunder-hardware-kit-model-5
Shells Here: https://www.thingiverse.com/thing:3210080
Stocks: https://www.thingiverse.com/thing:3129063
Sling Point: https://www.thingiverse.com/thing:3144712
Assembly Guide: https://www.shellingtonblasters.com/assembly-guide
Troubleshooting guide: https://www.shellingtonblasters.com/trouble-shooting-guide
~~~~ Updates ~~~~~~
(12-12-2020) New Plunger Head uploaded that takes the 311 sized O-ring as its shock padding.
R12_V1 is the new version that takes the O-ring
R11_V2 is the old one that takes the old shock pad
(11-26-2020) Uploaded a STEP file of the standard triple Rival Ball Buckshot shell. It is traditionally found with the rest of the shell files, but it makes sense to also include its download here.
(9-9-2020) Since transfer bars are 3d printed as a standard now, I have also uploaded their STLs here for anyone to print.
(8-22-2020) Big updates with the model 6 version of this blaster platform. I've been building testing the version for a few months now, so I think it's ready for public release now. The primary changes were made to improve durability of the firing mechanism and improve tolerances and ease of building.
Plunger Head - The Nylon rod was replaced with a threaded rod and 3D printed composite fitted with a harder stainless steel washer. The washer replaces the machined nylon surface, which improves its hardness significantly to greatly decrease the rate of wearing on the firing mechanism. The use of the threaded rod with the 3d printed plunger assembly also improves sizer tolerances for a more consistent build. The entire assembly also happens to be about 9% lighter. Not sure if this has much of an effect on performance, but my understanding is that you want as light of the plunger head as possible for the fastest spring movement.
Bolt - Simplified assembly by removing nuts and screws for securing the plunger tube. It's a little more complicated in a different way. Instead of securing the plunger tube using screws, it is now held in by crimping/bending the aluminum tubing onto the 3d prints to literally hold onto it. Removal is harder, but assembly and fabrication of parts are much easier, which also improves the consistency of how I fabricate them.
Smaller changes include the Ejection Ports A and B - I removed the pin holes and replaced them with 3d printed alignment tabs. These were optional in the past to assist with keeping the parts aligned. But with the 3d printed tabs, you won't need to manually insert these pins anymore. Which technically also makes the blaster lighter haha.
(5/19/2020) Thingiverse keeps moving the thumbnail around making it harder to find this posting. I manually moved it back, hopefully it stays that way.
(2/9/2020) A few much needed updates following many months of testing and a couple hundred successful builds, leaving this update ready to pass. As well as some parts that I've forgotten to update for a long while. Sorry to all the people who've ordered and built kits for these last couple of months.
Plunger Seal - Divots added to allow the bolt assembly work with the longer 1/2" screws
Shell Latch - this is a pretty big update, as the part has previously been unchanged for nearly 2 years of the project's development. The part was shifted by a bit to be more reliable with its activation by requiring less force to open while still retaining its holding power.
Back Plate - Added open slots for much easier installation of stocks and rear accessories.
(9/1/2019) Picatinny rail added, or rather I realized it was missing so now it's back.
(8/28/2019) Apparently the shell carrier was also missing. It's back and nothing is different about it I think.
(8/26/2019) Missing parts added
Apparently the back plate has been missing for some time, so I re-added it.
Bolt - revised with a larger groove for its sealing O-ring to make it easier to install. Its extractor cavity has been extended to better hold onto its extractor assembly. Its pivot pin hole has been expanded by about 0.010" to fit the assembly more easily.
(6/2/2019) Model 5 Released
Major update
New Bolt: Model 5 introduces a redesigned bolt that allows shells without o-rings to be used effectively. This needs a rebuilt bolt and some new hardware and an updated assembly guide will be provided in the coming days. This was created to allow users to more easily create their own shells with less involved labor. Additionally, this bolt is backwards compatible with old shell designs allowing for shells with either O-rings installed or not.
In addition to the new O-ring set up, this update introduces a couple other significant improvements.
Extractor Durability: The extractor was redesigned to bend less during jams. This used to cause the spring to overbend and loose its spring back ability, now it bends 50% less which extends its life and resistance to being bent too far during jams.
Tapped Rails: A response to overwhelming complaints over the difficulty in installing rails, the top holes have been narrowed to allow picatinny rails to directly screwed into the plastic for low load applications. The hex nut cavities were untouched to be used for high stress and loads such as sling points.
Minor Updates
Shell Carrier: Much needed chamfers were added to relive the part of sharp edges.
Carrier Roller Chamfer: This was added to reduce cleanup needed for assembly.
Ejection Port: Relief angles were added to reduce supports needed. Pin slots were extended to improve pin retention for the shell latches.
Mounting Holes: Added to support future accessories
Plunger Bolt Seal: Seal screw assembly reduced to QTY 1 as second screw was deemed redundant. Very low loads are experienced here. Additionally, fewer fasteners used reduces points of leakages in the plunger tube assembly.
Handle: Single print handle available, reducing labor and improving print quality for those with larger printers.
Model 4 Files are saved in a zip for those with older models looking to repair. Though I recommend you switch to the model 5.
(5/5/2019) Extractor Durability Upgrade
New extractor will be more resistant to over bending by the spring. This should extend the life and function of the extractor.
(3/22/2019) Missing Files Added
A user pointed out that I missed the shell align file, so that was added.
I also uploaded the previous version's files for anyone looking to repair an old build. These can be found in the Model 3 zip.
(3/10/2019) Big Assembly Update
Okay, a little later than I'd thought but it's finally here. I rebuilt the assembly guide the correct way so I can actually make changes and updates to it later on and I uploaded the new files that I've been making blasters with for the past month or so, so I definately know they work.
Here's the new assembly guide, packed with accurate part descriptions this time: Assembly Guide: https://imgur.com/a/rTDnmiZ
Here's also a changelog of the updated 3D printed parts.
In General - Chamfers added to all edges to help with elephant footing. This shouldn't be very noticeable but will help with the buldge created by elephant's foot as well as reducing support needed.
Bolt & Shell Align - These have faced the biggest change. Instead of press fitting 2 tiny spring pins, this is now held is with a single common screw (to the BOM) and a dab of loctite. This removes an item from the BOM and makes the assembly generally easier.
Ejection Port A - An angled relief cut was added to help the shell align and bolt move past it more easily. Entire port was widened in general.
Ejection Port B - The ejector slot was reconfigured to require less or no support to print.
Trigger - pin hole was tapered to help the pin retain better. Chamfers added to reduce support needed.
Pump Grip - A cavity for a captive nut was added to comply with the new action bars. These look better and are also stronger than previous designs. The angled grip slots also take the support out of the prints while approaching a more cosmetic appeal.
Handle Frame B - Priming indicator windows were added to both sides, so you can see if the blaster is primed by glancing from the side. An additional mounting hole (optional) was added to the bottom to allow more accessories and cosmetic options to be installed.
Handle Frame A - Reduced support needed for this part.
(2/6/2019) STEP files of the Dart slug was added so you can freely make your own variations of the ST shell.
All new shells can be found on the shell page provided in the links at the top of the description. Outdated were removed from this page except for the base Buckshot shell.
(1/27/2019) A big update is coming soon, including significant hardware changes to improve the ease of assembly. New assembly guide coming too.
For now, 2 new part files to fix some issues and add features.
Ejection_Port_A - Relief added to improve the feeding, as a vertical lip was removed because it was causing the shells to sometimes jam while feeding. Chamfers were also added to help combat elephant footing and to improve the general smoothness of the operation. Some dimensions were decreased to allow for even looser print tolerances while still allowing proper function.
Barrel_Coupler - One of the holes for adding picatinny rails is now complete and no longer just aesthetic. You can now attach a rail point here. Also same as above, chamfers were added to aid in the elephant foot issue.
(12/11/2018) Nothing huge, just added a barrel frame option with the entire "SPRING THUNDER" as a single piece for seamless embossed printing. It's here as
BarrelFrame_R10_V1BC. It's the BC unit. Also if you'd like to check out for more general news and updates, there's a facebook group for anyone to join. Shameless self promotional plug: https://www.facebook.com/groups/SpringThunder/
(11/21/2018) Lots of new updates, so new that I'm going to need to revise the assembly guide.
Bolt - Decreased ledge to improve ease of assembly of extractor and plunger tube. Plunger tube assembly is immensely easier now. You just twist it on instead of pressing it. This reduces assembly difficulty while also imposing less force on the sealing O-rings allowing for a cleaner fit.
Handles - widened cavity for the captive nuts for ease of assembly of the trigger guard. This was way too tight for no reason before.
Rear Spring Guide - Thickened backend to reduce depriming catching and removed the Shock Washer part from BOM. This is to be made with 3mm top/bottom solid infill.
Shock Washer - removed from assembly, one less part to print.
Ejection Port A - Widened front chambering slot to reduce interference with bolt assembly.
(11/11/2018) Shell officially release: https://www.thingiverse.com/thing:3210080
(10/8/2018) I know it seems like updates are suddenly rampant, but I'm trying to release more parts and support for the project now that the userbase is growing. Anyways, I made and released picatinny mounted Sling Points here: https://www.thingiverse.com/thing:3144712
Which by the way, because they're using the picatinny system, you can use this attachment on your airsoft guns or possibly even a real gun if you really felt like it.
Expect an assembly update later this week. I made a change that reduces the part count by 1 while saving assembly time.
(10/2/2018) Model 4 Files Officially released - Along with its own signature on the side of the blaster. Page for the shells coming soon. Added some updated pictures.
New Plunger head - redesigned for a tighter seal yet looser fit to give more power per shot at the cost of over 30 hours of redesign from me. This can be printed at 1.2mm walls with 1.5mm top/bottom fill and 20% infill.
(9/30/2018) Stocks Revised & Released - https://www.thingiverse.com/thing:3129063
(8/25/2018) Model 4 Released - Found inside the new file "Zip 4.1_Frame"
New model features better accessory mounting system. Instead of super gluing rails, they are mounted via 6-32 screws with captive nuts. This allows non permanent mounting that is load bearing. This leaves the option to have made semi-permanent using blue loctite or very permanent with red loctite.
Other changes include
upgraded chambering by adding a spiralized chamfer to help catch offcentered shells.
side mounting holes near ejection port
widened action bar slots for decreasing priming friction
(7/28/2018) Accessories coming soon
I'm going to start uploading the STLs for the various accessories for the Spring Thunder. Starting with stock, shell variants, shell mounts (picatinny and molle), and all on their own pages for organization purposes.
Also some new part updates coming in soon.
(6/26/2018) Massive Durability Upgrade & Exploded View/Assembly Guide
Made a huge change over the past week that improved the blaster's resistance to damage caused by dry firing by 16x, theoretically speaking. In practice, this meant I was able to dry fire the Spring Thunder 75 times in 3 minutes without seeing any damage.
In addition, here're the 3D parts that have been modified in the download files.
Shell_latches: Improved the ease of chambering rounds
Plunger_bolt_seal: Adjusted to function with new shock pads
Magazine_follower reupload: Turns out I had the wrong one uploaded. May still work, but not the one I normally use.
Here's the assembly guide with Exploded views and BOM: https://www.reddit.com/r/Nerf/comments/8ukdk6/spring_thunder_assembly_guide_v2_boms_exploded/
(6/21/2018) Hardware kit news & upcoming shells
The first hardware kit has shipped and we are working together to build the assembly guide in the best way possible and to work out all of the 2nd hand assembly details.
As for hardware kits, there will be several % levels available, each with fewer machined parts for their respective price points. For example, a 100% Hardware kit will have all hardware machined and is a drop in kit with the 3D printed parts and are starting at $100. Then a 20% kit will have only the laser cut sheet metal parts (this is the lowest I can go as my supplier gives me laser cut parts for cheaper than raw stock from the local hardware store) with all other parts only cut to length or approximate length with no other features machined in. The 20% kit will be the cheapest hardware kit available at probably around $40 to $50. Then all the levels in between will scale up with machined parts and prices. I will work on the exact details and how the ranges will work. Any suggestions are encouraged.
Additionally, the following parts have been updated:
Ejection_Port_A: Changed dimensions to allow easier fit checking
Ejector: Removed assembly steps
Bolt: Changed to accept standard 5/64" x 1" roll pins instead of cut to length 3/32" rod
Shell_Aligner: Increased acceptable tolerances for proper action. It's harder to break this now. It's also smoother and quieter in action.
PRail_Standard: Increased lengths of alignment pegs for better grip and added alignment holes on the sides for better daisy chaining of tactical railing.
Stay tuned, soon a lot of new shells are going to be uploaded. Perhaps onto a different page to keep it better organized. Some accessories being released also.
Here's Drac's short video review of the blaster: https://www.youtube.com/watch?v=uYp-iRkI4Gk
(6/6/2018) - Assembly Guide
I'm putting the assembly guide together. Come check it out and leave a comment if you'd like any clarifications or questions on it: https://docs.google.com/document/d/1xWQniR2GeUr-HgtQ9y3Q4QqNVudxlNn7RjYhra7oPgc/edit?usp=sharing
(6/4/2018) - Added Shells (Rival Buckshot, Elite Slug, MEGA Slug and Boomco Flechettes)
(5/24/2018) - NEWEST FILES RELEASED AT LAST
Forget all the weird issues with patents and intellectual property nonsense, I'm just releasing all of the current production files. These are for the new model 3 and its point revisions. I'm not going to be releasing the complete fabrication guide for a long time, but instead I'll begin working on the assembly & calibration guide if you want to get the cheaper $100 kit. Also a lot of people seem to think that building it from scratch will be easy or even fun, it's not, it's literally hell on earth. It takes me about 15 hours to completely put the thing together from scratch and calibrate to be battle ready. There's a reason why I outsource these machined parts now. So god bless whoever's soul who wishes to still build this from scratch.
I'll try to release hardware kits and assembly guides in the next month, but I'm moving to a new state and starting my first real job next week, so things are going to be nuts.
(5/8/2018)
Bad news guys, due to unforeseen problems the fabrication guide and STLs will be on hold indefinitely until I can figure out how to sustain this project in the long run. Fully assembled blasters are still for sale, but I will not be selling any hardware kits until this is all sorted out. Hopefully I'll arrive at a solution within a month's time.
I still want to release everything, but I need to sort this out first.
(4/29/2018)
Okay boys and girls, mass production is beginning. The first batch of 20 is now underway. The parts list, hardware fabrication guide, assembly guide and operations guide will all also be released by May 29th. Thanks for all the support so far.
Otherwise follow this page for future diy updates, including the eventual addition of a complete fabrication guide with parts lists, cut sheets and all.
(4/24/2018)
If you'd like to be put down for an order you can join this mailing list: https://docs.google.com/forms/d/e/1FAIpQLSdwvyDUVh74UPaP7Q_HdkaSJ23LQNGnuR1ySjkEExrPdiFE7g/viewform
(4/23/2018 URGENT UPDATE)
These files will work but are outdated, so don't print anything until I post the updated files sometime after my finals are over.
Similar models
thingiverse
free

Tevo Tarantula Upgrade set by GreyHunter147
...
-added motor coupler with less spring effect, print it horizontal
update
-added fan usb light support
update
-added phone suppor
thingiverse
free
Cherub "curvy" Nerf blaster by flemdogmillionaire
...e with each shot, and doesn't rotate back. i could update this to use a square pr but it's really not worth it right now.
thingiverse
free

X-Shot Chaos Meteor Internal Brace and Spring Guides
...des are for the prime and trigger lock springs.
slide reinforcement brace; just goes into the slide shell around the central peg.
thingiverse
free

UPDATED Lil Hyper V2 by that_reason
...
enjoy your new blaster.
note: compatibility with pvc coupler mods is unknown. front muzzle may require significant modification.
thingiverse
free

Lynx Blaster (full metric version) by GstoeGabs
...: https://www.thingiverse.com/thing:4668642
edit 2021.01.13: lynx v2 is now also metric https://www.thingiverse.com/thing:4720755
thingiverse
free

Handgun with magazine and bullets (Fully functional TOY!!!) by CJay9209
...gh i will keep the list updated below. i will also upload a full build and assembly guide that i'm working on, soon.
enjoy!!!
thingiverse
free

Lynx V2 Blaster (full metric version) by GstoeGabs
... files, if available. otherwise you´ll end drilling the bars for v1 (found here btw... https://www.thingiverse.com/thing:4661689)
cg_trader
$12

Eolambia Complete STL | 3D
... with the model. animal animals dinosaur dinosaurs eolambia herbivore prehistoric collection assembly print ready science biology
thingiverse
free

3D Printed Numechron Clock by Victorrr161
...nown gear ratio problem and improves accuracy. description of the problem here - https://forum.arduino.cc/index.php?topic=71964.0
thingiverse
free
Nerf Longstrike Direct Plunger Conversion Parts by Stryker5260
...version and renamed original to "hiprecomp". catch spacers are now symmetrical 5mm blocks, changed from 4.5mm x 4.75mm.
Gdop26
thingiverse
free

Multimeter Cable Tie by GDop26
...multimeter cable tie by gdop26
thingiverse
mutlimeter probe and cable tie for keeping those wires in place when not in use.
thingiverse
free

Barrel Frame Variants - Spring Thunder by GDop26
...barrel frame variants - spring thunder by gdop26
thingiverse
free barrel frame variants for the spring thunder platform.
thingiverse
free

Hooty Ornament by GDop26
... owl house.
you can also buy one from my shop here: https://www.etsy.com/listing/868196242/hooty-ornament?ref=shop_home_active_1
thingiverse
free

Spring Thunder - Singled angled shell mount Molle Clip by GDop26
...it: https://www.reddit.com/user/gdop26/
instagram: https://www.instagram.com/gdop26/?hl=en
etsy: https://www.etsy.com/shop/gdop26
thingiverse
free

Ninja Star Generator by GDop26
.... i didn't like where the project was going so i'm just releasing it as such, maybe someone out there will like it still.
thingiverse
free

Black & Decker Drill Chord Anchor by GDop26
...anchor by gdop26
thingiverse
chord anchor for black & decker drill. it makes it much easier to hang from a pegboard or hook.
thingiverse
free

Spring Thunder - Sling Stock Bidirectional by GDop26
...isting/603523542/spring-thunder-stock-with-sling-mounts?ref=shop_home_feat_1
blasters sold here: https://www.etsy.com/shop/gdop26
thingiverse
free

Nerf Rival Magazine by GDop26
...hingiverse's requirements.
clarification: this is a magazine, i only tagged it with clip so the younger audience can find it.
thingiverse
free

Customizable Clothing Button by GDop26
...a couple of remixes to showcase what kind of buttons you can make using this customizer. i might add more features in the future.
thingiverse
free

Ego One Mini - 3D Model by GDop26
... thought i'd start uploading some stuff, so here it is. i've left an stl, step and original iam assembly files with ipts.
Ejecting
3d_export
$50

Ejection seat 3D Model
...ion seat 3d model
3dexport
martin baker ejection seat eject martin-baker jet fighter
ejection seat 3d model tartino 1951 3dexport
3d_export
$55

Spacecraft ejection seat
... this ejection<br>seat to exit the descent module upon re-entry, after completing the<br>first manned orbit of earth.
cg_studio
$50

Ejection seat3d model
... seat3d model
cgstudio
.3ds .obj .obp - ejection seat 3d model, royalty free license available, instant download after purchase.
turbosquid
$199

ADAMS EJECTIONS SEAT
...oyalty free 3d model adams ejections seat for download as stl on turbosquid: 3d models for games, architecture, videos. (1290750)
turbosquid
$150

AIRCRAFT EJECTION SEAT
...alty free 3d model aircraft ejection seat for download as stl on turbosquid: 3d models for games, architecture, videos. (1290745)
turbosquid
$150

AIRCRAFT EJECTION SEAT
...alty free 3d model aircraft ejection seat for download as stl on turbosquid: 3d models for games, architecture, videos. (1290744)
turbosquid
$150

GEORGE EJECTION SEAT
...oyalty free 3d model george ejection seat for download as stl on turbosquid: 3d models for games, architecture, videos. (1290756)
turbosquid
$50
Saber ejecter seat
... available on turbo squid, the world's leading provider of digital 3d models for visualization, films, television, and games.
cg_studio
$45

F15 Ejection Seat3d model
...ection seat3d model
cgstudio
.max - f15 ejection seat 3d model, royalty free license available, instant download after purchase.
turbosquid
$40

Lowpoly Laptop with Ejectable Disk Drive
...ejectable disk drive for download as blend, max, fbx, and obj on turbosquid: 3d models for games, architecture, videos. (1614232)
Thunder
3ddd
$1
Thunder Wings
...r wings
3ddd
lego , конструктор
реактивный самолет lego thunder wings, модель 2013 года.
turbosquid
$60

Thunder Transporter
...royalty free 3d model thunder transporter for download as fbx on turbosquid: 3d models for games, architecture, videos. (1210036)
turbosquid
$60
Thunder HG1B
...squid
royalty free 3d model thunder hg1b for download as fbx on turbosquid: 3d models for games, architecture, videos. (1210029)
turbosquid
$25

Thunder Bomber
... available on turbo squid, the world's leading provider of digital 3d models for visualization, films, television, and games.
turbosquid
$15

Thunder Wheel
... available on turbo squid, the world's leading provider of digital 3d models for visualization, films, television, and games.
turbosquid
$12

Thunder Bird
... available on turbo squid, the world's leading provider of digital 3d models for visualization, films, television, and games.
turbosquid
$12

Thunder toy
... available on turbo squid, the world's leading provider of digital 3d models for visualization, films, television, and games.
3d_export
$50
Thunder Racing 3D Model
...thunder racing 3d model
3dexport
thunder racing drag
thunder racing 3d model vulturre 51334 3dexport
turbosquid
$80
Thunder Mountian Range
...alty free 3d model thunder mountian range for download as max on turbosquid: 3d models for games, architecture, videos. (1263201)
3d_export
$10

thunder ax of thor
...d to maximally convey the main features of ax. let me know what you think of it and feel free to contact me i offer full support.
Dart
archibase_planet
free

Darts
...darts
archibase planet
darts dartboard
darts n100912 - 3d model (*.gsm+*.3ds) for interior 3d visualization.
archibase_planet
free

Darts
...darts
archibase planet
darts dartboard
darts n270313 - 3d model (*.gsm+*.3ds) for interior 3d visualization.
archibase_planet
free

Darts
...darts
archibase planet
darts dartboard game
darts n021213 - 3d model (*.gsm+*.3ds+*.max) for interior 3d visualization.
3d_ocean
$3

Darts
...mes hobbies pin pins sport sports stick target toy
3d model of darts. 3ds max 2012 project (mental ray render) & obj export.
3d_ocean
$14
Dartboard and Darts
...al dimensions. the detailed board and dart will suit every pub and café scene but could also be used for photo realistic renders.
turbosquid
$20

dart
...rt
turbosquid
royalty free 3d model dart for download as max on turbosquid: 3d models for games, architecture, videos. (1171719)
turbosquid
$1

darts
...s
turbosquid
royalty free 3d model darts for download as max on turbosquid: 3d models for games, architecture, videos. (1280893)
turbosquid
$3

Dart
...oyalty free 3d model dart for download as , obj, stl, and fbx on turbosquid: 3d models for games, architecture, videos. (1710585)
3d_export
free
darts rgb
...darts rgb
3dexport
3d model darts rgb
3d_ocean
$3

Dart
...ndered in vray. this is midpoly model (541 polys), with clean geometry and great surface flow. you can add subdivision or othe...
Blaster
turbosquid
free
Blaster
...id
free 3d model blaster for download as obj, fbx, and blend on turbosquid: 3d models for games, architecture, videos. (1259706)
3d_export
free
Blaster
...blaster
3dexport
turbosquid
$35
blaster
... available on turbo squid, the world's leading provider of digital 3d models for visualization, films, television, and games.
turbosquid
$29
Blaster
...d model blaster for download as 3ds, obj, fbx, blend, and dae on turbosquid: 3d models for games, architecture, videos. (1296833)
turbosquid
$5

Blaster
... available on turbo squid, the world's leading provider of digital 3d models for visualization, films, television, and games.
turbosquid
free

blaster
... available on turbo squid, the world's leading provider of digital 3d models for visualization, films, television, and games.
turbosquid
$10

Blaster Machine
...squid
royalty free 3d model blaster machine for download as on turbosquid: 3d models for games, architecture, videos. (1407293)
3d_export
$5
Blaster 3D Model
...blaster 3d model
3dexport
blaster weapon game gun wars star shoter movie
blaster 3d model daniilbondar 93841 3dexport
3d_ocean
$15

Ghetto Blaster
...o blaster
3docean
audio boombox cassette ghettoblaster music radio stereo
fully modeled ghetto blaster including uvw texture psd.
turbosquid
$1
Alien Blaster
...id
royalty free 3d model alien blaster for download as blend on turbosquid: 3d models for games, architecture, videos. (1258055)
Wip
turbosquid
free

WIP Firemoth Omnimech
... available on turbo squid, the world's leading provider of digital 3d models for visualization, films, television, and games.
3d_ocean
$85

Ford Mustang WIP
...ord mustang is an automobile manufactured by the ford motor company. the ford mustang is one of the ten cars have changed the ...
turbosquid
$49
Sci-Fi Ship Wip
... available on turbo squid, the world's leading provider of digital 3d models for visualization, films, television, and games.
3d_export
$9

Mustang Wip 2009 Logo 3D Model
... of auto transport 3d model logo emblem detailed high quality badge marque
mustang wip 2009 logo 3d model rmodeler 46465 3dexport
3d_export
$9

Mustang Wip 2010 Logo 3D Model
... of auto transport 3d model logo emblem detailed high quality badge marque
mustang wip 2010 logo 3d model rmodeler 46683 3dexport
3d_export
$89

Ford Mustang WIP 2009 3D Model
...ica usa muscle ford mustang avto car vehicle auto automobile cars 3d model
ford mustang wip 2009 3d model creatord 56249 3dexport
cg_studio
$89

Ford Mustang WIP 20093d model
....fbx .lwo .max .mb .obj .xsi - ford mustang wip 2009 3d model, royalty free license available, instant download after purchase.
3d_export
$149
Star Wars Death Star Destroyed 3D Model
...darth vader death scenice fiction base imperial destroyed build wip work in star wars death star destroyed 3d model...
3d_export
$20
ural 4320 mod a
...ural 4320 mod a 3dexport still wip keep updating<br>you can use this model for commercial purposes...
thingiverse
free
wips by dap
...wips by dap
thingiverse
sonic color>>wips
Foam
3d_export
$5

cylinder foam does not fall stand polyurethane foam
...cylinder foam does not fall stand polyurethane foam
3dexport
cylinder foam does not fall stand.<br>polyurethane foam
turbosquid
$1

Foam Gun
...urbosquid
royalty free 3d model foam gun for download as fbx on turbosquid: 3d models for games, architecture, videos. (1659619)
turbosquid
$39

Foam Hand
... available on turbo squid, the world's leading provider of digital 3d models for visualization, films, television, and games.
turbosquid
$14

Shaving Foam
... available on turbo squid, the world's leading provider of digital 3d models for visualization, films, television, and games.
turbosquid
$10

Foam Glider
... available on turbo squid, the world's leading provider of digital 3d models for visualization, films, television, and games.
turbosquid
$2

Foam Brush
... available on turbo squid, the world's leading provider of digital 3d models for visualization, films, television, and games.
turbosquid
$10

Foam fire extinguisher
...alty free 3d model foam fire extinguisher for download as max on turbosquid: 3d models for games, architecture, videos. (1700116)
design_connected
$7

TORK Foam Soap Dispenser
...tork foam soap dispenser
designconnected
tork foam soap dispenser computer generated 3d model.
turbosquid
$29
Sierra Foam Sofa
...e 3d model sierra foam sofa for download as max, fbx, and obj on turbosquid: 3d models for games, architecture, videos. (1575076)
turbosquid
$1

Sound Proofing Foam
... sound proofing foam for download as ige, obj, stl, and sldpr on turbosquid: 3d models for games, architecture, videos. (1289027)
Shell
archibase_planet
free

Shell
...shell
archibase planet
sports shell playground
sports shell 1 - 3d model (*.gsm+*.3ds) for interior 3d visualization.
design_connected
$16

Shell
...shell
designconnected
fasem international shell armchairs computer generated 3d model. designed by roberto lazzeroni.
3ddd
$1

Shell Chair
...shell chair
3ddd
hans wegner , shell
shell chair
design_connected
$13

Shell
...shell
designconnected
fiam italia shell coffee tables computer generated 3d model. designed by danny lane.
3ddd
$1

Shell armchair
...shell armchair
3ddd
shell
shell armchair
designer don't remember
turbosquid
$1
Shells
...
turbosquid
royalty free 3d model shells for download as max on turbosquid: 3d models for games, architecture, videos. (1449062)
turbosquid
$10

Shell
...quid
royalty free 3d model shell for download as stl and obj on turbosquid: 3d models for games, architecture, videos. (1583461)
turbosquid
free
Shells
...uid
free 3d model shells for download as blend, fbx, and obj on turbosquid: 3d models for games, architecture, videos. (1562122)
turbosquid
$49

Shell
...yalty free 3d model shell for download as blend, fbx, and obj on turbosquid: 3d models for games, architecture, videos. (1569496)
turbosquid
$1

Shell
...yalty free 3d model shell for download as blend, fbx, and obj on turbosquid: 3d models for games, architecture, videos. (1606504)
Spring
3d_export
free

spring
...spring
3dexport
spring
3ddd
$1

Spring
... , spring
кресло spring фабрики potocco (италия)
длина 84
ширина 79
высота 100
design_connected
$16

Spring
...spring
designconnected
cappellini spring chairs computer generated 3d model. designed by erwan bouroullec.
3ddd
$1

Еmmemobili Spring
...еmmemobili spring
3ddd
еmmemobili , spring
кресло еmmemobili spring
design_connected
$11

Spring
...spring
designconnected
de padova spring chairs computer generated 3d model. designed by damian williamson.
turbosquid
$5

Spring
...
turbosquid
royalty free 3d model spring for download as skp on turbosquid: 3d models for games, architecture, videos. (1148583)
turbosquid
$1
Spring
...
turbosquid
royalty free 3d model spring for download as fbx on turbosquid: 3d models for games, architecture, videos. (1351471)
3ddd
$1

Еmmemobili Spring
...mobili spring
3ddd
emmemobili , spring
кресло еmmemobili spring, вариант в мягкой обивке
3d_export
$5

Ball spring
...ball spring
3dexport
ball spring
3ddd
$1

Смеситель SPRING
... fir italia , смеситель
смеситель spring, две модели, производитель fir italia!