Thingiverse

SpiffBot CoreXY 3D Printer by spiffcow
by Thingiverse
Last crawled date: 3 years, 1 month ago
Update 10/24/2016
I'm officially abandoning the whole nylon slider idea. It might work if you used POM, but nylon is not suitable, and I'm not willing to sink any more time into it. I've switched back to wheels.
Update 9/11/2016
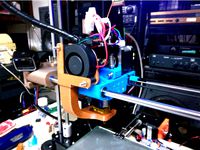
I have improved the sliders. There are now Y and Z sliders and a sliding X direct drive carriage based on croadfeldt's work (modified source code is available on github). For the extruder use a bowden adapter of your choice (I used the C-Bot bowden adapter).
Use Taulman 645 or Bridge for the sliders, and make sure you get as little warping as possible. I have had great results using Printbite at 95C for the first layer and 105C for all other layers.
I'm currently running the printer completely without wheels with no discernible loss of quality. Pictures coming soon once I clean it all up.
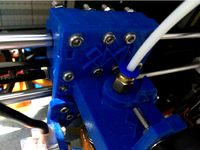
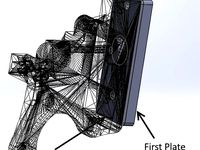
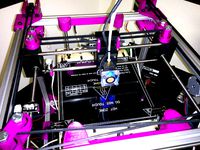
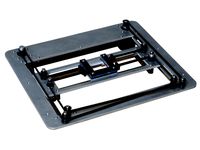
This is a collection of modifications for Carl Feniak's C-Bot. Many of the parts are redesigned for increased rigidity, reduced cost, and reduced build time requirements.
The latest code is always available on github (the code pretty ugly at the moment.. This project has been my learning project for OpenSCAD).
The corner brackets, stepper mounts, and perpendicular brackets are all tested and provide an extremely rigid frame for the printer. I have done full prints at 150mm/s with a heavy direct drive stepper on the carriage. Attempts to go higher fail only because my steppers are not up to the task -- the frame remains rock solid.
Currently I would recommend avoiding the sliders unless you are feeling adventurous, as I have encountered a few issues trying to get them to function adequately.
A secondary benefit is that the tolerances are so tight that being able to assemble the printer virtually guarantees that it is square -- assuming the printer you used to print the brackets is also square. This allows you to get to an assembled and squared frame in a matter of hours.
I'm officially abandoning the whole nylon slider idea. It might work if you used POM, but nylon is not suitable, and I'm not willing to sink any more time into it. I've switched back to wheels.
Update 9/11/2016
I have improved the sliders. There are now Y and Z sliders and a sliding X direct drive carriage based on croadfeldt's work (modified source code is available on github). For the extruder use a bowden adapter of your choice (I used the C-Bot bowden adapter).
Use Taulman 645 or Bridge for the sliders, and make sure you get as little warping as possible. I have had great results using Printbite at 95C for the first layer and 105C for all other layers.
I'm currently running the printer completely without wheels with no discernible loss of quality. Pictures coming soon once I clean it all up.
This is a collection of modifications for Carl Feniak's C-Bot. Many of the parts are redesigned for increased rigidity, reduced cost, and reduced build time requirements.
The latest code is always available on github (the code pretty ugly at the moment.. This project has been my learning project for OpenSCAD).
The corner brackets, stepper mounts, and perpendicular brackets are all tested and provide an extremely rigid frame for the printer. I have done full prints at 150mm/s with a heavy direct drive stepper on the carriage. Attempts to go higher fail only because my steppers are not up to the task -- the frame remains rock solid.
Currently I would recommend avoiding the sliders unless you are feeling adventurous, as I have encountered a few issues trying to get them to function adequately.
A secondary benefit is that the tolerances are so tight that being able to assemble the printer virtually guarantees that it is square -- assuming the printer you used to print the brackets is also square. This allows you to get to an assembled and squared frame in a matter of hours.
Similar models
thingiverse
free

No wheels sliders for C-Bot and derivatives by spiffcow
... find something to space them apart, such as a thin washer. you want it to fit as tightly as possible without impeding movement.
thingiverse
free

Anet A8 Bowden Extruder Mount by chadm424
...mount to hang my extruder and stepper to the top. this design allows you to pick up the stepper to load filament or troubleshoot.
thingiverse
free
E3Dv6 Holder V4 - Direct to Bowden Adapter by MarceloAMS
...
thingiverse
i remixed this fabulous e3dv6 carriage making possible the use of my e3dv6 direct drive extruder in a bowden setup.
thingiverse
free

Titan direct drive carriage front plate for C-Bot by ian_in_the_midlands
...owden option\c-bot bowden carriage rear plate (x1) ).
for the cooling fan ducts and bracket to mount the fans, see thing 2830838.
thingiverse
free

Athorbot Brother or Buddy E3D V6 Mount by Das_Faust
...er 25, 2017https://www.thingiverse.com/thing:2668564
you can get the belt mount, fan mount, bl touch mount from the original part
cg_trader
$3

TronXY X5SA Pro Direct Drive Extruder modification | 3D
...o direct drive extrusion. this bracket creates a platform to mount the extruder drive motor assembly above the extruder carriage.
thingiverse
free
Bowden Quick Connect Adapter Plates by ctchunter1
...tp://www.amazon.com/gp/product/b00we1a3d2/
i posted the full project on github.
http://github.com/ctchunter1/bowden-adapter-plate
thingiverse
free

C/D-Bot Direct Drive X-endstop Mount by pizzachef
...x endstop to the direct drive x-carriage which is similar to the arrangement spauda01 designed into his bowden x-carriage....
thingiverse
free

Anet A8 direct drive E3D X-carriage by Jori
...ve...
so i designed this replacement for the backing plate of x-carriage.
the front part as well as the fan shroud can be reused.
thingiverse
free
Anet A6 E3D V6 X Carriage Direct Drive and/or Bowden (Final) by chekcian
...d.
for fan duct, new fan bracket and proximity sensor bracket. please get them here :-
https://www.thingiverse.com/thing:2341588
Spiffcow
thingiverse
free

Parametric Stepper Bracket by spiffcow
... can choose how far away from the extrusion you want to mount your stepper motor so that it's flush with the leadscrew mount.
thingiverse
free

Giant Sorry game piece piggy bank by spiffcow
...son was obsessed with sorry, so i surprised him with a giant sorry game piece on his birthday. i also made a piggy bank version.
thingiverse
free

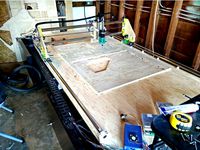
Portable Work Table by spiffcow
...2x bottomtop.step and 4x side.step.
and if you don't have a 4x4' or larger cnc, please consider my plastic monstrosity ;)
thingiverse
free

Parameterized Delta Effector by spiffcow
...s printed in place. for the other one, just detach it and turn it around, then attach it to the effector collar with an m3 bolt.
thingiverse
free
CNC Z Probe (Customizable) by spiffcow
...ll. the default settings work for a makita compact router with a 1/4" endmill, but you can edit the settings in customizer.
thingiverse
free

Bottom Frame Corners for Modified C-Bot by spiffcow
...metric v-slot corner bracket if you need to make any changes.
these should print without supports, but add them if you need them.
thingiverse
free

Span Support Generator for MPCNC rails by spiffcow
...mv.
the customizer view renders the the image a bit oddly. don't worry, the weird top and bottom tabs won't be printed.
thingiverse
free

Customizable Delta Push Rod by spiffcow
...re or wherever you can find them cheapest)
i used docpayce's effector and carriages: http://www.thingiverse.com/thing:1584513
thingiverse
free

Parametric V-Slot/T-Slot Power Supply Mount by spiffcow
...ses 10mm m3 bolts to attach to the common hobby power supplies, but you could easily change this up to mount an atx power supply.
thingiverse
free
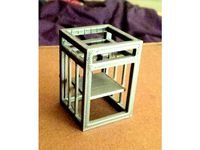
Gigantic Bastard CNC by spiffcow
...s for the round tubes and the belts.
side.dxf
this is the wooden panel that joins the mpcnc sliders to the root 2.1 short axis.
Corexy
thingiverse
free

CoreXY by Kaz_tech
...corexy by kaz_tech
thingiverse
this is the model of corexy platform. i separately put the parts on this place.
thingiverse
free

corexy plotter by tjwan
...corexy plotter by tjwan
thingiverse
parts for corexy mill inspired by http://der-frickler.net/technik/corexyportal
thingiverse
free
ScribbleJ CoreXY Beta by ScribbleJ
...j/corexy-v1https://github.com/scribblej/corexy-v1#corexy-beta
full gallery of development photos here: http://imgur.com/a/donun
thingiverse
free
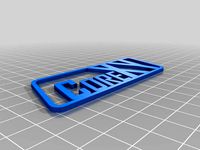
CoreXY Emblem by emkajot
...by emkajot
thingiverse
an emblem for your corexy printer.
size: 100mm x 38mm x 2mm.
update: added a version with a proper mount.
thingiverse
free

SolidCore CoreXY Carriage by shanehooper
...olidcore 3d printer. this design could be used in other corexy 3d printers.
also see:https://3ddistributed.com/corexy-3d-printer/
thingiverse
free
CoreXY 3D Printer Model by ReginaFabricam
...bricam
thingiverse
this is an original design of a corexy printer.https://www.tinkercad.com/things/jggr9qk4s4p-3d-printer-corexy
thingiverse
free

coreXY Upper structure Left
...corexy upper structure left
thingiverse
my customized corexy 3d printer upper left parts
thingiverse
free
CoreXY by frankie
...ing machines, etc. the design is described in greater detail at http://www.corexy.com . a video is at http://vimeo.com/40914530 .
thingiverse
free

Endstop block for CoreXY carriage by svkeulen
...endstop block for corexy carriage by svkeulen
thingiverse
endstop for corexy carriage
thingiverse
free
X carriage for the CoreXY MGN12 by hackerbijay
...x carriage for the corexy mgn12 by hackerbijay
thingiverse
x carriage for the corexy frame
Printer
archibase_planet
free

Printer
...inter
archibase planet
printer laser printer pc equipment
printer n120614 - 3d model (*.gsm+*.3ds) for interior 3d visualization.
archibase_planet
free

Printer
...rchibase planet
laser printer office equipment computer equipment
printer - 3d model (*.gsm+*.3ds) for interior 3d visualization.
turbosquid
$100

Printer
...er
turbosquid
royalty free 3d model printer for download as on turbosquid: 3d models for games, architecture, videos. (1487819)
turbosquid
$3

Printer
...turbosquid
royalty free 3d model printer for download as max on turbosquid: 3d models for games, architecture, videos. (1670230)
turbosquid
$1

printer
...turbosquid
royalty free 3d model printer for download as max on turbosquid: 3d models for games, architecture, videos. (1595546)
turbosquid
$1

printer
...turbosquid
royalty free 3d model printer for download as max on turbosquid: 3d models for games, architecture, videos. (1595105)
turbosquid
$10

Printer
...id
royalty free 3d model printer for download as max and 3dm on turbosquid: 3d models for games, architecture, videos. (1607146)
turbosquid
$7

Printer
...royalty free 3d model printer for download as ma, ma, and obj on turbosquid: 3d models for games, architecture, videos. (1644580)
turbosquid
$30

Printer
... available on turbo squid, the world's leading provider of digital 3d models for visualization, films, television, and games.
turbosquid
$20

Printer
... available on turbo squid, the world's leading provider of digital 3d models for visualization, films, television, and games.