Thingiverse
Sphere Painter by jam513
by Thingiverse
Last crawled date: 3 years ago
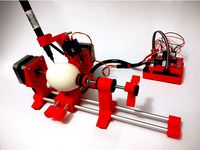
This is an Eggbot derivative that is a remix of the Egg Painter Mini by Thingiverse user Provlax.
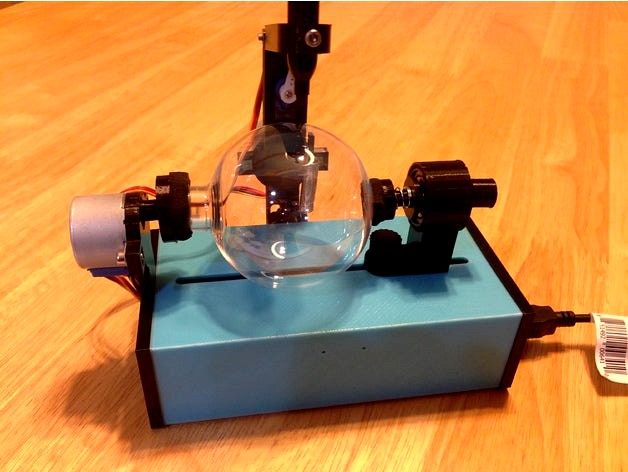
I have currently been using it for decorating Christmas ornaments like the one in the picture above. Prior to making this remix, I looked at a lot of Eggbot / Spherebot style robots available on Thingiverse. I liked how Provlax’s design used low cost components, fully enclosed the electronics, and could be powered over USB (when used with 5V motors). Additionally, I preferred how it looked compared to other designs.
While printing up Provlax’s design I began to make modifications, which I think might be useful. To help spread some holiday cheer (& give back to the open source community), I am sharing my modifications. I know the holiday season is rapidly approaching. Hopefully this is posted with enough time to make some ornaments before Christmas. If not, you can get an early start building it for decorating Easter eggs.
Printed Parts List
1 x 0000001.Case_Bottom-Remix.stl
1 x 0000002.Case_Top-Remix.stl
2 x 0000004.M5_Nut_Holder-Remix.stl
1 x 0000005.Axis_R-Remix.stl
1 x 0000006.Spring_Holder-Remix.stl
1 x 0000007.Axis_R_Holder-Remix.stl
1 x 0000008.Axis_R_Lock-Remix.stl
2 x 0000009.Bolt_Holder_Bottom-Remix.stl
2 x 0000010.Bolt_Holder_Top.stl
1 x 0000011.Axis_L_Holder-Remix.stl
1 x 0000012.Axis_L.stl
1 x 0000013.Hand_Holder-Remix.stl
1 x 0000014.Hand_Holder_Guide-Remix.stl
1 x 0000015.Hand_Holder_Guide_case-Remix.stl
1 x 0000016.Hand_H-Remix.stl
1 x 0000017.Hand_V-Remix.stl
1 x 0000018.Case_Right-Remix.stl
Modifications
As part of this remix, 16 of the 18 pieces which made up the original design were modified. A list of all of the changes is outlined below:
1) Case Bottom: All of the M3 Hex nuts were changed to M3 square nuts. Using square nuts allowed them to be captive on both sides, which should prevent a nut falling out of position during assembly. I also find using square nuts to be more forgiving when used with 3D printed designs. The hex shape seems to be harder to print accurately.
2) Case Top: All of the M3 hex nuts were changed to square nuts for the same reason as above. Additionally, the height of the enclosure was increased. This should allow for easier assembly, in that it provides more height for using those pre-made jumper wires commonly used with Arduino boards. Some of the Arduino UNO clones have lower component heights and extra headers than the original. This modification makes using the original Arduino Uno, with its fairly tall headers, and big DIP IC easier to work with.
UPDATE
The remixed Case Top piece contains the original holes used for a logo. I have left these holes in my design and have used them to hold a nameplate so that the machine can be personalized. This works well when the Sphere Painter is given as a gift. I was planing on making a customizable nameplate thing, but never got around to it. If you would prefer the top piece without the logo holes, Thingiverse user DamonJones has posted a remix with the holes removed here.
3) ProvLax’s PROBOT Logo (omitted): No Logo is included in this version.
4) M5 Nut Holder: The M5 Hex nut was changed to a square nut and made more captive. This should prevent the nut from ever falling onto the electronics inside the enclosure.
5) Axis R: I had a hard time locating the original spring used, so this piece was changed to be made thinner. That way I could use a spring from a 200 piece spring assortment kit I was able to easily obtain from my local budget hardware store (Harbor Freight). I have seen this same 200 piece spring kit available on Amazon, ebay, and other sites with slightly different packaging.
Example 1Example 2
6) Spring holder: Changed to fit with the modifications from 5.
7) Axis R Holder: Moved the bolt hole further away from the bearings. This helps with using slightly longer bolts. I did not have any M5x20mm bolts, and substituted it with an M5x25mm, which seemed more readily available.
8) Axis R Lock: Modified to work with the changes implemented on 5.
9) Bolt Holder Bottom: I stretched these in one axis to better fit over my M5x25mm bolt’s hex head. However, I think the M5 x25mm bolts have slightly higher hex heads.
10) Bolt Holder Top: No changes.
11) Axis L Holder: Increased the height of this part to match the height added in the modifications to piece 2. Additionally, the part was modified to use M3 square nuts that are captive.
12) Axis L: Added a captive square nut holder. In the original version, the set screw would force threads into the plastic. The plastic grooves were not very strong. This updated remix part relies on the square nut's threads for tightening to the motor shaft, which should produce a more reliable design.
13) Hand Holder: Modified to use M3 square nuts instead of hex nuts. The square nuts are captive.
14) Hand Holder Guide: This piece was elongated as part of a modification for parts 15 and 17. See 17 for more details.
15) Hand Holder Guide Case: This piece was elongated and a hook was added to it. This allows an optional spring to be added to improve accuracy. See 17 for details.
16) Hand H: An optional square nut was added to this piece to help hold the Pen. The hinge mechanism was changed from the nail/rivet to a M3 screw and a captive square nut. Additionally, this piece was lengthened to match the modifications applied to 14, 15, & 17.
The hand H piece was modified such that the square nut used to hold the pen could not fall down if the screw was completely removed.
17) Hand V: This piece received three significant changes. The first is the hinge mechanism mentioned above. The second is the servo motor mounting was changed to be in the middle of the part. This allowed for a more secure mounting of the servo motor using both screws in the middle of the piece. The third modification is the addition of a hook for use with an optional spring. The stepper motors used in this design seem to have some “wobble” or “play” in their mechanism. By adding a spring (which comes from the same 200 piece spring assortment kit used in 5) it seems like some of the “wobble” is reduced. To make room for the spring, some of the pieces mentioned earlier were elongated/stretched.
Added a captive square nut holder. In the previous version, the set screw would force threads into the plastic. The resulting plastic grooves were not very strong. This updated remix part relies on the square nut's threads for tightening to the motor shaft, which should produce a more reliable design.
18) Case Right: This piece was extended to match the height of the enclosure. Additionally, a little extra clearance was added to the connectors.
Adjusted the connector cut-outs to remove some of the excess space around connectors.
Bill of Materials (with changes for this remix indicated)
2 x 608zz Bearing
1 x 24mm Silicone, Rubber Gasket, Pads, or Cushions
1 x 15mm Silicone, Rubber Gasket Pads, or Cushions1 x Spring Diameter 9-15mm Length 17-20mm
1 x Compression Spring 3/8 x 3/4
This is the spring in Row 2 Column 2 from these generic 200 Piece Spring Assortment Kits:
1 x Spring Extension 5/16 x 1-1/4 (optional)
This is the spring in Row 3 Column 2 of the same spring kits linked above
1 x 2x18mm Iron Nail without a hat or Rivet
Replaced with M3 bolt and square nut. Quantities reflected in counts below.
2 x M5x20 Bolt
2 x M5x25mm Bolt2 x M5 Nut
2 x M5 Square Nut
I used the ones with the weird bronze tint. Typical caliper dimensions are 7.74mm x 7.81mm x 2.74mm (but listed as 8mm x 8mm x 3mm).
4 x M3x6 Screw
2 x M3x8 (optional for stepper motor shaft)8 x M3x10 Screw
5 x M3x12 Screw
4 x M3x16 Screw
1 x M3x20 screw12 x M3 Nut
16 x M3 square nut.
I used the ones with the weird bronze tint. Typical caliper dimensions are 5.36mm x 5.42mm x 1.78mm (but listed as 5.5mm x 5.5mm x 2mm).
4 x M3 Washer
12 x M2x5 Screw (self tapping)
1 x Arduino UNO
2 x ULN2003 Stepper Motor Driver Board
2 x or 28byj-48-5v (or 28byj-48-12v) Stepper Motor
1 x SG90 Micro Servo
1 x 12V DC Power Supply (not needed for 5v motors)
1 x USB Cable for connect to PC
2 x Arduino Jumper Wires (F-F)
10 x Arduino Jumper Wires (M-F)
3 x Arduino Jumper Wires (M-M)
1-3 zip ties (for cable management)
Assembly:
Provlax's Egg Painter Mini assembly documentation is very detailed and easy to follow.
I plan on eventually creating an assembly instructions document specifically for this remix. In the meantime, please reference Provlax's Egg Painter Mini Instructions here. I have outlined the changes needed to build this remix below.
1) Case: Push the square nuts into the top and bottom case pieces such that the hole of the square nut is concentric with the captive holders. I used pliers, and a small screw driver to position the square nuts into the cut-outs.
2) M5 square Nuts: Slide the square nuts into the M5 nut holder. Then slide them into the tracks on the top case.
Depending on the type of filament, you may notice a white crease where the plastic was bent. You can restore some of the original color by gently applying heat to the affected area.
3) Right Assembly: Similar assembly as the Egg Painter Mini.
4) left assembly: First install the square nut and M3x8 motor shaft set screw into the Axis L. Just catch the set screw for now. We will tighten it when we attaching it to the stepper motor shaft.
The rest of the Assembly is similar assembly as Egg Painter Mini.
5) Hand bottom: Some of the pieces are elongated, and the nuts are different, but the assembly is very similar to the Egg Painter Mini.
6) hand: First install the M3x8 motor shaft set screw and square nut. Just catch the screw for now. It will be tightened later, when this piece is attached to the stepper motor shaft.
Place the servo motor into the cut out in the hand vertical printed piece. Fasten the servo motor to the plastic using the mounting screws that came with the servo motor.
After the servo is mounted, install the smallest servo arm that came with the motor. Do not install the servo arm set screw (yet). With the servo arm side facing towards you, gently rotate the servo all of the way counter clockwise. Make sure no power is being applied to the servo while rotating the servo arm. When the servo arm stops, remove the arm and position it so it is pointing up. Then install the servo arm set screw.
Next install the square nut and screw that will hold the pen in the hand horizontal piece. Finally, installed the long 20mm M3 screw and square nut. Make sure the square nut is flush against the plastic and can not rotate while tightening.
Rotate the servo arm clockwise until it is out of the way. Slightly over-tighten the 20mm M3 hinge screw. Then slowly loosen the screw until the mechanism begins to move freely without binding.
The last portion of this step is to add the extension spring.
7 & 8) wiring: Similar assembly to Egg Painter Mini. Try to position and zip tie wires on the side opposite of the pen holder mechanism. In my first prototype, I made the stepper motor board closer to the Arduino the one attached to the egg stepper. I wired the stepper motor board further away from the Arduino to the pen holder stepper motor. Since this unit used 5V motors, and this Arduino board had an ICSP header, I was able to wire this using only jumper wires (without any soldering). Don't forget to use the jumper cables to extend the wires for the servo motor.
9) Final assembly: Similar assembly to the Egg Painter Mini.
Firmware / Software:
This remix uses the same firmware and software as Provlax's Egg Painter Mini. Download links for all of the necessary files are available on the thing page here.
Inkscape Settings:
Setup -> Pen up position 95
Setup -> Pen down position 85
Timing -> speed when pen is down 150
Timing -> Speed when pen is up 200
Timing -> Pen raising speed 5
Timing -> Delay after rising pen 50
Timing ->Pen lowering speed 5
Timing -> Delay after lowering pen 50
Options -> Reverse Motion of Motor 1 (pen) checked
Options -> Reverse Motion of Motor 2 (egg) checked
Options -> Egg x axis wraps around unchecked
Options -> Start with Pen Centered checked
Options -> Return home when done checked
Options -> Enable engraver if attached unchecked
Options -> Curve smoothing 0.2
Sample Ornaments:
Here is a sample (Eggbot - Elmo) ornament made on the Sphere Painter before painting the inside of the ornament.
Here is an example of some ornaments after painting the inside with white paint.
The design on the ornaments are by Thingiverse user R0b0Genius
The thing page for the Eggbot - Cookie Monster here.
The thing page for the Eggbot - Iron Man Mk3 is here.
The thing page for the Eggbot - Elmo design is here.
Sphere Painter Tips:
1) Sharpie ultra fine markers seem to work well.
2) Some of the designs for eggbots / spherebots have different dimensions and may need to be scaled to 4096 x 1100 to fill most of the ornament.
3) I place a line on all my sharpie markers that helps me make sure i place each marker in the holder at the same spot above the ornament.
4) Designs that are made up of many thin vertical and horizontal lines seem to work best.
Future Improvements:
There are some additional changes I would like to make to some of the printed pieces. These include changes primarily pertain to the Hand H, Hand V, and the axis L.
(UPDATES: 12-13-2017)
The Hand H, Hand V, and Axis L improvements are now posted.
Additionally, I think there may be some firmware changes that may help compensate for the mechanisms in these low cost stepper motors. These software updates will probably not be ready in time for this year's holiday season, but check back afterwords for future improvements.
Similar models
thingiverse
free

One Piece printed Eggbot/Spherebot by nalanengine
...ped it for the hextronik.
the arduino mounts directly to the frame. you can run the stepper motor wires within the printed frame.
thingiverse
free

Egg Painter Mini (Eggbot derivative) v1.1 by Provlax
..._serial.py on line 52 instead of "usb-serial ch340".
use template eggbot (file->new from template) for your drawing.
thingiverse
free

Sphere-O-Bot / Eggbot M3 Knob for Pen Holder by sixi
...ob needs some space, so i used a little longer skrew. but the 'original' m3 for the egg-bot also works fine for sharpies.
thingiverse
free
EggBot or Robot Easter eggs by Trigubovich
...ideohttps://www.youtube.com/watch?v=3zsbw9qmzk4
try to use a laserhttps://youtu.be/clexpbutbj8
refreshed parts from 26 march 2018
thingiverse
free

Nema17 peristaltic pump by Cristian2281
...mp and pin. rollers to be printed if not using mr105zz bearings.
this is still a work in progress and should be treated as such.
thingiverse
free

Easter egg painter helping hand by siddharta
...o gnd
it will work on a micro or nano as well, but you'll need an external 5v power supply for the stepper.
happy painting :)
thingiverse
free

Celestron C11 focuser by ym1964
...sed nano arduino with easydriver and eqfocuser to control the focuser
please see thing 4191869 for more details, it's a remix
thingiverse
free

Heavy Duty Pen Slider by Jonathan_K1906
...es an m4 screw and nut)
m3-without-nut-slot (uses an m3 screw, friction fit)
m4-without-nut-slot (uses an m4 screw, friction fit)
thingiverse
free

motor mount for a delta by Orange_OSOM
... fidget spinner),
1) m4 washer
1) m4 7.5mm screw (for barring) ,
2) m4 9.5mm screw (for fastining to frame),
2) m4 square nuts,
thingiverse
free
Arduino holder for egg-bot by duncan
...arduino holder for egg-bot by duncan
thingiverse
the holder for the arduino pcb for completely printable eggbot.

Sphere
3ddd
$1
sphere
...sphere
3ddd
sphere for interior
archibase_planet
free

Spheres
...spheres
archibase planet
balls spheres
spheres - 3d model (*.gsm+*.3ds) for interior 3d visualization.
archibase_planet
free
Sphere
...sphere
archibase planet
globe sphere
sphere n151009 - 3d model (*.gsm+*.3ds) for interior 3d visualization.
3d_export
$5

sphere
...sphere
3dexport
sfgsrybsrtfsz
turbosquid
$1

Sphere
...
turbosquid
royalty free 3d model sphere for download as max on turbosquid: 3d models for games, architecture, videos. (1235365)
3d_export
$5

pendant sphere
...pendant sphere
3dexport
pendant sphere
3d_export
$5

pendant sphere
...pendant sphere
3dexport
pendant sphere
3d_export
$5
pendant sphere
...pendant sphere
3dexport
pendant sphere
3d_export
$5

pendant sphere
...pendant sphere
3dexport
pendant sphere
3d_export
$5
pendant sphere
...pendant sphere
3dexport
pendant sphere
Painter
turbosquid
$25

Painters Signs
... available on turbo squid, the world's leading provider of digital 3d models for visualization, films, television, and games.
turbosquid
$5
Painter Cans
... available on turbo squid, the world's leading provider of digital 3d models for visualization, films, television, and games.
turbosquid
$24

painter cartoon lowpoly
...ter cartoon lowpoly for download as ma, unitypackage, and fbx on turbosquid: 3d models for games, architecture, videos. (1686753)
archive3d
free

Painter set 3D Model
...h brush paint
set painter n191213 - 3d model (*.gsm+*.3ds+*.max) for interior 3d visualization.
3d_ocean
$9

MatchBox Fire Painter
...using uv-noise-distortion to simulate fire motion ) and mix it with other images ( like a background ). render your final comp...
3d_export
$15
Painter Easel 3D Model
...den frame paint station drawing darkroom tools easels instrument creativity canvas
painter easel 3d model firdz3d 100290 3dexport
3d_export
free
painter tools - part 2
...nter tools maya version 2012 ( orginal file) fbx, obj all objects are grouped and named it easier to work with i hope you enjoy!
3d_export
$20

Palette and brush painter 3D Model
...palette and brush painter 3d model
3dexport
palette brush color wood
palette and brush painter 3d model imagebos 96330 3dexport
3d_export
$5

painter ease
...aterials are logically named<br>the main format is in 3ds max 2009.<br>satisfcation garranteed..<br>thank you !
3d_export
$10

still life with pears painter dmitry annenkov
...design and vizualizations. the original size of digital bas relief is 225x300x5 mm. 3d model can be scaled up or down. thank you!