Thingiverse
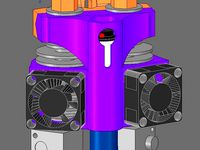
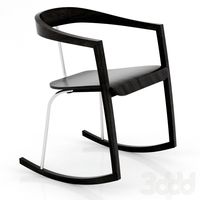
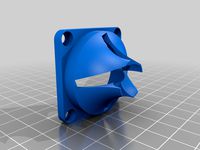
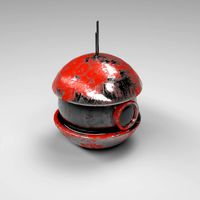
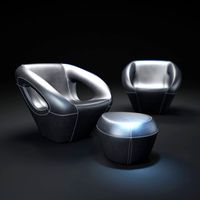
Space-efficient Probe-Ready 25mm Dual Fan Shroud (for E3D-V6 CLONE - differs slightly in dimmensions from original) by florinf-ro
by Thingiverse
Last crawled date: 3 years ago
UPDATE 03/02/2016: More of an FYI: the clone I have is slightly different from a genuine E3D-V6. I mostly posted this design for the idea. With DesignSpark Mechanical (the free tool I use), I became productive in under a day and could modify STLs.
I wish I had an E3D-V6 so I can design parts for it or at least have enough time to make it parametric but for now this is all I can do:)
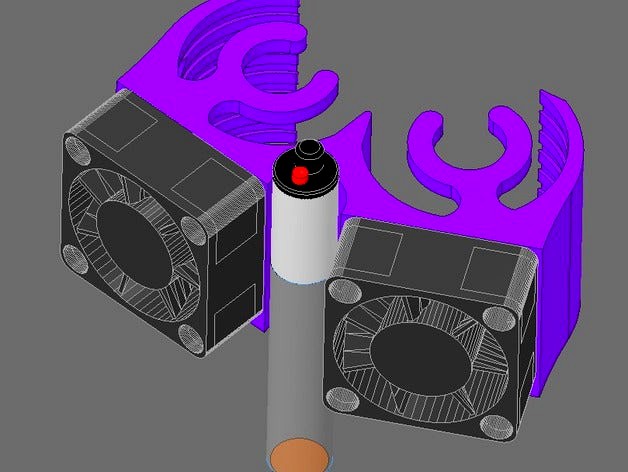
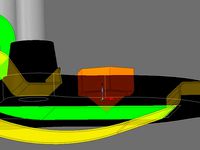
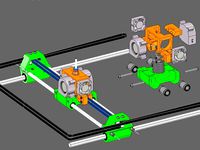
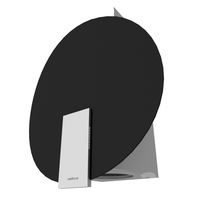
UPDATE 02/02/2016: Added a 12mm probe variant, as I couldn't find a capacitive probe (for non-metallic beds) smaller in diameter. As Inductive probes can be found for good prices from 6mm up, capacitive seem to come in two or three sizes, the smallest being 12mm. As you can see from the dimensioning picture, the distance to the nozzles is the same as with the 8mm version. Anyway I haven't seen a design that brings the probe this close to the nozzles.
Similar to my other Thing, the straight Dual 25mm Fan Shroud, this one makes it easy to accommodate an 8mm Inductive Proximity Probe without sacrificing too much space. Larger Probes can be accommodated but the distance from the nozzles would increase.
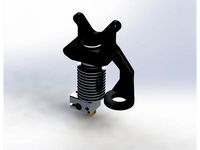
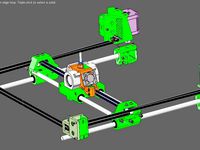
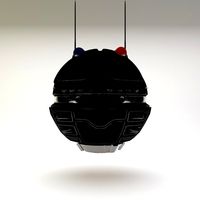
This should come together with a probe clamping part that you can design around it. I have included in the images a variation that I am developing for my Inductive Probe-based Dual Bowden Hotend Printer Head (The Corinthian).
The probe is at a minimum distance to the nozzles and i have included some dimensioning details. The ALU heater blocks should be angled as not to affect the probe with the emanated heat.
I will release the Corinthian Printer Head with more details when it will be ready.
NOTE that I haven't printed this part yet so I don't exactly know how it behaves but feel free to do it before me and post suggestions/improvements (I am including both STL and RSDOC -DesignSpark Mechanical- files).
Like my other shroud, this too should be installed by heating it with a hair dryer and snapping in place one hotend at a time.
I wish I had an E3D-V6 so I can design parts for it or at least have enough time to make it parametric but for now this is all I can do:)
UPDATE 02/02/2016: Added a 12mm probe variant, as I couldn't find a capacitive probe (for non-metallic beds) smaller in diameter. As Inductive probes can be found for good prices from 6mm up, capacitive seem to come in two or three sizes, the smallest being 12mm. As you can see from the dimensioning picture, the distance to the nozzles is the same as with the 8mm version. Anyway I haven't seen a design that brings the probe this close to the nozzles.
Similar to my other Thing, the straight Dual 25mm Fan Shroud, this one makes it easy to accommodate an 8mm Inductive Proximity Probe without sacrificing too much space. Larger Probes can be accommodated but the distance from the nozzles would increase.
This should come together with a probe clamping part that you can design around it. I have included in the images a variation that I am developing for my Inductive Probe-based Dual Bowden Hotend Printer Head (The Corinthian).
The probe is at a minimum distance to the nozzles and i have included some dimensioning details. The ALU heater blocks should be angled as not to affect the probe with the emanated heat.
I will release the Corinthian Printer Head with more details when it will be ready.
NOTE that I haven't printed this part yet so I don't exactly know how it behaves but feel free to do it before me and post suggestions/improvements (I am including both STL and RSDOC -DesignSpark Mechanical- files).
Like my other shroud, this too should be installed by heating it with a hair dryer and snapping in place one hotend at a time.
Similar models
thingiverse
free

E3D V6 Inductive Autolevel Probe Mount by oet
... inductive probe for auto bed leveling
for both single and dual hotends
see picture for measurements between hotend and the probe
thingiverse
free

E3D v6 fan holder with 12mm inductive probe mount by hindessm
...e3d v6 fan holder with 12mm inductive probe mount by hindessm
thingiverse
i needed a version for a 12mm inductive probe.
thingiverse
free

E3D clone fan shroud (40mm fan) by FuzzyBall
... attached solidworks file.
40mm fan
it has built in hotend cable manager!
in back of the shroud there is a place for a cable tie
thingiverse
free

IR Probe Mount for E3D V6 Shroud by rs4race
...
ir probehttps://miscsolutions.wordpress.com/mini-height-sensor-board/
e3d v6http://e3d-online.com/e3d-v6/full-kit/v6-3mm-direct
thingiverse
free

E3D v6 LM12UU x carriage by nikki81
...rse
lm12uu x carriage for a e3d v6 hotend and a 18mm dia inductive/capacitive proximity sensor
i have not yet tested this design
thingiverse
free

8mm probe mount for e3d by Gear206
...mount for e3d by gear206
thingiverse
allows to mount an 8mm inductive probe to the left side of an e3d v6 cooling fan.
enjoy ^_^
thingiverse
free

E3d Custom dual by Ashesman
...d v6 with 8mm linear bearings, cooling fan 40mm just mirror and print for other side. all should print with no or little support.
thingiverse
free

Clone E3D V6 40mm Fan Duct with ZipTie Clips V1 by bbilko
...
e3d v6 40mm fan snap on with zip tie tabs by rich1051414
should fit the 25mm clone e3d v6 hotend from the flsun i3 2017 model.
thingiverse
free

Fan shroud, dual cooling fan mounts, + ring LED mount for E3D v6 hotend. by TheKizard
...ll zip tie if necessary to keep shroud tight to hotend. (i haven't used it yet, but i included it in the design just in case)
thingiverse
free
D-bot E3D V6 3mm Bowden Hotend Mount with M12 Proximity Sensor by Cyrrus
...2 proximity sensor by cyrrus
thingiverse
d-bot e3d v6 3mm bowden hotend mount with m12 inductive or capacitive proximity sensor.
Florinf
thingiverse
free

Thumbwheel for jam-nuts (M5) by florinf-ro
...i don't know if anybody else would need this but nevertheless i have uploaded it to thingiverse for reference or convenience.
thingiverse
free
Compact Twin-Stand Shoe Rack by florinf-ro
... re-export the stl with your modifications.
i welcome suggestions and comments should you feel you have something to say/add/etc.
thingiverse
free
Odd Extrusion Profile Panel from Office Partitioning System by florinf-ro
...39;s not perfect match.
this is the post i opened on reprap forums for this question:http://forums.reprap.org/read.php?177,616175
thingiverse
free

Hunchback Bowden Extruder by florinf-ro
...ainst which the "shaft support thingie" -whatever it might be named- can press when the the tension bolt is tightened.
thingiverse
free
SCOUT Dual-Bowden Mount for E3D V6 CLONE Hotend (differs slightly from original dimensions) by florinf-ro
...er you'd like to design in front of your hotends. i have uploaded a 12mm probe housing that was designed into the half clamp.
thingiverse
free
![3D Printer Minimal X Carriage [#SCOUTcorexy design] by florinf-ro](/t/8857006.jpg)
3D Printer Minimal X Carriage [#SCOUTcorexy design] by florinf-ro
...me know if you want the inductive probe clamp too, or the directcontact probe maybe.
i have also attached the rsdoc of the mount.
thingiverse
free
Electro-Mechanical Direct-Contact, Independent Auto-leveling Probe by florinf-ro
...min on the arduino.
i have attached both stl and rsdoc.
reprap forums discussion here: http://forums.reprap.org/read.php?1,620626
thingiverse
free
SCOUTcorexy XY_Stage XCarriage !!10mm!! YCarriage 10mm HorizontalRods SingleHotend by florinf-ro
... undecided here];
tbd:
1) some way to remove wiggle/play from the linear bearings
2) design it for dual hotend
[...]
cheers,
flo.
thingiverse
free
8min print: Bear Cub Coffee Stencil (75mm-1Layer) | Also a First Layer Calibration thing :) by florinf-ro
... well as the design spark mechanical .rsdoc file (solid geometry) that you can use.
feel free to comment and make suggestions.
thingiverse
free
SCOUTcorexy XY_Stage XCarriage 8mm YCarriage 10mm HorizontalRods SingleHotend by florinf-ro
...d pretty quickly;
tbd:
1) some way to remove wiggle/play from the linear bearings
2) design it for dual hotend
[...]
cheers,
flo.
Dimmensions
3ddd
$1
Free_Gold Mosaic 90 x 90 cm
...90 x 90 cm 3ddd мозаика gold mosaic tile. dimmensions 90 x 90...
3ddd
$1

Azzardo Esperanza
...esperanza 3ddd azzardo , design , esperanza esperanza lamp dimmensions of 3d model d65 x...
3ddd
$1

Wall tile Tubadzin Colour violet / white
...плитка 3d model of wall tile from tubądzin colour. dimmensions 59,3cm x...
3ddd
$1

Azzardo Noble
...modern , lamp , noble azzardo noble lamp , dimmensions of 3d model d50cm x...
3ddd
$2
Last Night by Damien Langlois Meurinne
...meurinne http://loft-concept.ru/catalog/chandelier/lyustra_last_night_black/ http://www.dl-m.fr/mobilier/luminaires/last-night last night pendant by damien langlois meurinne dimmensions 1430 x 1430 x 1200 e27 - 18 x...
thingiverse
free

Prusa MK3(s) Bear upgrade PSU holder 115x50 (inner dimmension) by knobiks
...de psu holder 115x50 (inner dimmension) by knobiks
thingiverse
i needed a bit bigger version so this is 115x50 inner diamension
thingiverse
free
Cover by Hrii3y
...thingiverse just cover for cover something, u can change dimmensions at...
thingiverse
free

Jeremie 3D printable name. by jeremierx
...printable name. by jeremierx thingiverse name created in sketchup, dimmensions are mentioned in the...
thingiverse
free

Tape dispenser by lucibrandus
...thingiverse easy to print simple tape dispenser. for other dimmensions use .scad...
3d_sky
free

Free_Gold Mosaic 90 x 90 cm
...90 x 90 cm 3dsky mosaic gold mosaic tile. dimmensions 90 x 90...
Ro
3ddd
$1
RO-RO by Zilio Aldo
...ro-ro by zilio aldo
3ddd
zilio aldo
ro-ro by zilio aldo
turbosquid
$40

RO-RO military
... available on turbo squid, the world's leading provider of digital 3d models for visualization, films, television, and games.
design_connected
$18
Ro
...ro
designconnected
fritz hansen ro computer generated 3d model. designed by hayon, jaime.
3ddd
$1

RO by Fritz Hansen
... ro , fritz hansen
кресло ro от fritz hansen. текстуры в архиве.
turbosquid
$5

RO Table Lamp
...yalty free 3d model ro table lamp for download as max and fbx on turbosquid: 3d models for games, architecture, videos. (1658635)
3ddd
$1
RO-CHAIR-WOOD by Zilio Aldo
...ro-chair-wood by zilio aldo
3ddd
zilio aldo
ro-chair-wood by zilio aldo
turbosquid
$22

Ro Chair by Fritz Hansen
...el ro chair by fritz hansen for download as max, obj, and fbx on turbosquid: 3d models for games, architecture, videos. (1274002)
design_connected
$7
TIMO SARPANEVA & ANTONIO DA ROS Vases
...timo sarpaneva & antonio da ros vases
designconnected
timo sarpaneva & antonio da ros vases computer generated 3d model.
humster3d
$75

3D model of NSU Ro 80 1967
...uy a detailed 3d model of nsu ro 80 1967 in various file formats. all our 3d models were created maximally close to the original.
turbosquid
$15
KENT WATER PURIFIER SUPERB RO SMART
...urifier superb ro smart for download as ma, obj, fbx, and stl on turbosquid: 3d models for games, architecture, videos. (1322895)
Shroud
3d_export
$500

Centrifugal pump volute casing with impeller
...casing with impeller 3dexport volute casing with impeller and shroud ...
3d_export
$35
The Holy Face base relief 3D Model
...the holy face base relief 3d model 3dexport shroud turin veronica veronica's veil gospel ikon jesus holy face...
3d_export
$20
present car cloth presentation transport transportation shape concepts show celebration cover showro
...transportation shape concepts show celebration cover showroom covered revealin shroudd cover covering tarp draped fabric cloth showroom reveal revealing...
3d_export
$5

Lockheed F-117 Nighthawk lowpoly stealth bomber
...initial operating capability status in 1983. the aircraft was shroudd in secrecy until it was revealed to the public...
3d_export
$49
kriss vector gen 2 sub-d
...rear flip sight.<br>- vector ejection port.<br>- vector crb square shroud / 16"" sliencer.<br>- ds150 stock.<br>- .ma (maya 2020 ascii)<br>-...
3d_export
$10

vichy dining table
...in oak, sycamore and walnut marquetry.<br>even if the restaurant shroud the vichy in a long table cloth, two slender...
3d_export
$500

us navy pcu sterett ddg-104 arleigh burke class destroyer flight iia max
...the position has been shifted.<br>q. where are the exhaust shroud for the stacks?<br>a. since ddg-89, the exhaust system was...
thingiverse
free

shroud by samshay317
...shroud by samshay317
thingiverse
shroud
thingiverse
free

Fan Shroud
...fan shroud
thingiverse
this is a fan shroud for a 140mm fan
thingiverse
free
40mm fan shroud
...40mm fan shroud
thingiverse
40mm fan shroud
Probe
turbosquid
$25

Probe
... available on turbo squid, the world's leading provider of digital 3d models for visualization, films, television, and games.
turbosquid
$12
Mars probe space space exploration lunar probe
...be space space exploration lunar probe for download as max on turbosquid: 3d models for games, architecture, videos. (1630876)
turbosquid
$35
Space Probe
...osquid
royalty free 3d model space probe for download as c4d on turbosquid: 3d models for games, architecture, videos. (1571168)
turbosquid
$15
Space Probe
...osquid
royalty free 3d model space probe for download as obj on turbosquid: 3d models for games, architecture, videos. (1314864)
turbosquid
$25
Robot Probe
...y free 3d model robot probe for download as fbx, obj, and dae on turbosquid: 3d models for games, architecture, videos. (1537490)
turbosquid
$1

Dental Probe
...e 3d model dental probe for download as ma, obj, fbx, and stl on turbosquid: 3d models for games, architecture, videos. (1312400)
turbosquid
$60
Police Probe
... available on turbo squid, the world's leading provider of digital 3d models for visualization, films, television, and games.
turbosquid
$10

Dental Probe
... available on turbo squid, the world's leading provider of digital 3d models for visualization, films, television, and games.
turbosquid
$9

Space probe
... available on turbo squid, the world's leading provider of digital 3d models for visualization, films, television, and games.
turbosquid
free

Cassini Probe
... available on turbo squid, the world's leading provider of digital 3d models for visualization, films, television, and games.
E3D
turbosquid
$23

E3D - Google Home
... 3d model e3d - google home for download as max, obj, and c4d on turbosquid: 3d models for games, architecture, videos. (1192509)
cg_studio
free

e3d model
...e3d model
cgstudio
- e 3d model, royalty free license available, instant download after purchase.
turbosquid
$2

Syringe C4D (E3D Ready)
...lty free 3d model syringe c4d (e3d ready) for download as c4d on turbosquid: 3d models for games, architecture, videos. (1336720)
turbosquid
$12

Microphone USB E3D and C4D
...ree 3d model microphone usb e3d & c4d for download as c4d on turbosquid: 3d models for games, architecture, videos. (1568216)
turbosquid
$29

E3D - OnePlus 6 Black
...model e3d - oneplus 6 black for download as max, obj, and c4d on turbosquid: 3d models for games, architecture, videos. (1358534)
turbosquid
$29

E3D - Motorola One 2018
...del e3d - motorola one 2018 for download as max, obj, and c4d on turbosquid: 3d models for games, architecture, videos. (1358533)
turbosquid
$29

E3D - Disney MagicBands 2
...l e3d - disney magicbands 2 for download as max, obj, and c4d on turbosquid: 3d models for games, architecture, videos. (1355515)
turbosquid
$29

E3D - Samsung Z4 Smartphone
...e3d - samsung z4 smartphone for download as max, obj, and c4d on turbosquid: 3d models for games, architecture, videos. (1182179)
turbosquid
$23

E3D - Razer Phone model
...del e3d - razer phone model for download as max, obj, and c4d on turbosquid: 3d models for games, architecture, videos. (1231207)
turbosquid
$23

E3D - Alcatel Idol 5
... model e3d - alcatel idol 5 for download as max, obj, and c4d on turbosquid: 3d models for games, architecture, videos. (1212799)
V6
3d_export
$100

v6 engine
...engine
3dexport
complete v6 engine modeled on solidworks 2017 along with .stl, .sldprt and .sldasm of all th parts and assembly.
3d_export
$10

V6 engine
... the first v6 engines were designed and produced independently by marmon motor car company, deutz gasmotoren fabrik and delahaye.
3d_export
$35

v6 engine
...s a complete model of a v6 engine containing over 400 components. you can contact me for a video of all the components assembling
3d_export
$10

v6 engine
...v6 engine
3dexport
turbosquid
$25

Bed1001-v6
... available on turbo squid, the world's leading provider of digital 3d models for visualization, films, television, and games.
turbosquid
$22

Chair2-v6
... available on turbo squid, the world's leading provider of digital 3d models for visualization, films, television, and games.
turbosquid
$20

V6.mb
... available on turbo squid, the world's leading provider of digital 3d models for visualization, films, television, and games.
3d_export
$20

V6 engine
...rovided in this package is all the parts in sldprt format and assembly in sldasm format. i can also convert the format on demand.
3ddd
$1

Стол V6
...6" в стиле дизельпанк изготовлен из блока двигателя, 4х поршней и 4х шатунов.
столешница изготовлена из стекла толщиной 8мм.
cg_studio
$199

V6 VVTi3d model
...v6 vvti3d model
cgstudio
.3ds - v6 vvti 3d model, royalty free license available, instant download after purchase.
25Mm
turbosquid
$10

25MM Bullet
... available on turbo squid, the world's leading provider of digital 3d models for visualization, films, television, and games.
turbosquid
$1

SciFi Base for miniatures 25mm
...e 3d model scifi base for miniatures 25mm for download as stl on turbosquid: 3d models for games, architecture, videos. (1534684)
turbosquid
$7

Grenade Launcher Ammo 25mm
... available on turbo squid, the world's leading provider of digital 3d models for visualization, films, television, and games.
turbosquid
$7
Grenade Launcher Ammo 25mm ESP
... available on turbo squid, the world's leading provider of digital 3d models for visualization, films, television, and games.
3d_export
$5

phone holder
...handy phone holder, made of wood. cnc production. thickness 25mm dimensions ~...
3d_export
$5

3D Wine Bottle Storage Container
...parts. easy to print. full-scale bottle. the joint is 25mm ...
3d_export
$10

Type 96 3D Model
...type 96 3d model 3dexport antiaircraft type-96 25mm gun type 96 3d model ivan454 97528...
3d_export
$139

Hummer 3D Model
...autocannon cannon army djordje jovanovic 3dsmax 2010 hummer with 25mm chain-fed autocannon m242 bushmaster mounted on roof.extra bfgoodrich all-terrain...
3ddd
$1
ODESD2
...odes furniture type chair с2 specifications material(s): fabric, plywood 25mm dimensions width: 560mm depth: 550mm height: 780mm -author: язык_эйнштейна...
3ddd
free

ODESD2 chair C1
...odesd2 furniture type chair с1 specifications material(s): fabric, plywood 25mm dimensions width: 475mm depth: 550mm height: 780mm -author: язык_эйнштейна...
Efficient
turbosquid
$50

energy efficiency
... available on turbo squid, the world's leading provider of digital 3d models for visualization, films, television, and games.
3d_export
$10
Efficient Dynamic 3D Model
...efficient dynamic 3d model
3dexport
efficient dynamic bmw concept best
efficient dynamic 3d model akila 52142 3dexport
turbosquid
$29

Energy Efficiency 3
... available on turbo squid, the world's leading provider of digital 3d models for visualization, films, television, and games.
turbosquid
$29

Energy Efficiency 2
... available on turbo squid, the world's leading provider of digital 3d models for visualization, films, television, and games.
turbosquid
$29

Energy Efficiency 1
... available on turbo squid, the world's leading provider of digital 3d models for visualization, films, television, and games.
turbosquid
$12

Energy Efficient Lightbulb
... available on turbo squid, the world's leading provider of digital 3d models for visualization, films, television, and games.
turbosquid
$5

Energy Efficient LightBulb 04
... available on turbo squid, the world's leading provider of digital 3d models for visualization, films, television, and games.
3d_export
$19

BMW Efficient Dynamics 3D Model
...port fast tuning 2009 2010 2011 2012 germany cc r-line super power auto car
bmw efficient dynamics 3d model tokeno 29167 3dexport
turbosquid
$30

LEGO HIGH EFFICIENCY SERVO MOTOR
... available on turbo squid, the world's leading provider of digital 3d models for visualization, films, television, and games.
3d_export
$25

Energy Efficient Light Bulb 3D Model
...ealistic cinema 4d c4d standard green spiral efficient fixture helical
energy efficient light bulb 3d model xellow 58211 3dexport
Clone
3d_export
$5
Clones great republic
...clones great republic
3dexport
clones great republic.those same clones from the star wars movie universe.4 clones available.
3d_export
$10
Clone 3D Model
...clone 3d model
3dexport
clone woman girl female lady chamber sci fi
clone 3d model calcm1 51695 3dexport
turbosquid
$5

Clone machine
... available on turbo squid, the world's leading provider of digital 3d models for visualization, films, television, and games.
archive3d
free
Clone trooper 3D Model
...nd army soldier trooper
clone trooper 2 - 3d model (*.gsm+*.3ds) for interior 3d visualization.
turbosquid
free
Lego Clone Walker
...ree 3d model lego sw clone walker for download as max and fbx on turbosquid: 3d models for games, architecture, videos. (1292252)
turbosquid
$15
Clone trooper helmet
...d model clone trooper helmet for download as ma, obj, and fbx on turbosquid: 3d models for games, architecture, videos. (1199355)
archive3d
free

Clone trooper 3D Model
...and army soldier trooper
clonetrooper 3 - 3d model (*.gsm+*.3ds) for interior 3d visualization.
archive3d
free
Clone trooper 3D Model
...and army soldier trooper
clonetrooper 1 - 3d model (*.gsm+*.3ds) for interior 3d visualization.
3d_ocean
$35

Surface Clone C4D materials
...+ of the most well made materials for maxon’s cinema 4d; on the internet today. each material is crafted with a specific purpo...
turbosquid
$3

Sci-fi cloning vats
...cloning vats for download as 3ds, obj, wrl, x, fbx, and blend on turbosquid: 3d models for games, architecture, videos. (1290168)
Dual
turbosquid
free

Dual Pistols
...ls
turbosquid
free 3d model dual pistols for download as fbx on turbosquid: 3d models for games, architecture, videos. (1320360)
turbosquid
$2

Dual Axe
...urbosquid
royalty free 3d model dual axe for download as fbx on turbosquid: 3d models for games, architecture, videos. (1332372)
turbosquid
$10

Dual Lesaths
... available on turbo squid, the world's leading provider of digital 3d models for visualization, films, television, and games.
3ddd
$1

плитка Dual Bianco (Испания)
...й плитки venis dual (испания). технические качества: устойчивость к стирания, отличная геометрия, отсутствие проблем при укладке.
turbosquid
$35

Dual Mesh Fonts
...ree 3d model dual mesh fonts for download as ma, obj, and fbx on turbosquid: 3d models for games, architecture, videos. (1352989)
turbosquid
$29

Dual Flask with Bungs
...del dual flask with bungs for download as obj, fbx, and blend on turbosquid: 3d models for games, architecture, videos. (1210512)
turbosquid
$19

Dual Socket Plug
...3d model dual socket plug for download as obj, fbx, and blend on turbosquid: 3d models for games, architecture, videos. (1303912)
turbosquid
$13

Dual Adjustable Pulley
... available on turbo squid, the world's leading provider of digital 3d models for visualization, films, television, and games.
turbosquid
$10

Amoi N809 Dual
... available on turbo squid, the world's leading provider of digital 3d models for visualization, films, television, and games.
turbosquid
$5

Dual Turret Tank
... available on turbo squid, the world's leading provider of digital 3d models for visualization, films, television, and games.
Slightly
turbosquid
free

Fork slightly used
...bosquid
free 3d model fork slightly used for download as fbx on turbosquid: 3d models for games, architecture, videos. (1230401)
turbosquid
$19

Slightly Worn Leather Chair - Game/VR Ready
...hair - game/vr ready for download as 3ds, obj, fbx, and blend on turbosquid: 3d models for games, architecture, videos. (1275581)
3d_export
$5

teapot
...teapot 3dexport an ordinary kettle, slightly ...
3d_export
$5

depth chargemk9
...depth chargemk9 3dexport actual size may vary slightly ...
3d_export
$8

skippy cyberpunk2077
...hjke-11 yukimura “skippy”: a smartwith a unique voice-user interface. slightly ...
3d_export
$15

world war carrier
...model was made from akagi ship. however, it is slightly different from the...
3d_ocean
$3

Grass Hand Painted Texture Tile
...floor tile, one of healthy green grass, one of slightly subdued grass and the last is a slightly darker...
3d_export
$5
orthodontic aligners
...teeth. wearing them puts gentle pressure on the teeth, ever-so-slightly repositioning...
3d_ocean
$19

Cartoony Pirate Model
...caricature cartoony fantasy funny pirate pirate hat pirates a slightly caricatured, cartoonish pirate...
3d_ocean
$3
Striped Jersey 5
...seamless tilable jersey texture with bump and normal map. slightly ...
Fan
3d_export
$5

fan
...fan
3dexport
fan 3d model, table fan, fan, electric fan, ventilator
archibase_planet
free

Fan
...fan
archibase planet
fan large fan
fan out n260707 - 3d model for interior 3d visualization.
archibase_planet
free

Fan
...fan
archibase planet
fan ceiling fan ventilator
fan stealth n300615 - 3d model (*.gsm+*.3ds) for interior 3d visualization.
3d_export
$15

fan
...fan
3dexport
is an ancient fan
3ddd
$1

Fan-C-Fan by marco gallegos
...n-c-fan by marco gallegos
3ddd
вентилятор , marco gallegos
fan-c-fan by marco gallegos
3d_export
$10

fan
...fan
3dexport
a detailed fan designed for home or space blowing is now available for only 19.99!
turbosquid
$1

Fan
...fan
turbosquid
free 3d model fan for download as on turbosquid: 3d models for games, architecture, videos. (1427865)
turbosquid
$14

Fan
...fan
turbosquid
royalty free 3d model fan for download as on turbosquid: 3d models for games, architecture, videos. (1415642)
3ddd
$1

Светильник Fan
...светильник fan
3ddd
fan , italamp
светильник fan, производитель italamp
turbosquid
$25

Fan
...fan
turbosquid
royalty free 3d model fan for download as c4d on turbosquid: 3d models for games, architecture, videos. (1483246)
Differs
turbosquid
free
Different Chair
...id
free 3d model different chair for download as max and fbx on turbosquid: 3d models for games, architecture, videos. (1642013)
turbosquid
free

different rubbish
... available on turbo squid, the world's leading provider of digital 3d models for visualization, films, television, and games.
3d_export
$10

Different 3D Model
...different 3d model
3dexport
different 3d model wintik174 96497 3dexport
3d_export
free
three different type
...three different type
3dexport
three different type: mace, axe, sword
3d_ocean
$10

Different types of gears
... industrial parts machine gears machine parts mechanics parts round shape
different types of machine parts/gears made in blender.
turbosquid
free

Wires in different colours
...ires in different colours for download as blend, fbx, and obj on turbosquid: 3d models for games, architecture, videos. (1652797)
turbosquid
$6
3 Different Arrows
...3d model 3 different arrows for download as 3ds, obj, and fbx on turbosquid: 3d models for games, architecture, videos. (1478401)
turbosquid
$4

Four Different Vases
...odel four different vases for download as obj, fbx, and blend on turbosquid: 3d models for games, architecture, videos. (1484813)
3d_ocean
$3

8 Different Stone
...ures : low poly mesh & hand painting texture ~contain normal map ~different mesh have any problem? feel free to contact me...
turbosquid
$45

Different Food Products
... food products for download as blend, max, fbx, gltf, and obj on turbosquid: 3d models for games, architecture, videos. (1614198)
Space
3ddd
free
Space
... space , вытяжка
вытяжка elica space, производство elica evolution
3d_ocean
$19

Space station
...space station
3docean
space station
space station
3d_ocean
$7
Space Fighter
...space fighter
3docean
fighter space
space fighter
turbosquid
$5

space
...e
turbosquid
royalty free 3d model space for download as max on turbosquid: 3d models for games, architecture, videos. (1184221)
turbosquid
$2
Space
...turbosquid
royalty free 3d model space for download as blend on turbosquid: 3d models for games, architecture, videos. (1660625)
3d_ocean
$4
Space Station
...space station
3docean
habitat low poly ship space space ship space station vehicle
space station low poly modelled, not textured.
turbosquid
$2

Space
...royalty free 3d model space for download as max, fbx, and obj on turbosquid: 3d models for games, architecture, videos. (1644726)
turbosquid
$8

Space
...ty free 3d model space for download as c4d, 3ds, fbx, and obj on turbosquid: 3d models for games, architecture, videos. (1521166)
turbosquid
$160
space
... available on turbo squid, the world's leading provider of digital 3d models for visualization, films, television, and games.
turbosquid
$5

Space
... available on turbo squid, the world's leading provider of digital 3d models for visualization, films, television, and games.
Original
3d_export
free
original table
...original table
3dexport
this is an original table with on one side a metallic square and on the other side a wood cylinder
design_connected
$16
Original beanbag
...designconnected
photo-realistic 3d models of the fatboy original beanbag for 3d architectural and interior design presentations.
turbosquid
$15

Original Gun
...squid
royalty free 3d model original gun for download as obj on turbosquid: 3d models for games, architecture, videos. (1483511)
turbosquid
$10
original faucet
...ree 3d model original faucet for download as ma, obj, and fbx on turbosquid: 3d models for games, architecture, videos. (1243295)
turbosquid
$30
original-armchairs
... available on turbo squid, the world's leading provider of digital 3d models for visualization, films, television, and games.
turbosquid
$29

Baileys Original
... available on turbo squid, the world's leading provider of digital 3d models for visualization, films, television, and games.
turbosquid
$20

Original Chair
... available on turbo squid, the world's leading provider of digital 3d models for visualization, films, television, and games.
turbosquid
$20

original-armchair
... available on turbo squid, the world's leading provider of digital 3d models for visualization, films, television, and games.
turbosquid
$12
Original Chair_039
... available on turbo squid, the world's leading provider of digital 3d models for visualization, films, television, and games.
turbosquid
$10

Sofia Original
... available on turbo squid, the world's leading provider of digital 3d models for visualization, films, television, and games.
Ready
turbosquid
$51

ready
... available on turbo squid, the world's leading provider of digital 3d models for visualization, films, television, and games.
turbosquid
$15
Creature_pigman_print-ready
...model creature_pigman_print-ready for download as obj and ztl on turbosquid: 3d models for games, architecture, videos. (1283135)
3d_export
$10

alien ready for animation
...alien ready for animation
3dexport
alien 3d model ready for animation
3d_export
$10
Tractore Game Ready
...tractore game ready
3dexport
high poly game texture (tractor) game ready
3d_export
$5
Pickup TruckGame Ready
...pickup truckgame ready
3dexport
high poly game object (car) game ready
3d_export
free

tavern game-ready
...tavern game-ready
3dexport
game-ready tevern files: .fbx .blender .png
3d_export
$12

Game ready robot
...game ready robot
3dexport
black robot with a sword, game ready,melee,low poly,animetet
3d_ocean
$5
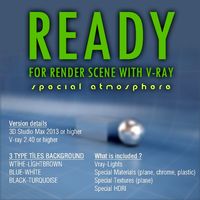
Ready for render scene
... 2013 or higher. need : 3d studio max 2013 or higher, v-ray 2.4 or higher, v-ray physical camera with d.o.f. – ready ! this much
3d_ocean
$20
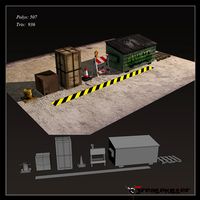
Game ready Props
...game ready props
3docean
box props
this are 3d game ready props….the archive contains textures and psd files…enjoy
3d_export
$5
Game-ready Cat
...game-ready cat
3dexport
game-ready low-poly animated cat<br>walk, run and hit animations