Thingiverse
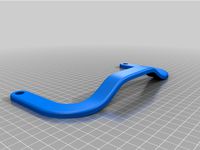
SOVOL SV01 Neoteck Digital Dial Indicator for bed comparateur fo
by Thingiverse
Last crawled date: 4 years, 3 months ago
I was inspired by /thing:3340644 and thing:3148230 and GlassCurtain : thanks to autors !
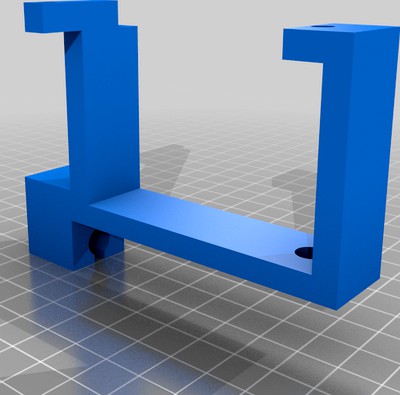
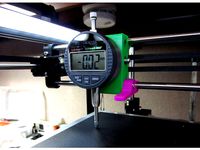
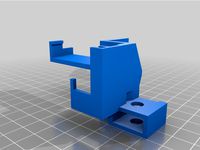
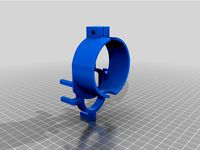
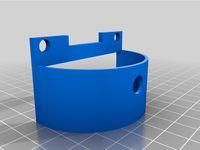
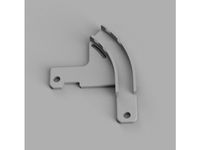
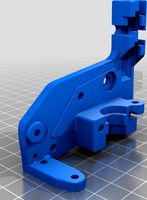
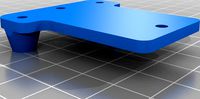
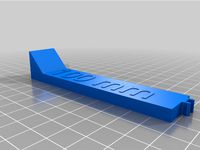
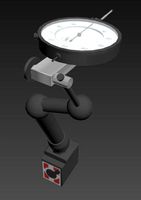
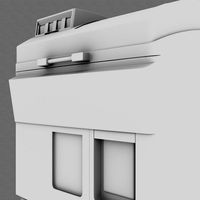
Print the STL horizontally (filled : 30% or more) with supports. Use one M3 and one M5 screws to fix it to Sovol SV01, near the extruder stepper (see photo)
I have added gcode for bedlevel procedure (originated from Federico Salis and Romeoknight, Many thanks !) and personalized it to support the SOVOL SV01.
"Put the gcode (SV01bedlevel_hot.gcode file) on your SD card and follow these 10 steps :
Start your printer (whithout your Digital Dial Indicator) and select the file "SV01bedlevel_hot.gcode" from your SD card.
The printer will auto home and heat up the heatbed to 60 degree celsius.
After bed has reached 60 degree, press the button on your Ender 3 display.
The nozzle will move into the first measure point at the front left corner of the heatbed. Use a piece of paper to manually set the nozzle height, but only with the bedlevel screw on the front left!
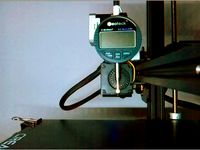
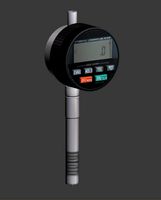
Meanwhile, install and switch on your Neoteck dial indicator.
Press the button again and the dial indicator probe will move near the spot you've just leveled. Now press the Zero button on the dial indicator! This front left corner is now your reference point (0.00mm).
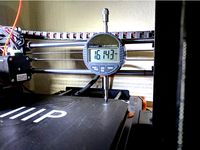
Press the (printer) button again and the dial indicator will move into every other corner and stop there, waiting for you to level each corner with it's corresponding bedlevel-screw, so that the dial indicator shows 0.00mm.
After each point, press the (printer) button.
The dial indicator will move into the center of the heatbed every now and then. Don't move any of the bedlevel screws here! This center measure is just for your information, so that you can get an idea of how much the heatbed is bent in the middle (i get values arround 0.05mm using a glass/mirror).
After all measure points are done, the printhead will move into the front left corner again. Don't use the bedlevel screw here, it's just your reference point again, it should still be in the area of 0.00 - 0.05.
Repeat the bedlevel procedure one more time, to make sure everything is fine.
Your heatbed is leveled now as perfect as possible for your setup!"
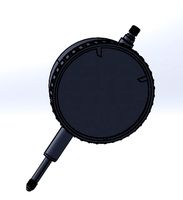
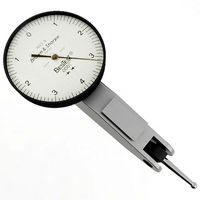
Neoteck digital dial indicator (0-12.7mm/0.01mm/0.0005') used for this thing :https://www.amazon.fr/gp/product/B07CMLYXCG/
Print the STL horizontally (filled : 30% or more) with supports. Use one M3 and one M5 screws to fix it to Sovol SV01, near the extruder stepper (see photo)
I have added gcode for bedlevel procedure (originated from Federico Salis and Romeoknight, Many thanks !) and personalized it to support the SOVOL SV01.
"Put the gcode (SV01bedlevel_hot.gcode file) on your SD card and follow these 10 steps :
Start your printer (whithout your Digital Dial Indicator) and select the file "SV01bedlevel_hot.gcode" from your SD card.
The printer will auto home and heat up the heatbed to 60 degree celsius.
After bed has reached 60 degree, press the button on your Ender 3 display.
The nozzle will move into the first measure point at the front left corner of the heatbed. Use a piece of paper to manually set the nozzle height, but only with the bedlevel screw on the front left!
Meanwhile, install and switch on your Neoteck dial indicator.
Press the button again and the dial indicator probe will move near the spot you've just leveled. Now press the Zero button on the dial indicator! This front left corner is now your reference point (0.00mm).
Press the (printer) button again and the dial indicator will move into every other corner and stop there, waiting for you to level each corner with it's corresponding bedlevel-screw, so that the dial indicator shows 0.00mm.
After each point, press the (printer) button.
The dial indicator will move into the center of the heatbed every now and then. Don't move any of the bedlevel screws here! This center measure is just for your information, so that you can get an idea of how much the heatbed is bent in the middle (i get values arround 0.05mm using a glass/mirror).
After all measure points are done, the printhead will move into the front left corner again. Don't use the bedlevel screw here, it's just your reference point again, it should still be in the area of 0.00 - 0.05.
Repeat the bedlevel procedure one more time, to make sure everything is fine.
Your heatbed is leveled now as perfect as possible for your setup!"
Neoteck digital dial indicator (0-12.7mm/0.01mm/0.0005') used for this thing :https://www.amazon.fr/gp/product/B07CMLYXCG/
Similar models
thingiverse
free

Dial Indicator Holder for Petsfang Bullseye by TheAllstar85
...e other corners.
important note:
remove the dial indicator before printing as it may damage the print, printer or dial indicator.
thingiverse
free

Bed Adjust tool by centerridge
...ust threaded rod to level bed. use z home to verify. move to back, should only need slight adjust to level, use z home to verify.
thingiverse
free

Prusa i3 Dial Indicator Mount by henryarnold
...d and do you normal z height adjustment. all four corners are level so no check should be needed other than the middle of the bed
thingiverse
free
HyperCube Dial Indicator Mount by henryarnold
...dial indicator i used although you can buy a similar unit from harbor freight.https://www.amazon.com and then search for "b01g9k8u5g"...
thingiverse
free

Dial Indicator holder Sovol SV03 printer by BSA-LLC
...ter to better level the bed. its made in several pieces for ease of printing and variability of people's own dial indicators.
thingiverse
free

Creality CR-10 use a Dial Indicator for Bed Leveling by zekitez
...the dial indicator 1 mm lower before returning to its position to level the bed.
the video is here : https://youtu.be/8yacwsjbhve
thingiverse
free
Bed Leveling Bracket by kbrint
...%2f0.00005%27%27+digital+probe+indicator+dial+test+gauge+range+0-25.4mm%2f1%27%27+dial+test+indicators+electronic+indicator+gauge
thingiverse
free

Leveling Gauge
...dimensions but will work on any 3d printer with similar specs. designed to replace the back of the navigator...
thingiverse
free
Waste Bucket Sovol SV01 Direct Drive Printer
...e sovol sv01 direct drive printer
you can replace it left or right or whatever position fix it but in horizontal position only...
thingiverse
free
Dial Indicator / Dept Gauge Bracket by ClausA
...gauge bracket is designed for a tevo tornado or similar 3d printers. it requires the purchase of a harbor...
Comparateur
thingiverse
free
Support de comparateur 3018
...support de comparateur 3018
thingiverse
je partage ce support pour monter un comparateur sur une graveuse 3018
thingiverse
free

anycubic i3 mega support comparateur by Pachypodium
...anycubic i3 mega support comparateur by pachypodium
thingiverse
support comparateur anycubic
thingiverse
free

support comparateur by franck4x4
...support comparateur by franck4x4
thingiverse
comparator support for artillery x1 or genius
thingiverse
free

SUPPORT POUR COMPARATEUR by FABYUCO
...support pour comparateur by fabyuco
thingiverse
a poser sur nema 17 avec wade extrudeur
thingiverse
free

Comparateur sur bed sidewinder X1 by lecureuil
...out d'un assistant pour le réglage du bed : comparateur monté sur une ventouse magnétique de support de téléphone de voiture.
thingiverse
free

Support Comparateur pour Creality CR10 by bGratia
...upport de comparateur pour creality cr10. permet de régler le plateau sans utiliser de câle entre l'extrudeur et le plateau.
thingiverse
free

bras de fixation pour le comparateur by maxdgdg
...utres cotés
ensuite, démonter le comparateur et vérifier l'espace de 0.25mm entre le nez et le lit grâce à un jeu de cales
thingiverse
free

Porte-outils rapide comparateur (dial indicator) by Matthieu13
...dran sur un porte-outil à changement rapide cnc a2z
il faut taraudé le trou central en m5
utilisez une vis m3 pour le comparateur
thingiverse
free

Support Comparateur sur AXE X by frogger1805
...ontalement.
requis en plus de l'impression, une vis m3x10 tete ronde
comme d'habitude, le fichier freecad est fournit :-)
thingiverse
free

Support comparateur pour RS-CNC32 by macandnews
...e
si vous aimez mon travail, vous pouvez me soutenir en faisant un don à l'adresse suivante :https://www.paypal.me/macandnews
Neoteck
thingiverse
free

FLYINGBEAR REBORN Comparator holder (NEOTECK) by SteSte88
...e original fan. (provisional method for alignment.)
the difference between the two components is only the spacing of the screws.
thingiverse
free

Neoteck 8233D Multimeter Holder by wermy
...ximum tidiness. :)
you can follow me on instagram to see other things i'm working on: http://www.instagram.com/sudomod_wermy
thingiverse
free

MP Mini Dial Indicator Mount Neoteck
... sure.
figure:
2------------3
1------------4 ---> ( 4 corners on the bed looking from above, corner 1 is home position)
thingiverse
free
Neoteck DTI Digital Dial Indicator Holder for Satsana 5015 Fan Shroud by FalseAlarm
...ur bed, no. however, it will remove some of the frustration with manually leveling before creating a mesh with auto bed leveling.
thingiverse
free
Ender 3 Direct Drive compatible Neoteck Digital Dial Indicator Side Mount by base4
...modify the design to your heart's content.
i am open to any suggestions as to how to improve the design work-flow in freecad.
thingiverse
free
Neoteck DTI Digital Dial mount for Anycubic i3 Mega S by CubbyNINJA
...can level your print bed precisely. saw a post on reddit, the file wasn't working so i made my own :). first upload, be kind.
thingiverse
free

Neoteck Dial Gauge Slot Mount Ender 3 Pro (2020/4040) by falo2k
...holder to each gantry. on the x gantry you can clip the gauge in horizontally or vertically as needed for each axis measurement.
thingiverse
free

AnyCubic i3 Dial Gauge Holder by ltlowe
...of https://www.thingiverse.com/thing:1445744 to fit anycubic i3 mega printer and neoteck ntk021 gauge. adjusted spacing for 8mm rails spaced 50mm...
thingiverse
free
Bed Leveling Bracket by kbrint
...only works when you are logged in to amazon: https://www.amazon.com/neoteckindicator-0-25-4mm-indicators-electronic/dp/b0793rz9zc/ref=sr_1_1?ie=utf8&qid=1521861943&sr=8-1&keywords=neoteck+dti+digital+dial+indicator+0.001%2f0.00005%27%27+digital+probe+indicator+dial+test+gauge+range+0-25.4mm%2f1%27%27+dial+test+indicators+electronic+indicator+gauge ...
Sv01
design_connected
$16

Svarga SV01 Carpet
...svarga sv01 carpet
designconnected
mischioff svarga sv01 carpet computer generated 3d model.
thingiverse
free

Sovol SV01 Rail Cover
...sovol sv01 rail cover
thingiverse
this is a rail cover for the sovol sv01 printer
thingiverse
free
Sovol SV01 BLTouch Mount
...sovol sv01 bltouch mount
thingiverse
bltouch mount for sovol sv01, nozzle offset of -33, -11.
thingiverse
free

Sovol SV01 Logitech C270 Mount
...sovol sv01 logitech c270 mount
thingiverse
camera mount for sovol sv01
thingiverse
free

Sovol SV01 Rail Cover by Flamingbrad
...sovol sv01 rail cover by flamingbrad
thingiverse
added sovol logo for sv01 users
thingiverse
free
Zugentlastung Kabelführung Sovol SV01 by pcmaik
...zugentlastung kabelführung sovol sv01 by pcmaik
thingiverse
kabelführung für den sovol sv01
thingiverse
free
Sovol SV01 BLT base by Sir_Stig
...sovol sv01 blt base by sir_stig
thingiverse
just a remix for a sovol sv01 baseplate.
thingiverse
free
Braket for Laser Module SV01 by Sovol
...ducts/laser-kits
sovol sv01: https://sovol3d.com/products/sv01-direct-drive-printer
sovol sv03: https://sovol3d.com/products/sv03
thingiverse
free

SV01 Damper Foot (Fully Printable)
...sv01 damper foot (fully printable)
thingiverse
a nice and easy fully printable damper foot for the sv01
made with pla and tpu
thingiverse
free
X-Axis template for Sovol SV01 by piervania
...x-axis template for sovol sv01 by piervania
thingiverse
x-axis template for sovol sv01
Sovol
thingiverse
free

Sovol Knob
...sovol knob
thingiverse
replacement knob for sovol sv01
thingiverse
free
Template for Sovol FEP Film by Sovol
...e
on the sovol fep film, you need to drip holes, this template will help you and give you the correct position of all the holes.
thingiverse
free

Sovol 3d printed Comb by Sovol
... printed comb is comfortable and hair safe to use, it will give you tha same using experience as the comb you order in the store,
thingiverse
free
sovol cover
...sovol cover
thingiverse
this will make a cover for the circuit board on the back of the sovol screen. use supports.
thingiverse
free
SOVOL Bedhandle
...sovol bedhandle
thingiverse
a bed handle for the sovol printer
use support
for stock springs and the 10mm yellow springs
thingiverse
free

Sovol Lighting Logo Sign by Sovol
...r with auto leveling :https://sovol3d.com/products/sv03
buy sovol pla&tpu filament : https://sovol3d.com/collections/filament
thingiverse
free
Sovol SV01 Rail Cover
...sovol sv01 rail cover
thingiverse
this is a rail cover for the sovol sv01 printer
thingiverse
free
Sovol SV01 BLTouch Mount
...sovol sv01 bltouch mount
thingiverse
bltouch mount for sovol sv01, nozzle offset of -33, -11.
thingiverse
free

Sovol dial knob with finger
...sovol dial knob with finger
thingiverse
knob for sovol sv01 control panel. same as other, just added a finger.
thingiverse
free
Sovol SV01 Logitech C270 Mount
...sovol sv01 logitech c270 mount
thingiverse
camera mount for sovol sv01
Fo
turbosquid
$1

Blue FO
... available on turbo squid, the world's leading provider of digital 3d models for visualization, films, television, and games.
turbosquid
free

kuma fo-8
... available on turbo squid, the world's leading provider of digital 3d models for visualization, films, television, and games.
3d_export
$6

SERIP AP1468-FO 3D Model
...468-fo sconce wall light
serip ap1468-fo 3d model download .c4d .max .obj .fbx .ma .lwo .3ds .3dm .stl deckorator 104147 3dexport
turbosquid
$19

TIE-fo space superiority fighter
...riority fighter for download as 3ds, obj, fbx, blend, and dae on turbosquid: 3d models for games, architecture, videos. (1351264)
3ddd
$1

SERIP AP1468-FO
... , serip
serip path leaf collection high resolution. габариты (вхшхг): 265 x 70 x 15 см
turbosquid
$18
3D model fo a buffet/small closet
... available on turbo squid, the world's leading provider of digital 3d models for visualization, films, television, and games.
3ddd
$1

Ванна Rexa Design Fonte 20 FO 2001
...ванна rexa design fonte 20 fo 2001
3ddd
rexa , ванна
1750х550х960
3ddd
$1

Гончарный круг электрический FO-3412
...ность 350 вт, гончарная тарелка выполнена диаметром 30 см. вес 27 кг. упаковочный размер 72 х 62 х 65 см.
производство: италия.
3d_export
$12

vacuum cleaner
...vacuum cleaner 3dexport vacuum cleaner fo ...
3ddd
$1
Тумба под ТВ Grilli
..., tv , тумба , тв , tv grilli 180807/fo тв тумба итальянской фабрики grilli, коллекция rondo, tv grilli...
Dial
3ddd
$1

Hidra Dial
...a dial , биде , унитаз
hidra dial унитаз + биде
turbosquid
$30
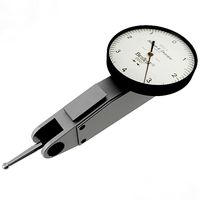
Dial Indicator
...ree 3d model dial indicator for download as 3ds, max, and obj on turbosquid: 3d models for games, architecture, videos. (1302779)
3d_export
$7
dial indicator
...r is any of various instruments used to accurately measure small distances and angles, and amplify them to make them more obvious
turbosquid
$99

Phone Dialing
... available on turbo squid, the world's leading provider of digital 3d models for visualization, films, television, and games.
turbosquid
$25
Dial Indicator
... available on turbo squid, the world's leading provider of digital 3d models for visualization, films, television, and games.
turbosquid
$15

Dial Indicator
... available on turbo squid, the world's leading provider of digital 3d models for visualization, films, television, and games.
3d_ocean
$12
Old Rotary Dial Telephone
...ial phone telephone
this is a model of a rotary dial telephone made in cinema4d file contains the following files: .obj .c4d .3ds
3ddd
$1

Dialing kitchen
...зон , базилик , лук
polys: 48 893
verts: 54 349
3d_export
$45
Dial Indicator 3D Model
...tion metalworking hurco indicating geometric dimensioning tolerancing bridgeport
dial indicator 3d model plutonius 63521 3dexport
turbosquid
$38

Sun Dial 3ds
... available on turbo squid, the world's leading provider of digital 3d models for visualization, films, television, and games.
Indicator
3ddd
$1
Indice Sofa
...indice sofa
3ddd
indice sofa , roche bobois
indice sofa roche bobois
archive3d
free
Indicator 3D Model
...sor indicator pointer
indicator n130508 - 3d model (*.gsm+*.3ds) for interior 3d visualization.
turbosquid
$26
Km indicator
...squid
royalty free 3d model km indicator for download as max on turbosquid: 3d models for games, architecture, videos. (1153786)
turbosquid
free

Road Indicator
...d
royalty free 3d model road indicator for download as blend on turbosquid: 3d models for games, architecture, videos. (1299938)
turbosquid
$30
Dial Indicator
...ree 3d model dial indicator for download as 3ds, max, and obj on turbosquid: 3d models for games, architecture, videos. (1302779)
3d_export
$7
dial indicator
...r is any of various instruments used to accurately measure small distances and angles, and amplify them to make them more obvious
turbosquid
$3

Power Indicator
...ree 3d model power indicator for download as ma, obj, and fbx on turbosquid: 3d models for games, architecture, videos. (1143828)
turbosquid
$50

altitude indicator
... available on turbo squid, the world's leading provider of digital 3d models for visualization, films, television, and games.
turbosquid
$50

Digital Indicator
... available on turbo squid, the world's leading provider of digital 3d models for visualization, films, television, and games.
turbosquid
$25
Dial Indicator
... available on turbo squid, the world's leading provider of digital 3d models for visualization, films, television, and games.
Bed
3ddd
$1

bed
...bed
3ddd
bed , постельное белье
bed
3ddd
$1

bed
...bed
3ddd
bed , постельное белье
bed
3ddd
$1

bed
...bed
3ddd
bed , постельное белье
bed
3ddd
$1

bed
...bed
3ddd
bed , постельное белье
bed
3ddd
$1

bed
...bed
3ddd
bed , постельное белье
bed
3ddd
$1

bed
...bed
3ddd
bed , постельное белье
bed
3ddd
free

bed
...bed
3ddd
bed , постельное белье
bed
3ddd
free

bed
...bed
3ddd
bed , постельное белье
bed
3ddd
$1

Bed
...bed
3ddd
bed , постельное белье , постель
bed
3d_export
$7

bed adairs bed
...rs bed
3dexport
bed adairs bed in modern style. if you want a smoother surface, please turn on turbosmooth in the modifier list.
Digital
turbosquid
$20
Digits
...available on turbo squid, the world's leading provider of digital 3d models for visualization, films, television, and...
turbosquid
$79

Digital piano
... available on turbo squid, the world's leading provider of digital 3d models for visualization, films, television, and games.
turbosquid
$70

Digital Cameras
... available on turbo squid, the world's leading provider of digital 3d models for visualization, films, television, and games.
turbosquid
$50
Digital Indicator
... available on turbo squid, the world's leading provider of digital 3d models for visualization, films, television, and games.
turbosquid
$49

Digital Clock
... available on turbo squid, the world's leading provider of digital 3d models for visualization, films, television, and games.
turbosquid
$49
Digital Printer
... available on turbo squid, the world's leading provider of digital 3d models for visualization, films, television, and games.
turbosquid
$39

Digital scales
... available on turbo squid, the world's leading provider of digital 3d models for visualization, films, television, and games.
turbosquid
$25
Digital Durometer
... available on turbo squid, the world's leading provider of digital 3d models for visualization, films, television, and games.
turbosquid
$25

Digital Scales
... available on turbo squid, the world's leading provider of digital 3d models for visualization, films, television, and games.
turbosquid
$25
Digital 21
... available on turbo squid, the world's leading provider of digital 3d models for visualization, films, television, and games.