Thingiverse
Soldering Helping Hands Remixed³ by wavexx
by Thingiverse
Last crawled date: 3 years, 1 month ago
Soldering Helping hands, re-re-remixed
A further evolution of the re-remix, based on this, inspired by this which originated from this. Phew..
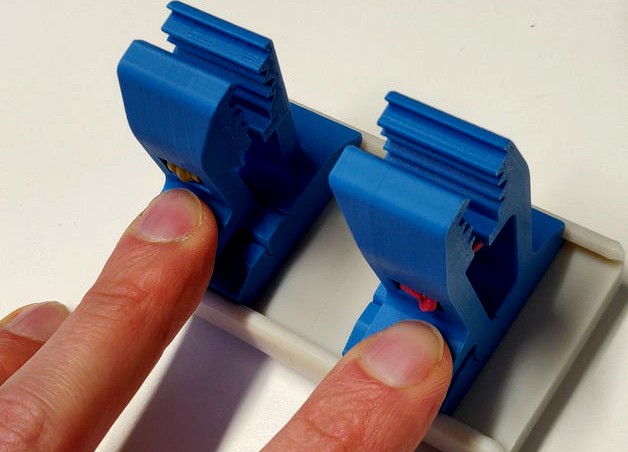
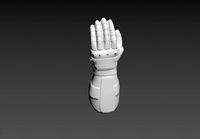
Third-hand designed to solder wires and/or component leads, featuring:
Adjustable distance between the clamps
Weighted support for stability (using 2x 40x80x2mm steel bars)
Ample space around the soldering job
Different clamp teeth for varying grip/hold
Press-down to open for improved ergonomics
Printing
Optimized for a 0.4mm nozzle, 0.2mm layers, 3 perimeters, 15-20% infill. No supports required.
Several printing options are available:
hands_full_plate.stl contains all printable parts. You'll need two 40x80x2mm steel bars to be used as weight and two short elastic bands.
hands_clamps_only.stl contains only the clamps. If you already printed the previous remix the base is compatible and can be reused (the new base differs just by slightly improved feet).
hands_solid_base.stl contains the full base as a solid single piece. If you don't care about the weight, you can print this along with hands_clamps_only.stl. Printing vertical is recommended: some friction provided by layer lines is beneficial.
hands_solid_core.stl can be used as a template for the weight size or printed in order to join the two hollow bases until you have the required hardware.
Assembly
Assembly is trivial. Fit two 40x80x2mm steel bars stacked on top of each other on one end of the base:
If the fit is not tight, a dab of hot glue is recommended in order to keep the base steady. The base has four thin feet to avoid wobble, however adding adhesive rubber pads is still recommended to avoid sliding.
Fitting the elastic on the clamps is more annoying. Use some packing wire and wrap a short elastic around it, making as many turns as required (more turns = stiffer clamp):
Bend the wire into an U shape, then insert the wire into one hole of the clamp:
Insert the pin between the elastic loops (hold it from both sides using your fingertips), then pull the wire to drag it fully into the slot:
Join the articulated lever, then repeat:
Pull on the wire to make space for the second pin into the elastic, then release.
Open and close the clamp a few times to test it. If it's too hard, remove one loop from the elastic. If it's too soft, add a loop instead. Remove the packing wire when satisfied.
A further evolution of the re-remix, based on this, inspired by this which originated from this. Phew..
Third-hand designed to solder wires and/or component leads, featuring:
Adjustable distance between the clamps
Weighted support for stability (using 2x 40x80x2mm steel bars)
Ample space around the soldering job
Different clamp teeth for varying grip/hold
Press-down to open for improved ergonomics
Printing
Optimized for a 0.4mm nozzle, 0.2mm layers, 3 perimeters, 15-20% infill. No supports required.
Several printing options are available:
hands_full_plate.stl contains all printable parts. You'll need two 40x80x2mm steel bars to be used as weight and two short elastic bands.
hands_clamps_only.stl contains only the clamps. If you already printed the previous remix the base is compatible and can be reused (the new base differs just by slightly improved feet).
hands_solid_base.stl contains the full base as a solid single piece. If you don't care about the weight, you can print this along with hands_clamps_only.stl. Printing vertical is recommended: some friction provided by layer lines is beneficial.
hands_solid_core.stl can be used as a template for the weight size or printed in order to join the two hollow bases until you have the required hardware.
Assembly
Assembly is trivial. Fit two 40x80x2mm steel bars stacked on top of each other on one end of the base:
If the fit is not tight, a dab of hot glue is recommended in order to keep the base steady. The base has four thin feet to avoid wobble, however adding adhesive rubber pads is still recommended to avoid sliding.
Fitting the elastic on the clamps is more annoying. Use some packing wire and wrap a short elastic around it, making as many turns as required (more turns = stiffer clamp):
Bend the wire into an U shape, then insert the wire into one hole of the clamp:
Insert the pin between the elastic loops (hold it from both sides using your fingertips), then pull the wire to drag it fully into the slot:
Join the articulated lever, then repeat:
Pull on the wire to make space for the second pin into the elastic, then release.
Open and close the clamp a few times to test it. If it's too hard, remove one loop from the elastic. If it's too soft, add a loop instead. Remove the packing wire when satisfied.
Similar models
thingiverse
free

Soldering Helping Hands Re-Remix
... base has two thin legs to avoid wobble which will get you started. however i still added four thin rubber pads to avoid sliding.
grabcad
free

Solder Organizer
...50 grams.
as a result you get really compact and solid organizer which will help you avoid the mess on your workshop's desk.
thingiverse
free

Electrical Wire Spool
... pieces, the hole in the cylinders are lined up. if they're not, you can't attach the beginning of the wire to the spool.
thingiverse
free

Soldering Cable Holder by apexskier
...lder. it avoids damage that can be cause by alligator clips on a helping hand.
printing time lapse – https://youtu.be/nhj6ezel46e
thingiverse
free

Weighted Soldering hand Base by PrintAddiction
...as well will add later.
prints with base flat on build plate no supports
requires cooling lines
1 3/4 x bolts course thread bolt
thingiverse
free

Reversible Elastic Band PCB vice vise by Hagster
...b vice is ideal for holding your parts.
an optional cable clamp can be used to hold wires and cables in place while you solder.
thingiverse
free

Soldering iron tip cleaner, steel wire container by szalat
...dering-solder-iron-tip-cleaner-cleaning-steel-wire-with-stand-set-soldering-iron-stand/32580430800.html
you need only steel wire.
thingiverse
free

Wire Coupler
...r to avoid shorts.
these should be used as an alternative when soldering is impossible, or if you have to make quick connections.
thingiverse
free
Helping Hand Base - Soldering Assistant by HJW012
...t x 4 (required)
m3 nut x 4 (required)
rubber feet x 8 (not required)
weight x 1 (not required)
helping hand x 8 (required) (duh)
thingiverse
free
solder reel stand by Jaisl
...xt element, but the fitment is tight enough to just press fit the elements together. main body is printed in pla, and feet in tpu
Wavexx
thingiverse
free
Petri Dish Cap by wavexx
...cap by wavexx
thingiverse
a simple cap for a standard petri dish.
in this case it was printed in black to act as a light shield.
thingiverse
free
STM32 Nucleo F4 / F4* bumper by wavexx
...stm32 nucleo f4 / f4* bumper by wavexx
thingiverse
super-simple, minimal bumper for the st nucleo f4* boards.
thingiverse
free

Tarantula display hanging hooks by wavexx
...arantula display to a vertical surface, such as the side of a cabinet. the hooks must be glued (i used strong double-sided tape).
thingiverse
free

Cat Stand for IPhone 5 by wavexx
...r it wins on cuteness alone.
stretch on z as desired. might hold other mobiles, however getting the right fit can be challenging.
thingiverse
free

Piston Keychain (press-fit version) by wavexx
...required! i used a vice:
https://youtu.be/d8rxq-3lft8
tested with petg, 0.2 layers, 0.4 nozzle, 2 perimeters, no infill required.
thingiverse
free

GM328 Transistor-tester battery holder by wavexx
...around the pcb (<0.1mm gap). push firmly the pcb until it snaps into place. m3 screws can be directly fastened on the support.
thingiverse
free

Sausage Dipole Antenna mount by wavexx
...up. when satisfied, line the interior with silicone and close shut.
be sure to take an action shot during the first comm-check ;)
thingiverse
free

Zassenhaus coffee grinder Sliding Cap by wavexx
...ate freely, with just a little bit of friction.
petg with 0.4 nozzle, 0.2 layer height, 4 perimeters and 100% infill recommended.
thingiverse
free

Orange Scientific Comfopette screw-cap v2 by wavexx
...ue. please note the correct orientation of the teeth by looking at the images (same as provided in the model: teeth lining down).
thingiverse
free

IFlight XL5 BN-880 GPS holder by wavexx
... support holes (these are press-fit) until the bottom faces are flush. once screwed back in place the holder/gps is fully locked.
Soldering
3d_export
$6

Solder toy
...solder toy
3dexport
solder toy arnold render
3d_export
$6
Automatic soldering machine
...automatic soldering machine
3dexport
automatic soldering machine
turbosquid
$10
Solder Tools
...rbosquid
royalty free 3d model solder tools for download as on turbosquid: 3d models for games, architecture, videos. (1624226)
turbosquid
$1
Solderer simple
...squid
royalty free 3d model solderer simple for download as on turbosquid: 3d models for games, architecture, videos. (1171836)
turbosquid
$2
tin for soldering
...free 3d model tin for soldering for download as blend and fbx on turbosquid: 3d models for games, architecture, videos. (1689841)
turbosquid
$1
Soldering Iron
...ty free 3d model soldering iron for download as obj and blend on turbosquid: 3d models for games, architecture, videos. (1447146)
3d_export
$15

Solder 3D Model
...model 3dexport solder fusible metal alloy join melt melting soldering iron electronic gun alloys tin lead electrical wire coil...
turbosquid
$14

Soldering iron
...d model soldering iron for download as 3ds, max, obj, and fbx on turbosquid: 3d models for games, architecture, videos. (1389924)
turbosquid
$13
Soldering station
...el soldering station for download as blend, fbx, obj, and stl on turbosquid: 3d models for games, architecture, videos. (1552016)
turbosquid
$5
Steel solder
... available on turbo squid, the world's leading provider of digital 3d models for visualization, films, television, and games.
Remixed³
turbosquid
$5

MODA Collection Remix Chair
... available on turbo squid, the world's leading provider of digital 3d models for visualization, films, television, and games.
3d_export
$12

remix yamaha rm1x
...remix yamaha rm1x
3dexport
geometry triangles 15.2k vertices 7.6k pbr no textures 1 materials 1 uv layers yes
3d_ocean
$5

Vray fabric Kvadrat remix green - tileable
...th vray and 3dsmax. high-resolution texture images (2000×2000 px) file included: shader vray 2.40 texture image 3ds max 2011 file
turbosquid
$20

Gerrit Rietveld 1938 Zig Zag Chair Remix
... available on turbo squid, the world's leading provider of digital 3d models for visualization, films, television, and games.
3d_export
$10

multicolored remix parametric table furniture
... fbx, obj, mtl, archive with textures. the model has no glitches. render and materials - vray . without using plugins. good use!
3ddd
$1

Barovier&Toso / Manhattan Remix 7192
... 004293-142405
в коллекции есть люстры 7, 9, 12 рожковые. диаметр соответственный 1000, 1250, 1500 мм.
3ddd
$1

Muuto fiber chair
...ture/black, nature/oak, remix 133/grey, remix 183/black, remix 643/dusty red, black silk leather/black, cognac silk leather/black
3ddd
$1

Barovier&Toso 7190-7195
...лочнай люстра фабрики barovier&toso;, коллекция manhattan remix, артикул 7190-7195.
размеры в inches: 39" 1/2wх26"h
3d_export
$5

3D Locking Handle Weatherproof Storage Box Container
... silicone to make a watertight seal. original box: https://cults3d.com/en/3d-model/gadget/3d-locking-rugged-storage-box-container
cg_studio
$49

HTC One Mini 2 Amber Gold3d model
...bj .mb .lwo .fbx .c4d .3ds - htc one mini 2 amber gold 3d model, royalty free license available, instant download after purchase.
Hands
3d_export
$8
hand
...hand
3dexport
fantasy hand
3d_export
$5

hand
...hand
3dexport
male hand
3d_export
$5
hand
...hand
3dexport
realistic male hand
3d_export
$5

hand
...hand
3dexport
hand with nails and structure
archibase_planet
free

Hand
...hand
archibase planet
hand
hand n190111 - 3d model (*.gsm+*.3ds) for interior 3d visualization.
3ddd
$1

Hand
...hand
3ddd
hand
модель руки будды
3d_export
$5

hand
...hand
3dexport
it is my wrist of hand and this is on 3d sculpt
3d_export
$5
hand
...hand
3dexport
realistic male hand obj file
3d_export
$7

hand-006 rigged hand
...hand-006 rigged hand
3dexport
rigged right hand 3d model additional textures for pbr rendering included
3d_ocean
$6
Hand
...poly rigged texture two this 3d models of the hands made in 3ds max, has textures(.jpg), materials(.mat), rigged, the...
Helping
3d_export
$5

Woman offering help
...woman offering help
3dexport
woman offering help
3ddd
$1

COUPLE STATUE man help
...couple statue man help
3ddd
статуэтка
couple statue man help
turbosquid
free

help wanted biplane banner.blend
... available on turbo squid, the world's leading provider of digital 3d models for visualization, films, television, and games.
turbosquid
$7
German soldier ww2 help wounded G5
... 3d model german soldier ww2 help wounded g5 for download as on turbosquid: 3d models for games, architecture, videos. (1687738)
turbosquid
$3
Uttermost Helping Hand Nickel Plated Bookends
... available on turbo squid, the world's leading provider of digital 3d models for visualization, films, television, and games.
3d_export
$45

3d Printable May I Help YOu sign STL OBJ 3D Model
...ntable sign may help you mall airport public sidnaique
3d printable may i help you sign stl obj 3d model sidnaique 48477 3dexport
3d_export
free
Diamond Ring
...diamond ring
3dexport
blue diamond ring. who needs help in 3d, please contact, i will be glad to help.
3d_export
$15

police badge photorealistic pbr low-poly
...police badge photorealistic pbr low-poly
3dexport
need help, support, or questions? contact me, i'll be happy to help.
3ddd
$1
Door
...door
3ddd
двери
hope it helps .
3d_export
$15

Prototype version of the robot assistant
...a person in a variety of tasks, both in helping in the garden and in armed...