Thingiverse
SMuFF - Servo Variant
by Thingiverse
Last crawled date: 5 years, 4 months ago
Here we go again...
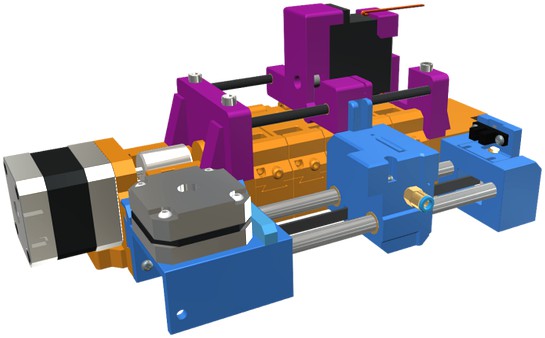
This is a new option (or variant) of the SMuFF Revolver.
The first pictures above depicts the complete SMuFF with this new option.
In the 2nd, 3rd and 4th picture you'll see all the new parts needed.
If you don't know what a SMuFF could possibly be, head over to the main project and read all about it.
What's the gist?
Using a servo instead of the original Revolver comes with some benefits:
Less parts to print and assemble
easier to maintain if something gets stuck
more precise pressure point on the upper Bondtech gear (means less interlocking and binding)
not restricted to "only" 9 materials (make it as big as you need)
Here you can see it in action:https://youtu.be/uA2HJwa0xys
I've been stress testing the whole unit, just to make sure it's worth posting. The test ran continuously for 32.5 hours (whereas 24 hours was my goal), as you can see in the screenshot above.
In this time it performed a mind blowing 7383 tool (filament) changes. In real life, this would compare to a almost 1.5 meter tall 3D printed something with one tool change per layer (at 0.2 layer height).
BOM
To build this thingy, you'll need:
The printed parts
A standard size servo
A servo horn (preferably Aluminium) with an overall length of 27 mm
An step down converter (to generate the 5-7V needed to drive the servo)
Two rods, 5mm in diameter (either steel, brass or - the preferred one carbon fiber)
4 self tapping screws 2.9 x 9.5 mm (for the servo)
2 self tapping screws 2.2 x 6.5 mm (for the lid)
A M3 x 6mm screw to mount the servo horn to the servo
the latest firmware version for the SMuFF (on Github)
What else?
The parts are named the same way as the parts in the main project (SMuFF). R stands for Revolver with a "-Servo" suffix (whereas this - from a technical perspective - isn't a Revolver anymore but I'll keep the term just to confuse you). So it's pretty easy to spot which parts are to be replaced.
If you're going to build the SMuFF, or you already have built one, please notice that you'll need the "new controller", based on the SKR mini V1.1, which is shown here.
Assembly
Not much to say here. Connect all parts together, screw the servo to its position and place it on top of the Feeder-Assembly.
Hints
For a better motion, I've used a brass tube, 6 mm OD / 5.1 mm ID as a bushing on the rod facing the selector. The rear hole has no bushing but I've drilled it out to around 5.5 mm.
It seems a bit wiggly but it doesn't bind while the Selector moves left/right.
The step down converter is needed, because the SKR mini V1.1 doesn't deliver enough power to drive the servo directly. Since the controller itself runs on 12/24V, it's easy enough to split the power input and feed the step down converter too.
Set the output of the step down converter to a decent voltage, according to your servos specs (i.e. 7V). Keep in mind, the higher the voltage on the servo, the faster it moves and the more torque it has.
Firmware setup
To switch from the default Revolver to the servo version, go to the Settings->Steppers->Revolver menu and set Use Servo to Yes. Also, you have to define the On/Off positions of the servo in degrees in Servo open and Servo closed
Testing
After you've assembled this variant, go to the Testrun menu and select the Selector test script to make sure everything is running smoothly and there's no binding between Selector and servo carriage.
Update 1
I've added the parts for the mini servo version of this thingy.
I wasn't convinced at all, that a mini servo has enough force to work as expected but, as you can see in the video, I proved myself wrong in a test run of over 24 hours.
The main benefit - beside it's not as bulky as the other one - is that the cable management is better by far.
If you'd like to switch from the standard sized servo to the mini servo version, you only have to print the new 3 parts and you're ready to go.
The servo horn shoe I've added helps to put more pressure onto the lid as well as to get the right distance between servo horn and lid. I've glued mine onto the servo horn with a distance of 8.5 mm measured in between the top of the horn shoe and the bottom of the servo carriage.
To get the right distance of the horn shoe, you may have to shave off a bit of the servo horn.