Thingiverse
SmartRap Metal Plates by SkyRider
by Thingiverse
Last crawled date: 3 years ago
Ok against my better judgement I am posting these for your guys to look at. Details:
1) The V2 file is just an idea of how things would fit. The blocks on which the pulleys are are just there for illustration, as are the pillow blocks. I would be using a spacer in between the pillow blocks as that is far easier.
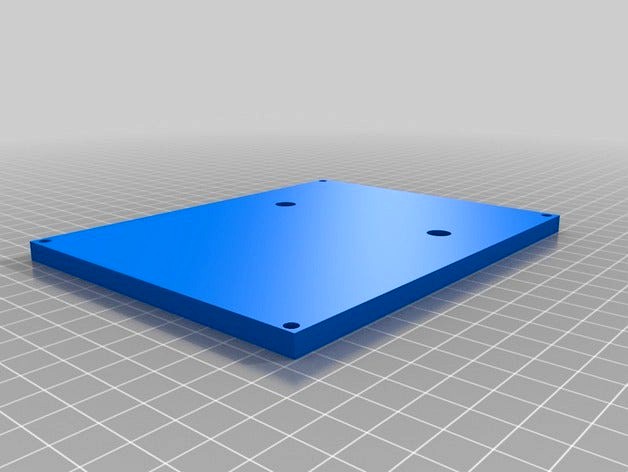
2) The V3 and the bottom plate allow me to 'sandwich' the vertical motors between them. That's the extruder, Z and X axis motors.
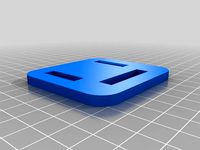
3) Some slot mounts on the screws in the corners allow me to slot 'walls' which turn the bottom of the SmartRap into a box and allows me to put rubber feet
4) I am using a Melzi which is currently mounted under my table, but can now be mounted inside the box and introducing a CNC-ed 'wall' that has openings for the SD card, power connection, reset switch and whatever else I feel like. This makes the machine look more 'professional'
5) I am machining this out of 6mm Aluminum plate. I like 6061-T6 for corrosion resistance and strength. Why? Because I plan a head that holds a Dremel tool extension to allow me to CNC and laser engrave with this machine. So, ignore the fact that my STLs show 6.4mm, that was just so I can overlay it on top of the original plastic plate STLs.
6) The intent is NOT to print these plates, rather, any printed version is simply to act as a template/guide to use on my material. If one of you prints a set of these plates, test fits steppers, rods and pillow blocks (you can get a sample from thing 178531) and lets me know before Thursday, I will make a set of plates for you. If all fits well anyone who wants a set of aluminum plates can contact me directly. The material costs $21 (which includes shipping) and say throw in another $15 and I'll send you plates back. BUT do not do so until we know all the holes line up and we determine that you can bolt on the extruder.
7) I left out the holes for the AirTripper, but that's next. My intent is to test make one, take one of my standalone AirTripper's and bolt that on. I will then add the holes for that. I am also considering the all metal Printrbot extruder which I have as well.
8) After these plates, I will address Plate X. I already have a design but I haven't tweaked it yet.
9) Ultimately my SmatRaps will be all metal and if you choose to use this your End-Ys will NOT WORK. You will need to redo these to line up with the pillow blocks. Again, give me time to get it done. Based on what I am seeing, your X-ends will likewise need to change. My intent, again, is to make that all metal too.
As you will have guessed, I like metal. A lot. And if you guys give me enough encouragement, I will be making kits and assembled versions available. This in addition to 2 other designs I have already prototyped. But please understand that this is not meant to be printed for production use....you can certainly try, but caveat emptor.
Samer
Update: I uploaded a new file to make 4 corners that can be printed or machined to allow for the introduction of walls.
Update: Just uploaded some modified Y-Ends. You could use what you already have and drill a new hole, or use these. These are printable, but I will be uploading metal versions which are flat pieces later today. Those will be machined out of 6mm aluminum plate as well.
Another Update: Ok so I've uploaded the machinable Y ends. For these, you will see I added a belt clamp. The holes are 3mm, and I suggest you tap these holes so you don't have to use nuts and so can make adjustments with just one tool (like an allen key). On the thin edge of these, drill and tap 2 holes so that you can screw in a table. I also made these ends 6" long to fully support a table and allow you to mount end stops and whatever else you want. I didn't put holes for those because there are so many out there, you can choose what you want to do.
Update 04/19/14:I have machined 2 sets of plates, one for me and one for Chris M who is also in the SmartRap world. The plates work out well, but I need to revisit my design for the corners. I should just have a set that slips right over the edges. This is because the Z- axis motor is really close to the edge and one of the holes for it is really close to the corner holes. What's that you say? You want me to make you a set? Why sure, but give me a week or so to wrap up this build.....
Update 04/21/14: As you can see I now have walls. Those were printed and I will post them shortly. You will also need 4 clamps to hold the 8mm rods in place, and those I had to print as well because the metal ones I have are slightly too large. I might be able to cast replacements at some point. Later this week I will post the X plate which will be made with 26ga aluminum sheet and angle. That just leaves 2 more printed parts, the X ends. The Y ends will be replaced with aluminum angle. More details: the pillow blocks are pre-tapped for #6-32 screws, so you don't need nuts and can cut those down to disappear inside the pillow blocks. The holes should be reamed out to an oval shape 'downwards' (away from the back of the top plate) to accommodate variations in hole positions on the steppers and to allow for alignment of the pillow blocks. 3/16" should do fine -- use washers to distribute the load. The RAMPS board can go inside the box and you can choose to add walls of your own and mount an LCD right on there, or print something suitable and bolt it on (I will do this for mine and post an example). Finally, put rubber feet on the bottom to give it some traction.
Update 4/23/14: Made some progress today. I am going with a Melzi instead of a RAMPS because I want to put a Panelolu 2 LCD controller on it like my original SmartRap. I cut 2 pieces of 1"x1"x1/8" angle at 9" each to make up the Y ends. You have to drill 6 holes in each. 2 big holes drilled oversize for the 8mm rod (you need some play for alignment) and 4 (2 per clamp) for the rod clamps, which I include here. What that mounted, the only thing left is to mount your end stop. For that, choose a location for the end stop and mount it on the base plate, then mount a screw secured with 2 nuts at the angle. This is your adjustment for the end stop. You can move the screw back and forth to adjust where you tap switch gets hit. Next up, the X Plate....again.
Update 06/12/14: I posted some additional pictures. As you can see the printer is almost done. What I did was add acrylic walls, although I have also provided someone with aluminum walls. This completely encloses the 'guts' and allows you to hide unsightly wiring. This week we wrap up the build and install the Sanguilolu board (instead of the full RAMPS just for aesthetics). I should have the milling attachment installed next week. I am also using an excellent non servo based autoleveling system as designed by quick61 (thing 301007). The laser engraver attachment will use a variation of this, as will the CNC head.
Update 6/18/2014: Some of you have asked for the SVGs of the plates. Here they are. Please note that you should drill the holes for mounting the steppers oversize to accommodate my ineptitude and variations in manufacture. Also if you guys are interested in latest developments, please see this: http://3dprint.com/6202/3-in-1-3d-printer-cnc-machine/
1) The V2 file is just an idea of how things would fit. The blocks on which the pulleys are are just there for illustration, as are the pillow blocks. I would be using a spacer in between the pillow blocks as that is far easier.
2) The V3 and the bottom plate allow me to 'sandwich' the vertical motors between them. That's the extruder, Z and X axis motors.
3) Some slot mounts on the screws in the corners allow me to slot 'walls' which turn the bottom of the SmartRap into a box and allows me to put rubber feet
4) I am using a Melzi which is currently mounted under my table, but can now be mounted inside the box and introducing a CNC-ed 'wall' that has openings for the SD card, power connection, reset switch and whatever else I feel like. This makes the machine look more 'professional'
5) I am machining this out of 6mm Aluminum plate. I like 6061-T6 for corrosion resistance and strength. Why? Because I plan a head that holds a Dremel tool extension to allow me to CNC and laser engrave with this machine. So, ignore the fact that my STLs show 6.4mm, that was just so I can overlay it on top of the original plastic plate STLs.
6) The intent is NOT to print these plates, rather, any printed version is simply to act as a template/guide to use on my material. If one of you prints a set of these plates, test fits steppers, rods and pillow blocks (you can get a sample from thing 178531) and lets me know before Thursday, I will make a set of plates for you. If all fits well anyone who wants a set of aluminum plates can contact me directly. The material costs $21 (which includes shipping) and say throw in another $15 and I'll send you plates back. BUT do not do so until we know all the holes line up and we determine that you can bolt on the extruder.
7) I left out the holes for the AirTripper, but that's next. My intent is to test make one, take one of my standalone AirTripper's and bolt that on. I will then add the holes for that. I am also considering the all metal Printrbot extruder which I have as well.
8) After these plates, I will address Plate X. I already have a design but I haven't tweaked it yet.
9) Ultimately my SmatRaps will be all metal and if you choose to use this your End-Ys will NOT WORK. You will need to redo these to line up with the pillow blocks. Again, give me time to get it done. Based on what I am seeing, your X-ends will likewise need to change. My intent, again, is to make that all metal too.
As you will have guessed, I like metal. A lot. And if you guys give me enough encouragement, I will be making kits and assembled versions available. This in addition to 2 other designs I have already prototyped. But please understand that this is not meant to be printed for production use....you can certainly try, but caveat emptor.
Samer
Update: I uploaded a new file to make 4 corners that can be printed or machined to allow for the introduction of walls.
Update: Just uploaded some modified Y-Ends. You could use what you already have and drill a new hole, or use these. These are printable, but I will be uploading metal versions which are flat pieces later today. Those will be machined out of 6mm aluminum plate as well.
Another Update: Ok so I've uploaded the machinable Y ends. For these, you will see I added a belt clamp. The holes are 3mm, and I suggest you tap these holes so you don't have to use nuts and so can make adjustments with just one tool (like an allen key). On the thin edge of these, drill and tap 2 holes so that you can screw in a table. I also made these ends 6" long to fully support a table and allow you to mount end stops and whatever else you want. I didn't put holes for those because there are so many out there, you can choose what you want to do.
Update 04/19/14:I have machined 2 sets of plates, one for me and one for Chris M who is also in the SmartRap world. The plates work out well, but I need to revisit my design for the corners. I should just have a set that slips right over the edges. This is because the Z- axis motor is really close to the edge and one of the holes for it is really close to the corner holes. What's that you say? You want me to make you a set? Why sure, but give me a week or so to wrap up this build.....
Update 04/21/14: As you can see I now have walls. Those were printed and I will post them shortly. You will also need 4 clamps to hold the 8mm rods in place, and those I had to print as well because the metal ones I have are slightly too large. I might be able to cast replacements at some point. Later this week I will post the X plate which will be made with 26ga aluminum sheet and angle. That just leaves 2 more printed parts, the X ends. The Y ends will be replaced with aluminum angle. More details: the pillow blocks are pre-tapped for #6-32 screws, so you don't need nuts and can cut those down to disappear inside the pillow blocks. The holes should be reamed out to an oval shape 'downwards' (away from the back of the top plate) to accommodate variations in hole positions on the steppers and to allow for alignment of the pillow blocks. 3/16" should do fine -- use washers to distribute the load. The RAMPS board can go inside the box and you can choose to add walls of your own and mount an LCD right on there, or print something suitable and bolt it on (I will do this for mine and post an example). Finally, put rubber feet on the bottom to give it some traction.
Update 4/23/14: Made some progress today. I am going with a Melzi instead of a RAMPS because I want to put a Panelolu 2 LCD controller on it like my original SmartRap. I cut 2 pieces of 1"x1"x1/8" angle at 9" each to make up the Y ends. You have to drill 6 holes in each. 2 big holes drilled oversize for the 8mm rod (you need some play for alignment) and 4 (2 per clamp) for the rod clamps, which I include here. What that mounted, the only thing left is to mount your end stop. For that, choose a location for the end stop and mount it on the base plate, then mount a screw secured with 2 nuts at the angle. This is your adjustment for the end stop. You can move the screw back and forth to adjust where you tap switch gets hit. Next up, the X Plate....again.
Update 06/12/14: I posted some additional pictures. As you can see the printer is almost done. What I did was add acrylic walls, although I have also provided someone with aluminum walls. This completely encloses the 'guts' and allows you to hide unsightly wiring. This week we wrap up the build and install the Sanguilolu board (instead of the full RAMPS just for aesthetics). I should have the milling attachment installed next week. I am also using an excellent non servo based autoleveling system as designed by quick61 (thing 301007). The laser engraver attachment will use a variation of this, as will the CNC head.
Update 6/18/2014: Some of you have asked for the SVGs of the plates. Here they are. Please note that you should drill the holes for mounting the steppers oversize to accommodate my ineptitude and variations in manufacture. Also if you guys are interested in latest developments, please see this: http://3dprint.com/6202/3-in-1-3d-printer-cnc-machine/
Similar models
thingiverse
free

Modified Y-Ends for SmartRap by SkyRider
...orks fine. i would suggest that this part is now deprecated and you should download the new one for smartrap from the main site.
thingiverse
free

SmartRap 4.6 from GitHub as plates (RAMPS and J-Head) by SkyRider
... around this problem, i wrap my lm8uu bearings with some blue tape (2 passes is enough) and that locks the bearings down solidly.
thingiverse
free

Corner plate by ClausJ
...plate, and for the fixing to the wall.
the corner plate is 7mm. thick.
i have added a .stl with 4 pieces for printing, if needed.
thingiverse
free

Lamp Extender by craftcadet
...and so my prints are not perfect. doing this thing helped me get my bearings around my printer and understand some of its quirks.
grabcad
free

Projector Screen Clamp
... the bottom of the clamp for the screen to be pulled down. will update again when the printed clamps are finished and installed.
thingiverse
free

Wades Extruder with MK5 by jballard
...nd, maybe not your printer, and it may not function, use at your own risk. i will up load pics later, and will update as needed.
thingiverse
free
Gopro chestmount backplates by patatie4
...e mount so you can stick an official mount on it.
if you have ideas to make it better, please comment so i can update the file.
thingiverse
free

Rigidbot Extruder Plate Risers for mounting E3D hotends by Sactocal
...riginal can be still downloaded at the wiki.
i use m3 x 35 machine screws for the risers. i purchased them at a local hobby shop.
grabcad
free

Custom CNC machine Gantry with 240mm Z-Axis stroke
...39;s your call, put it wherever you like just add the necessary components to facilitate how you plan to mount it. that is all...
thingiverse
free

SmartRap Plate by SkyRider
...at night. once more part had to be flipped on its side (the lm8uu holder) because of too much overhang for us fdm printer users.
Skyrider
thingiverse
free

Ariane rocket cut for printing by SkyRider
... printing by skyrider
thingiverse
i took the original and cut it for printing. next step: make a flying model rocket out of it.
thingiverse
free

608 Bearing Support by SkyRider
... it works very well. i am posting it here at the request of @fjn777. i can also share it on tinkercad if you want to modify it.
thingiverse
free

TP Rocket Remix by SkyRider
... not flown this...yet, but it should not be too far removed from the original. also added a longer nose cone for a sleeker look.
thingiverse
free

TIE Fighter Interior Wing by SkyRider
...at is the same in the movies. simply glue these on the thin half wings and you will have a suitable cavity for the cockpit arms.
thingiverse
free

Starship Model Rocket Fin Can for BT-55 tube by SkyRider
...p model rocket fin can for bt-55 tube by skyrider
thingiverse
fits perfectly on a bt-55 tube and takes a d-engine mount exactly.
thingiverse
free

8mm Rod Clamp by SkyRider
...;s simple enough to scale this up or down. primarily used on my all-metal smartrap before i tore it down to build an mprime one.
thingiverse
free
SmartRap Plate by SkyRider
...at night. once more part had to be flipped on its side (the lm8uu holder) because of too much overhang for us fdm printer users.
thingiverse
free

Model Rocket Concept 1 by SkyRider
...cutout for an engine retention hook
2) tube
3) tube coupler
4) engine stop cylinder (goes into the fin can tube)
5) 2 sample fins
thingiverse
free

8mm Shaft Support by SkyRider
...nc machine's x-y table in which i put my threaded rod, in case anyone is interested in that. if so, leave me a comment here.
thingiverse
free

ROV Inspired by TankBot by SkyRider
... otherwise it's mostly there. if you do make it, drop me a line. i will wrap up my initial development in a couple of days.
Smartrap
thingiverse
free

Smartrap bed upgrade by Ideas3D
...smartrap bed upgrade by ideas3d
thingiverse
this is an upgrade for the smartrap bed.
thingiverse
free

smartrap jhead cool by z26013162
...smartrap jhead cool by z26013162
thingiverse
smartrap jhead cool
thingiverse
free

Smartrap fixations tiges Z - Smartrap Z smooth rod fix by yome
...ooth rod fix by yome
thingiverse
permet de fixer la smartrap sur une structure bois
fix smartrap printer on the wood structure
thingiverse
free

SMARTRAP with NEMA 14 by gunawansy
...smartrap with nema 14 by gunawansy
thingiverse
this is smartrap printer with nema 14 motor mount. not yet tested for printing
thingiverse
free

LCD case for SmartRap by ldanut
...lcd case for smartrap by ldanut
thingiverse
small changes to allow usage of the great lcd case to smartrap 3d printer.
thingiverse
free

Smartrap Core - E3D V6 by jgvonk1984
...smartrap core - e3d v6 by jgvonk1984
thingiverse
smartrap core - e3d v6
thingiverse
free

SmartRap Z axis shaft by Abybos
...smartrap z axis shaft by abybos
thingiverse
z axis shaft for smartrap
thingiverse
free

JHead Support for SmartRap by ldanut
...trap by ldanut
thingiverse
i wanted to use jhead or aluhotend for smartrap but could not find a support for it so i created one.
thingiverse
free

E3D V5 - SmartRap Core - Modify by jzzxhciu
...e3d v5 - smartrap core - modify by jzzxhciu
thingiverse
e3d v5 - smartrap core - modify
thingiverse
free

Smartrap core - cooling fan v1 by jzzxhciu
...smartrap core - cooling fan v1 by jzzxhciu
thingiverse
smartrap core - cooling fan v1
Plates
archibase_planet
free

Plates
...plates
archibase planet
plates and dishes plate
plates - 3d model (*.gsm+*.3ds) for interior 3d visualization.
3d_export
$5

plate
...plate
3dexport
plate
archibase_planet
free
Plates
...plates
archibase planet
plates and dishes plate kitchen ware
plates - 3d model (*.gsm+*.3ds) for interior 3d visualization.
archibase_planet
free
Plates
...plates
archibase planet
plate plates and dishes crockery
plates 2 - 3d model (*.gsm+*.3ds) for interior 3d visualization.
archibase_planet
free

Plate
...plate
archibase planet
dinner-plate plate kitchen ware
plate n070808 - 3d model (*.gsm+*.3ds) for interior 3d visualization.
3d_export
$6

plate
...plate
3dexport
design of plate
3d_export
$5

plate
...plate
3dexport
plate lowpoly
archibase_planet
free
Plates
...plates
archibase planet
plate dish kitchen-ware
plate - 3d model for interior 3d visualization.
3ddd
$1
Plates
...plates
3ddd
полка , тарелка
african plates
archibase_planet
free
Plate
...plate
archibase planet
plate kitchen ware
plate - 3d model (*.gsm+*.3ds) for interior 3d visualization.
Metal
3d_ocean
$10

Metal Barrel
...metal barrel
3docean
barrel barrels metal metal barrel wood barrel
metal barrel
turbosquid
$14

Metals
...als
turbosquid
royalty free 3d model metals for download as on turbosquid: 3d models for games, architecture, videos. (1486252)
3d_ocean
$18
Metal Furniture
...metal furniture
3docean
design desk indoor industrial metal metal furniture restoration table
metal furniture 3d model
3d_export
$5
metal table
...metal table
3dexport
metal table.blend
3d_export
$5
Metal Shelf
...metal shelf
3dexport
metal shelf
3d_export
free

metal detector
...metal detector
3dexport
metal detector
3ddd
$1
metal lux
...metal lux
3ddd
dedalo , metal lux
люстра и бра metal lux коллекция dedalo.
3ddd
$1
bonded metal
...bonded metal
3ddd
https://www.forms-surfaces.com/bonded-metal
boded tiled metal
3ddd
$1

Metal
...metal
3ddd
1280-1024 бесшовный 8-)
3d_export
$5

cgaxis metal
...cgaxis metal
3dexport
notebook cgaxis metal