Thingiverse

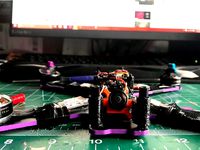
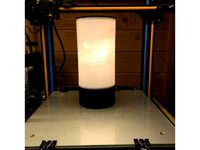
Small Lithophane Lamp (75mm Lithophanes) by techyg
by Thingiverse
Last crawled date: 3 years ago
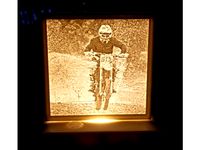
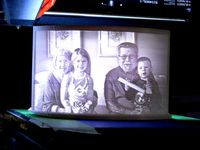
I created this Lithophane lamp as an example for my local school Coder Dojo. If you would like to make one please follow the instructions per below.
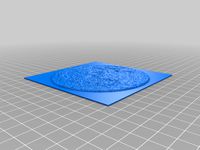
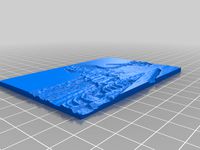
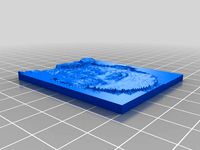
Creating the Lithophanes (you'll need 4)
Find a picture that you want to use for your Lithophane. This image needs to have the correct dimensions to ensure that the Lithophane will fit. Please note, the dimensions of your image needs to be exactly 491(w)x658(h) pixels. If your image size is different, it may not fit in the frame. Most image software allows you to change the dimensions of your "canvas" to achieve the proper dimension. I have provided a blank image, open it up by navigating via the Thingiverse thumbnails. Right Click/ Save As to use it (it has the correct dimensions).
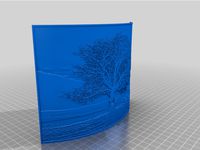
Go to the 3dp.rocks site. http://3dp.rocks/lithophane/ Go to the "settings" page and make the following changes:
Maximum Size (MM) - change to 75
Border (MM) - change to 3
Thickness (MM) - confirm it is 3
The other default settings should be fine. Next, go to the Images tab, upload your image. After that, go to the model tab, and press the "download" button.
Please note: the final dimensions of the Lithophane are 56(w)x75(h)mm, which includes a 1mm border around the entire lithophane.
Repeat step 2 above until you have all your images created. Feel free to also use the "blanklithophane.stl" if you want a lithophane that has nothing on it.
Use your slicer to print the Lithophanes. I recommend using 100% infill for anything with a picture on it. You can use 20% infill if you are just printing the blank.
Adjusting the Lithophane Frame
If you have changed the size of your Lithophane, you can modify the code to make it fit. I have included the source code. The code wasn't written to easily adjust (ideally, one could simply specify a height/width), but if you have decent programming skills you should be able to figure out how to adjust it. Please feel free to refactor/rewrite the code to make it more parameterized- incorporating some simple math / logic should do the trick. If you do that, post a remix!
You will need to use OpenSCAD to modify the code. It can be found at: http://www.openscad.org
The LED Light
For the LED light, I recommend using a 1 watt LED. These are similar to the ones I used, and they should fit in the case:https://www.amazon.com/Uxcell-a14073100ux0209-Emitter-Heatsink-3-0-3-6V/dp/B00S4U0XL4/
I recommend a USB cable with a small cord, at least 2-3ft in length. You can cut off one end and use the red/black wires. Plug the other end into a 5v power supply. An old cell phone charger will work fine, as long as it can put out at least 1 amp.
Here is an example of a power supply you could use: https://www.amazon.com/charger-FOBSUNLAND-Universal-Adapter-S6-Note/dp/B073Q1N8FL
Depending on the LED you use, you're going to need to solder a resistor in line on the positive wire before connecting to the LED. Verify the resistor you need using http://www.ledcalc.com If you are using the recommendations per above, you will need a 5.6 ohm 1 watt resistor. You can buy it here: https://www.mouser.com/ProductDetail/Ohmite/OX56GKE/?qs=sGAEpiMZZMvmQ%252bOLa8n%2fM14fcBcO8UjqVyDNvST7Y3k%3d
Not feeling up to soldering? No problem. Just find a tea light and use that. The only downside is that you won't want to glue the lid on in final assembly.
Assembly
Plan on around 1 hour 30 minutes for printing each Lithophane. The frame is also around that time.
If using an LED
Place your LED in the frame, and glue the wire down so it is flush with the bottom of the frame.
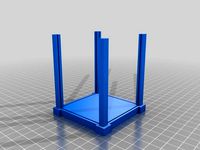
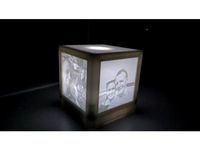
Slide all 4 panes in. Find a helper to hold the frame and panes so it is "square". Then hot glue the top on.
If using a Tea Light
Hot glue the corners of the Lithophane together at the top. Otherwise things aren't going to stay together.
Set the lid on top. You may want to use some double sided tape, or very thin velcro to help keep it secured but still be able to easily remove it.
Other Information
I printed my frame with PETG and my panels with ABS and PETG, which is what I happened to have available. PLA should also work well. I recommend using a light filament for anything that you want to shine through.
Please note, the example Lithophane Image is trademarked. Please contact Northwood Local Schools before using.
Creating the Lithophanes (you'll need 4)
Find a picture that you want to use for your Lithophane. This image needs to have the correct dimensions to ensure that the Lithophane will fit. Please note, the dimensions of your image needs to be exactly 491(w)x658(h) pixels. If your image size is different, it may not fit in the frame. Most image software allows you to change the dimensions of your "canvas" to achieve the proper dimension. I have provided a blank image, open it up by navigating via the Thingiverse thumbnails. Right Click/ Save As to use it (it has the correct dimensions).
Go to the 3dp.rocks site. http://3dp.rocks/lithophane/ Go to the "settings" page and make the following changes:
Maximum Size (MM) - change to 75
Border (MM) - change to 3
Thickness (MM) - confirm it is 3
The other default settings should be fine. Next, go to the Images tab, upload your image. After that, go to the model tab, and press the "download" button.
Please note: the final dimensions of the Lithophane are 56(w)x75(h)mm, which includes a 1mm border around the entire lithophane.
Repeat step 2 above until you have all your images created. Feel free to also use the "blanklithophane.stl" if you want a lithophane that has nothing on it.
Use your slicer to print the Lithophanes. I recommend using 100% infill for anything with a picture on it. You can use 20% infill if you are just printing the blank.
Adjusting the Lithophane Frame
If you have changed the size of your Lithophane, you can modify the code to make it fit. I have included the source code. The code wasn't written to easily adjust (ideally, one could simply specify a height/width), but if you have decent programming skills you should be able to figure out how to adjust it. Please feel free to refactor/rewrite the code to make it more parameterized- incorporating some simple math / logic should do the trick. If you do that, post a remix!
You will need to use OpenSCAD to modify the code. It can be found at: http://www.openscad.org
The LED Light
For the LED light, I recommend using a 1 watt LED. These are similar to the ones I used, and they should fit in the case:https://www.amazon.com/Uxcell-a14073100ux0209-Emitter-Heatsink-3-0-3-6V/dp/B00S4U0XL4/
I recommend a USB cable with a small cord, at least 2-3ft in length. You can cut off one end and use the red/black wires. Plug the other end into a 5v power supply. An old cell phone charger will work fine, as long as it can put out at least 1 amp.
Here is an example of a power supply you could use: https://www.amazon.com/charger-FOBSUNLAND-Universal-Adapter-S6-Note/dp/B073Q1N8FL
Depending on the LED you use, you're going to need to solder a resistor in line on the positive wire before connecting to the LED. Verify the resistor you need using http://www.ledcalc.com If you are using the recommendations per above, you will need a 5.6 ohm 1 watt resistor. You can buy it here: https://www.mouser.com/ProductDetail/Ohmite/OX56GKE/?qs=sGAEpiMZZMvmQ%252bOLa8n%2fM14fcBcO8UjqVyDNvST7Y3k%3d
Not feeling up to soldering? No problem. Just find a tea light and use that. The only downside is that you won't want to glue the lid on in final assembly.
Assembly
Plan on around 1 hour 30 minutes for printing each Lithophane. The frame is also around that time.
If using an LED
Place your LED in the frame, and glue the wire down so it is flush with the bottom of the frame.
Slide all 4 panes in. Find a helper to hold the frame and panes so it is "square". Then hot glue the top on.
If using a Tea Light
Hot glue the corners of the Lithophane together at the top. Otherwise things aren't going to stay together.
Set the lid on top. You may want to use some double sided tape, or very thin velcro to help keep it secured but still be able to easily remove it.
Other Information
I printed my frame with PETG and my panels with ABS and PETG, which is what I happened to have available. PLA should also work well. I recommend using a light filament for anything that you want to shine through.
Please note, the example Lithophane Image is trademarked. Please contact Northwood Local Schools before using.
Similar models
thingiverse
free
Lithophane Pencil Cup by techyg
...anes. i recommend using 100% infill for anything with a picture on it. you can use 20% infill if you are just printing the blank.
thingiverse
free
Ikea lithophane by Cipper
...hane or triocrisb.stl if you want glue the lithophane.
after i use cyanoacrylate glue to connect with ikea prossimity sensor led.
thingiverse
free

Tealight holder for lithophane circle by johnny007g36
...ld print slower than normal. you'll probably need a brim. if your pc cant handle the lithophane, lower the vectors per pixel.
thingiverse
free

Lithophane Nightlight by DeltaZ3dNS
...photos work.
the lithophane clips in to the base.
let me know if you have any issues, or would like anything changed.
deltaz3dns
thingiverse
free

Lithophane holder by svennand
...ouches the top of
the holder in your slicer.
i would recommend to have several prosesses so you can change the infill after need.
thingiverse
free

Night Light Holder for Lithophane by rdvngrsy
...u can change as you wish.http://3dp.rocks/lithophane/
note: this holder is for the 100mm size lithophane of the site in the link.
thingiverse
free
Lithophane box, with AA battery + LED light by bartosslajos
... the images)
turn on/off button
2xaa battery
some wire
1x battery holder
1x 5 mm led
1x 100 ohm resistor
8x screw (würth wüplast)
thingiverse
free
Lithophane frame and LED mount by ClydeCoulter
...te a negative (black= thick, white= thin) lithophane with software such as http://3dp.rocks/lithophane/
makes a nice night light.
thingiverse
free

Basic Photo Lithopane Box by JTreasures
...or buy me a coffee. not obligated to do either. have a wonderful day and have fun being creative.
www.buymeacoffee.com/jtreasures
thingiverse
free

Doors of Durin Lithophane Frame
...taly free. i design stand and frames on solidworks. realy simple and sophisticated lithophane frame for lord of the rings lovers.
Techyg
thingiverse
free

Happy 4th! by techyg
...r each of these separate. after printing, just glue the words on top.
hope you enjoy this!
no special settings, no supports, etc.
thingiverse
free

A basic coaster by techyg
...to customize it, but you may have to edit the code- it probably isn't super customizable. but if you do, please post a remix!
thingiverse
free

QX70 LED Diffuser by techyg
...r height (recommended)
after printing, dab a bit of hot glue on the top and bottom to hold it in place. zip ties could also work.
thingiverse
free
Eachine X73S Prop Riser by techyg
...are not using a flex filament, i am not sure how well this would work, because it might not grip the shaft quite as well and rub.
thingiverse
free
ESC Cover (Diatone Inspired) by techyg
...put the cover on top of that.
i recommend printing this with something strong, like abs or petg. it may also work well with tpu.
thingiverse
free
Configurable Banana Post Terminal Block by techyg
.../products/radioshack-multipurpose-nylon-binding-posts-2-pack
you can easily change the diameter of the holes using the scad file.
thingiverse
free
Emax Babyhawk Antenna Holder by techyg
...lace like that, otherwise they will pop off.
5) run the antennas through the holder. i put some small heatshrink on mine as well.
thingiverse
free

Maker Coin Fidget Spinner by techyg
...ttings should be 10% infill, .20 or lower layer height. i've made these in pla and petg and they are fine either way.
enjoy!
thingiverse
free
Runcam Micro Swift / Swift 2 Camera Mount by techyg
... it would fit right with a more rigid filament. this is a very quick print. hope it works for you, please post a pic if it does!
thingiverse
free

Tiny Whoop Arrow Frame by techyg
...ientation for this frame. refer to the picture. the board will also only fit one way, due to how the motor connectors are set up.
Lithophanes
3d_export
free

lithophane of elfen lied
...lithophane of elfen lied
3dexport
elfen lied lithophane free
turbosquid
$25
Table Lamp (Bamboo Motif Lithophane Accent - Model 015)
... available on turbo squid, the world's leading provider of digital 3d models for visualization, films, television, and games.
thingiverse
free

at at lithophane by philip3dprinter
...at at lithophane by philip3dprinter
thingiverse
at at lithophane
thingiverse
free
Lithophane universe
...lithophane universe
thingiverse
it is a lithophane if the universe
thingiverse
free
Lithophane Moon
...lithophane moon
thingiverse
lithophane moon
thingiverse
free
Lithophane Sphinx
...lithophane sphinx
thingiverse
lithophane sphinx
thingiverse
free

Lithophane NewYork
...lithophane newyork
thingiverse
lithophane newyork
thingiverse
free
Lithophane by sromanos
...lithophane by sromanos thingiverse experimenting with lithophanes ...
thingiverse
free
Tree Lithophane
...tree lithophane
thingiverse
a lithophane of a tree
thingiverse
free

Toyota Lithophane
...toyota lithophane
thingiverse
toyota lithophane logo print.
Lithophane
3d_export
free
lithophane of elfen lied
...lithophane of elfen lied
3dexport
elfen lied lithophane free
turbosquid
$25
Table Lamp (Bamboo Motif Lithophane Accent - Model 015)
... available on turbo squid, the world's leading provider of digital 3d models for visualization, films, television, and games.
thingiverse
free
at at lithophane by philip3dprinter
...at at lithophane by philip3dprinter
thingiverse
at at lithophane
thingiverse
free
Lithophane universe
...lithophane universe
thingiverse
it is a lithophane if the universe
thingiverse
free
Lithophane Moon
...lithophane moon
thingiverse
lithophane moon
thingiverse
free
Lithophane Sphinx
...lithophane sphinx
thingiverse
lithophane sphinx
thingiverse
free
Lithophane NewYork
...lithophane newyork
thingiverse
lithophane newyork
thingiverse
free
Lithophane by sromanos
...lithophane by sromanos
thingiverse
experimenting with lithophanes
thingiverse
free
Tree Lithophane
...tree lithophane
thingiverse
a lithophane of a tree
thingiverse
free
Toyota Lithophane
...toyota lithophane
thingiverse
toyota lithophane logo print.
75Mm
cg_studio
$79

75mm Pak 97/383d model
...rld ww2 wwii
.obj .jpg .max .fbx .3ds - 75mm pak 97/38 3d model, royalty free license available, instant download after purchase.
3d_export
$79

75mm Pak 97-38 3D Model
... pak tank war weapon world
75mm pak 97-38 3d model download .c4d .max .obj .fbx .ma .lwo .3ds .3dm .stl graverino 108478 3dexport
3d_ocean
$79
75mm Pak 97/38
...el originally created with 3ds max and rendered with vray the model is easy to modify, the main parts can be easily moved as i...
cg_studio
$149

M4A3 Sherman - 75mm - Mid production3d model
... .c4d .lwo .obj - m4a3 sherman - 75mm - mid production 3d model, royalty free license available, instant download after purchase.
cg_studio
$139
M4A2 Sherman - Colorado3d model
...m4a2 sherman colorado tank us marine corps pacific theatre 75mm m3 l/40 gun .c4d .obj .lwo .fbx .3ds -...
cg_studio
$139

M4A2 Sherman - Destroyer3d model
...m4a2 sherman destroyer tank us marine corps pacific theatre 75mm m3 l/40 gun .c4d .obj .lwo .fbx .3ds -...
cg_studio
$65

Pak 403d model
...pak 403d model cgstudio gun ww2 75mm artillery world war wwii 1943 army 1945 anti tank...
cg_studio
$125
Anti tank guns ww23d model
...anti tank guns ww23d model cgstudio gun ww2 75mm artillery wwii army 1945 antitank projectile weapon shell case...
3ddd
free
Indian vase
...311742 размеры: длинна маленькой вазы - 460mm, ширина - 75mm высота - 130mm длинна большой вазы - 600mm, ширина...
3d_export
$7
facemaskearloopweldingmachine
...the welding of one-time plane mask ear belt with 75mm standard ear band spacing. if you want to weld...
Lamp
archibase_planet
free
Lamp
...lamp
archibase planet
lamp reading lamp table lamp
lamp - 3d model (*.gsm+*.3ds) for interior 3d visualization.
archibase_planet
free
Lamp
...lamp
archibase planet
lamp reading lamp table lamp
lamp - 3d model (*.gsm+*.3ds) for interior 3d visualization.
archibase_planet
free

Lamp
...lamp
archibase planet
lamp table lamp reading lamp
lamp - 3d model (*.gsm+*.3ds) for interior 3d visualization.
archibase_planet
free

Lamp
...lamp
archibase planet
lamp table lamp reading lamp
lamp - 3d model (*.gsm+*.3ds) for interior 3d visualization.
archibase_planet
free

Lamp
...lamp
archibase planet
lamp reading lamp table lamp
lamp - 3d model (*.gsm+*.3ds) for interior 3d visualization.
archibase_planet
free
Lamp
...lamp
archibase planet
lamp reading lamp table lamp
lamp - 3d model (*.gsm+*.3ds) for interior 3d visualization.
archibase_planet
free
Lamp
...lamp
archibase planet
lamp table lamp reading lamp
lamp - 3d model (*.gsm+*.3ds) for interior 3d visualization.
archibase_planet
free

Lamp
...lamp
archibase planet
lamp table lamp reading lamp
lamp - 3d model (*.gsm+*.3ds) for interior 3d visualization.
archibase_planet
free
Lamp
...lamp
archibase planet
lamp reading lamp table lamp lantern
lamp - 3d model (*.3ds) for interior 3d visualization.
3d_ocean
$6
Lamp
...lamp
3docean
lamp
a high quality lamp.
Small
3d_export
$10
small bed
...small bed
3dexport
small bed design for small house or small room with storage
3d_export
$10

small house
...small house
3dexport
a small house. the project of a small country house.
3d_ocean
$4

Small Cake
...small cake
3docean
cake food small
just a small cake ready for render
3d_export
$6
small armchair
...small armchair
3dexport
small armchair
3d_export
$5

a small world
...a small world
3dexport
a small world
3d_export
$5
small room
...small room
3dexport
small cozy room
3d_export
$5
small tank
...small tank
3dexport
small tank modeling in blender
design_connected
free

small lounge
...small lounge
designconnected
free 3d model of small lounge
design_connected
$11
Watermelons Small
...watermelons small
designconnected
watermelons small computer generated 3d model.
3d_export
$5
small house
...small house
3dexport
a small cozy house on the foundation, the interior is missing.