Thingiverse
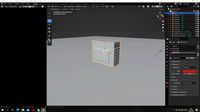
Slimline Disc and Drawer unit for PC by Cargy
by Thingiverse
Last crawled date: 3 years, 3 months ago
Now I know you're gonna tell me that hardly anyone uses optical drives any more. But I still do! Only occasionally, it's true! But I still like the convenience of simply opening a tray and whacking in a disc when needed, rather than having to dig a portable unit out of a cupboard, find all the right leads, and then trying to prop it somewhere stable whilst in use.
My existing drive allowed me to play CDs and DVDs if I wanted (rarely!) but, since a remodelling a few years back, I had no means to play Bluray media on my living room TV.
Despite their approaching obsolescence, full size Bluray drives still command a disproportionately large price compared to DVD drives. So, with this in mind, I acquired a used Bluray burner taken from an old laptop (for the princely sum of £18!), and started thinking sbout how I would incorporate this into the drive bay in place of the existing DVD burner.
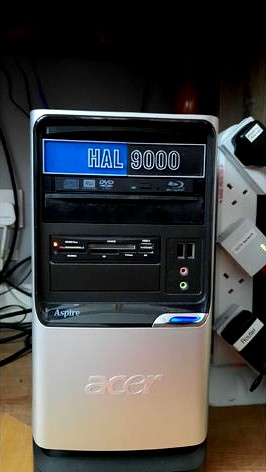
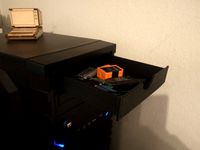
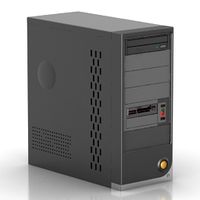
You may have noticed that my PC case is from a branded, off-the-shelf, mid-2000s, home PC. The innards are actually far more state of the art than this, but I enjoy the fact that it looks somewhat archaic and obsolete. In common with PCs of the time, it's equipped with two 5.25" drive bays - something that's getting rarer each passing day. Last year I repurposed one of the bays into a drawer for storing memory cards, thumb drives, etc (https://www.thingiverse.com/thing:4047973). But I quickly realised the "new" drive would free up even more storage space that could be put to good use in taming my ever-expanding collection of these things.
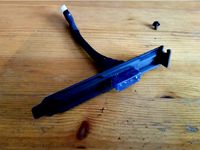
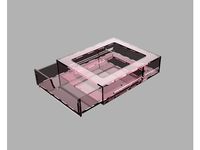
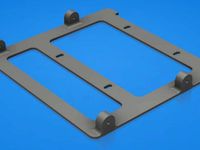
Taking my previous drawer design as a starting point, it was no great effort to reduce the size of the cage and drawer to provide room for the new drive and, with a little bit of measuring and experimenting, graft a drive mounting on the top.
On my previous drawer design I had issues with the prototype's cage holes mis-aligning with the frame in my PC case. Whether the PC case was just distorted, or I messed up somehow, I could never get more than 3 bolts into the frame. Another minor issue was that the cage walls were a bit too thin to take a normal length drive retaining bolt without snagging on the drawer.
So on this design I deliberately chose to omit any set fixing points, and gave the bracket thicker walls, with the holes to be drilled with the cage in situ. The fixing bolts then cut their own threads as they were screwed into place.
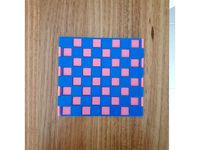
Experience had also taught me that having dividers in the drawer would make finding things easier. So the new drawer was split into an arbitrary set of partitions that I hope will be suitable for my needs.
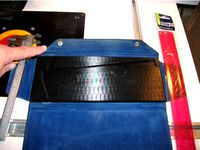
One of the unforeseen problems of using an ex-laptop drive was that the front fascia was custom-shaped to match the body of whatever machine it came from (in my case, a Sony Vaio machine). Fortunately all the drive bodies are standard, and I was simply able to source a new flat fascia, from eBay, for the ludicrously cheap sum of £2.45 delivered. Not only was it astonishingly cheap, but it arrived at my door, all the way from China, within 7 days. I've routinely ordered stuff from the UK that has taken longer than this to arrive! Full marks to the seller and the postal services involved.
In terms of printing, I placed the main cage on its open end, with the angled piece at the bottom, tapering upwards. Doing it this way, no support was needed.
The drawer tray prints fine as is. But there are two possible orientations for the drawer front: Print it with the drawer-pull flat on the buildplate, and no support is necessary.
But I wanted to use ironing to smooth out the layer lines. So printed mine on its back, using tree support where needed. The latter required a little post-printing clean up, but that's a small price to pay to reduce the layer lines on the finished article.
I'm very pleased with the result. It doesn't look out of place, it provides some organised storage for my media collection, and the PC now allows me to play Blurays without the hassle of plugging in an external drive.
I usually reserve this last paragraph for a closing pun - Something like "thus this description drawers to a close". But, to be honest, I couldn't think of one.
Happy 3D printing to you all!
My existing drive allowed me to play CDs and DVDs if I wanted (rarely!) but, since a remodelling a few years back, I had no means to play Bluray media on my living room TV.
Despite their approaching obsolescence, full size Bluray drives still command a disproportionately large price compared to DVD drives. So, with this in mind, I acquired a used Bluray burner taken from an old laptop (for the princely sum of £18!), and started thinking sbout how I would incorporate this into the drive bay in place of the existing DVD burner.
You may have noticed that my PC case is from a branded, off-the-shelf, mid-2000s, home PC. The innards are actually far more state of the art than this, but I enjoy the fact that it looks somewhat archaic and obsolete. In common with PCs of the time, it's equipped with two 5.25" drive bays - something that's getting rarer each passing day. Last year I repurposed one of the bays into a drawer for storing memory cards, thumb drives, etc (https://www.thingiverse.com/thing:4047973). But I quickly realised the "new" drive would free up even more storage space that could be put to good use in taming my ever-expanding collection of these things.
Taking my previous drawer design as a starting point, it was no great effort to reduce the size of the cage and drawer to provide room for the new drive and, with a little bit of measuring and experimenting, graft a drive mounting on the top.
On my previous drawer design I had issues with the prototype's cage holes mis-aligning with the frame in my PC case. Whether the PC case was just distorted, or I messed up somehow, I could never get more than 3 bolts into the frame. Another minor issue was that the cage walls were a bit too thin to take a normal length drive retaining bolt without snagging on the drawer.
So on this design I deliberately chose to omit any set fixing points, and gave the bracket thicker walls, with the holes to be drilled with the cage in situ. The fixing bolts then cut their own threads as they were screwed into place.
Experience had also taught me that having dividers in the drawer would make finding things easier. So the new drawer was split into an arbitrary set of partitions that I hope will be suitable for my needs.
One of the unforeseen problems of using an ex-laptop drive was that the front fascia was custom-shaped to match the body of whatever machine it came from (in my case, a Sony Vaio machine). Fortunately all the drive bodies are standard, and I was simply able to source a new flat fascia, from eBay, for the ludicrously cheap sum of £2.45 delivered. Not only was it astonishingly cheap, but it arrived at my door, all the way from China, within 7 days. I've routinely ordered stuff from the UK that has taken longer than this to arrive! Full marks to the seller and the postal services involved.
In terms of printing, I placed the main cage on its open end, with the angled piece at the bottom, tapering upwards. Doing it this way, no support was needed.
The drawer tray prints fine as is. But there are two possible orientations for the drawer front: Print it with the drawer-pull flat on the buildplate, and no support is necessary.
But I wanted to use ironing to smooth out the layer lines. So printed mine on its back, using tree support where needed. The latter required a little post-printing clean up, but that's a small price to pay to reduce the layer lines on the finished article.
I'm very pleased with the result. It doesn't look out of place, it provides some organised storage for my media collection, and the PC now allows me to play Blurays without the hassle of plugging in an external drive.
I usually reserve this last paragraph for a closing pun - Something like "thus this description drawers to a close". But, to be honest, I couldn't think of one.
Happy 3D printing to you all!
Similar models
thingiverse
free
PC Bay Drawer
...cardreader, usb-sticks, batteries, ...
it fits the 5.25'' bay of a pc; just screw it in like a dvd-drive;
happy printing!
thingiverse
free
Molex 4 pin power connector PCI bracket by Jimbob
...iverse
my new pc hasn't got a dvd drive bay so i made this for powering internal dvd burners / hhd drives to use externally.
thingiverse
free
PC Bay Drawer - LaserCut
... cardreader, usb-sticks, batteries, ...
it fits the 5.25'' bay of a pc; just screw it in like a dvd-drive;
happy cutting!
thingiverse
free

5.25" PC Drive Drawer by sp005
...remix, but a new design scaled to fit into that mount as the posted original printed too thin and broke after a few weeks of use.
3dwarehouse
free

Sony VAIO pc
...sony vaio pc
3dwarehouse
sony vaio pc with bluray/cd/dvd drive #bluray #cd #computer #dvd #pc #sony #sony_vaio #vaio #windows
thingiverse
free

Thermaltake P5 Drive bay by Mr_Terasaur
...t-glase.
as with all my items, it is not required, but a tip through paypal is always appreciated for my work. thanks and enjoy!
thingiverse
free
SSD bracket to fit DVD bay by Normand
...fix.
i used a m3 tap on the four sides holes but i guess a screw can auto tap with enough pressure.
enjoy!
http://solidutopia.com
thingiverse
free

Frame for slim-line DVD/BluRay and SSD
...it into the slot of an old cd player i am upcycling as media player. it can be easily adapted to fit into a 5,25" drive bay.
thingiverse
free

Customizable PC Bay Drawer by gmelenka
... for the drawer. this way you can still open the drawer but there won't be a tab or handle that could potentially break off.
thingiverse
free

EVGA Hadron Air dual SSD and optical drive bay by modularis
... original optical drive position and front of case.
for legacy - first complete iteration is still in files (don't print it).
Cargy
thingiverse
free

Soft Jaws for Stanley 4" Vice (Model # 83-065) by Cargy
...uot; vice (model # 83-065) by cargy
thingiverse
yes, yellow again! thankfully, no lengthy explanation involved (for a change!).
thingiverse
free

Maglight Wall Mount Remix by Cargy
... its back to allow unsupported printing, as per the stl file.
probably overkill, but i went for a 30% fill because of the weight.
thingiverse
free

Filament Roller Endcaps for 15mm Tube by Cargy
...the 22mm tube instructions (and, of course, hugohuge's masterpiece, without which i'd have nothing to put my roller into)
thingiverse
free

Storage For TC1 Component Tester by Cargy
...ood?!
13th september 2020 :i've just added a small removable tray insert option for easier access to the accessories storage.
thingiverse
free

Basic Ender 3 Tool Holder by Cargy
...hook uppermost, and whack on a bit of support. job's a good 'un!
it simply slides on to the extrusion, no fixings needed.
thingiverse
free

Handle For Cake Slice by Cargy
...int, and i've no doubt i'll see it again. but, mean time, i reckon i've earned a slice of one of her delicious cakes!
thingiverse
free
Vernier Caliper Case Insert by Cargy
...gthy print.
if you are blessed with a larger build area, you should just be able to lay it flat and print it in the sensible way.
thingiverse
free

Guide for Bosch PHO100 Planer by Cargy
...his without my help, though!
so there ya go: if you've got a similarly ancient planer, you too could have a guide like mine!
thingiverse
free

Tray Insert For Drawer Unit (with update) by Cargy
...at's what you get when you design stuff when you're tired! the stl has now been corrected to centre these holes properly.
thingiverse
free

Ender 3 PSU Fan Cover by Cargy
...w, if only i can come up with a way of hushing the hotend and parts cooling fans, and i'll be a happy bunny!
happy printing!
Slimline
turbosquid
$167

SLIMLINE 10 MEGA-PIXELS DIGITAL CAMERA
... available on turbo squid, the world's leading provider of digital 3d models for visualization, films, television, and games.
turbosquid
$12

On stage 4-leg model with slimline backrest
... available on turbo squid, the world's leading provider of digital 3d models for visualization, films, television, and games.
turbosquid
$12

On stage 4-leg model with slimline backrest with seat and backrest cushion
... available on turbo squid, the world's leading provider of digital 3d models for visualization, films, television, and games.
3dfindit
free

Slimline
...slimline
3dfind.it
catalog: west coast industries
3dfindit
free

Slimline Interface Relays
...slimline interface relays
3dfind.it
catalog: altech
tf3dm
free

Slimline Hall Storage Unit3d model
...y furniture architecture
free download, 3d slimline hall storage unit model available in 3ds, c4d format and made with cinema 4d.
3dfindit
free

Orbis sf3 Slimline Side Fixing
...orbis sf3 slimline side fixing
3dfind.it
catalog: delta balustrades
3dfindit
free

Orbis sf3 Slimline Side Fixing
...orbis sf3 slimline side fixing
3dfind.it
catalog: delta balustrades
thingiverse
free

Nitecore TIP Slimline physical lockout by GreenBolivian
...n carbon fibre pla
v1 is shown in the picture. v2 has a larger opening for the button and some material removed from the corners.
thingiverse
free
Hinged slimline chess board by CheesmondN
...y of my chess sets (architecture, music, kpop or orignal)
see all my designs here: https://www.thingiverse.com/cheesmondn/designs
Disc
archibase_planet
free
Discs
...discs
archibase planet
compact discs cd compact disk
discs - 3d model (*.gsm+*.3ds) for interior 3d visualization.
turbosquid
$7

SS with Disc Bonbon with disc
...ee 3d model ss with disc bonbon with disc for download as max on turbosquid: 3d models for games, architecture, videos. (1285181)
3d_export
$20
Car discs
...car discs
3dexport
car discs
3d_export
$5

disc knob
...disc knob
3dexport
disc knob
3d_export
$5
disc knob
...disc knob
3dexport
disc knob
3d_ocean
$2

Compact Disc
...compact disc
3docean
album audio cd compact disc dvd laser disc movie music
a cd
turbosquid
$30

Protrusion and slipped disc herniated disc
...usion and slipped disc (herniated disc) for download as blend on turbosquid: 3d models for games, architecture, videos. (1572177)
turbosquid
free
disc
... available on turbo squid, the world's leading provider of digital 3d models for visualization, films, television, and games.
3d_ocean
$5

Realistic Floppy Disc
...op storage usb
this is a model of a floppy disc. floppy discs were used as computer storage devices before the invention of usbs.
3d_export
$10

brake-disc-brembo
...brake-disc-brembo
3dexport
brake-disc-brembo
Pc
archibase_planet
free
PC
...pc
archibase planet
pc case pc tower pc equipment system unit
pc - 3d model (*.gsm+*.3ds) for interior 3d visualization.
3d_export
free
Pc
...pc
3dexport
pc
archibase_planet
free
PC
...pc
archibase planet
notebook pc computer equipment
pc - 3d model (*.gsm+*.3ds) for interior 3d visualization.
archibase_planet
free
PC
...pc
archibase planet
system unit pc equipment
pc - 3d model (*.gsm+*.3ds) for interior 3d visualization.
archibase_planet
free
PC
...pc
archibase planet
pc equipment cabinet system unit
pc 70 - 3d model (*.gsm+*.3ds) for interior 3d visualization.
3d_export
$5
pc
...pc
3dexport
computer
archibase_planet
free
PC
...pc
archibase planet
cabinet chassis system unit
pc case n241107 - 3d model (*.gsm+*.3ds) for interior 3d visualization.
turbosquid
$3

PC
...id
royalty free 3d model pc for download as ma, obj, and fbx on turbosquid: 3d models for games, architecture, videos. (1159175)
turbosquid
$7
lap top ,pc portable, PC
...ty free 3d model lap top ,pc portable, pc for download as c4d on turbosquid: 3d models for games, architecture, videos. (1352084)
turbosquid
$100
PC
... available on turbo squid, the world's leading provider of digital 3d models for visualization, films, television, and games.
Drawer
3d_export
$5

chest of drawers with drawers sonata
...chest of drawers with drawers sonata
3dexport
chest of drawers with drawers sonata
archibase_planet
free

Drawer
...drawer
archibase planet
drawer case locker
drawer - 3d model for interior 3d visualization.
archibase_planet
free
Drawer
...drawer
archibase planet
drawer dathroom furniture
drawer 896410 - 3d model for interior 3d visualization.
archibase_planet
free
Drawer
...drawer
archibase planet
drawer shelving case
drawer - 3d model (*.3ds) for interior 3d visualization.
archibase_planet
free
Drawer
...drawer
archibase planet
locker bureau drawer
drawer - 3d model (*.gsm+*.3ds) for interior 3d visualization.
archibase_planet
free

Drawer
...drawer
archibase planet
case drawer locker
drawer - 3d model (*.gsm+*.3ds) for interior 3d visualization.
archibase_planet
free
Drawer
...drawer
archibase planet
locker drawer case
drawer - 3d model (*.gsm+*.3ds) for interior 3d visualization.
archibase_planet
free

Drawer
...drawer
archibase planet
drawer case bathroom furniture
drawer 896411 - 3d model for interior 3d visualization.
archibase_planet
free
Drawer
...drawer
archibase planet
locker drawer case
drawer - 3d model (*.gsm+*.3ds) for interior 3d visualization.
archibase_planet
free

Drawer
...drawer
archibase planet
locker case drawer
drawer - 3d model (*.gsm+*.3ds) for interior 3d visualization.
Unit
turbosquid
$4

UNIT
...unit
turbosquid
royalty free 3d model unit for download as on turbosquid: 3d models for games, architecture, videos. (1196686)
archibase_planet
free
Unit
...unit
archibase planet
desk board
entertainment unit 02 - 3d model (*.gsm+*.3ds) for interior 3d visualization.
3d_export
$15
control unit
...control unit
3dexport
control unit
3ddd
$1
bathroom unit
...bathroom unit
3ddd
bathroom unit
3ddd
$1
Crockery unit
...crockery unit
3ddd
сервант
crockery unit
3ddd
$1
Process unit
...process unit
3ddd
статуэтка
process unit
3d_export
$5

united nations
...united nations
3dexport
united nations-logo -cnc plant
turbosquid
$3
TV unit-1 / 2 unit
...-1 / 2 unit for download as 3ds, max, obj, fbx, dwg, and dae on turbosquid: 3d models for games, architecture, videos. (1207609)
3d_export
$5
tv unit
...tv unit
3dexport
the tv unit design simple design with texture for interior
3d_ocean
$5

Tv Unit
...gh quality apple tv unit. the model is made using 3ds max. hope you enjoy it and if you have any queries feel free to contact me.