Thingiverse
SlideSnap Pro Modification by AKADAP
by Thingiverse
Last crawled date: 3 years, 1 month ago
This is a modification to the SlideSnap Pro: https://slidesnappro.com/
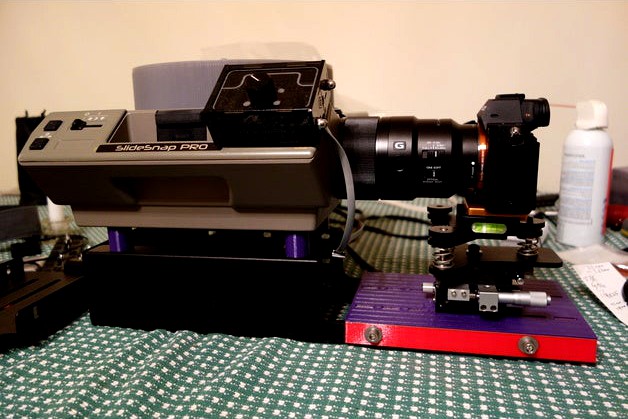
At the time I bought a SlideSnap Pro, they had two models, the SlideSnap Pro, and the SlideSnap Lite. Both are based on a refurbished and modified Kodak carousel projector.
The Lite came with a Canon G-16 camera and a macro lens adaptor, the Pro came with hardware to mount a DSLR, but no camera.
I had inherited a Canon G-16 camera from my father, and was not quite sure that the G-16 had the resolution to capture all of the resolution available on a 35mm slide, so I decided to compromise. I bought the Pro, and the macro adapter lens.
I had to do a bit of tweaking to get this to work because the lite still has the lens barrel in the projector to allow the macro adapter to just slide into place, but the pro has the lens barrel removed from the projector to give the dslr a clear view of the slide.
I captured a couple of rolls of film with this setup until I got to a slide with the license plate of a car in the lower left corner. I was trying to date my grandfathers slides, so I tried to read the year on the plate, and found it illegible. I took the slide to my microscope, and could easily read the license plate year. This proved to me that the G-16 with the macro adapter was inadequate.
I attempted to find a lens/camera combination that was adequate to capture all of the resolution of the slides, but the only data I could find was relative information. This lens is better than that lens, but nothing about absolute resolution. I gave up on finding absolute information and bought the best combination I could afford. This was a Sony A7RII with a F2.8 90mm macro lens. This proved capable of resolving the grain of the film. I don't need any better than that. The camera eats batteries quickly, even when turned off, and focuses slowly, but it is adequate for the purpose of digitizing slides.
The lens is big enough and must be close enough to the slide that I had to trim back some of the plastic on the projector. I also needed to remove a piece of sheet metal from the mechanism that was blocking some of the lens' view of the slide. Luckily, this piece of sheet metal was only meant as a light mask, and did not serve any structural purpose, so it was easy to get rid of. Included is a photo of the piece of sheet metal I removed.
The Slide Snap Pro comes with a camera alignment system that I found to be inadequate. Part of the alignment procedure is to mount a target on the lens to ensure that the camera axes is perpendicular to the slide, by focusing on the target through a special mirror slide. But once this procedure is done, the target must be removed from the lens. Since the end of this lens is inside the case of the projector when the slide is framed properly, the camera must be removed from the mount in order to remove the target. The problem is that the mounting system is not repeatable. It is the same crummy single quarter twenty screw used on most tripods. Also, adjusting any of the adjustments on the mount affected all other adjustments, so it was impossible to line the camera up correctly.
This is where this modification comes in. I bought this x,y,yaw stage:http://www.optics-focus.com/xy-axis-plus-rotation-stage-p-1033.html
and used it with the z, pitch and roll adjustment part of the stage that came with the SlideSnap Pro. I 3D printed standoffs to account for the taller profile of this stage, and printed a mount to allow this stage to be mounted to the frame. These are the parts included in this "thing". I also used a quick release that came with a 3 legged thing tri-pod which had a pin that allowed the camera to be removed, and replaced repeatably in the same place.
The system is not perfect, the X axis is sufficient to frame the slide once the carriage is mounted in the correct location for that slide type, but different slide types require moving the mount closer or further from the projector for proper framing. I avoided most of this problem by setting aside the odd sized slides, and doing them last. I included a photo of the different size slides I encountered.
The threaded spacer must be printed with enough wall thickness that you can tap it with threads.
Note that the two lines indicating mounting points are incorrectly placed, and even if they were correct, could only be correct for one camera & lens combination.
A newer version of the SlideSnap Pro has been released. I know they have updated the electronics, but I do not know if they have changed any of the mechanical elements.
Note that this is the 3rd iteration of attempts to make the alignment reasonable. The two previous attempts were failures for various reasons, so I did not publish them.
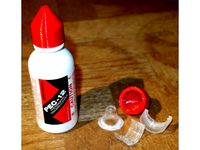
Notes about cleaning slides. I found canned air inadequate. It was common for people to smoke in the 50's, and I found that some slides had dust glued to the surface. For most slides I could brush off the dust with a brush designed to clean digital camera sensors, but some required cleaning with a q-tip and a film cleaning solution. I used PEC-12. I used this solution as little as possible because even a cotton q-tip will scratch the emulsion a little bit. I found the fine scratches left were not visible, but I did not like damaging the emulsion. PEC-12 did not dissolve all of the substances that were on the slides I scanned, but most of the time it worked. Gunk on the slides seemed to be cigarette smoke sometimes, and leftover developing chemicals other times. Most of the time it was just dust that could be brushed off.
The camera would occasionally fail to focus, and others incorrectly expose the pictures. I would review the results before unloading the carousel, and re-take the mistakes. It took more time to load and unload the carousels than it did for the SlideSnap to sequence through them.
At the time I bought a SlideSnap Pro, they had two models, the SlideSnap Pro, and the SlideSnap Lite. Both are based on a refurbished and modified Kodak carousel projector.
The Lite came with a Canon G-16 camera and a macro lens adaptor, the Pro came with hardware to mount a DSLR, but no camera.
I had inherited a Canon G-16 camera from my father, and was not quite sure that the G-16 had the resolution to capture all of the resolution available on a 35mm slide, so I decided to compromise. I bought the Pro, and the macro adapter lens.
I had to do a bit of tweaking to get this to work because the lite still has the lens barrel in the projector to allow the macro adapter to just slide into place, but the pro has the lens barrel removed from the projector to give the dslr a clear view of the slide.
I captured a couple of rolls of film with this setup until I got to a slide with the license plate of a car in the lower left corner. I was trying to date my grandfathers slides, so I tried to read the year on the plate, and found it illegible. I took the slide to my microscope, and could easily read the license plate year. This proved to me that the G-16 with the macro adapter was inadequate.
I attempted to find a lens/camera combination that was adequate to capture all of the resolution of the slides, but the only data I could find was relative information. This lens is better than that lens, but nothing about absolute resolution. I gave up on finding absolute information and bought the best combination I could afford. This was a Sony A7RII with a F2.8 90mm macro lens. This proved capable of resolving the grain of the film. I don't need any better than that. The camera eats batteries quickly, even when turned off, and focuses slowly, but it is adequate for the purpose of digitizing slides.
The lens is big enough and must be close enough to the slide that I had to trim back some of the plastic on the projector. I also needed to remove a piece of sheet metal from the mechanism that was blocking some of the lens' view of the slide. Luckily, this piece of sheet metal was only meant as a light mask, and did not serve any structural purpose, so it was easy to get rid of. Included is a photo of the piece of sheet metal I removed.
The Slide Snap Pro comes with a camera alignment system that I found to be inadequate. Part of the alignment procedure is to mount a target on the lens to ensure that the camera axes is perpendicular to the slide, by focusing on the target through a special mirror slide. But once this procedure is done, the target must be removed from the lens. Since the end of this lens is inside the case of the projector when the slide is framed properly, the camera must be removed from the mount in order to remove the target. The problem is that the mounting system is not repeatable. It is the same crummy single quarter twenty screw used on most tripods. Also, adjusting any of the adjustments on the mount affected all other adjustments, so it was impossible to line the camera up correctly.
This is where this modification comes in. I bought this x,y,yaw stage:http://www.optics-focus.com/xy-axis-plus-rotation-stage-p-1033.html
and used it with the z, pitch and roll adjustment part of the stage that came with the SlideSnap Pro. I 3D printed standoffs to account for the taller profile of this stage, and printed a mount to allow this stage to be mounted to the frame. These are the parts included in this "thing". I also used a quick release that came with a 3 legged thing tri-pod which had a pin that allowed the camera to be removed, and replaced repeatably in the same place.
The system is not perfect, the X axis is sufficient to frame the slide once the carriage is mounted in the correct location for that slide type, but different slide types require moving the mount closer or further from the projector for proper framing. I avoided most of this problem by setting aside the odd sized slides, and doing them last. I included a photo of the different size slides I encountered.
The threaded spacer must be printed with enough wall thickness that you can tap it with threads.
Note that the two lines indicating mounting points are incorrectly placed, and even if they were correct, could only be correct for one camera & lens combination.
A newer version of the SlideSnap Pro has been released. I know they have updated the electronics, but I do not know if they have changed any of the mechanical elements.
Note that this is the 3rd iteration of attempts to make the alignment reasonable. The two previous attempts were failures for various reasons, so I did not publish them.
Notes about cleaning slides. I found canned air inadequate. It was common for people to smoke in the 50's, and I found that some slides had dust glued to the surface. For most slides I could brush off the dust with a brush designed to clean digital camera sensors, but some required cleaning with a q-tip and a film cleaning solution. I used PEC-12. I used this solution as little as possible because even a cotton q-tip will scratch the emulsion a little bit. I found the fine scratches left were not visible, but I did not like damaging the emulsion. PEC-12 did not dissolve all of the substances that were on the slides I scanned, but most of the time it worked. Gunk on the slides seemed to be cigarette smoke sometimes, and leftover developing chemicals other times. Most of the time it was just dust that could be brushed off.
The camera would occasionally fail to focus, and others incorrectly expose the pictures. I would review the results before unloading the carousel, and re-take the mistakes. It took more time to load and unload the carousels than it did for the SlideSnap to sequence through them.
Similar models
thingiverse
free

macro lens for iphone 5c by JohanLink
...macro lens for iphone 5c by johanlink
thingiverse
i used a lens that i found in a camera.
thingiverse
free

77MM ND Circular filter sliding mounting adapter by tskamath
...lens, and then adapter mount threaded to the adapter ring, 77mm filter is threaded to the slide mount, which is slided into place
3dwarehouse
free
Carousel projector
...carousel projector
3dwarehouse
slide projector #kodak #projector #slide
thingiverse
free

ZMR250 Camera Mount for HS1177. by rogueqd
...p the camera from rotating in the mount. the top plate must be removed to install/remove the camera, life is always a compromise.
grabcad
free

lense mount for Lidar Lite
...lense mount for lidar lite
grabcad
lens bought from aliexpress
grabcad
free

Ring Pro Doorbell Camera 45 Degree Corner Mount
...eded, so i designed this one for that purpose with an included hood to help keep rain off the lens and reduce glare from the sun.
thingiverse
free
iPhone 5s macro lens mount by jsc
...e mount and adapts it to hold a bare lens.
update: added 12mm version for surplus shed lens l4581, with a higher magnification.
thingiverse
free

G Clamp Remix - Camera Mount by KakePrints
...e screw that came with the mount, and even added in printable pads.
tips appreciated:
bitcoin: 13oqyarww3wdhhat7pruutjn8c5vgwdhoe
thingiverse
free
Projector mount for Tripod
...ork for the projector so i made my own. this mount fits a sunpak 5200d tripod. i have included the stl and files from fusion 360.
thingiverse
free

35mm Slide Holder / scanner
...e slide holder with my eos 450d and macro lens. it works really good.
for more information also look at the original by tacotim.
Akadap
thingiverse
free

Replacement Rain Gauge Mount by AKADAP
... how well this holds up sitting in direct sun light.
this is a particularly simple design that i threw together in about an hour.
thingiverse
free

Parameterized Tesla valve straw by AKADAP
...lex than i initially thought.
i am rather disappointed with the performance though. i can understand why these are not used much.
thingiverse
free

Taz Camera by AKADAP
...t without printing it again.
be sure to measure your bolt, and adjust the hole sizes appropriately in the design before printing.
thingiverse
free

White Board Pen Holder by AKADAP
...rized.
if fillets are enabled, it takes about 30 minutes to compile on my computer.
this took about 24 hours to print on my taz 6
thingiverse
free

OpenSCAD I-Beam Library by AKADAP
...ed..
import this library into your project with the "use" function to avoid including the test vectors in your project.
thingiverse
free

Dust Cover for Microscope eyepieces by AKADAP
...g the scope. this has been intentionally made loose fitting so that it can be installed and removed without moving the eyepieces.
thingiverse
free
Emergency Replacement Bottle Cap by AKADAP
... your eye). not sure it is actually sealing there, may be sealing on the shoulder of the bottle.
this is another openscad design.
thingiverse
free
Adaptor to align camera to microscope eyepiece by AKADAP
... solid tube, but found it to be a bit too snug. this is a little loose, but adjustments could be made to make the spring stiffer.
thingiverse
free

Spade Bit Rack by AKADAP
...gsybbqr90
it shows the first prototype. the file included here has some tweaks that fixed some problems with the original design.
thingiverse
free

List Defined (sort of) Tap Wrench Tray by AKADAP
...efined by lists, but there was some hand tweaking involved.
as usual you must edit the code to make this fit your specific tools.
Modification
turbosquid
$12
AKMS (AK47 modification)
... available on turbo squid, the world's leading provider of digital 3d models for visualization, films, television, and games.
turbosquid
$79
BusTransForm - Modif Bus Thailand
...d model bustransform - modif bus thailand for download as obj on turbosquid: 3d models for games, architecture, videos. (1383303)
3d_export
$25

mitsubishi evo 9 modification
...mitsubishi evo 9 modification
3dexport
evo 9 has been modified with a nice and elegant look.
3d_ocean
$25

Dart Vader (modificated helm)
...niforms, as well as anatomical model of the character itself. the model is divided into groups for further editing. primarily ...
turbosquid
$15

FN SCAR-H modification low-poly game ready
...fication low-poly game ready for download as ma, obj, and fbx on turbosquid: 3d models for games, architecture, videos. (1386384)
3d_export
$5

sphere light
...sphere light
3dexport
the socket and light are modifables
3d_export
$5
Fabulous chest
...chest 3dexport fabulous chest for your game or further modification ...
3d_export
free
cold coffee
...cold coffee 3dexport cold coffee can. any required modification will be done at...
3d_ocean
$12

Cartoon Dump or Sand Truck
...already rig low poly modifier still in stack for modification unwrap uvw for material and colour...
3d_ocean
$12

Cartoon Cement Mixer Truck
...already rig low poly modifier still in stack for modification unwrap uvw for material and colour...
Pro
turbosquid
$29

Pro
...ree 3d model mac pro for download as obj, c4d, fbx, and blend on turbosquid: 3d models for games, architecture, videos. (1505782)
turbosquid
$15

Apple Mac Pro and Pro Display
...ee 3d model apple mac pro and pro display for download as max on turbosquid: 3d models for games, architecture, videos. (1417078)
3d_export
$5

iphone 13 pro max and pro
...3 pro max and 13 pro the model is made in four colors (graphite, gold, silver, and blue), all of which are attached in the files.
3d_export
free

sapphire pro
...sapphire pro
3dexport
sapphire pro 3d printer head mask
3d_export
$4

macbook pro
...macbook pro
3dexport
macbook pro 13" inch 2020 years model
3ddd
free

GentleLase Pro
... syneron , candela
gentlelase pro аппарат для лазерной эпиляции
turbosquid
$25

PRO frame
...rbosquid
royalty free 3d model pro frame for download as max on turbosquid: 3d models for games, architecture, videos. (1148329)
turbosquid
$5

Alien pro
...osquid
royalty free 3d model alien pro for download as blend on turbosquid: 3d models for games, architecture, videos. (1678446)
turbosquid
$5

iphone11 pro
...uid
royalty free 3d model iphone11 pro for download as blend on turbosquid: 3d models for games, architecture, videos. (1562707)
3ddd
$1

Mac Pro (appel)
...mac pro (appel)
3ddd
компьютер , apple
mac pro