Thingiverse
SLA/DLP Flex VAT by AmeraLabs
by Thingiverse
Last crawled date: 3 years, 1 month ago
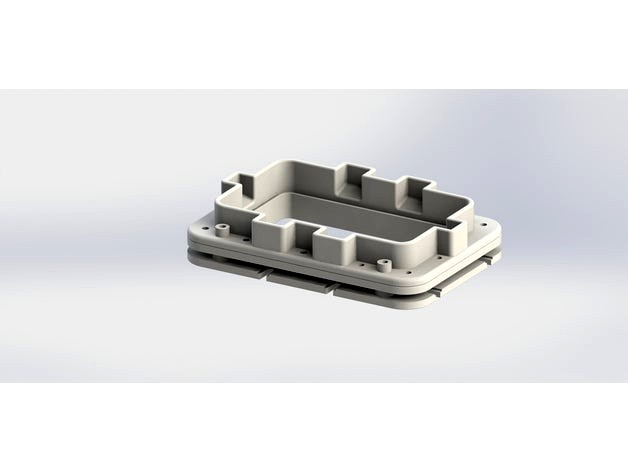
I could not find any reasonable bigger Flex VAT for DLP/SLA printer, so I made one. Usable area is ~14.5 cm x ~8.5 cm.
VAT is assembled by assembling top part first.
Take "middle" part and use that as a template to make a seal from some sort of thin rubber (~1mm). I used EPDM and it worked fine.
Choose one of "top" parts, print it.
Stack everything together: (1) middle part, (2) FEP film, (3) seal, (4) top part. I used M5 screws.
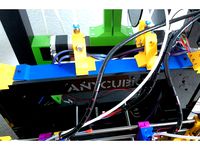
Fix tensioner to your printer, align it well and mount top assembly with four dedicated screws in each corner. You can easily remove top part just by unscrewing those four screws. WARNING: when placing assembled top part on tensioner, screw every corner very gently and do NOT over stress FEP film. FEP tensioning must be done very carefully.
If you experience serious sagging (since I do not like to tension FEP film too much), get yourself some acrylic glass (I used 2mm thickness), and use tiny glass supports that I have also added to fix that acrylic piece of glass at the top of tensioner. This would provide good foundation for FEP film. Remember, that glass support MUST not come out of the tensioner - glass must be in one line / plane / flat with tensioner edges. The easiest way to mount glass is simply to put tensioner on the flat surface up side down, put the glass rectangle inside the tensioner (then tensioner and glass will both be flat) and then use glue to fix those supports: push each support hard against the flat surface in each corner (see attached photo), wait a bit for glue to harden. It is possible to modify tensioner to include those glass supports, but by printing them separately you can use glass of any thickness. I do not recommend using window glass, since if you shatter it, you might seriously damage your printer. Piece of acrylic can bend easily and will let you make some errors when leveling printer.
Remember to sand corners of acrylic piece, make them round and smooth. This will lower risk of damaging FEP film.
P.S. I know that funnel is not in the best place, but there just wasn't room for it. So you can choose if you want to have it or not (choose appropriate top part). You can also print it together with top part or separately and use glue to fix it in place later.
UPDATE:
I have updated all parts, since there were issues with scale. The software I used to position them properly modified scale factors of some parts, so I have re-uploaded parts in their original printing position, so please orient them yourself since best position is pretty obvious. Sorry for that.
For other great content, please visit our blog at http://ameralabs.com/blog/
VAT is assembled by assembling top part first.
Take "middle" part and use that as a template to make a seal from some sort of thin rubber (~1mm). I used EPDM and it worked fine.
Choose one of "top" parts, print it.
Stack everything together: (1) middle part, (2) FEP film, (3) seal, (4) top part. I used M5 screws.
Fix tensioner to your printer, align it well and mount top assembly with four dedicated screws in each corner. You can easily remove top part just by unscrewing those four screws. WARNING: when placing assembled top part on tensioner, screw every corner very gently and do NOT over stress FEP film. FEP tensioning must be done very carefully.
If you experience serious sagging (since I do not like to tension FEP film too much), get yourself some acrylic glass (I used 2mm thickness), and use tiny glass supports that I have also added to fix that acrylic piece of glass at the top of tensioner. This would provide good foundation for FEP film. Remember, that glass support MUST not come out of the tensioner - glass must be in one line / plane / flat with tensioner edges. The easiest way to mount glass is simply to put tensioner on the flat surface up side down, put the glass rectangle inside the tensioner (then tensioner and glass will both be flat) and then use glue to fix those supports: push each support hard against the flat surface in each corner (see attached photo), wait a bit for glue to harden. It is possible to modify tensioner to include those glass supports, but by printing them separately you can use glass of any thickness. I do not recommend using window glass, since if you shatter it, you might seriously damage your printer. Piece of acrylic can bend easily and will let you make some errors when leveling printer.
Remember to sand corners of acrylic piece, make them round and smooth. This will lower risk of damaging FEP film.
P.S. I know that funnel is not in the best place, but there just wasn't room for it. So you can choose if you want to have it or not (choose appropriate top part). You can also print it together with top part or separately and use glue to fix it in place later.
UPDATE:
I have updated all parts, since there were issues with scale. The software I used to position them properly modified scale factors of some parts, so I have re-uploaded parts in their original printing position, so please orient them yourself since best position is pretty obvious. Sorry for that.
For other great content, please visit our blog at http://ameralabs.com/blog/
Similar models
thingiverse
free

fep vat for peopoly moai by stephanemg
...the calculated width is 138mm, but sometimes you can get much lower width, so print the tensioner and mesure for the glass width.
thingiverse
free

FSL3D Full spectrum laser- Pegasus Touch resin Tray Vat by willy1067
...lone for 3 hours.
repeat silicone gluing the edges of part1 on the top of part2 and the fep
i will keep you posted on my results.
grabcad
free

Peopoly Moai FEP VAT - FDM Printed
... than 170mm x 170mm
- 3d printed parts: pla, four 0.45mm perimeters, four top and bottom layers, 30% infill, 0.2mm layer height.
thingiverse
free

D7 FEP Stretcher by macdarren
...a while it loosens a bit. i saw something similar for a different setup but i can't find the...
thingiverse
free
Anycubic Prusa i3 Acrylic top strengthening by Scachi
...e harden.
now it should be a lot more stable while still being removeable.
i use mine as a platform for my bowden stepper motors.
thingiverse
free

Corner Top 3d-plexi-printer by steijlen
...my case plexi glass).
i have not yet used this but it is supposed to fit and stay without screws. (maybe it will need some glue).
grabcad
free

"Anycubic Photon Mono 4k" resin vat bottom frame for FEP film
... - added pdf files for drawings;
- parts were divided into two types: for cnc milling and for 3d printing.
thingiverse
free

Elegoo Saturn FEP Tool by PhoenixBlueStudios
... when reinstalled.
if you're concerned about scratching your fep film, i would suggest covering the center with kapton tape.
thingiverse
free

LCD SLA VAT pool by erdemerciyas
...lcd sla vat pool by erdemerciyas
thingiverse
for 7" lcd
25% pla printing
you need m3 screw & nuts and fep film...
thingiverse
free

Elegoo Mars all in one Vat Cover / Stacker / Fep Protector
...t vat. push fit with enough resistance to not fall off.
prints flat and unsupported on one of those new fangled fdm type things.
Ameralabs
thingiverse
free

Numbered Ameralabs calibration by luismatheo
...n by luismatheo
thingiverse
these are 8 ameralabs town calibration to be use to create r_e_r_f files on anycubic resin printers.
thingiverse
free

Ameralabs town chamfered edges file by SpiritofMadMesh
...ation on how to interpret the printed test piece, check the ameralabs website.
https://ameralabs.com/blog/town-calibration-part/
thingiverse
free

AmeraLabs Town | Awesome calibration part for SLA 3D printers by AmeraLabs
...ensive guide on how to understand all features of the part in order to improve your printing quality at http://town.ameralabs.com
thingiverse
free

Anycubic Photon S RERF test using Ameralabs Town
...ferent exposure time.
50um test prints in ~50 minutes and uses up ~15ml of resin.
compatibility- needs firmware v3.4.1 or above.
thingiverse
free

Mono X - Ameralabs Town R_E_R_F by PapaChop83
...dding 0.4 seconds, i.e. matrix 2 will be + 0.4 seconds, matrix 3 will be + 0.8 seconds, etc.
export with filename of r_e_r_f.pwmx
thingiverse
free

AmeraLab Plate for R_E_R_F by Printcontrol
... are no secrets!
you may place your own testparts as you like its only necessary to place theparts within t one of the 8 patterns
thingiverse
free

Door Sign | "I will be back" Clock by AmeraLabs
...ething is incorrect, just drop us a comment and we will fix it asap.
for more content, please visit http://www.ameralabs.com blog
thingiverse
free

SLA/DLP Flex VAT 4:3 aspect ratio by roubledainbow
...thingiverse a wider version of the flex vat by ameralabs the print area on this one is ~152x114mm to...
thingiverse
free

Mono X R_E_R_F by csimplex
...csimplex thingiverse r_e_r_f stl file based on the new ameralabs city and updated by the atlas community set the...
Vat
turbosquid
$49
vat
... available on turbo squid, the world's leading provider of digital 3d models for visualization, films, television, and games.
turbosquid
$5
vat
... available on turbo squid, the world's leading provider of digital 3d models for visualization, films, television, and games.
turbosquid
$19

Wooden Vat Closed
...y free 3d model wooden vat closed for download as max and obj on turbosquid: 3d models for games, architecture, videos. (1197266)
turbosquid
$19
Wooden Vat 03
...yalty free 3d model wooden vat 03 for download as max and obj on turbosquid: 3d models for games, architecture, videos. (1197209)
turbosquid
$19
Wooden Vat 02
...yalty free 3d model wooden vat 02 for download as max and obj on turbosquid: 3d models for games, architecture, videos. (1197207)
turbosquid
$280
VAT RASER 02.jpg
... available on turbo squid, the world's leading provider of digital 3d models for visualization, films, television, and games.
turbosquid
$265
VAT SP 07.jpg
... available on turbo squid, the world's leading provider of digital 3d models for visualization, films, television, and games.
turbosquid
$180
VAT LUX 02.jpg
... available on turbo squid, the world's leading provider of digital 3d models for visualization, films, television, and games.
turbosquid
$2
Large Cartoony Oil Vat
... available on turbo squid, the world's leading provider of digital 3d models for visualization, films, television, and games.
turbosquid
$3

Sci-fi cloning vats
...cloning vats for download as 3ds, obj, wrl, x, fbx, and blend on turbosquid: 3d models for games, architecture, videos. (1290168)
Dlp
archive3d
free
Projector 3D Model
...projector equipment projection apparatus projector vidikron vision model 65 dlp n041110 - 3d model (*.gsm+*.3ds) for interior 3d...
3d_export
$10

cute kitten v2 stl 3d print model
...3dexport solid type (fdm) and hollow type (sla & dlp<br>stl file for 3d print<br>size :<br>x : 66 mm<br>y :...
3d_export
$23

the last engineer 3d printing figurine
...will also receive "assembly manual" for fff/fdm 1.0 and dlpsla 1.0 versions in pdf format. the figurine is saved...
3d_export
$5
groot con grabadora
...some supports enabled, however you can also use a dlp or sla printer with resin as well. for small...
3d_export
$5

deer christmas 3
...some supports enabled, however you can also use a dlp or sla printer with resin as well. you should...
3d_export
$5
deer christmas 2
...some supports enabled, however you can also use a dlp or sla printer with resin as well. you should...
3d_export
$5

deer christmas
...some supports enabled, however you can also use a dlp or sla printer with resin as well. you should...
3d_export
$5
deer christmas 5
...some supports enabled, however you can also use a dlp or sla printer with resin as well. you should...
3d_export
$5

papa noel - santa claus
...some supports enabled, however you can also use a dlp or sla printer with resin as well. you should...
3d_export
$15
carl and ellie chair - up
...some supports enabled, however you can also use a dlp or sla printer with resin as well. for small...
Sla
3ddd
$1

CILEK SL ACTIVE
...sl active 3ddd cilek cilek active (sl active white) sla1304 кровать...
3ddd
$1
Cilek SL ACTIVE
...3ddd cilek , стеллаж cilek active (sl active white) 1501-sla стеллаж...
3d_export
$5

ring-love norian-54-64 mm 4pcs
...norian-54 ring-love norian-56 ring-love norian-60 ring-love norian-64 suitable for sla and sls and similar printing...
3d_export
$10
cute kitten v2 stl 3d print model
...print model 3dexport solid type (fdm) and hollow type (sla & dlp)<br>stl file for 3d print<br>size :<br>x : 66...
3d_export
$5
tesseract hypercube
...each diagonal has 6 faces. you can use sls, sla and other technologies to print it. moreover different textures...
3d_export
$23
the last engineer 3d printing figurine
...will also receive "assembly manual" for fff/fdm 1.0 and dlp/sla 1.0 versions in pdf format. the figurine is saved...
3d_export
$5
groot con grabadora
...enabled, however you can also use a dlp or sla printer with resin as well. for small scale printouts,...
3d_export
$5
deer christmas 3
...enabled, however you can also use a dlp or sla printer with resin as well. you should use a...
3d_export
$5
deer christmas 2
...enabled, however you can also use a dlp or sla printer with resin as well. you should use a...
3d_export
$5
deer christmas
...enabled, however you can also use a dlp or sla printer with resin as well. you should use a...
Flex
3ddd
$1

Flex
...flex
3ddd
flex , конференц-зал
кресло для переговоров
3ddd
$1

Flex — I Laccati
... i laccati
3ddd
flex , дверь
двери межкомнатные, окрашенные. flex, коллекция «i laccati»
3ddd
free
Flex Seating 6032
... конференц-зал , flex
кресло модульное, модель flex seating 6032
3ddd
free
TechnoGym Flex Posterior
... flex , тренажер
3ds max 2012 (v-ray) + fbx
technogym flex posterior
3ddd
$1
Банкетка Flex Team
... , flex team
http://www.abitant.com/products/banketka-flex-team-2014-kilt-pouf
3ddd
free

FLEX , I Laccati
...cati
3ddd
flex , i laccati
flex , i laccati
модель p 14 q stucco fiorentino decoro gigli
3ddd
$1

Metal lux / FLEX
...metal lux / flex
3ddd
metal lux
люстра metal lux flex.
turbosquid
$11
Stool Flex
...ty free 3d model stool flex for download as max, obj, and fbx on turbosquid: 3d models for games, architecture, videos. (1673813)
3ddd
$1
Flex by Skandiform
...flex by skandiform
3ddd
skandiform , стул
enjoy
turbosquid
$7
Flex Chair
... available on turbo squid, the world's leading provider of digital 3d models for visualization, films, television, and games.