Thingiverse
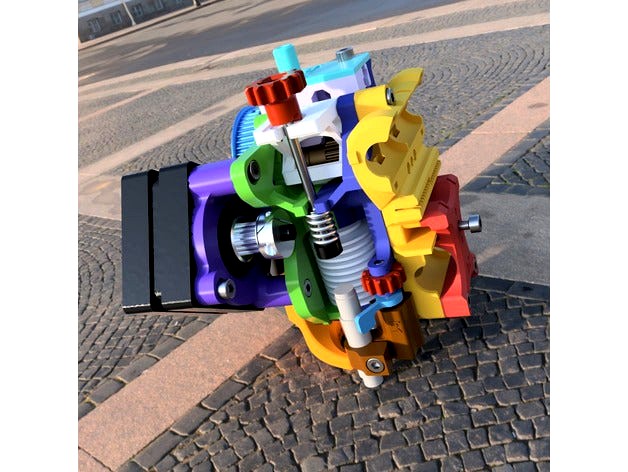
Skelestruder V1 for Prusa MK3 and MK3s by jltx
by Thingiverse
Last crawled date: 3 years ago
Apologies for delay on IR sensor support. I finally received the backorder kit from Prusa. I will get it out asap once I can test. In the meantime, try this.
I did a beta release for MMU2s IR sensor support. Follow MMU link below.
First official release is in progress! Finally getting out of beta. Less than one year. ;-) I am still making updates/improvements so you may want to add "watch" to this project. Example is new hybrid sensor mod I released.
New instructions: I moved these to their (hopefully) permanent home. The transfer was manual so let me know if you see any issues.
Motivation:
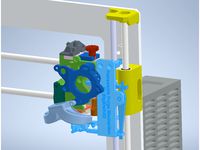
I wanted to see if I could make a lighter weight extruder to unlock more speed on the MK3. I also wanted to try some new innovations, fix some nagging issues, easier adjustments, etc. while keeping the good bits from PR. I started with a blank piece of paper, solving the problems I saw and ended up with something related to e3d Titan and Bondtech BMG. But it’s tailored for Prusa MK3, includes more features and you can make it yourself for much less.
Project goals:
Remove: 200g of moving mass and center motor on belt-line to increase acceleration potential
Keep: build volume, e3d v6, Bondtech, laser sensor, other goodness from PR
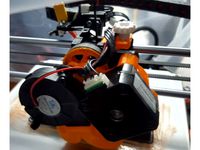
Improve cooling and nozzle visibility
Increase ease of use -> see Usage
Optimize parts for FDM printing -> RepRap spirit
Purchase as little new hw as possible
lightweight motor: $8-15 (or use stock for free)
5mm shaft: $2-8
belt loop: $1
3 bearings: $2
Main highlights (so far):
Almost 200g less mass, centered on belt line
Increased print volume for V6; Or use Volcano with no loss in print volume
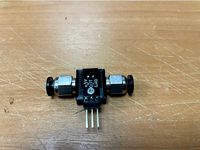
Filament sensor works with any color filament including clear (solved here first)
Shorter stack and free path to better handle flexible filaments
Tool-free rack-and-pinion PINDA mount adjustment
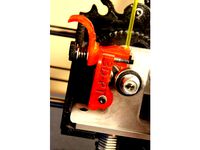
Tool-free quick-lock idler with tension adjust and manual load/unload
Improved part cooling from both sides
Full visibility of nozzle printing
Garter screw to keep V6 sock in place
Supports (now or soon):
E3d V6 or E3d volcano, also Mosquito, BetaMMU 2.0 (also see Hairlock ) or other multi-filament
Direct filament or reverse Bowden
NEMA17 or NEMA14 (deprecated but ask)
Direct or indirect laser filament sensor
Std inlet or full PTFE
Other things that are better:
Bondtech gear meshing better aligned with taller more central pivot
Improved torque for pushing filament
decoupled motor so no heat transfer to filament
gearing + belt reduces stepper noise into print surfaces
easier X belt access for maintenance
larger, less restrictive path for Noctua cooling
Multiple gear ratios supported. More on the way. Note 56/16 is most common.
Tread
Pinion
Ratio
Esteps
56
14
4.0
1120
56
16
3.5
980
56
20
2.8
784
54
18
3.0
840
Short path anim shows how the filament has a short path from the cartridge to the inlet while traveling between the Bondtech gears. This better handles flexible filaments as there is no room to deviate. Also the motor is not attached to either gear so there is no heat transfer. Witness Note video shows older design, but performance is the same
No Firmware change required! That said, there are things you may want to change for convenience. See assembly instructions. Indirect filament sensor does require a small change which is very simple.
weight
Stock
SPV1
Motor
270g
128g
Parts
115g
70g
HW
~40g
~30g
---------
---------
--------
Total
425g
228g
|
LogsUpdate 4/21/20: I added r2 omega part cooler nozzle. This version has reinforced tips to resist heat for softer filaments. I opened the throat some more to improve airflow a bit. The main change is I added a springy clip to the right side for better support. To install, first hook the right clip over the edge of the cageS, then press to the left, flexing right clip a little, to be able to clip the left side hook in as normal. Then screw in and mount fan as before. I print in PETG and have good performance. Use support on base only with 20% threshold.
Update 6/1/19: I added step files for version r1b. I may make some notable changes to accommodate some things I've been wanting to do, like mosquito support. That may involve removing the key for example. So folks can hack up the step to continue support for the current version and add mods for other platforms, etc. Please link a remix back to this project so people can find. Enjoy!
Update 3/24/19: finally updated the omega coolers to R1 as they had some fitment issues. Made a hair thicker for folks using exotic filaments or 0.6 nozzles.
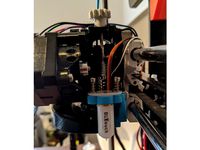
Update 2/2/19: added new hybrid filament sensor (beta). This requires no firmware changes!. The sensor simultaneously reads the filament and bearing. Initial testing looks promising. It is definitely better than stock direct sensor. I hope it achieves 100% reliability like my indirect solution. This is nicer too because it sits recessed and can use the standard covers. To build, print Bcart(ridge) and Bplate in PLA 0.15 layer. Note that you will see screw hole punch through which is fine. Screw sensor into cartridge using a button head MK3x8 or 10mm. I found that MK2.5 button head also works. I only mention because I found one of those oddly in my spare bag from Prusa. Place 2 673 bearings on plate spindles. Now snap the plate into the side of the cartridge and install cartridge in normal position. Note: if you flashed firmware for indirect sensor (Y flip), you need to undo that because this does not need that modification. Please let me know how if you find a filament not reliable.
Update 1/31/19: increased cavity on inlet to fit collet clip if you use one. small tweak to cartridge to improve printing.
Update 1/13/19: first official release. Also multiple gear ratios supported. Note, if you are upgrading from B4 or newer, the Ecages and Prack have changed. Other parts, including carriage, spider, inlet, cartridge, etc should still fit.
update 12/12: fixed P rack to print cleaner in PETG and better fit with Ecage B (why nobody complained?)
Update 11/25: added cage option for e3d Beta heatsink with thread mount instead of groove mount.
Also updated carriage and X clamp to offer multiple belt paths, per a million requests. Now supports Bear, or stock with 16T (flat), or stock with larger idler (offset). Recommend cutting 2 10mm piece of belt and insert in paths not used to add bite. For stock idler (20/22T) screw on jammer using a M3x8mm to align belt if desired.
Update 11/13: updated cage to b5 with some more tweaks after testing. I included a second screw hole for holding down the I_cartridge. This is needed for bowden setups like MMU2. I also added a jam block you can screw onto carriage if you want the belt level lower if using smaller X idler pulley. Beefed up some areas including idler after long term testing. I recommend PETG for most parts now, though PLA is also viable.
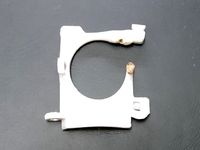
update 11/3: added a modified frame bracket for MMU2 that gives a bit more clearance for wiring on the tail/fin. I also rotated it forward 15 deg to assist clearance but also help the FINDA ball settle with a bit more force. Probably negligible.
update 11/1: I uploaded the new b5 cage for testing. The idea is that cage S can be printed in a high temp friendly filament, like PC, ABS, etc. Then the rest of the cage can print in more print friendly material like PLA or PETG since it does not see the high heat. The assembly is a bit trickier as you have to slip the new cage S over the heatsink first and then assembly the rest of the cage. Leave it loose on the heat block while you assemble cage and then snap it in place in front right corner. Use 2 M3x18mm screws for back Noctua fan and 2 M2x12mm for front holes. These help secure the cage S too.
update 10/19: updated Omega to improve blower fit. The CAD model I have is the wrong fillet radius. Also, if you have an older wheel, replace with b5. My 4 month old wheel cracked so I reinforced that area.
In other news, I have MMU2 mostly working now and it looks like I may need no changes over what is already here. Stay tuned.
Update 10/16: added OmegaV for Volcano. see below for tricky print. I am working on other b5 changes to Ecage.
Update 10/15: I received my MMU2, so I am testing to get everything working with skelestruder. Also added tail step file to people could make cable chain adapters, etc.
Meanwhile, I designed a new omega cooler. This is experimental and needs new spider and shroud. I am still testing so be warned. For V6 only, working on Volcano version. Use M3x12 to screw spider to cage without bracket (not used now). Instead used M3x10 to screw omega to spider while also fitting hook in shroud. Then screw blower onto spider with M3x18. You can use hex or Nyloc nuts. Printing: omega is challenging, needs 4mm brim + support base only with 40 degree threshold using 0.15 layer height. Let me know how it goes.
Update 9/15: fixed rotation on Ecage F17. Removed nema14 support temporarily. PM if you need it.
Update 9/8: add direct cover that will connect to MMU2. need brass nut, see instructions
Update 7/12: finally got the indirect filament sensor added. Assembly instructions updated. Makes filament sensor work with any color filament, even clear. Fixed small issue on I-lid b2a.
Note 6/30: if you build b2 or newer with a v6 as opposed to volcano, you may fail XYZ cal because you have more Z range than the firmware is expecting. You can change #define Z_MAX_POS 220 in Configuration_prusa.h, OR temporarily position the PINDA below the nozzle, run the XYZ cal, then return the PINDA to normal position, run Z only cal, then run First Layer Cal.
Update 6/2: finally added fin part as alternative to tail, for testing. Do this to your stock machine: unhook X belt so carriage can slide freely. Slide it from one side to the other and notice the high tension from the umbilical connection. I am trying another route following the ancient philosophy of "bend don't break" and inspired by cartilage in shark fins. I built in the strain relief into the part so it stays light and keeps wires stable. Seems to work so far.
Updated assembly instructions.
I did a beta release for MMU2s IR sensor support. Follow MMU link below.
First official release is in progress! Finally getting out of beta. Less than one year. ;-) I am still making updates/improvements so you may want to add "watch" to this project. Example is new hybrid sensor mod I released.
New instructions: I moved these to their (hopefully) permanent home. The transfer was manual so let me know if you see any issues.
Motivation:
I wanted to see if I could make a lighter weight extruder to unlock more speed on the MK3. I also wanted to try some new innovations, fix some nagging issues, easier adjustments, etc. while keeping the good bits from PR. I started with a blank piece of paper, solving the problems I saw and ended up with something related to e3d Titan and Bondtech BMG. But it’s tailored for Prusa MK3, includes more features and you can make it yourself for much less.
Project goals:
Remove: 200g of moving mass and center motor on belt-line to increase acceleration potential
Keep: build volume, e3d v6, Bondtech, laser sensor, other goodness from PR
Improve cooling and nozzle visibility
Increase ease of use -> see Usage
Optimize parts for FDM printing -> RepRap spirit
Purchase as little new hw as possible
lightweight motor: $8-15 (or use stock for free)
5mm shaft: $2-8
belt loop: $1
3 bearings: $2
Main highlights (so far):
Almost 200g less mass, centered on belt line
Increased print volume for V6; Or use Volcano with no loss in print volume
Filament sensor works with any color filament including clear (solved here first)
Shorter stack and free path to better handle flexible filaments
Tool-free rack-and-pinion PINDA mount adjustment
Tool-free quick-lock idler with tension adjust and manual load/unload
Improved part cooling from both sides
Full visibility of nozzle printing
Garter screw to keep V6 sock in place
Supports (now or soon):
E3d V6 or E3d volcano, also Mosquito, BetaMMU 2.0 (also see Hairlock ) or other multi-filament
Direct filament or reverse Bowden
NEMA17 or NEMA14 (deprecated but ask)
Direct or indirect laser filament sensor
Std inlet or full PTFE
Other things that are better:
Bondtech gear meshing better aligned with taller more central pivot
Improved torque for pushing filament
decoupled motor so no heat transfer to filament
gearing + belt reduces stepper noise into print surfaces
easier X belt access for maintenance
larger, less restrictive path for Noctua cooling
Multiple gear ratios supported. More on the way. Note 56/16 is most common.
Tread
Pinion
Ratio
Esteps
56
14
4.0
1120
56
16
3.5
980
56
20
2.8
784
54
18
3.0
840
Short path anim shows how the filament has a short path from the cartridge to the inlet while traveling between the Bondtech gears. This better handles flexible filaments as there is no room to deviate. Also the motor is not attached to either gear so there is no heat transfer. Witness Note video shows older design, but performance is the same
No Firmware change required! That said, there are things you may want to change for convenience. See assembly instructions. Indirect filament sensor does require a small change which is very simple.
weight
Stock
SPV1
Motor
270g
128g
Parts
115g
70g
HW
~40g
~30g
---------
---------
--------
Total
425g
228g
|
LogsUpdate 4/21/20: I added r2 omega part cooler nozzle. This version has reinforced tips to resist heat for softer filaments. I opened the throat some more to improve airflow a bit. The main change is I added a springy clip to the right side for better support. To install, first hook the right clip over the edge of the cageS, then press to the left, flexing right clip a little, to be able to clip the left side hook in as normal. Then screw in and mount fan as before. I print in PETG and have good performance. Use support on base only with 20% threshold.
Update 6/1/19: I added step files for version r1b. I may make some notable changes to accommodate some things I've been wanting to do, like mosquito support. That may involve removing the key for example. So folks can hack up the step to continue support for the current version and add mods for other platforms, etc. Please link a remix back to this project so people can find. Enjoy!
Update 3/24/19: finally updated the omega coolers to R1 as they had some fitment issues. Made a hair thicker for folks using exotic filaments or 0.6 nozzles.
Update 2/2/19: added new hybrid filament sensor (beta). This requires no firmware changes!. The sensor simultaneously reads the filament and bearing. Initial testing looks promising. It is definitely better than stock direct sensor. I hope it achieves 100% reliability like my indirect solution. This is nicer too because it sits recessed and can use the standard covers. To build, print Bcart(ridge) and Bplate in PLA 0.15 layer. Note that you will see screw hole punch through which is fine. Screw sensor into cartridge using a button head MK3x8 or 10mm. I found that MK2.5 button head also works. I only mention because I found one of those oddly in my spare bag from Prusa. Place 2 673 bearings on plate spindles. Now snap the plate into the side of the cartridge and install cartridge in normal position. Note: if you flashed firmware for indirect sensor (Y flip), you need to undo that because this does not need that modification. Please let me know how if you find a filament not reliable.
Update 1/31/19: increased cavity on inlet to fit collet clip if you use one. small tweak to cartridge to improve printing.
Update 1/13/19: first official release. Also multiple gear ratios supported. Note, if you are upgrading from B4 or newer, the Ecages and Prack have changed. Other parts, including carriage, spider, inlet, cartridge, etc should still fit.
update 12/12: fixed P rack to print cleaner in PETG and better fit with Ecage B (why nobody complained?)
Update 11/25: added cage option for e3d Beta heatsink with thread mount instead of groove mount.
Also updated carriage and X clamp to offer multiple belt paths, per a million requests. Now supports Bear, or stock with 16T (flat), or stock with larger idler (offset). Recommend cutting 2 10mm piece of belt and insert in paths not used to add bite. For stock idler (20/22T) screw on jammer using a M3x8mm to align belt if desired.
Update 11/13: updated cage to b5 with some more tweaks after testing. I included a second screw hole for holding down the I_cartridge. This is needed for bowden setups like MMU2. I also added a jam block you can screw onto carriage if you want the belt level lower if using smaller X idler pulley. Beefed up some areas including idler after long term testing. I recommend PETG for most parts now, though PLA is also viable.
update 11/3: added a modified frame bracket for MMU2 that gives a bit more clearance for wiring on the tail/fin. I also rotated it forward 15 deg to assist clearance but also help the FINDA ball settle with a bit more force. Probably negligible.
update 11/1: I uploaded the new b5 cage for testing. The idea is that cage S can be printed in a high temp friendly filament, like PC, ABS, etc. Then the rest of the cage can print in more print friendly material like PLA or PETG since it does not see the high heat. The assembly is a bit trickier as you have to slip the new cage S over the heatsink first and then assembly the rest of the cage. Leave it loose on the heat block while you assemble cage and then snap it in place in front right corner. Use 2 M3x18mm screws for back Noctua fan and 2 M2x12mm for front holes. These help secure the cage S too.
update 10/19: updated Omega to improve blower fit. The CAD model I have is the wrong fillet radius. Also, if you have an older wheel, replace with b5. My 4 month old wheel cracked so I reinforced that area.
In other news, I have MMU2 mostly working now and it looks like I may need no changes over what is already here. Stay tuned.
Update 10/16: added OmegaV for Volcano. see below for tricky print. I am working on other b5 changes to Ecage.
Update 10/15: I received my MMU2, so I am testing to get everything working with skelestruder. Also added tail step file to people could make cable chain adapters, etc.
Meanwhile, I designed a new omega cooler. This is experimental and needs new spider and shroud. I am still testing so be warned. For V6 only, working on Volcano version. Use M3x12 to screw spider to cage without bracket (not used now). Instead used M3x10 to screw omega to spider while also fitting hook in shroud. Then screw blower onto spider with M3x18. You can use hex or Nyloc nuts. Printing: omega is challenging, needs 4mm brim + support base only with 40 degree threshold using 0.15 layer height. Let me know how it goes.
Update 9/15: fixed rotation on Ecage F17. Removed nema14 support temporarily. PM if you need it.
Update 9/8: add direct cover that will connect to MMU2. need brass nut, see instructions
Update 7/12: finally got the indirect filament sensor added. Assembly instructions updated. Makes filament sensor work with any color filament, even clear. Fixed small issue on I-lid b2a.
Note 6/30: if you build b2 or newer with a v6 as opposed to volcano, you may fail XYZ cal because you have more Z range than the firmware is expecting. You can change #define Z_MAX_POS 220 in Configuration_prusa.h, OR temporarily position the PINDA below the nozzle, run the XYZ cal, then return the PINDA to normal position, run Z only cal, then run First Layer Cal.
Update 6/2: finally added fin part as alternative to tail, for testing. Do this to your stock machine: unhook X belt so carriage can slide freely. Slide it from one side to the other and notice the high tension from the umbilical connection. I am trying another route following the ancient philosophy of "bend don't break" and inspired by cartilage in shark fins. I built in the strain relief into the part so it stays light and keeps wires stable. Seems to work so far.
Updated assembly instructions.
Similar models
thingiverse
free

Improved Prusa Mk3S MMU2S filament sensor mount by 01chevyguy
...rning the screw. once the adjustment is correct, tighten the fs-cover mounting screw on top.
edit: added photographs of assembly.
thingiverse
free

Prusa MK3 Indirect filament sensor mod for stock extruder by jltx
...c with any improvements i make going forward. so i made this interposer to translate the mount to mine. see instructions below.
thingiverse
free
Adapterplate
...ports.
i don't use a mk3s stock, so i'm not able to test it myself. i included the step files if some changes are needed.
thingiverse
free
I3 Mk2/MK2s Extruder Idler with Push fitting Support for filament guide by crynool
...ified version of the original scad file from prusa, i did not print it, so i'm not sure if this works with the push fitting.
thingiverse
free

Anycubic I3 Mega Filament Sensor Holder v2 Improved by Aerocalculus
...ger/higher to see better.
and way nicer design !!
prints without support, but for cleaner viewing arch i used a support in there.
thingiverse
free

Anet A8 Bowden conversion by Dousi
...rds the part and blows less on the nozzle
-made the radius on the belt holder larger so that its easier to put the belt in place.
thingiverse
free
mmu2s extension by mumg
...mmu2s extension by mumg
thingiverse
added support of endstop for mmu2 idler
thingiverse
free

Vertical X Idler with Belt Tensioner by pin13
...th a v-wheel. use a 50mm m4 screw here.
update 1: adding versions with 8mm extra belt clearance for linear rails such as mgn12.
thingiverse
free

MMU2 filament buffer - Stand/mount
...n probably use shorter ones if you're low on supplies. (if you're mounting this, be sure to secure your pfte tubes first)
thingiverse
free
Lulzbot Taz 5 Speed Idler arm & Latch for Greg Wade extruders by Eagleknot
...ant to quickly change filament colors.
when combined these two are an improvement on the factory printed idler arms and latches.
Skelestruder
thingiverse
free

Skelestruder Fan Cover
...skelestruder fan cover
thingiverse
decoration...
thingiverse
free
Skelestruder BLTouch rack by ressukka
...he offsets with this mount are x30 y2 and z offset should be around 2.6 when the rack is raised to the highest possible location.
thingiverse
free
Skelestruder -> Retractable Purge Mechanism
... of these 3 parts:
purge - mount_right.stl
purge - bracket.stl
purge - action.stl
then assemble as standard.
thanks! =dbigbrain3d
thingiverse
free
skelestruder remix for wanhao i3
...erence on the prints.
thanks to jltx for his excellent work.
feel free to add sugestions and comments, and to remix as you wish.
thingiverse
free
Filament lid for Skelestruder and Mosaic Palette 2 grommet
...ound up with a filament cover that holds the grommet and incoming tube from my palette 2. also able to use with regular filament.
thingiverse
free
Skelestruder EcageS protector
...n the stock mk3/mk2 extruder.
use sp_prack_antisag for prusa mk3/s and sp_prack_mk2_antisag for prusa mk2/s (with my mk2/s remix)
thingiverse
free

Skelestruder Mosquito reSTEP by hnzxdv
...thickness relative to ringo's original. the latch/clip between the two cage halves (opposite the fan) was slightly beefed up.
thingiverse
free
Unibody 56T Pulley for Skelestruder by hnzxdv
...6 set screw in place of the normal m3 socket head screw due to lack of clearance. aside from that it's a drop-in replacement.
thingiverse
free

Skelestruder Omron SS-5GL filament sensor
...ce issues.
i used this model while making this: https://grabcad.com/library/omron-ss-5gl-limit-switch-1/details?folder_id=1704724
thingiverse
free
Skelestruder Optical Sensor Cartridge with Transparent PFA Protective Lining
...the filament managed to get wedged in the sensor cavity and the mmu2 kept feeding filament until the die shattered. rip in peace.
Jltx
thingiverse
free

TOSLink Adpater by jltx
... into a traditional plug, this is for you. plug this adapter in first the insert cable end. holds snug and sounds flawless. :-)
thingiverse
free
Freedom Wrench by jltx
...ose with strong hands
full-throated freedom, william wallace edition
leave a comment to let me know how it works for you. enjoy.
thingiverse
free

Sony Alpha accessory mount dust cap by jltx
...39;d like a dust cap for my accessory mount. so i made one. thought i'd share. designed to print vertically so add a brim.
thingiverse
free

72mm lens cap clip for neck strap by jltx
...f the three tabs. you'll have to work it a bit and pull from other side as it is designed to be snug. repeat for other two.
thingiverse
free
GT2 Idler Pulley for F693ZZ Bearing by Flex35
...by flex35 thingiverse i remixed the great design by jltx to fit in f693zz...
thingiverse
free

Prusa MK3 - toolbox by KurzyKocour
...prusa i3 mk3 reuses the t nuts designed by jltx works fine for storing your 3d printer...
thingiverse
free
Prusa MK3 hard feet (with spikes) by vaxxi
...hard feet (with spikes) by vaxxi thingiverse remix of jltx#39;s printer feet with two rows of 4 spikes (each...
thingiverse
free
Prusa i3 MK3 X carriage back plate with belt access by jltx
...
2/12/18 update prusa released r2 versions and i updated the back cover to give belt access. need to flip over before slicing.
thingiverse
free
Prusa MK3 Indirect filament sensor mod for stock extruder by jltx
...c with any improvements i make going forward. so i made this interposer to translate the mount to mine. see instructions below.
thingiverse
free

Taurus PSU relo frame brace for Prusa MK3 and MK3s by jltx
...cally for strength. do not reorient. add brim if needed.
i printed mine in thingiverse blue. j/k, it’s atomic pearl blue petg.
Mk3S
turbosquid
$50

cention mk3
...ty free 3d model cention mk3 for download as ma, obj, and fbx on turbosquid: 3d models for games, architecture, videos. (1454148)
turbosquid
$129

MK3 Tank
... available on turbo squid, the world's leading provider of digital 3d models for visualization, films, television, and games.
turbosquid
$100

Toyota Supra MK3
... available on turbo squid, the world's leading provider of digital 3d models for visualization, films, television, and games.
turbosquid
$44

cention mk3 low poly
...d model cention mk3 low poly for download as ma, obj, and fbx on turbosquid: 3d models for games, architecture, videos. (1454666)
turbosquid
$30

Challenger I Mk3 Falcon
... available on turbo squid, the world's leading provider of digital 3d models for visualization, films, television, and games.
turbosquid
$10

American Frag hand grenade MK3
...free 3d model american frag hand grenade mk3 for download as on turbosquid: 3d models for games, architecture, videos. (1393624)
turbosquid
$20

Mk3 US Navy Combat Knife
...ty free 3d model mk3 us navy combat knife for download as fbx on turbosquid: 3d models for games, architecture, videos. (1172791)
3d_export
$29

Ford Fiesta MK3 Modified 3D Model
...7 tumerfx mtumer mehmet t?mer 1993 1995 1996 wrc special modifed modifiye
ford fiesta mk3 modified 3d model mtumer 30698 3dexport
3d_export
$99

Toyota Supra Mk3 19861993 3D Model
...ort fast coupe japan 1986 1987 1988 1989 1990 1991 1992 1993 tuning turbo
toyota supra mk3 19861993 3d model squir 62530 3dexport
turbosquid
$5

Timothy Oulton Mars Chair MK3
...on mars chair mk3 for download as 3ds, max, obj, fbx, and dae on turbosquid: 3d models for games, architecture, videos. (1209782)
Mk3
turbosquid
$50
cention mk3
...ty free 3d model cention mk3 for download as ma, obj, and fbx on turbosquid: 3d models for games, architecture, videos. (1454148)
turbosquid
$129
MK3 Tank
... available on turbo squid, the world's leading provider of digital 3d models for visualization, films, television, and games.
turbosquid
$100
Toyota Supra MK3
... available on turbo squid, the world's leading provider of digital 3d models for visualization, films, television, and games.
turbosquid
$44
cention mk3 low poly
...d model cention mk3 low poly for download as ma, obj, and fbx on turbosquid: 3d models for games, architecture, videos. (1454666)
turbosquid
$30
Challenger I Mk3 Falcon
... available on turbo squid, the world's leading provider of digital 3d models for visualization, films, television, and games.
turbosquid
$10
American Frag hand grenade MK3
...free 3d model american frag hand grenade mk3 for download as on turbosquid: 3d models for games, architecture, videos. (1393624)
turbosquid
$20
Mk3 US Navy Combat Knife
...ty free 3d model mk3 us navy combat knife for download as fbx on turbosquid: 3d models for games, architecture, videos. (1172791)
3d_export
$29
Ford Fiesta MK3 Modified 3D Model
...7 tumerfx mtumer mehmet t?mer 1993 1995 1996 wrc special modifed modifiye
ford fiesta mk3 modified 3d model mtumer 30698 3dexport
3d_export
$99
Toyota Supra Mk3 19861993 3D Model
...ort fast coupe japan 1986 1987 1988 1989 1990 1991 1992 1993 tuning turbo
toyota supra mk3 19861993 3d model squir 62530 3dexport
turbosquid
$5
Timothy Oulton Mars Chair MK3
...on mars chair mk3 for download as 3ds, max, obj, fbx, and dae on turbosquid: 3d models for games, architecture, videos. (1209782)
Prusa
turbosquid
$2

Frame Filament Guide Clip-On for Prusa Mk3
...rame filament guide clip-on for prusa mk3 for download as stl on turbosquid: 3d models for games, architecture, videos. (1634730)
3d_export
free

prusa i3 mk3s laser mount for opt lasers
...to learn more about the blue laser technology that conceived the cutting and engraving laser heads from opt lasers, please visit:
turbosquid
free

Prusa small printer adapter holder
...er for download as ipt, skp, dwg, dxf, fbx, ige, obj, and stl on turbosquid: 3d models for games, architecture, videos. (1642936)
3d_export
$30

geisha by jonathan adler
...** i did a 3d printing test in the prusa software, you can find it among the attached images.<br>exchange:<br>.blend...
thingiverse
free

Prusa without Prusa (rc2) by madless
...prusa without prusa (rc2) by madless
thingiverse
just the main part of prusa rc2 faceshield, without writing.
enjoy :)
thingiverse
free

Prusa by acejbc
...prusa by acejbc
thingiverse
prusa knob info
m3 8mm screw
thingiverse
free

Prusa house
...prusa house
thingiverse
how prusa house could look like...
thingiverse
free

Prusa Mk2 "Fake Prusa" LCD cover by anraf1001
...r by anraf1001
thingiverse
version of prusa's lcd cover with "fake prusa" instead of "original prusa"
thingiverse
free

Prusa stabilizator by gutiueugen
...prusa stabilizator by gutiueugen
thingiverse
prusa stabilizator
thingiverse
free

Keychain Prusa by rbarbalho
...keychain prusa by rbarbalho
thingiverse
keychain with text prusa.
V1
turbosquid
$35

v1
... available on turbo squid, the world's leading provider of digital 3d models for visualization, films, television, and games.
3d_export
$10

street tree v1
...street tree v1
3dexport
street tree v1
3d_export
$5
potato v1
...potato v1
3dexport
turbosquid
$20

Kitchen V1
...bosquid
royalty free 3d model kitchen v1 for download as max on turbosquid: 3d models for games, architecture, videos. (1153622)
turbosquid
$12

sofa v1
...turbosquid
royalty free 3d model sofa v1 for download as max on turbosquid: 3d models for games, architecture, videos. (1283267)
turbosquid
$3

Chair V1
...urbosquid
royalty free 3d model chair v1 for download as fbx on turbosquid: 3d models for games, architecture, videos. (1486093)
turbosquid
$15

Cupboard v1
...royalty free 3d model cupboard v1 for download as max and fbx on turbosquid: 3d models for games, architecture, videos. (1444568)
3d_export
$5
tram v1
...tram v1
3dexport
3d_export
$8
lumber car v1
...lumber car v1
3dexport
lumber car v1 printable, low poly model.
turbosquid
$20

DELTALIGHT v1
...free 3d model deltalight v1 for download as max, max, and obj on turbosquid: 3d models for games, architecture, videos. (1630928)