Thingiverse
Simple Zero Ooze Dual Extruder - CRUX - no electronics, motors, or changed firmware by galaxyman7
by Thingiverse
Last crawled date: 2 years, 12 months ago
Update 10/23/17: The mechanism still works great almost 4 months later. The only thing that could be improved is the cooling fan mount, because it tend to slip down if the screws aren't tight. I made a little piece to keep it upright that I will include in the files.
Update 7/2/17: Updated the hotend holder cap (for normal sized hotends) to be more form-fitted in order to reduce cooling of the heat block. Changed the retaining arm for the extruder part to be less fragile and easier to assemble.
Update 6/18/17: I changed the design to work with either volcano hotends or normal sized hotends (just not both at once).
Update 6/17/17: The current version only works with the volcano hotends, I am working on a version for the regular sized hotends.
If you have ever tried a dual extrusion print, you know it can be a huge pain. The other nozzle bumps into what you are printing, it oozes all over your prints, and has to be primed before printing, which wastes plastic.
And if you try a mixing nozzle, it will constantly clog if you don't print with one of the colors for a while, one color will bleed into the next, and it can't use materials that aren't similar, for instance dissolvable support or flexible materials.
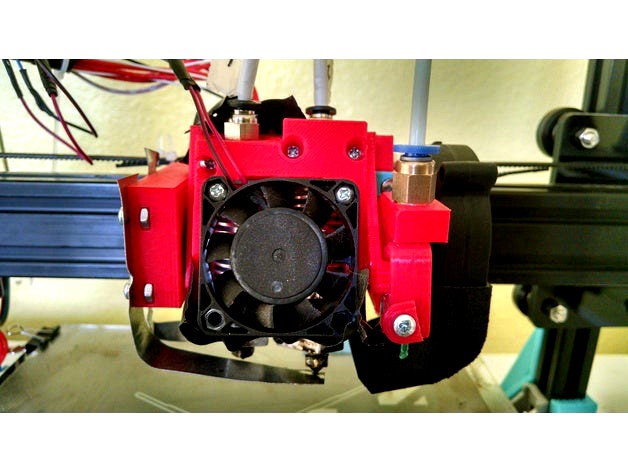
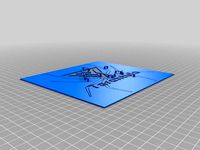
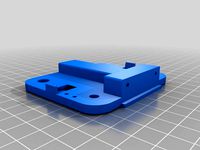
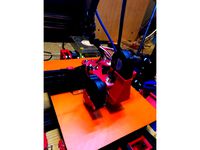
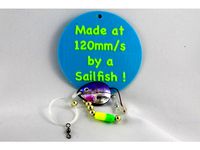
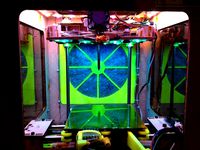
The CRUX dual extruder system eliminates all of these problems with a super cheap (less than $10!) and simple solution that requires no special knowledge to operate: No added motors, electronics, or firmware. Just build it and attach it, and change a few slicing settings. You can see the results in the images. The frog was printed at 0.3 layer height, so it does look rough but it was just for testing (I will upload more when I make more cool stuff).
Here's how it works:
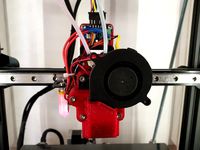
The two hotends are at an angle to each other, and rotate together on two bearings. Rotating the hotends causes one to be vertical when printing, and the other to be "capped" with a metal strip, which prevents oozing. In order to rotate these hotends back and forth, the system uses a mechanism similar to a bike brake cable, but using a piece of filament and a bowden tube instead.
The carriage is switched remotely by the extruder. When the extruder gear rotates one direction (extruding), the mechanism pushes on the piece of filament, causing that hotend to rotate to the vertical position. While the extruder keeps extruding, the force remains constant, holding the hotend in place.
When the extruder rotates the other direction by 80mm (retracting), it will pull on the filament, switching to the other hotend. When the extruder un-retracts, it will switch back. The other extruder does not need any modifications.
The extruder mechanism allows for normal retractions (~ 6mm or less) without switching. This way you can just set your "extruder switch retraction distance" to 90mm in the slicer, and it will just work.
The youtube video below also kind of explains how it works (it is a bit old and describes problems that are now fixed):https://www.youtube.com/watch?v=-pla2nTOf0U
Here is the parts list, not including the extruders and hotends (fits e3d hotend style and stock tarantula extruder):
https://docs.google.com/spreadsheets/d/1BHZdDf7nSVykozLdog23PVMdhgn_bmm2i0PQVCDQTcQ/edit?usp=sharing
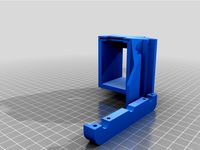
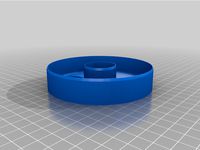
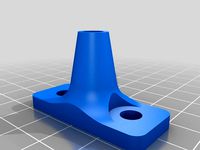
Printed parts (see combined file for all on one build plate):
1x carriage
1x hotend holder pt 1 v2
1x hotend holder pt 2
1x hotend holder cap
2x peg
1x wire holder
1x extruder piece
1x pivot clamp
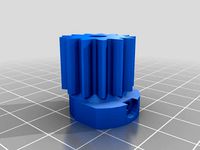
1x gear 1
1x gear 2
1x gear 2 cap
1x rack
1x magnet wheel
1x stage 2 v2
1x retaining arm
1x fan duct (optional for cooling fan)
1x fan duct linkage (optional for cooling fan)
Other:
2x steel sheet metal strips (these you will need to punch holes in, and bend to shape to fit your hotend)
Instructions for assembly:
https://docs.google.com/document/d/1xazkP1N-5GEsPjiDxOkdNpdAoYsKdL9Ixf4trrOvHqo/edit?usp=sharing
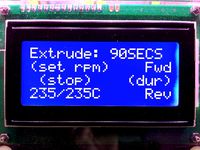
Slicer setting changes:
Retract on extruder switch: 90mm
Retract on extruder switch speed: up to 100mm/s
Start G code:
G21
G90
M107
G28 X0 Y0
G28 Z0
G1 Z5.0 F{travel_speed}
G1 X30 ;optional, positions the nozzle somewhere that works better for purging
T1
G92 E0
G1 F600 E-90 ;pivots to first hotend
T0
G92 E0
G1 F200 E20 ;purges first hotend
G92 E0
G1 F600 E-90 ;retracts first hotend
T1
G1 F600 E0 ;pivots to second hotend
G1 F200 E20 ;purges second hotend
G92 E0
G1 F600 E-90 ;pivots back to first hotend
T0
G1 F{travel_speed}
M117 Printing...
End Gcode:
G91
G1 E-1 F300
G1 Z+0.5 E-5 X-20 Y-20 F{travel_speed}
G28 X0 Y0
T0
G1 F1000 E0 ;brings filament back to nozzle to prepare for next print
T1
G1 F1000 E0 ;brings filament back to nozzle to prepare for next print
M104 T0 S0
M104 T1 S0
M140 S0
M84
G90
Instructions for printing:
-The filament must be loaded all the way into each hotend before printing. You especially need to check this after stopping a print halfway through, since one of the filaments will be retracted by 90mm.
-If you are having trouble with the first layer not sticking, it's probably because your nozzles aren't level. Level the nozzles as best you can, and if it still doesn't work, try using a raft, which will make it much easier to get everything to stick.
-Don't be alarmed when you hear the extruder "clicking". The mechanism is making that noise, and it is normal. The two wheels with magnets are skipping past each other.
-You probably want to assign the extruder with the mechanism attached to the second extruder, so you don't constantly use it when you are doing single color prints. And you probably also want to use it for the part in the model that uses the least material, again so you don't constantly use the mechanism.
Update 7/2/17: Updated the hotend holder cap (for normal sized hotends) to be more form-fitted in order to reduce cooling of the heat block. Changed the retaining arm for the extruder part to be less fragile and easier to assemble.
Update 6/18/17: I changed the design to work with either volcano hotends or normal sized hotends (just not both at once).
Update 6/17/17: The current version only works with the volcano hotends, I am working on a version for the regular sized hotends.
If you have ever tried a dual extrusion print, you know it can be a huge pain. The other nozzle bumps into what you are printing, it oozes all over your prints, and has to be primed before printing, which wastes plastic.
And if you try a mixing nozzle, it will constantly clog if you don't print with one of the colors for a while, one color will bleed into the next, and it can't use materials that aren't similar, for instance dissolvable support or flexible materials.
The CRUX dual extruder system eliminates all of these problems with a super cheap (less than $10!) and simple solution that requires no special knowledge to operate: No added motors, electronics, or firmware. Just build it and attach it, and change a few slicing settings. You can see the results in the images. The frog was printed at 0.3 layer height, so it does look rough but it was just for testing (I will upload more when I make more cool stuff).
Here's how it works:
The two hotends are at an angle to each other, and rotate together on two bearings. Rotating the hotends causes one to be vertical when printing, and the other to be "capped" with a metal strip, which prevents oozing. In order to rotate these hotends back and forth, the system uses a mechanism similar to a bike brake cable, but using a piece of filament and a bowden tube instead.
The carriage is switched remotely by the extruder. When the extruder gear rotates one direction (extruding), the mechanism pushes on the piece of filament, causing that hotend to rotate to the vertical position. While the extruder keeps extruding, the force remains constant, holding the hotend in place.
When the extruder rotates the other direction by 80mm (retracting), it will pull on the filament, switching to the other hotend. When the extruder un-retracts, it will switch back. The other extruder does not need any modifications.
The extruder mechanism allows for normal retractions (~ 6mm or less) without switching. This way you can just set your "extruder switch retraction distance" to 90mm in the slicer, and it will just work.
The youtube video below also kind of explains how it works (it is a bit old and describes problems that are now fixed):https://www.youtube.com/watch?v=-pla2nTOf0U
Here is the parts list, not including the extruders and hotends (fits e3d hotend style and stock tarantula extruder):
https://docs.google.com/spreadsheets/d/1BHZdDf7nSVykozLdog23PVMdhgn_bmm2i0PQVCDQTcQ/edit?usp=sharing
Printed parts (see combined file for all on one build plate):
1x carriage
1x hotend holder pt 1 v2
1x hotend holder pt 2
1x hotend holder cap
2x peg
1x wire holder
1x extruder piece
1x pivot clamp
1x gear 1
1x gear 2
1x gear 2 cap
1x rack
1x magnet wheel
1x stage 2 v2
1x retaining arm
1x fan duct (optional for cooling fan)
1x fan duct linkage (optional for cooling fan)
Other:
2x steel sheet metal strips (these you will need to punch holes in, and bend to shape to fit your hotend)
Instructions for assembly:
https://docs.google.com/document/d/1xazkP1N-5GEsPjiDxOkdNpdAoYsKdL9Ixf4trrOvHqo/edit?usp=sharing
Slicer setting changes:
Retract on extruder switch: 90mm
Retract on extruder switch speed: up to 100mm/s
Start G code:
G21
G90
M107
G28 X0 Y0
G28 Z0
G1 Z5.0 F{travel_speed}
G1 X30 ;optional, positions the nozzle somewhere that works better for purging
T1
G92 E0
G1 F600 E-90 ;pivots to first hotend
T0
G92 E0
G1 F200 E20 ;purges first hotend
G92 E0
G1 F600 E-90 ;retracts first hotend
T1
G1 F600 E0 ;pivots to second hotend
G1 F200 E20 ;purges second hotend
G92 E0
G1 F600 E-90 ;pivots back to first hotend
T0
G1 F{travel_speed}
M117 Printing...
End Gcode:
G91
G1 E-1 F300
G1 Z+0.5 E-5 X-20 Y-20 F{travel_speed}
G28 X0 Y0
T0
G1 F1000 E0 ;brings filament back to nozzle to prepare for next print
T1
G1 F1000 E0 ;brings filament back to nozzle to prepare for next print
M104 T0 S0
M104 T1 S0
M140 S0
M84
G90
Instructions for printing:
-The filament must be loaded all the way into each hotend before printing. You especially need to check this after stopping a print halfway through, since one of the filaments will be retracted by 90mm.
-If you are having trouble with the first layer not sticking, it's probably because your nozzles aren't level. Level the nozzles as best you can, and if it still doesn't work, try using a raft, which will make it much easier to get everything to stick.
-Don't be alarmed when you hear the extruder "clicking". The mechanism is making that noise, and it is normal. The two wheels with magnets are skipping past each other.
-You probably want to assign the extruder with the mechanism attached to the second extruder, so you don't constantly use it when you are doing single color prints. And you probably also want to use it for the part in the model that uses the least material, again so you don't constantly use the mechanism.
Similar models
thingiverse
free

Dual material Y joiner remix by hackwell
...ustom gcode
g92 e0 t1
g91
g1 t1 e-140 f3500; unload filament
g90
g92 e0 t1
g0 x{prime_tower_position_x} y{prime_tower_position_y}
thingiverse
free
A20M A10M BigMac MKII 5015 Blower
...
g1 e70 f3000
g92 e0
g1 e30 f200
g92 e0
g4 s3
g0 f10000
; end extruder 2
g92 e0
g1 e-5 f6000
g1 x-10.5 f8000
g1 e-70 f3000
g92 e0
thingiverse
free
TEVO TORNADO CR10 dual extruder by Calo_pc
...
g1 e125 f3000 ;extrude the new selected filament to the nozzle
g92 e0;
g1 e4 f180;
g92 e0;
//g1 e-3 f3600 ; retract the filament
thingiverse
free
nozzle cleaning bin by Calo_pc
...
g1 e125 f3000 ;extrude the new selected filament to the nozzle
g92 e0;
g1 e4 f180;
g92 e0;
//g1 e-3 f3600 ; retract the filament
thingiverse
free

Mini dual Y adapter for E3D V6 style hotend with bowden extruders by gimle
...r
slic3r custom tool change gcode:
t[previous_extruder]
g92 e0
g1 e-110 f4200
g92 e0
t[next_extruder]
g92 e0
g1 e110 f4200
g92 e0
thingiverse
free
SVO2 Purge Bucket and GCODE by RedSquirrelHobbies
... positioning on
g1 z-1 f1000 ; lower nozzle by 1mm
g90 ; absolute positioning on
m400 ; wait for finish
thingiverse
free

A10M A20M Purge extension (Aibecy hotend) by deakbannok
...91 ; switch from absolute positioning to relative positioning
g1 z-0.4 f800 ;
g90 ; return to absolute
g1 e6.5 f3600.0 ;
g92 e0 ;
thingiverse
free

Extruder Merger by mokash770
...original layer hight
the speed of the retraction is important, to slow will stretch the filament in the path without clearing it.
thingiverse
free

Anet A8 Filament Scraper by DasEimer
... z0
g29 /autolevel
g1 z2 x-20 f9000
g1 y2 f9000
g92 e0
g1 e25 f500 /extrude 25mm
g4 s1
g1 x0 f2000 /wipe
g92 e0
g1 f9000
m117
thingiverse
free

Purge Bucket for A10M (cleaned up) by carterlewellyn
... e0 ;reset extruder positioning
g1 e-2 f5000 ;retract filament to resting spot
g92 e0 ;reset extruder positioning
i hope it helps
Galaxyman7
thingiverse
free

Robotic arm polar printer by galaxyman7
...robotic arm polar printer by galaxyman7
thingiverse
a robotic arm printer to be used with geared hobby motors
thingiverse
free
Donut cutter by galaxyman7
...rested:
https://www.youtube.com/watch?v=m5_eu92j-ac
you should probably make it using petg so you can stick it in the dishwasher.
thingiverse
free

2020 toilet paper ornament by galaxyman7
...upports, in two pieces. the roller is 1.6mm smaller than the roll, so it should be totally fine even for non calibrated printers.
thingiverse
free

Stiffened X axis motor mount for TEVO Tarantula by galaxyman7
...iage for the tevo tarantula, to increase the stiffness of the part so it doesn't flex back and forth when changing direction.
thingiverse
free

Raptor Reloaded - Infinite Love gauntlet by galaxyman7
...t.co.nz%2fuser-images%2fitemuploads%2fu22067%2fi449321%2fo.jpg&action=click
i also added psalm 34:18 inscribed on the inside.
thingiverse
free
TEVO Tarantula T-Shirt Spray Paint Stencil by galaxyman7
...me and wait a few minutes between sprays. you may also want to put a backing inside the t-shirt, in case any paint soaks through.
thingiverse
free
Printrbot Original Improved extruder spur gear Greg Wade's by galaxyman7
... infill in the orientation shown. the gear teeth overhang so they will start out sagging, but it will be fine after a few layers.
thingiverse
free
Remix - Diamond hotend TEVO Tarantula X-axis carriage by galaxyman7
...d mount page and thingirob's carriage page.
note: i also attached a few more parts that are required for the diamond upgrade
thingiverse
free
Dual Switching Extruder Servo rotating no ooze by HE3DUser151
...better clearance. https://www.youtube.com/watch?v=jiplzppdmak first off, a big thanks from galaxyman7 and his support on this project. background: this project...
Crux
thingiverse
free

Crux Terminatus
...rux terminatus, and crux terminatus pendant.
pendant loop not visible on preview due to perspective (you can just see its shadow)
thingiverse
free

Another Crux Terminatus by kj7574
...another crux terminatus by kj7574
thingiverse
a crux terminatus.
renderosity
$13

CruX Vamp
... optimized for the iray render engine.<br />
<br />
thanks for stopping by, and i hope you enjoy crux vamp!</p>
renderosity
$16

CruX For La Femme
...racter morphs. <br />
<br />
the material presets include shaders optimized for both firefly and superfly.</p>
renderosity
$19

CruX Obsession
...character morphs. <br />
<br />
all material presets include shaders optimized for the iray render engine.</p>
thingiverse
free

Crux Shoulder Pad
...crux shoulder pad
thingiverse
shoulder pad for veteran old marines
renderosity
$9

CruX III - Gothica
...t and the iray render engine.<br />
<br />
thanks for stopping by, and i hope you enjoy crux iii - gothica!</p>
renderosity
$13

CruX Nightfall
...character morphs. <br />
<br />
all material presets include shaders optimized for the iray render engine.</p>
renderosity
$15

CruX Killer StaX
... />
- 4 metal material options<br />
- 5 sole and heel material options<br />
- 6 strap material options</p>
renderosity
$11

CruX Appeal for the G3 and G8 Females
...2 sleeves and panel options for top<br />
<br />
thanks for stopping by, and i hope you enjoy crux appeal!!</p>
Ooze
turbosquid
$30

Ooze
... available on turbo squid, the world's leading provider of digital 3d models for visualization, films, television, and games.
3d_ocean
$15

Lowpoly Ooze Barrel
...ne with this sexy next-gen barrel. you can even get rid of the ooze and just have a beat up barrel. highpoly barrel that the l...
turbosquid
$10

Ooze Face Monster
... available on turbo squid, the world's leading provider of digital 3d models for visualization, films, television, and games.
cg_studio
$30

Ooze3d model
...ooze3d model
cgstudio
.max - ooze 3d model, royalty free license available, instant download after purchase.
3d_export
$5
arco stool by cantarutti - barstool
...air, stool. polys: 5.322 verts: 5.430 render: v-ray 3.2 - corona 3.0 formats: 3ds max 2013, obj uv mapped: yes units: centimeters
thingiverse
free

Ooze by ggordon12
...ooze by ggordon12
thingiverse
ooze made for table top dnd games to act as a ooze before it is triggered into attacking.
thingiverse
free

Ooze by ggordon12
...don12
thingiverse
small quick and dirty model for an ooze. no support needed.the base ooze was made by my super cool bro-in-law!
thingiverse
free

Ooze by Porcupine
...ooze by porcupine
thingiverse
devouring ooze creature designed for tabletop rpgs
thingiverse
free

Ooze man / humanoid ooze d&d miniature
...ooze man / humanoid ooze d&d miniature
thingiverse
ooze man /humanoid ooze miniature for tabletop gaming or d&d.
thingiverse
free

Brain Ooze
...brain ooze
thingiverse
a brain ooze.
you can support me on https://www.patreon.com/schlossbauer if you like my work.
Firmware
3d_export
$5
Pepe stool by Opinion Ciatti Italian
...design provides a special slope. additional decor - manual firmware<br>32 x 48 x h58...
3d_export
$5

LENNY BED by Felis
...removable. an additional decor of the headboard is a firmware that imitates the capitonne technique. the bed can be...
thingiverse
free

sidewider x1 firmware by Xavierart26
...sidewider x1 firmware by xavierart26
thingiverse
firmware for sidewider x1
thingiverse
free
Sailfish Firmware by jetty
... created with omnomnom creator:http://www.thingiverse.com/thing:24639.
note: this is not an official makerbot firmware release.
thingiverse
free
Jetty Accelerated Firmware by jetty
...y-firmware#toc66
any updates will be placed here, so check back often.
note: this is not an official makerbot firmware release.
thingiverse
free
Sigma Türkçe firmware (marlin1.1) by Paarthurnax
...sigma türkçe firmware (marlin1.1) by paarthurnax
thingiverse
sigma türkçe firmware (marlin1.1)
thingiverse
free

firmware for orca 040 by sellemann
...y sellemann
thingiverse
firmware and settings for orca 040 with 025 nozzle
i had trubble getting it to work but now its working.
thingiverse
free
Gen4 Interface Firmware by jetty
...-firmware#toc66
any updates will be placed here, so check back often.
note: this is not an official makerbot firmware release.
thingiverse
free

cl-260 standard firmware (outdated!) by renoisenoir
...re is not for 2018 or higher version of cl-260!
this firmware is for 2016-version of cl-260
it can be used for reference purpose.
thingiverse
free
Firmware Tronxy XY2 Pro Titan by droidlex
...flashed your printer with marlin firmware, this should help restore the factory firmware, including the boot screen and interface
Zero
3ddd
$1

ZERO, BEAM
...zero, beam
3ddd
zero
поворотная люстра zero , beam
design_connected
$9
Zero-in
...zero-in
designconnected
established & sons zero-in tables computer generated 3d model. designed by jay osgerby .
3ddd
free
Sub-Zero
...sub-zero
3ddd
sub-zero , голова
sub-zero corona render!
3ddd
$1
Metalspot / Zero
...metalspot / zero
3ddd
metalspot
metalspot zero
3ddd
$1
Catalano Zero
...catalano zero
3ddd
catalano , унитаз
catalano zero
3ddd
$1
SUB ZERO
... sub zero
the first and only 3d model of sub zero refrigerator.
the model is very accurate.
turbosquid
free
Zero
... available on turbo squid, the world's leading provider of digital 3d models for visualization, films, television, and games.
turbosquid
free
Zero
... available on turbo squid, the world's leading provider of digital 3d models for visualization, films, television, and games.
turbosquid
free

Zero
... available on turbo squid, the world's leading provider of digital 3d models for visualization, films, television, and games.
3ddd
$1

ZERO / Hide
...zero / hide
3ddd
zero
polys: 25486
wire-spline
Dual
turbosquid
free

Dual Pistols
...ls
turbosquid
free 3d model dual pistols for download as fbx on turbosquid: 3d models for games, architecture, videos. (1320360)
turbosquid
$2

Dual Axe
...urbosquid
royalty free 3d model dual axe for download as fbx on turbosquid: 3d models for games, architecture, videos. (1332372)
turbosquid
$10

Dual Lesaths
... available on turbo squid, the world's leading provider of digital 3d models for visualization, films, television, and games.
3ddd
$1

плитка Dual Bianco (Испания)
...й плитки venis dual (испания). технические качества: устойчивость к стирания, отличная геометрия, отсутствие проблем при укладке.
turbosquid
$35

Dual Mesh Fonts
...ree 3d model dual mesh fonts for download as ma, obj, and fbx on turbosquid: 3d models for games, architecture, videos. (1352989)
turbosquid
$29

Dual Flask with Bungs
...del dual flask with bungs for download as obj, fbx, and blend on turbosquid: 3d models for games, architecture, videos. (1210512)
turbosquid
$19

Dual Socket Plug
...3d model dual socket plug for download as obj, fbx, and blend on turbosquid: 3d models for games, architecture, videos. (1303912)
turbosquid
$13

Dual Adjustable Pulley
... available on turbo squid, the world's leading provider of digital 3d models for visualization, films, television, and games.
turbosquid
$10

Amoi N809 Dual
... available on turbo squid, the world's leading provider of digital 3d models for visualization, films, television, and games.
turbosquid
$5

Dual Turret Tank
... available on turbo squid, the world's leading provider of digital 3d models for visualization, films, television, and games.
Extruder
3ddd
$1

Extruded Chair
...extruded chair
3ddd
extruded , tom dixon
inspired by tom dixon extruded chair
turbosquid
$2

3D Printer Extruder
...d
royalty free 3d model 3d printer extruder for download as on turbosquid: 3d models for games, architecture, videos. (1537359)
turbosquid
$1

Zombie extruded text
...oyalty free 3d model zombie extruded text for download as obj on turbosquid: 3d models for games, architecture, videos. (1322198)
turbosquid
$4

Extruder conical screw
...el extruder conical screw for download as sldpr, ige, and stl on turbosquid: 3d models for games, architecture, videos. (1524433)
turbosquid
$50

3d PRINTER - Extruder
... available on turbo squid, the world's leading provider of digital 3d models for visualization, films, television, and games.
3d_export
$5

world earth extrude map
...world earth extrude map
3dexport
3ddd
$1

Simply Elegant Extruded Tree Coffee Table Design
...ble by link studios. the silhouette of a tree is visible at one angle, extruded from the surface to create the support structure.
3d_export
$13
extruded table
...ed to give you the highest possible quality for up to 4k renders. there is no post-production used on any of the renders you see.
3d_export
$13
extruded chair
...for high-quality render results. no extra plugins are required for this model. lights and cameras are not included in the scenes.
3d_export
$13
extruded table 2
...for high-quality render results. no extra plugins are required for this model. lights and cameras are not included in the scenes.
Electronics
turbosquid
$1

electron
...urbosquid
royalty free 3d model electron for download as max on turbosquid: 3d models for games, architecture, videos. (1157488)
turbosquid
$50

electronic
...
royalty free 3d model electronic for download as max and obj on turbosquid: 3d models for games, architecture, videos. (1289427)
3d_ocean
$8
Electronic game
...electronic game
3docean
electronic games nu pogody wait a minute well
electronic game “well, wait a minute”, “nu pogody”
3ddd
$1
Brilux Electronic
...brilux electronic
3ddd
подвес. brilux electronic. польша. материалы настроены.
3d_export
free

electronic shop
...lectronic shop with high quality interior and exterior. it has tvs smartphone play station printer and many more electronic item.
3ddd
$1

Термостаты OJ Electronics
...ермостаты oj electronics
3ddd
oj electronics , термостат
термостаты фирмы oj electronics
3d_export
$8

electron 714
...electron 714
3dexport
game ready model for export to unreal engine soviet tv electron 714 pbr 4k
3ddd
$1

Термостат OJ Electronics
... oj electronics
3ddd
oj electronics , термостат
термостат occ2-1991 фирмы oj electronics
turbosquid
$60
Electronics Stuff
...
royalty free 3d model electronics stuff for download as max on turbosquid: 3d models for games, architecture, videos. (1624680)
turbosquid
$2

ELECTRONIC PARTS
...
royalty free 3d model electronic parts for download as blend on turbosquid: 3d models for games, architecture, videos. (1481798)
Motors
archibase_planet
free

Motor
...base planet
motor motor engine engine electric motor
motor wagner n250213 - 3d model (*.gsm+*.3ds) for interior 3d visualization.
archibase_planet
free

Motor
...motor
archibase planet
motor motor engine engine
motor n151112 - 3d model (*.gsm+*.3ds) for interior 3d visualization.
archibase_planet
free

Motor
...motor
archibase planet
motor motor engine engine
motor n150615 - 3d model (*.gsm+*.3ds+*.max) for interior 3d visualization.
turbosquid
$15

Motor
...otor
turbosquid
royalty free 3d model motor for download as on turbosquid: 3d models for games, architecture, videos. (1639404)
3d_ocean
$5

Electric motor
...electric motor
3docean
car electric engine industry motor phase train vehicle
an electric motor enjoy!
3d_ocean
$18

Electric Motor
...electric motor
3docean
electric motor engine machine mover parts
3d model electric motor for hoist crane
turbosquid
$5

Motor
... available on turbo squid, the world's leading provider of digital 3d models for visualization, films, television, and games.
3d_export
$5

electric motor
...electric motor
3dexport
electric motor use for industrial purposes
3d_export
$5

servo motor
...tor
3dexport
it's a simple part of servo motor 0.75kw for used in machines assembly to show specified motor in own project.
archive3d
free

Motor 3D Model
...ine electric motor
motor wagner n250213 - 3d model (*.gsm+*.3ds) for interior 3d visualization.
Changed
3d_export
$10
Feed chang
...feed chang
3dexport
turbosquid
$5

Change Dish
... available on turbo squid, the world's leading provider of digital 3d models for visualization, films, television, and games.
design_connected
$29

Basis 25 + Change
...basis 25 + change
designconnected
schramm basis 25 + change computer generated 3d model.
turbosquid
$9

Change black coin
...
royalty free 3d model change black coin for download as max on turbosquid: 3d models for games, architecture, videos. (1494730)
turbosquid
$9

Change gold coin
...d
royalty free 3d model change gold coin for download as max on turbosquid: 3d models for games, architecture, videos. (1494727)
turbosquid
$3

change cup box
...uid
royalty free 3d model change cup box for download as stl on turbosquid: 3d models for games, architecture, videos. (1241132)
turbosquid
$50

110214 da chang
... available on turbo squid, the world's leading provider of digital 3d models for visualization, films, television, and games.
turbosquid
$15

Stove (Color Changing)
... available on turbo squid, the world's leading provider of digital 3d models for visualization, films, television, and games.
3d_export
$9

baby changing table 001
...baby changing table 001
3dexport
modern changing table - chest of drawers for a children room + decor.
evermotion
$15

changing table 38 am119
...ging table with all textures, shaders and materials. it is ready to use, just put it into your scene.. evermotion 3d models shop.
Simple
turbosquid
$1

Simple goblet (Taca simples)
... available on turbo squid, the world's leading provider of digital 3d models for visualization, films, television, and games.
3d_export
$5
simple bench
...simple bench
3dexport
the simple bench which can be used in simple projects or video-games.
3d_export
$5
simple knob
...simple knob
3dexport
simple knob
3d_export
$5
simple handle
...simple handle
3dexport
simple handle
3d_export
$5
simple button
...simple button
3dexport
simple button
3d_export
$5

simple spindle
...simple spindle
3dexport
simple spindle
3d_export
$5

simple wheel
...simple wheel
3dexport
simple wheel
3d_export
$5
simple chair
...simple chair
3dexport
simple blue chair
3d_export
free
Simple room
...simple room
3dexport
here is a simple but beautiful room
3ddd
free
SIMPLE | Кресло
...io cianfarra , simple
производитель area declic дизайн giulio cianfarra коллекция simple