Thingiverse
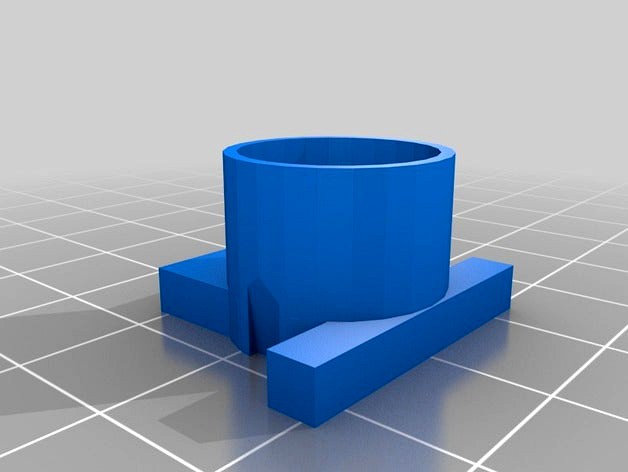
Simple electric motor demonstration kit by JustReadTheInstructions
by Thingiverse
Last crawled date: 3 years ago
Years ago my son brought home a very simple electric motor made of a coil of wire supported on brass contacts above a D cell battery holder. I thought it was quite an elegant little demonstration. I was recently asked if my company could support a STEM night an an elementary school. Since we build a lot of products with electric motors, I said I'd provide an activity where the students could build and take home their own electric motor. They also said to plan for 150 kids. Those D cell batteries were going to be very expensive in that quantity. This is a variation of a C cell design I found on line using safety pins to support the coil and a rubber band to hold it together. It had no base and just rolled around on a table. I thought the project would be improved by a base, and C cells were still too expensive. An AA battery fit my budget but it is too small for the rubber band to stay on. I designed the two plastic ends to provide a base, to steady the pins, and to grip the rubber bands. The cost of the kit was about $1.10 each, including a color printed instruction sheet and a baggie to take it all home.
The STEM activity was a complete success. We saw over 160 kids in an hour an a half and ran out of some parts in the last five minutes.
On my Flashforge Creator, a set of the two parts takes about 21 minutes. I used the Lulzbot Taz 5 at work as well, which can print more but was a little bit slower, perhaps because of different settings. The parts were printed in several colors of ABS. All the parts were purchased from Amazon except for the plastic, the batteries (Costco), and the sandpaper (Home Depot). You could get the cost down another few cents per kit by just using one magnet. I used two so they stood up closer to the coil, which made the coil itself less critical.
Assembling the base is easy and nobody had trouble with it. There are two keys to success in making the coil:
1) Get the coil as evenly balanced as possible. It spins on the axis formed by the extended wires. if it is out of balance, gravity will be fighting with the magnetic forces and may win.
2) The enamel on the wire is sanded completely off on one end and just on one side on the other end. The side to sand is what I call the "top". Hold the coil vertical (so that it would be flat if you pressed it against a wall) and just sand the top side of one wire. The coil will work equally well if you sand only the top side of both wire ends, but that means you have to be careful on both ends and I was trying to make sure a first grader could make this work.
If the motor doesn't work, it's usually the coil sanding or the balance. Some motor builders needed a little help getting the wires sanded and the coils balanced, but in the end everyone went home with a smile and a working motor.
Similar models
thingiverse
free

3 AAA battery holder by mpete53
...f battery's
photos show, how when loaded the one end sticks out a bit, how it looks assembled and how the wire ends are made.
thingiverse
free

Educational electric motor kit by fredio
...ow kids to build a working electric motor.
batteries are connected with paperclips in the base,
this is a active work in progress
thingiverse
free

Two 18650 to three C battery adapter with BMS slot by Muzycy
...n it to not wrek wire by screwing plug.
print settings
print on side
0.2 mm layer high work fine to me
infill 100%
line width 0.4
thingiverse
free

18650 battery spot welding jig by bananazx
...monstrate how it works.
the jig is about little less than two inches high. if you shorten the height, aa cells will work as well.
thingiverse
free

20mm Coin Cell Battery Holder by mrownership
...two wires in place.
the battery is a tight fit and my need some pushing to fit in, easily removes with a pair of pliers though.
grabcad
free

Electric Motor with AA battery holder
...l of the coil ring or a thick paper clip
for more information go to: https://www.instructables.com/id/3d-printed-electric-motor/
thingiverse
free

Motor End Cap by Fr8Dog
... relatively little effort. there is a tab for securing/stress relief of the wiring. i used a small zip tie as shown in the photo.
thingiverse
free

Low Speed Sander by bkgray115
...will have a rubber band belt to a battery powered motor for sanding printed parts.
\
1-24-17 updated - full base with motor mount
thingiverse
free

Dual small wire clamp for soldering
...ided tape for improved grip on the wires
clamping force can be adjuster by varying the amout and the position of the rubber bands
thingiverse
free

Ryobi 18V to 40V adapter by willtan930
...he holes on the 40v battery base may need to be adjusted otherwise the batteries will not sit straight when attached to the tool.
Demonstration
3d_export
$5

Solitaire Ring Demonstration 3D Model
...solitaire ring demonstration 3d model
3dexport
solitaire ring demonstration 3d model rehansheikh 30601 3dexport
3d_export
$9

Simple atmosphere fashion demonstration area SU model
...simple atmosphere fashion demonstration area su model
3dexport
simple atmosphere + fashion demonstration area su modelv
3d_export
$19

Enterotoxin demonstration internal organs anatomy gastrointestinal
...ation internal organs anatomy gastrointestinal, human organs medical animation black intestine stomach 2.files include 3dmax mb
3d_export
$7

Characteristic Chinese-style demonstration area landscape su model
... chinese-style demonstration area landscape su model
3dexport
characteristic chinese-style demonstration area landscape su model
3d_export
$5

robot cat
...cat 3dexport 3d model of a robot cat for demonstration or...
3d_export
$299
dragon
...animation. the scene and video file are attached for demonstration ...
3d_export
$5

vertu new signature touch
...vertu new signature touch 3dexport vertu phone for demonstration purposes, assistance in creating a picture or...
3d_ocean
$30

Realistic Lens For Camera
...outside buttons and displays. perfect for mechanism of lens demonstration all parts were made with...
3d_export
$10

Toaster 3D Model
...toaster 3d model
3dexport
toaster house-hold kitchen electronics appliances
toaster 3d model demonstrator 32412 3dexport
3d_ocean
$2

Loudspeaker
...loudspeaker 3docean demonstration loudspeaker music police speaker tool voice a high-quality model...
Kit
turbosquid
$3

Bathroom Kit Baño kit
... available on turbo squid, the world's leading provider of digital 3d models for visualization, films, television, and games.
turbosquid
$19

Kit
... available on turbo squid, the world's leading provider of digital 3d models for visualization, films, television, and games.
3d_export
$20

Drift Kit
...drift kit
3dexport
turbosquid
$40

BitCoin Kit
...urbosquid
royalty free 3d model bitcoin kit for download as on turbosquid: 3d models for games, architecture, videos. (1519068)
turbosquid
$9

Industrial kit
...osquid
royalty free 3d model industrial kit for download as on turbosquid: 3d models for games, architecture, videos. (1144117)
turbosquid
$6

Kit Vases
...
turbosquid
royalty free 3d model kit vases for download as on turbosquid: 3d models for games, architecture, videos. (1285114)
turbosquid
free

Survival Kit
...rbosquid
royalty free 3d model survival kit for download as on turbosquid: 3d models for games, architecture, videos. (1637721)
turbosquid
$50

Ninja Kit
...rbosquid
royalty free 3d model ninja kit for download as fbx on turbosquid: 3d models for games, architecture, videos. (1672364)
turbosquid
$35

Brushes Kit
...osquid
royalty free 3d model brushes kit for download as max on turbosquid: 3d models for games, architecture, videos. (1216721)
turbosquid
$19

Kit Bedroom
...osquid
royalty free 3d model kit bedroom for download as max on turbosquid: 3d models for games, architecture, videos. (1290049)
Electric
3d_export
$5
Electric pole
...electric pole
3dexport
electric pole for street, electricity line
3ddd
$1

electric mixer
...electric mixer
3ddd
electric mixer , миксер
electric mixer
3ddd
$1

electrical installation
...electrical installation
3ddd
electrical installation , розетка
electrical installation
turbosquid
$19
The electric water heater electric
... available on turbo squid, the world's leading provider of digital 3d models for visualization, films, television, and games.
turbosquid
free
Electrical Outlet electric splitter
... available on turbo squid, the world's leading provider of digital 3d models for visualization, films, television, and games.
3d_ocean
$20
Electric Guitar
...electric guitar
3docean
electric electric guitar guitar music music instrument
model of a electric guitar created in maya.
3d_ocean
$12

Electric Shaver
...electric shaver
3docean
electric electric shaver hair removal personal care shaver shaving
electric shaver created in 3ds max.
3ddd
$1

electrical switch
...h
3ddd
electrical , розетка
electrical switch from bticino company
series livinglight
3d_export
$7
Electric Conveyor
...electric conveyor
3dexport
electric conveyor
3d_export
$5
electric drums
...electric drums
3dexport
electric drums
Motor
archibase_planet
free

Motor
...base planet
motor motor engine engine electric motor
motor wagner n250213 - 3d model (*.gsm+*.3ds) for interior 3d visualization.
archibase_planet
free

Motor
...motor
archibase planet
motor motor engine engine
motor n151112 - 3d model (*.gsm+*.3ds) for interior 3d visualization.
archibase_planet
free

Motor
...motor
archibase planet
motor motor engine engine
motor n150615 - 3d model (*.gsm+*.3ds+*.max) for interior 3d visualization.
turbosquid
$15

Motor
...otor
turbosquid
royalty free 3d model motor for download as on turbosquid: 3d models for games, architecture, videos. (1639404)
3d_ocean
$5

Electric motor
...electric motor
3docean
car electric engine industry motor phase train vehicle
an electric motor enjoy!
3d_ocean
$18

Electric Motor
...electric motor
3docean
electric motor engine machine mover parts
3d model electric motor for hoist crane
turbosquid
$29

Motor
... available on turbo squid, the world's leading provider of digital 3d models for visualization, films, television, and games.
turbosquid
$5

Motor
... available on turbo squid, the world's leading provider of digital 3d models for visualization, films, television, and games.
3d_export
$5

electric motor
...electric motor
3dexport
electric motor use for industrial purposes
3d_export
$5

servo motor
...tor
3dexport
it's a simple part of servo motor 0.75kw for used in machines assembly to show specified motor in own project.
Simple
turbosquid
$1

Simple goblet (Taca simples)
... available on turbo squid, the world's leading provider of digital 3d models for visualization, films, television, and games.
3d_export
$5
simple bench
...simple bench
3dexport
the simple bench which can be used in simple projects or video-games.
3d_export
$5
simple knob
...simple knob
3dexport
simple knob
3d_export
$5
simple handle
...simple handle
3dexport
simple handle
3d_export
$5
simple button
...simple button
3dexport
simple button
3d_export
$5

simple spindle
...simple spindle
3dexport
simple spindle
3d_export
$5

simple wheel
...simple wheel
3dexport
simple wheel
3d_export
$5

simple chair
...simple chair
3dexport
simple blue chair
3d_export
free

Simple room
...simple room
3dexport
here is a simple but beautiful room
3ddd
free

SIMPLE | Кресло
...io cianfarra , simple
производитель area declic дизайн giulio cianfarra коллекция simple