Thingiverse
Sim Racing Handbrake - Easy Hall Sensor Analog Setup by cowtown
by Thingiverse
Last crawled date: 3 years ago
This is a very simple setup to add a Hall Sensor to the generic handbrakes being sold for cheap, for SimRacing use.
You need:
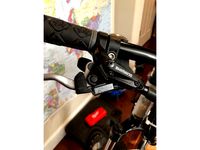
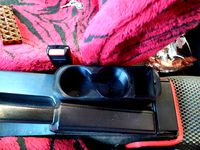
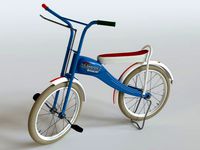
1) Generic handbrake like the one in the photos, available from the usual sources. (~$23).
2) One Leonardo Pro Micro (~$5)
3) One Hall Effect Sensor - Honeywell SS49E (~$1)
4) One 10mm x 5mm circular neo magnet (~$1)
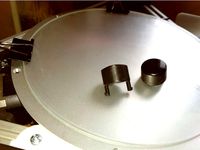
5) Prints of the two included STL files
Instructions:
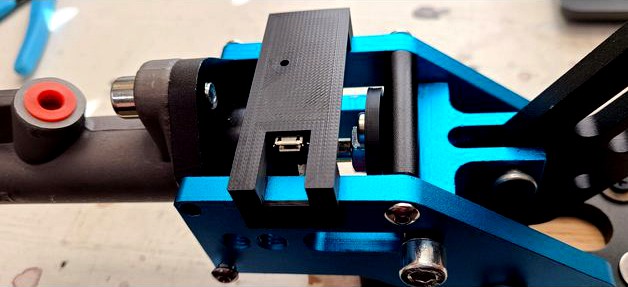
1) Solder the Hall Sensor directly to the Leonardo as shown. The sensor should stick up at a 90 degree angle from the circuit board. The larger face of the sensor package should be oriented to face the magnet when assembled.
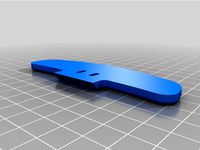
2) Snap the Leonardo into the printed bracket. No glue is necessary if the print's tolerances are reasonably tight. The little hole in the bracket should be directly lined up with the Leonardo's red LED.
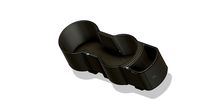
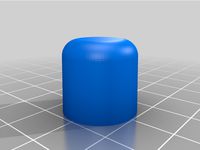
3) Install the magnet into the other printed piece. It's a tight fit and you may need to warm up the PLA with a heatgun or flame. You can put a drop of superglue in there but I didn't.
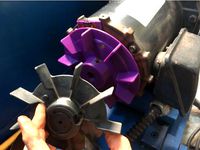
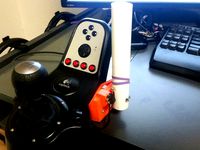
4) On the brake, undo the two hex screws holding the thin aluminum cylinder crosspiece, and reinstall the crosspiece in the alternate holes to provide a hard stop to the brake lever (see photo - it's the slim black cylinder next to the magnet-holding bracket).
5) On the brake, liberate the master cylinder from the rest of the assembly by removing the four hex-head screws securing it to the brake's frame. Then unscrew the shaft from the aluminum receiver on the sliding portion of the mechanism. You can then slip the printed magnet bracket over the shaft as shown, and reassemble the master cylinder.
6) Install the bracket containing the Leonardo onto the brake assembly as shown. It just snaps on and uses the two holes in the top of the aluminum brake frame to stay positioned.
7) Open up Arduino IDE and make sure you have the Joystick Library available: https://github.com/MHeironimus/ArduinoJoystickLibrary
8) Load the included code in the ZIP file onto the Leonardo. It was revised on 2/5/2021 to include self-calibration at power-on, to account for variances in sensors and magnets.
9) Now you have a new single-axis joystick in Windows that you can map to a handbrake in your games. If your output seems inverted, you can flip the magnet over and reinstall it in the bracket to reverse output.
Good Luck, and I'd love to see any builds!
You need:
1) Generic handbrake like the one in the photos, available from the usual sources. (~$23).
2) One Leonardo Pro Micro (~$5)
3) One Hall Effect Sensor - Honeywell SS49E (~$1)
4) One 10mm x 5mm circular neo magnet (~$1)
5) Prints of the two included STL files
Instructions:
1) Solder the Hall Sensor directly to the Leonardo as shown. The sensor should stick up at a 90 degree angle from the circuit board. The larger face of the sensor package should be oriented to face the magnet when assembled.
2) Snap the Leonardo into the printed bracket. No glue is necessary if the print's tolerances are reasonably tight. The little hole in the bracket should be directly lined up with the Leonardo's red LED.
3) Install the magnet into the other printed piece. It's a tight fit and you may need to warm up the PLA with a heatgun or flame. You can put a drop of superglue in there but I didn't.
4) On the brake, undo the two hex screws holding the thin aluminum cylinder crosspiece, and reinstall the crosspiece in the alternate holes to provide a hard stop to the brake lever (see photo - it's the slim black cylinder next to the magnet-holding bracket).
5) On the brake, liberate the master cylinder from the rest of the assembly by removing the four hex-head screws securing it to the brake's frame. Then unscrew the shaft from the aluminum receiver on the sliding portion of the mechanism. You can then slip the printed magnet bracket over the shaft as shown, and reassemble the master cylinder.
6) Install the bracket containing the Leonardo onto the brake assembly as shown. It just snaps on and uses the two holes in the top of the aluminum brake frame to stay positioned.
7) Open up Arduino IDE and make sure you have the Joystick Library available: https://github.com/MHeironimus/ArduinoJoystickLibrary
8) Load the included code in the ZIP file onto the Leonardo. It was revised on 2/5/2021 to include self-calibration at power-on, to account for variances in sensors and magnets.
9) Now you have a new single-axis joystick in Windows that you can map to a handbrake in your games. If your output seems inverted, you can flip the magnet over and reinstall it in the bracket to reverse output.
Good Luck, and I'd love to see any builds!
Similar models
thingiverse
free

Thrustmaster Hotas One/4/X Yaw potentiometer to Hall Effect Sensor conversion kit by rolbista
...to the joystick shaft where yaw potentiometer is and a bracket/mount for two magnets on each side for easier orientation. big wip
grabcad
free

regen lever assemblied
...regen lever assemblied
grabcad
design of a bike/bicycle lever for regen braking working with a hall sensor and a magnet
thingiverse
free

Rotation speed sensor for Tank Chassis by Lekkybits
...or a set period of time to equalise left & right motor speeds.
also works to make accurate turns easier by counting pulses.
grabcad
free

Tilton 76 Series Master Cylinder
...s. 1.1" of travel. the mates in the assembly are set in a way that you can move the shaft throughout its 1.1 inch of travel.
thingiverse
free
eBike Brake Sensor Mount for Shimano Altus M355 by locnhinho
...he side closest to the bike handle bar
printing instruction:
for the magnet mount, print two set
on the second set, mirrored them
thingiverse
free
anemometer by jostak
...er resistant.
use the hole at the bottom of the tower for the wire, allowing the connection to the rest of the automation system.
cg_trader
$3

Anemometer
...er resistant.
use the hole at the bottom of the tower for the wire, allowing the connection to the rest of the automation system.
thingiverse
free
xISTIx Bed Leveling Sensor by xistix
...he hole, and another one below the hole. as the slider moves the magnets are getting closer or further away from the hall sensor.
thingiverse
free
RPM Hall Sensor for Motor Fan Mount, Speedometer, Arduino by KillaCycle
...magnet on the wheel somewhere, mount the ky003 sensor so that the magnet passes nearby, and "bob's your uncle". :-)
grabcad
free

logitech G27 / G29 / G920 Brake Pedal Piston
...ke pedal feel and a lot more accuracy. 3d printed or machined parts with some springs and a magnetic hall sensor is all you need.
Cowtown
thingiverse
free

Cable Management Clip for Mige Motor (Simracing) by cowtown
...e direct-drive motor's cooling fins and provides several cable-management snapins. quite halfassedly done but it works fine.
thingiverse
free

Sim Racing Button Box by cowtown
...allow for use of a zero-delay joystick board, or one or the other for something smaller like a leonardo. m3 or similar hardware.
thingiverse
free

Paper Towel / Shop Towel holder for towel rack by cowtown
...spools of paper towels like the ones found at costco. print the stl once, then mirror it in your slicer and print a second time.
thingiverse
free

Ergonomic Shift Paddle for Sim Racing Wheel by cowtown
...erse. it's not much to look at, but does have rounded edges and more thickness, designed for comfortable use without gloves.
thingiverse
free
Larger Shift Paddles for bremme's Formula Shifters by cowtown
... they cover both the upper and lower grip areas. the picture shows the modified design (mounted) next to the original (in hand).
thingiverse
free

Mascall Mill Addition for Rolling Log Mouse Trap by cowtown
...es, to allow zipties for attachment. the picture shows the regular and mascall mill versions side-by-side. 3/4" pvc sized.
thingiverse
free

CCCKC The door stop by asmodianx
...for ccckc. this was designed on hexagon for the cowtown computer congress 3d design class in...
thingiverse
free

Bre Pettis Talking Head by Skimbal
...collaboration between michael curry and jestin stoffel of the cowtown computer congress the glasses are a scaled down version...
thingiverse
free

LED Ornament Topper by Luis
...a little more, try it, you might like it! cowtown computer congress of kansas city - http://c3kc.org hammerspace hobby...
Handbrake
3d_export
$12
E30 Cup Holder v2
...removable box.<br>the installation location is located next to the handbrake<br>printed abs layer...
3d_export
$10
e30 cup holder
...box. the installation location is located next to the handbrake the diameter of the cup is 68 mm. the...
3d_export
$19
Bambino bicycle
...i owned and used one myself in 1965-1966. the handbrake was dangerous; rolling down the hill and using the...
3d_export
$70

lancer evolution 9
...wheel 2 4 sliders for opening each door 3 handbrake down slider 4 sun shades 5 bardachek 6 dashboard...
3d_export
$129

ursus c-355 tractor
...front tank front tires front wheels gauges gear sticks handbrake head lights hydrolic hitch system pedals rear axle rear...
thingiverse
free
Honda Jazz handbrake button
...honda jazz handbrake button
thingiverse
i had a request for a new handbrake button for a honda jazz.
thingiverse
free

Handbrake Simracing by Javi91ac
...handbrake simracing by javi91ac
thingiverse
work in progress
thingiverse
free
Mitsubishi Colt handbrake button by Raptirius
...mitsubishi colt handbrake button by raptirius
thingiverse
mitsubishi colt z34 handbrake button.
thingiverse
free
G27/G25 Handbrake Mount by Roedkill
...g27/g25 handbrake mount by roedkill
thingiverse
simple handbrake mount for the g27/g25 shifter
thingiverse
free
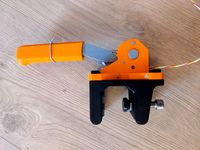
Table Mount For Handbrake
...or an m12 spacer on the bottom side of the print.
this was printed in pla with 3-4 walls while laying on the side with 20% infill
Analog
turbosquid
$1
Analog scape
... free 3d model analog scape for download as 3ds, max, and fbx on turbosquid: 3d models for games, architecture, videos. (1315807)
turbosquid
$25

Analog Durometer
... available on turbo squid, the world's leading provider of digital 3d models for visualization, films, television, and games.
turbosquid
$3

playstation analog
... available on turbo squid, the world's leading provider of digital 3d models for visualization, films, television, and games.
design_connected
$7

Analog Wall Clock
...analog wall clock
designconnected
hay analog wall clock computer generated 3d model. designed by schneck, shane.
turbosquid
free

Vossen rim analog
... 3d model vossen rim analog for download as max, obj, and fbx on turbosquid: 3d models for games, architecture, videos. (1706126)
turbosquid
$7

Old analog multimeter
...analog multimeter for download as 3ds, max, obj, fbx, and dae on turbosquid: 3d models for games, architecture, videos. (1365964)
3d_export
$10

Analog Synthesizer 3D Model
... model
3dexport
keyboard moog synth retro vintage electronic techno music
analog synthesizer 3d model nillervision 59956 3dexport
cg_studio
$29
Analog Chess Timer3d model
...del
cgstudio
.obj .lwo .max .3ds - analog chess timer 3d model, royalty free license available, instant download after purchase.
turbosquid
$10

Dining Table Analog Set
...ritz hansen analog set for download as max, max, fbx, and obj on turbosquid: 3d models for games, architecture, videos. (1596537)
turbosquid
$24

Analog Cassette Audio Tape
...ssette audio tape for download as 3ds, max, obj, fbx, and stl on turbosquid: 3d models for games, architecture, videos. (1495255)
Sim
turbosquid
$6

sim
...osquid
royalty free 3d model sim for download as 3dm and max on turbosquid: 3d models for games, architecture, videos. (1669193)
turbosquid
$39

Sim Card
... available on turbo squid, the world's leading provider of digital 3d models for visualization, films, television, and games.
turbosquid
free

SIM Card
... available on turbo squid, the world's leading provider of digital 3d models for visualization, films, television, and games.
design_connected
$16
Deck SIM, PIM
...deck sim, pim
designconnected
de padova deck sim, pim computer generated 3d model. designed by nichetto, luca.
turbosquid
$7

smart phone and sim
...free 3d model smart phone and sim for download as 3dm and max on turbosquid: 3d models for games, architecture, videos. (1669641)
turbosquid
$35
Grameenphone Sim Card
... grameenphone sim card for download as max, fbx, obj, and 3ds on turbosquid: 3d models for games, architecture, videos. (1527884)
turbosquid
$3
Flow Leather Chair and Sim
...lty free 3d model flow leather chair and sim for download as on turbosquid: 3d models for games, architecture, videos. (1510088)
turbosquid
$19
Nokia 107 Dual SIM
... available on turbo squid, the world's leading provider of digital 3d models for visualization, films, television, and games.
turbosquid
$15

Nokia 225 Dual Sim
... available on turbo squid, the world's leading provider of digital 3d models for visualization, films, television, and games.
turbosquid
$12

Nokia 130 Dual SIM
... available on turbo squid, the world's leading provider of digital 3d models for visualization, films, television, and games.
Sensor
3d_export
free

parking sensor
...parking sensor
3dexport
car parking sensor
turbosquid
$1

Sensor
... available on turbo squid, the world's leading provider of digital 3d models for visualization, films, television, and games.
3d_export
$5

Smoke sensor
...port
smoke sensor, can be an impressive element for your projects. easy to use, realistic image, low polygon, quality materials.
3d_export
$5

Air Quality Sensor v1
...air quality sensor v1
3dexport
air quality sensor v1
3d_export
$15

float sensor
...e up render. - all parts and materials are logically named. other formats ================= - collada (.dae) - autodesk fbx - obj
turbosquid
$26

Wind sensor C
...free 3d model wind sensor c for download as 3ds, obj, and fbx on turbosquid: 3d models for games, architecture, videos. (1328943)
turbosquid
$26

Wind sensor B
...free 3d model wind sensor b for download as 3ds, obj, and fbx on turbosquid: 3d models for games, architecture, videos. (1328168)
3d_export
$5

ultrasound sensor
...ivers convert ultrasound into electrical signals, and transceivers can both transmit and receive ultrasound. export in: -obj -fbx
3ddd
free

Вытяжка Shindo pallada sensor
... вытяжка
вытяжка shindo pallada sensor. в двух размерах - 600 и 900. текстуры в комплекте.
turbosquid
$52

Wind sensor A B C
...
royalty free 3d model wind sensor a b c for download as fbx on turbosquid: 3d models for games, architecture, videos. (1408406)
Hall
3d_export
$5

hall
...hall
3dexport
hall
archibase_planet
free
Hall
...hall
archibase planet
hallstand hall furniture
hall n020909 - 3d model (*.gsm+*.3ds) for interior 3d visualization.
design_connected
$25

Hall
...hall
designconnected
driade hall computer generated 3d model. designed by dordoni, rodolfo.
archibase_planet
free
Hall tree
...hall tree
archibase planet
hall tree clothes tree hall-stand
hall tree n311011 - 3d model (*.3ds) for interior 3d visualization.
archibase_planet
free

Hall tree
...hall tree
archibase planet
hall tree clothes tree hall-stand
hall tree n071111 - 3d model (*.3ds) for interior 3d visualization.
archibase_planet
free

Hall tree
...hall tree
archibase planet
hall tree hall-stand clothes tree
hall tree n181112 - 3d model (*.3ds) for interior 3d visualization.
archibase_planet
free

Hall tree
...hall tree
archibase planet
hall tree hanger hall-stand
hall tree n160913 - 3d model (*.gsm+*.3ds) for interior 3d visualization.
turbosquid
$18

Hall
...ll
turbosquid
royalty free 3d model hall for download as max on turbosquid: 3d models for games, architecture, videos. (1616192)
turbosquid
$5
Hall
...ll
turbosquid
royalty free 3d model hall for download as max on turbosquid: 3d models for games, architecture, videos. (1311500)
turbosquid
$5

Hall
...ll
turbosquid
royalty free 3d model hall for download as max on turbosquid: 3d models for games, architecture, videos. (1311458)
Racing
3ddd
$1
race
...race
3ddd
мотоцикл
race
turbosquid
$15
Racing
...d
royalty free 3d model racing for download as obj and blend on turbosquid: 3d models for games, architecture, videos. (1474846)
3d_export
$5

racing car
...racing car
3dexport
racing car
3d_export
$5
racing helmet
...racing helmet
3dexport
helmet 3d model for motocross or racing cars
3d_export
$5

racing car
...racing car
3dexport
low poly classical racing car model
3d_ocean
$29
racing car
...cing car rim seat speed sport sport car tyre
detailed 3d model of racing car. all materials are included. model is ready for use.
3d_ocean
$29

racing car
... rim seat speed spoiler sport sport car tire
detailed 3d model of racing car. all materials are included. model is ready for use.
3d_ocean
$15
Race Car
...race car
3docean
a very detailed and realistic 3d model of a race car, which was created with polygons.
3ddd
$1
Turbo Racing
... машинка
игрушечная гоночная дорога "turbo racing". почувствуй себя настоящим гонщиком.
3d_export
$100

start race motocross
...start race motocross
3dexport
start race motocross
Setup
3d_ocean
$5
Light Setup
...
3docean
light setup lightbox lights render setup
that’s light setup. easy for use. just delete spheres and position your object!
turbosquid
free
Desk setup
...oyalty free 3d model desk setup for download as fbx and blend on turbosquid: 3d models for games, architecture, videos. (1300745)
turbosquid
free
the library.max(setup)
... available on turbo squid, the world's leading provider of digital 3d models for visualization, films, television, and games.
3d_ocean
$5

HDRI Studio Lighting Setup
...ate the hdri into many lighting combinations. increase/decrease intensity. this is the complete lighting setup for vray using ...
3d_ocean
$9

Fireworks - Render Setup
...can be used for any kinds of short movies, or other works. includes a well documentation which includes the steps to change th...
3d_ocean
$5
MentalRay Studio Lighting Setup
...ene which you can change. the colors of the lights are ofcourse tweak-able. this is a basic light setup for you to use for pro...
3d_ocean
$5

Vray scene setup
...studio scene 2. vray setup 3. 2 vray cameras, one of them with dof 4. vray lights 5. vitra panton chair model 6. photoshop fil...
3d_ocean
$15
Render Setups Chair Wall
...render setups chair wall
3docean
chair max render setups vray wall white
render setups chair wall
turbosquid
$25

Interior light setup
...oyalty free 3d model interior light setup for download as c4d on turbosquid: 3d models for games, architecture, videos. (1539984)
turbosquid
$1
basic pc setup
...d
royalty free 3d model basic pc setup for download as blend on turbosquid: 3d models for games, architecture, videos. (1650020)
Easy
design_connected
$16
Easy
...easy
designconnected
sollos easy computer generated 3d model. designed by almeida, jader.
design_connected
$20

Easy
...easy
designconnected
established & sons easy armchairs computer generated 3d model. designed by ed carpenter.
3d_ocean
$1

Easy Button
... it is accurate in close-ups. you can drop this model right into any setting. the textures are included as well as links to do...
design_connected
$16

Easy Armchair
...easy armchair
designconnected
easy armchair computer generated 3d model. designed by jeanneret, pierre.
3ddd
$1
Pouf EASY
... easy
3ds max 2010.v-ray 2.40.03.file formats fbx,obj. pouf desiree 2014 easy. dimensions 100x100x45 cm.
design_connected
$18
Easy Armchair
...easy armchair
designconnected
fsm easy armchair computer generated 3d model. designed by hartmann, markus.
design_connected
$16
Easy Chair
...easy chair
designconnected
magis easy chair computer generated 3d model. designed by seymour, jerszy.
design_connected
$16

Easy Rider
...easy rider
designconnected
bulo easy rider computer generated 3d model. designed by venlet, danny.
design_connected
$11

Easy Footstool
...easy footstool
designconnected
fsm easy footstool computer generated 3d model. designed by hartmann, markus.
design_connected
$18

Doda - Easy
...doda - easy
designconnected
molteni & c doda - easy computer generated 3d model. designed by laviani, ferruccio.