Thingiverse

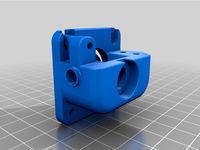
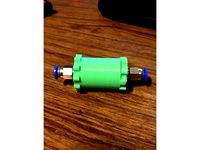
Short bowden extruder & E3D v6 bracket for Velleman K8200 / 3Drag by akkenoth
by Thingiverse
Last crawled date: 3 years, 1 month ago
Description
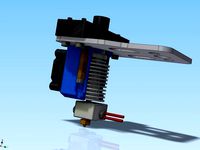
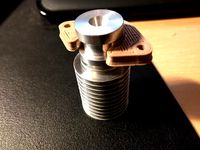
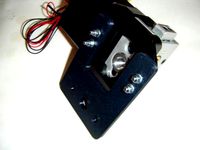
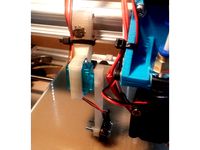
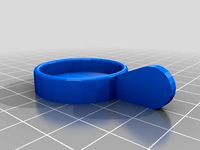
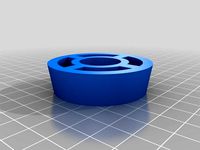
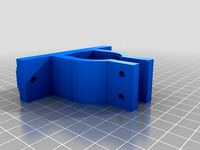
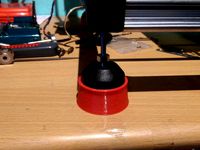
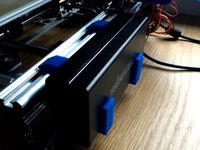
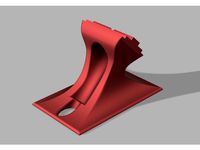
An improved bracket for Velleman K8200 / 3Drag to hold E3D v6 hotend (or clones) and generic MK8-based bowden extruder.
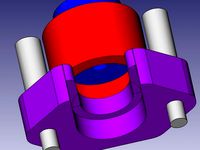
Based on Arron_mollet22's idea, designed from scratch in 123D Design.
Use at your own risk. I'm not responsible for misprints, fried stepsticks, your printer catching fire or attacking you. Though this part is working for me.
Improvements
Main improvements (compared to original model)
wider parts (8 vs 6 mm for main structures)
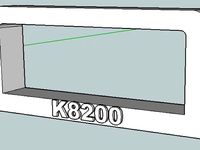
more accurate dimensions (based on technical drawings of things to be used)
better grip on printer's aluminium extrusion/profile
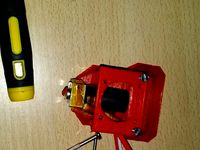
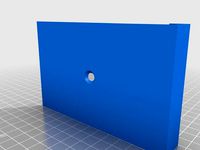
added screw for locking hotend in place
designed to print without supports and with minimal overhangs
Vitamins needed
4x M4x25 screw (for assembling the bracket)
2x M4x15 screw (for mounting stepper motor bracket)
1x M4x60 screw (for locking the hotend)
7x M4 washer
7x M4 nut
And, of course, you'll need extruder, hotend and a piece of PTFE tubing (about 5cm).
Build notes
Push nuts into plastic gently - I've used a vise
Don't overtighten the screws
Use washers
Measure twice (or 4 times), cut once
1mm too much of the tubing won't hurt, it can be squeezed a bit
Follow E3D's notes on building the extruder
My chinese V6 copy required drilling the pneumatic lock for the tubing to go inside
Mount the hotend's fan so that it blows upwards not downwards or it will affect the prints
Heater cardridge's and thermistor's cables were long enough so I didn't use original ribbon cable
My extruder's spring was too hard so I've removed the additional nut from spring's screw
Usage notes
I recommend switching extruder motor driver to DRV8825
Increase extruder motor's current to 1.4-1.6A or it will skip
I've lost about 2cm of Y-axis movement - might have to reposition the bed or the vertical frame
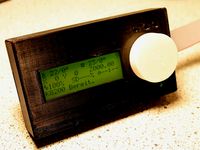
Use PID auto-tuning
Add a cover against cold air blows (e.g. pieces of cardboard)
Print settings (for PLA)
STEPS_PER_UNIT or STEPS_PER_MM: 100 for original stepstick, 200 for DRV8825
Slic3r Print settings: mostly default Slic3r ones, lowered the speeds slightly
Slic3r Filament settings:
Diameter: 1.75
Extrusion multiplier: 1
Extruder temperature: 195->190 (depends on your material ofc)
Heatbed temperature: 60
Cooling: yes (adjust to your needs)
Slic3r Printer settings:
Extruder nozzle diameter: 0.4
Results
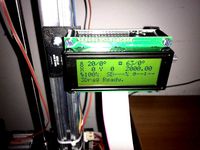
After dealing with problematic heatbed and adding cardboard covers for the printer, it prints nicely.
I've used glass on original heatbed (with additional cardboard insulation below) and stick glue. 0.3 layers, 200% width for first layer.
Still requires some calibration, 3DBenchy pictures included.
An improved bracket for Velleman K8200 / 3Drag to hold E3D v6 hotend (or clones) and generic MK8-based bowden extruder.
Based on Arron_mollet22's idea, designed from scratch in 123D Design.
Use at your own risk. I'm not responsible for misprints, fried stepsticks, your printer catching fire or attacking you. Though this part is working for me.
Improvements
Main improvements (compared to original model)
wider parts (8 vs 6 mm for main structures)
more accurate dimensions (based on technical drawings of things to be used)
better grip on printer's aluminium extrusion/profile
added screw for locking hotend in place
designed to print without supports and with minimal overhangs
Vitamins needed
4x M4x25 screw (for assembling the bracket)
2x M4x15 screw (for mounting stepper motor bracket)
1x M4x60 screw (for locking the hotend)
7x M4 washer
7x M4 nut
And, of course, you'll need extruder, hotend and a piece of PTFE tubing (about 5cm).
Build notes
Push nuts into plastic gently - I've used a vise
Don't overtighten the screws
Use washers
Measure twice (or 4 times), cut once
1mm too much of the tubing won't hurt, it can be squeezed a bit
Follow E3D's notes on building the extruder
My chinese V6 copy required drilling the pneumatic lock for the tubing to go inside
Mount the hotend's fan so that it blows upwards not downwards or it will affect the prints
Heater cardridge's and thermistor's cables were long enough so I didn't use original ribbon cable
My extruder's spring was too hard so I've removed the additional nut from spring's screw
Usage notes
I recommend switching extruder motor driver to DRV8825
Increase extruder motor's current to 1.4-1.6A or it will skip
I've lost about 2cm of Y-axis movement - might have to reposition the bed or the vertical frame
Use PID auto-tuning
Add a cover against cold air blows (e.g. pieces of cardboard)
Print settings (for PLA)
STEPS_PER_UNIT or STEPS_PER_MM: 100 for original stepstick, 200 for DRV8825
Slic3r Print settings: mostly default Slic3r ones, lowered the speeds slightly
Slic3r Filament settings:
Diameter: 1.75
Extrusion multiplier: 1
Extruder temperature: 195->190 (depends on your material ofc)
Heatbed temperature: 60
Cooling: yes (adjust to your needs)
Slic3r Printer settings:
Extruder nozzle diameter: 0.4
Results
After dealing with problematic heatbed and adding cardboard covers for the printer, it prints nicely.
I've used glass on original heatbed (with additional cardboard insulation below) and stick glue. 0.3 layers, 200% width for first layer.
Still requires some calibration, 3DBenchy pictures included.
Similar models
thingiverse
free
K8200/3Drag E3D v6 HotEnd extruder mount with fan by Area51
...ng the original parts.
here is the version for 40mm fan.
updated: 2015.01.23:
easier to print
stronger grip on e3d cooler
thingiverse
free

K8200/3Drag E3D v6 HotEnd extruder mount for 40mm fan by Area51
... are other solutions out there...
please post your experiences with this fan duct.
update: added step model for easier remix.
thingiverse
free

E3D Titan Extruder Mounting bracket for K8200 by RolandSautner
... the original nozzel position. in addition i needed a short piece of the original aluminium frame and an additional edge bracket.
thingiverse
free
K8200/3Drag E3D v6 HotEnd extruder mount without fan by Mirtio
... print one. that is what this is for.
edit 31 oct 2016: corrected main diameter so that it fits more easily on the extruder base.
thingiverse
free
Velleman K8200 / 3Drag Bulldog Extruder Support by 3DFranky
...k8200 / 3drag bulldog extruder support by 3dfranky
thingiverse
support plate for a bulldog extruder for a k8200 /3drag 3dprinter
thingiverse
free
Quick and dirty j_Head Merlin hotend mount for K8200 3Drag by eytec
...pter to mount a merlin (with j-head socked) by a k8200 (velleman 3d printer)
you need only the printed parts and 2 screws m3x10mm
thingiverse
free

E3D v6 mount for K8200 by kuraasu
...ich otherwise fix the original hotend, so there are no further changes to the extruder necesssary to use the e3d in this printer.
thingiverse
free

K8200/3Drag 40mm fan adapter by mbjoker
...xtruder.
the files included are for a fan placed to the right of the extruder.
for a left fan please mirror the mesh of the clip.
thingiverse
free

E3D mount for K8200 by kuraasu
...er changes to the extruder necesssary to use the e3d v5 in this printer.
thanks to jangermann, who helped in testing the adapter.
thingiverse
free

K8200 - E3D Titan Mount by o_liviu
...ages (own) also benefit from other improvements:
gt2 belts on x and y axis
k8204 on z axis
drylin linear bearings on x and y axis
Akkenoth
thingiverse
free

Z-Motor holder with precision Z-Axis calibration for Velleman K8200 / 3Drag by akkenoth
...m3 nut and 4x m3 washer to mount microswitch to plate
to mount z endstop screw block you can use original screw, washers and nut.
thingiverse
free
Autolevel Z-probe mount and arm for Velleman K8200 / 3Drag (5g servo) by akkenoth
...
slicer configuration
in custom g-code section (for slic3r it's in 'printer settings') add g29 just after g28.
profit
3Drag
thingiverse
free

3DRag Enclousure by gigi78
...sure for 3drag
plexiglass enclosure with aluminum rod
http://www.guadagna-scrivendo.it/3drag/chiusura-per-stampante-3d-3drag/
thingiverse
free
3Drag CHOCO by GabrieleDaghetta
...
3d name to apply on m8 threaded rod of the 3drag choco printer.
3drag site: http://www.open-electronics.org/3drag-3d-printer/
thingiverse
free
Paraluce 3drag by MARCONE67
...paraluce 3drag by marcone67
thingiverse
paraluce 3drag
thingiverse
free
3drag XXL by deltaforce
...eltaforce
thingiverse
quando le dimensioni di stampa della 3drag non bastano più, si può trasformarla in una super stampante xxl
thingiverse
free

Pen Holder for 3Drag printer by GabrieleDaghetta
...ter. it utilizes an elastic band to hold the pen against the plate.
3drag site: http://www.open-electronics.org/3drag-3d-printer/
thingiverse
free
3Drag CHOCO side plate by GabrieleDaghetta
...late that falls from the syringe while the printer is on standby.
3drag site: http://www.open-electronics.org/3drag-3d-printer/
thingiverse
free
K8200/3dRag Reel Holder by willygroup
...k8200/3drag reel holder by willygroup
thingiverse
another reel holder for k8200/3drag
thingiverse
free
3DRag Cnc Parkside Lidl by gigi78
...3drag cnc parkside lidl by gigi78
thingiverse
adaptator for 3drag cnc parkside lidl
thingiverse
free
k8200 3Drag Anti-Vibration by unkapputtbar
...k8200 3drag anti-vibration by unkapputtbar
thingiverse
some anti-vibrations for k8200 or 3drag
thingiverse
free
K8200 / 3DRAG lcd support by Frank3
...k8200 / 3drag lcd support by frank3
thingiverse
change lcd support for 3drag / k8200
Velleman
thingiverse
free

testing velleman K8200 by treblasnirp
...testing velleman k8200 by treblasnirp
thingiverse
velleman k8200 with abs settings in cura.
thingiverse
free

Velleman solder station by forrozza
...velleman solder station by forrozza
thingiverse
velleman solder station for the gasiron2 but would fit most butane solder irons.
thingiverse
free

Fan Tool K8400 Velleman by dergringo
...fan tool k8400 velleman by dergringo
thingiverse
fan tool velleman k8400
thingiverse
free
Velleman K8055 Box by Cerberus
...berus
thingiverse
a laser cut enclosure for the velleman k8055 relay project board. might fit the k8055n but this is not tested.
thingiverse
free

Velleman Dice Kit Box by Sadesign
...velleman dice kit box by sadesign
thingiverse
box for velleman mk150 electronic dice kit
thingiverse
free

Mini pc holder Velleman k8200 by treblasnirp
...c holder velleman k8200 by treblasnirp
thingiverse
mini pc holder velleman k8200
thx k8200 flat frame clip velleman 3d printer
thingiverse
free

Velleman K8200 Frame Piece by TheMatt2582
...velleman k8200 frame piece by thematt2582
thingiverse
this is a frame part for a velleman k8200.
it's 15cm or 5.91inch long.
thingiverse
free

Velleman robot arm KSR10 gear by spore29
...ot arm ksr10 gear by spore29
thingiverse
gear for velleman ksr10 robot arm kit.
engrenage pour le kit bras robot velleman ksr10
thingiverse
free
Velleman Metal Detector Enclosure by CodeCreations
...enclosure by codecreations
thingiverse
project enclosure for the velleman metal detector kit, commonly available at radio shack.
thingiverse
free
PSU bracket holder for Velleman K8200 by dan241297
...psu bracket holder for velleman k8200 by dan241297
thingiverse
brackets to hols the psu for the velleman k8200
K8200
thingiverse
free
K8200 Mount
...k8200 mount
thingiverse
universal mounting bracket for velleman k8200 printers.
thingiverse
free

K8200 HANDLE by Zalex60
...k8200 handle by zalex60
thingiverse
handle for k8200 printer
thingiverse
free

k8200 belt tension by wreckless19
...k8200 belt tension by wreckless19
thingiverse
needed for k8200
thingiverse
free
k8200 handle by ralfselfjord
...k8200 handle by ralfselfjord
thingiverse
handle for carrying your k8200. to be mounted on the top rail with 2 bolts.
thingiverse
free
Support tablette K8200 by Zalex60
...support tablette k8200 by zalex60
thingiverse
support pour k8200
thingiverse
free

K8200 Pencil Holder by wallie
...k8200 pencil holder by wallie
thingiverse
k8200 pencil holder
thingiverse
free

vm8201 fixation k8200 by domeniconixavier
...vm8201 fixation k8200 by domeniconixavier
thingiverse
kit for printer screenshot 3d k8200
thingiverse
free
testing velleman K8200 by treblasnirp
...testing velleman k8200 by treblasnirp
thingiverse
velleman k8200 with abs settings in cura.
thingiverse
free

Fan Mount K8200 by telegnom
...fan mount k8200 by telegnom
thingiverse
additional fan mount for the k8200 3d-printer.
thingiverse
free
K8200 LCD-Panel by sharandac
...k8200 lcd-panel by sharandac
thingiverse
lcd-panel with sd-card support for the k8200.
Bowden
turbosquid
$199
Vintage Ben Bowden Spacelander bike
... available on turbo squid, the world's leading provider of digital 3d models for visualization, films, television, and games.
3ddd
$1

Manooi Artica
...and pendants in various sizes and forms. suspension: galvanized bowden - dia. 1,5 mm. bulb: max 60 w -...
thingiverse
free
Remix Compact Bowden extruder - m6 bowden couplers and bowden tube pass-through
...ouplers and bowden tube pass-through
thingiverse
remix compact bowden extruder - m6 bowden couplers and bowden tube pass-through
thingiverse
free

Bowden Extruder
...bowden extruder
thingiverse
i have created bowden extruder for flsun delta 3d printer.
thingiverse
free

bowden 3mm by spee_D
...bowden 3mm by spee_d
thingiverse
for bowden 3mm
thingiverse
free
Bowden Tube Cutter
...bowden tube cutter
thingiverse
bowden tube cutter
thingiverse
free
Customizable Bowden Clip
...customizable bowden clip
thingiverse
customizable bowden clip
thingiverse
free
Bowden Oiler by fcheshire
...bowden oiler by fcheshire
thingiverse
inline bowden oiler
thingiverse
free

Bowden adapter by helkaroui
...bowden adapter by helkaroui
thingiverse
this is a fixed bowden adapter
thingiverse
free

Adventure3 Bowden Clip
...adventure3 bowden clip
thingiverse
adventure3 bowden clip
E3D
turbosquid
$23

E3D - Google Home
... 3d model e3d - google home for download as max, obj, and c4d on turbosquid: 3d models for games, architecture, videos. (1192509)
cg_studio
free

e3d model
...e3d model
cgstudio
- e 3d model, royalty free license available, instant download after purchase.
turbosquid
$2

Syringe C4D (E3D Ready)
...lty free 3d model syringe c4d (e3d ready) for download as c4d on turbosquid: 3d models for games, architecture, videos. (1336720)
turbosquid
$12

Microphone USB E3D and C4D
...ree 3d model microphone usb e3d & c4d for download as c4d on turbosquid: 3d models for games, architecture, videos. (1568216)
turbosquid
$29

E3D - OnePlus 6 Black
...model e3d - oneplus 6 black for download as max, obj, and c4d on turbosquid: 3d models for games, architecture, videos. (1358534)
turbosquid
$29

E3D - Motorola One 2018
...del e3d - motorola one 2018 for download as max, obj, and c4d on turbosquid: 3d models for games, architecture, videos. (1358533)
turbosquid
$29

E3D - Disney MagicBands 2
...l e3d - disney magicbands 2 for download as max, obj, and c4d on turbosquid: 3d models for games, architecture, videos. (1355515)
turbosquid
$29

E3D - Samsung Z4 Smartphone
...e3d - samsung z4 smartphone for download as max, obj, and c4d on turbosquid: 3d models for games, architecture, videos. (1182179)
turbosquid
$23

E3D - Razer Phone model
...del e3d - razer phone model for download as max, obj, and c4d on turbosquid: 3d models for games, architecture, videos. (1231207)
turbosquid
$23

E3D - Alcatel Idol 5
... model e3d - alcatel idol 5 for download as max, obj, and c4d on turbosquid: 3d models for games, architecture, videos. (1212799)
V6
3d_export
$100

v6 engine
...engine
3dexport
complete v6 engine modeled on solidworks 2017 along with .stl, .sldprt and .sldasm of all th parts and assembly.
3d_export
$10

V6 engine
... the first v6 engines were designed and produced independently by marmon motor car company, deutz gasmotoren fabrik and delahaye.
3d_export
$35

v6 engine
...s a complete model of a v6 engine containing over 400 components. you can contact me for a video of all the components assembling
3d_export
$10

v6 engine
...v6 engine
3dexport
turbosquid
$25

Bed1001-v6
... available on turbo squid, the world's leading provider of digital 3d models for visualization, films, television, and games.
turbosquid
$22

Chair2-v6
... available on turbo squid, the world's leading provider of digital 3d models for visualization, films, television, and games.
turbosquid
$20

V6.mb
... available on turbo squid, the world's leading provider of digital 3d models for visualization, films, television, and games.
3d_export
$20

V6 engine
...rovided in this package is all the parts in sldprt format and assembly in sldasm format. i can also convert the format on demand.
3ddd
$1

Стол V6
...6" в стиле дизельпанк изготовлен из блока двигателя, 4х поршней и 4х шатунов.
столешница изготовлена из стекла толщиной 8мм.
cg_studio
$199

V6 VVTi3d model
...v6 vvti3d model
cgstudio
.3ds - v6 vvti 3d model, royalty free license available, instant download after purchase.
Short
3d_ocean
$3
Shorts
...shorts
3docean
3d models clothes & accessories shorts
3d models, clothes & accessories, shorts
turbosquid
free

shorts
...shorts
turbosquid
free 3d model shorts for download as blend on turbosquid: 3d models for games, architecture, videos. (1433959)
3d_export
$5

short foot
...short foot
3dexport
short foot
turbosquid
$15

short
...royalty free 3d model short for download as max, max, and pac on turbosquid: 3d models for games, architecture, videos. (1568324)
turbosquid
$9

Shorts
... available on turbo squid, the world's leading provider of digital 3d models for visualization, films, television, and games.
3d_export
$5
pant short
...pant short
3dexport
pant short for cc 3
3d_ocean
$2
Short sword
...sy fentezi for games podhodit short style textured
short blade, textured style fentezi.podhodit for fantasy animations and games!
3d_export
$5
short simple knob
...short simple knob
3dexport
short simple knob
3d_export
$5
short screw clip
...short screw clip
3dexport
short screw clip
turbosquid
$2

Short Table
...urbosquid
royalty free 3d model short table for download as on turbosquid: 3d models for games, architecture, videos. (1324464)
Extruder
3ddd
$1

Extruded Chair
...extruded chair
3ddd
extruded , tom dixon
inspired by tom dixon extruded chair
turbosquid
$15

Extruded Table
... extruded table for download as blend, dae, fbx, obj, and stl on turbosquid: 3d models for games, architecture, videos. (1634137)
turbosquid
$2

3D Printer Extruder
...d
royalty free 3d model 3d printer extruder for download as on turbosquid: 3d models for games, architecture, videos. (1537359)
turbosquid
$1

Zombie extruded text
...oyalty free 3d model zombie extruded text for download as obj on turbosquid: 3d models for games, architecture, videos. (1322198)
turbosquid
$4

Extruder conical screw
...el extruder conical screw for download as sldpr, ige, and stl on turbosquid: 3d models for games, architecture, videos. (1524433)
turbosquid
$50

3d PRINTER - Extruder
... available on turbo squid, the world's leading provider of digital 3d models for visualization, films, television, and games.
turbosquid
$15

Extruded Table 2
...xtruded table 2 for download as blend, dae, fbx, obj, and stl on turbosquid: 3d models for games, architecture, videos. (1621846)
turbosquid
$10

Maya Extrude Tool
... available on turbo squid, the world's leading provider of digital 3d models for visualization, films, television, and games.
3d_export
$5

world earth extrude map
...world earth extrude map
3dexport
3ddd
$1

Simply Elegant Extruded Tree Coffee Table Design
...ble by link studios. the silhouette of a tree is visible at one angle, extruded from the surface to create the support structure.
Bracket
archibase_planet
free

Bracket
...bracket
archibase planet
bracket corbel holder
bracket 1 - 3d model (*.gsm+*.3ds) for interior 3d visualization.
archibase_planet
free

Bracket
...bracket
archibase planet
bracket corbel console
bracket 5 - 3d model (*.gsm+*.3ds) for interior 3d visualization.
archibase_planet
free

Bracket
...bracket
archibase planet
corbel holder bracket
bracket 6 - 3d model (*.gsm+*.3ds) for interior 3d visualization.
archibase_planet
free

Bracket
...bracket
archibase planet
bracket corbel console
bracket 8 - 3d model (*.gsm+*.3ds) for interior 3d visualization.
archibase_planet
free

Bracket
...bracket
archibase planet
bracket corbel holder
bracket n280911 - 3d model (*.gsm+*.3ds) for interior 3d visualization.
archibase_planet
free

Bracket
...bracket
archibase planet
holder corbel bracket
bracket 9 - 3d model (*.gsm+*.3ds) for interior 3d visualization.
archibase_planet
free

Bracket
...bracket
archibase planet
corbel holder bracket
bracket 10 - 3d model (*.gsm+*.3ds) for interior 3d visualization.
archibase_planet
free

Bracket
...bracket
archibase planet
corbel console bracket
bracket 11 - 3d model (*.gsm+*.3ds) for interior 3d visualization.
archibase_planet
free

Bracket
...bracket
archibase planet
holder console bracket
bracket 12 - 3d model (*.gsm+*.3ds) for interior 3d visualization.
archibase_planet
free

Bracket
...bracket
archibase planet
bracket corbel holder
bracket 13 - 3d model (*.gsm+*.3ds) for interior 3d visualization.