Thingiverse
SharkByte RunCam Camera Body for CaddX 1.66mm M12 Lens by cadmonkeyfpv
by Thingiverse
Last crawled date: 2 years, 10 months ago
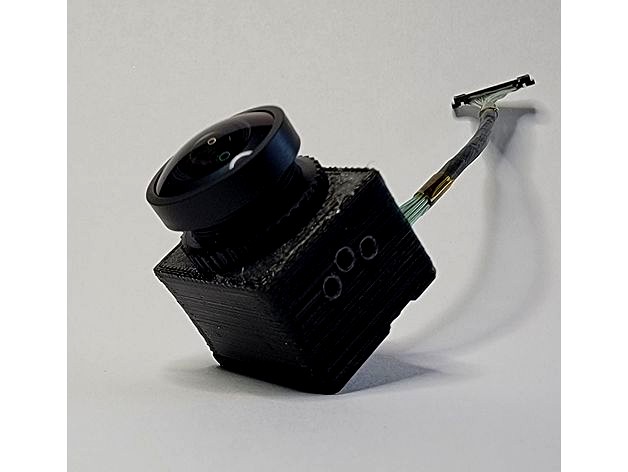
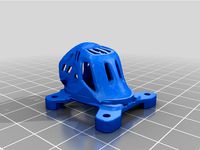
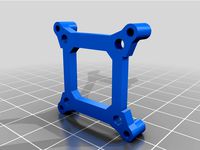
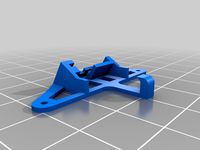
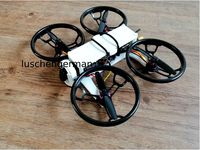
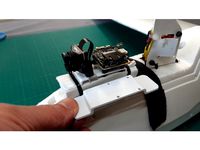
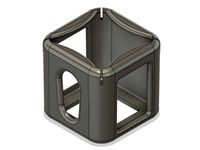
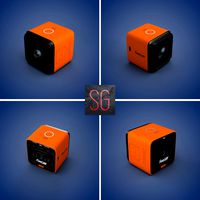
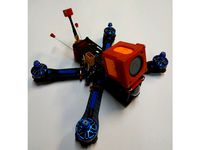
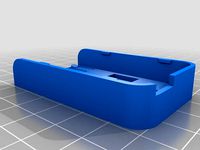
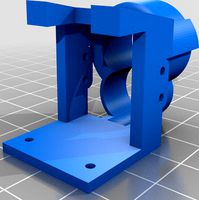
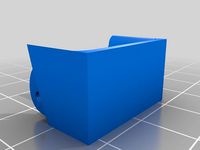
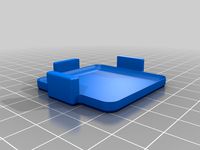
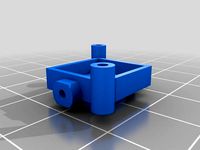
Based off the work of Alf_Skaar on RCGroups I wanted to go a step further for my SharkByte RunCam HD to CaddX M12 lens upgrade. This shell mounts the RunCam sensor board internally, retains the MIPI connector and protects the back of the board. Very much mimics the DJI camera format. I've created 3 different variants - micro and full size, as well as a 20mm that works with the 20mm spacing of many frames, eliminating the need for washers/spacers to anchor firmly.
Mounting holes are only point marked and will need to be pilot drilled and the M2 holes tapped. The holes for the board and the cover only need to be piloted. ABS takes tapped threads nicely. I use a #66 orifice drill (0.033in) in a pin vise to pilot the board mounting holes and retainer holes, using the cover and the board to make sure the center holes are accurate as possible. To tap the camera mounting holes (there are 3 each side, you can tap all or just the ones you want to use), I start with the same #66 to start the holes, then a 1/16" drill in a pin vise followed by an M2 tap. If you're stingy and don't want to spend the $6 for an import M2 tap on Amazon you can take a long M2 and using a Dremel and a cutoff wheel make a slot in it to make a workable tap for plastic use. After tapping the mounting holes I clean up the lens threads. I picked up an M12x0.5mm tap on Amazon (around $13) for the finals but during protoyping I just used an M3 tap to scrape the threads (the standard M3 thread is also 0.5mm pitch) until the lens threads in without too much effort. The lens threads are aluminum so they can take a fairly tight fit without damaging it. I will recommend the proper tap though as it's easy to get the lens off angle which make focusing the entire frame impossible - non perpendicular lens will result in a vignetting effect with the center in focus and the edges blurry.
I picked up a small assortment of M1, M1.2, M1.4 and M1.7 self tapping screws on Amazon for $7 to use to replace screws that ran away and to mount the cover. You can also use some of the small self tapping screws that come with some of the micro AIO FCs.
The 20mm version you see here was printed with a 0.25mm nozzle and Polymaker PolyLite ABS in black, but during the prototyping process I was printing with a 0.40mm nozzle. Print time on the 0.40mm was around 90 minutes, the 0.25mm takes significantly longer at between 5 and 11 hours depending on the size you choose. All version have been printed at 0.06mm layer height to make the fine M12 threads as accurate as possible.
I have not needed to spray paint the housing to block IR using the ABS like when using TPU. I also have not needed to scale up the print or adjust horizontal expansion to get the threads close enough for the lens to thread in with only minor scraping/chasing like many have experienced with the original Alf_Skaar version. I have an enclosure made of 8020, black foam core and a Lexan door on my modified Ender 3 but no active enclosure heating beyond the radiated heat from the bed and the ABS yields a nice result.
Mass statistics:
Standard RunCam HD w/ nano->micro adapter & cable = 5.56g
Printed body w/ sensor, CaddX lens and cable = 8.98g
And since the lens itself is a 2.08g premium (RC: 2.52g v CaddX 4.60g) the body is only a 1.34g premium so on your typical 5" quad the additional mass is negligible.
Links:RC Groups threadLink to relevant postCaddX Ratel Lens at PyrodroneScrews on AmazonM12x0.5mm Tap on AmazonM2 Tap on Amazon
Similar models
thingiverse
free

Runcam Mini Lens cover and Micro mount by jacobbloy
...elf as 3d printing such small pitch threads will not work. because of this i would print with 80-100% infill and 4-6 layer walls.
thingiverse
free

Macro camera m12 lens adapter by svogl
...odules
update:
i cut the m12 thread as well which should improve printing and added reinforcement blobs for stability and looks
thingiverse
free

GDMK: Runcam Split 3 Nano Camera Mount (Replacement Lens Clip) by MsStevieWoo
...
bracket 4 is the better clips, print in pla and drill the holes as you need ideally just a pilot hole for a self tapping screw.
thingiverse
free
Acrobot MiK Pod - Canopy Micro Drone 16x16 Stack 25x25 AIO
... m2)
c. aio board - micro cam / runcam split mini / foxeer mix/ caddx turtle (spacer 20mm m2)
d. aio board - micro cam / tarsier
thingiverse
free

Sharkbyte Racer HD to Runcam Swift, Split Mini V2 and Caddx Ratel by AntonsThings
...ate to the split case, cut the original screws in half (side cutters will do the trick).
print in pla @ 15-20% infill no supports
thingiverse
free

M12 12mm Lens holder for Raspberry Pi camera board by mariuschirita
... threads , you can try the threaded file.
free to print for non commercial use.
https://www.youtube.com/watch?v=l0nst748rpc&t
thingiverse
free

PI Camera M12 Lens Holder by Marksz
... the rhinoceras (3dm) source.
change: i've added the files for the actual container - it's ugly but works with a pi zero.
thingiverse
free

x210 Caddx RunCam Foxeer Micro Mini Mount by NachosFPV
...10 caddx runcam foxeer micro mini mount by nachosfpv
thingiverse
mount for caddx runcam micro or mini.
x210 mount 35mm standoff.
thingiverse
free

16x16mm to 20x20mm ESC/Flight Controller Adapter by jocampo
...will need to use thread using a m3x0.5 tap. for the 16x16, you can either thread using a m2x.04 tap or enlarge to use a m2 screw.
thingiverse
free

Armattan Chameleon Runcam Micro Swift support or mount by malarcky
...ement but i think its not necessary.
the lens is protected under the aluminium braces, using a standard 2.3 mm runcam micro lens.
Cadmonkeyfpv
thingiverse
free

Shocker Tank AXII Mount by cadmonkeyfpv
...etween the nubs to secure in place. so far it's been very resilient to crashes :)
best results were when printed on its side.
thingiverse
free

BangGod Runcam 5 Orange Mount by cadmonkeyfpv
... the slotted hole as an angle adjustment. standoff tubes are 25° to the camera so should provide a range of approximately 20-30°.
thingiverse
free

QAV-S Joshua Bardwell Edition RunCam 5 Orange Mount by cadmonkeyfpv
... jello guard nd filters (also fits the camera butter filters).
mounts using the front 4 standoff screws. 25, 30 and 40° versions.
thingiverse
free

Massive Droner HD Sharkbyte by cadmonkeyfpv
...he rear support cf plates.
there are 2 locations to run a cable tie around the vtx antenna but i only utilized the outermost one.
thingiverse
free

FPV Goggle Battery Holsters by cadmonkeyfpv
... free to remix to fit your needs!
photos show a version with my fpv logo on them but the stl's here do not. enjoy and go fly!
thingiverse
free

QAV-S Joshua Bardwell Edition Sharkbyte Rush Cherry Mount by cadmonkeyfpv
...utton facing down and the antenna connector forward, the bind button is accessible through one of the cutouts in the lower plate.
thingiverse
free

BangGod Sharkbyte VTX & CRSF Immortal-T Antennas Mount by cadmonkeyfpv
...he tx5m.1 vtx and aligned with the rf board being the topmost board of the stack, and the vtx being mounted with 2mm tpu washers.
thingiverse
free
Catalyst Machine Works Shocker Tank RunCam 5 Orange Mount by cadmonkeyfpv
...ew dozen times with no damage whatsoever. even a few asphalt impacts only left minor scuffing.
print on the side with supports.
Sharkbyte
thingiverse
free

Sharkbyte sma patch adapter by iroNLionX
...tch adapter by ironlionx
thingiverse
sharkbyte vrx sma adapter, so you can replace the original patch antennas with better ones.
thingiverse
free

Fatshark SharkByte Tripod mount by shaddi
...ount for a cullmann tripod. should also fit other tripods with 35x41 mm quicklock size.
base-plate should be printed as uploaded.
thingiverse
free

Source PodRacer - Pod Sharkbyte by ChenPanSey
... turtle mode fin with antenna holder (just ziptie it on)
bigger holes for m2 screws and holes for m2 nuts ( or nylon stand offs).
thingiverse
free
SharkByte TX5S.1 Vtx 30x30 Adapter by FireNWater
... transmitter in a 30 x 30 stack. you need to clip off the corner tabs. i've included the fusion 360 file for easy remixing.
thingiverse
free

Fan-mount for Fatshark Sharkbyte Receiver by Crazy_Diver_84
...stet the fan-mount on fatshark dominator hdo2 goggels and fatshark dominator hd3 goggels. maybe it will fit on other goggles too.
thingiverse
free
larvaX HD SharkByte Canopy by radla
...f 2 canopies, because in the first one fits a runcam nano hd and and the other offers the right alignment with an angle of 45deg.
thingiverse
free

sharkbyte dummy battery holder by adoerempeng
...or the model in slicer and you will have 2 parts. mount together using 2 m3 bolt/screws. cable will be squeeze and will fit nice.
thingiverse
free
26x26 to 20x20 adapter for Sharkbyte by evilmerlin
... the tx5s.1, you can try using regular m2x6 screws but i found that using self tapping ones make it easier to screw into the tpu.
thingiverse
free

Sharkbyte mr steele swift mini 2 adapter by iroNLionX
...t mini 2 adapter by ironlionx
thingiverse
adapter plate to fit the runcamnanohd sensor in a swift v2 mr_steele cam. (gopro lens)
thingiverse
free

Sharkbyte quickrelease v1, v2, v3 by Kheine556
..._2 as male.
v3 final version works great. just use v3 files for this version.
enjoy removing the module whenever you need it! :)
66Mm
3d_export
$19

Mega Sleek Beverage Can 591 Ml 20 Oz
...vertex with more than 5 edges: 0<br>object:<br>- dimension mm: 66mm x 66mm x 194mm<br>- dimension inches: 2.59" x 2.59"...
3d_export
$19

Standard Beverage Can 250 Ml 845 Oz
...vertex with more than 5 edges: 0<br>object:<br>- dimension mm: 66mm x 66mm x 92mm<br>- dimension inches: 2.6" x 2.6"...
3d_export
$19

Standard Beverage Can 330 Ml 1115 Oz
...vertex with more than 5 edges: 0<br>object:<br>- dimension mm: 66mm x 66mm x 115mm<br>- dimension inches: 2.6" x 2.6"...
3d_export
$19

Standard Beverage Can 440 Ml 1487 Oz
...vertex with more than 5 edges: 0<br>object:<br>- dimension mm: 66mm x 66mm x 150mm<br>- dimension inches: 2.6" x 2.6"...
3d_export
$19

Standard Beverage Can 500 Ml 169 Oz
...vertex with more than 5 edges: 0<br>object:<br>- dimension mm: 66mm x 66mm x 168mm<br>- dimension inches: 2.6" x 2.6"...
3d_export
$19

Standard Beverage Can 568 Ml 192 Oz 1 Pint
...vertex with more than 5 edges: 0<br>object:<br>- dimension mm: 66mm x 66mm x 188mm<br>- dimension inches: 2.6" x 2.6"...
3d_export
$19
Pine cone
...vertex with more than 5 edges: 0<br>object:<br>- dimension mm: 66mm x 66mm x 82mm<br>- dimension cm: 6.6cm x 6.6cm...
3d_export
$16

Opened Standard Beverage Can 250 Ml 845 Oz
...vertex with more than 5 edges: 0<br>object:<br>- dimension mm: 66mm x 66mm x 95mm<br>- dimension inches: 2.6" x 2.6"...
3d_export
$16

Opened Standard Beverage Can 568 Ml 192 Oz 1 Pint
...vertex with more than 5 edges: 0<br>object:<br>- dimension mm: 66mm x 66mm x 191mm<br>- dimension inches: 2.6" x 2.6"...
3d_export
$16

Opened Standard Beverage Can 330 Ml 1115 Oz
...vertex with more than 5 edges: 0<br>object:<br>- dimension mm: 66mm x 66mm x 118mm<br>- dimension inches: 2.6" x 2.6"...
Caddx
thingiverse
free

Caddx orca_gopro_mount by Lorent_Den
...caddx orca_gopro_mount by lorent_den
thingiverse
caddx orca gopro mount
thingiverse
free
fx900-nbd/caddx
...fx900-nbd/caddx
thingiverse
fx900/ nbd cam with caddx vtx mount
thingiverse
free

Caddx Vista Antenna by MadVulture
...caddx vista antenna by madvulture
thingiverse
caddx vista antenna
thingiverse
free

caddx ant model by Getenforce
...caddx ant model by getenforce
thingiverse
caddx ant model for make canopy
thingiverse
free

HX115 Caddx Protection lentille
...hx115 caddx protection lentille
thingiverse
protection lentille caddx pour betafpv hx115
thingiverse
free
luschencopter 1106 Caddx by luschengerman
...luschencopter 1106 caddx by luschengerman
thingiverse
light frame for 1106 motors and a caddx cam print in pla+
thingiverse
free

caddx ant whoop canopy by Getenforce
...caddx ant whoop canopy by getenforce
thingiverse
caddx ant whoop canopy
thingiverse
free
Caddx Tarsier mount
... tarsier or any other split style camera with a 20mm hole spacing. designed to be taped down on a wing or fuselage for fixed wing
thingiverse
free

caddx ant whoop canopy by Getenforce
...caddx ant whoop canopy by getenforce
thingiverse
another caddx ant whoop canopy
thingiverse
free
caddx orca case for remix by Floxflux
...caddx orca case for remix by floxflux
thingiverse
the files for the case of caddx orca to be remixed
Runcam
turbosquid
$39
Runcam 3
...free 3d model runcam 3 for download as 3ds, obj, c4d, and fbx on turbosquid: 3d models for games, architecture, videos. (1147541)
thingiverse
free

runcam hybrid
...runcam hybrid
thingiverse
runcam hybrid is a fpv camera. this are the dimensions, for model creation.
thingiverse
free
RUNCAM 3S CASE
...runcam 3s case
thingiverse
runcam 3s case
thingiverse
free
RunCam Mount Base by MattRuwe
...ruwe
thingiverse
a mount for the runcam action camera. this is basically an exact copy of the mount that ships with the runcam.
thingiverse
free
Runcam hybrid hood by Mrbear1989
...runcam hybrid hood by mrbear1989
thingiverse
runcam hood
thingiverse
free

Runcam 2 case by HEAVENHIMXBENNETH
...runcam 2 case by heavenhimxbenneth
thingiverse
runcam 2 case
thingiverse
free
Micro RunCam Insert by flitetest
...micro runcam insert by flitetest
thingiverse
micro runcam insert
thingiverse
free
cap for enclosure runcam 5
...cap for enclosure runcam 5
thingiverse
cap for runcam 5
thingiverse
free
RunCam Micro casing by dergringo
...runcam micro casing by dergringo
thingiverse
runcam micro gehäuse
thingiverse
free

Runcam camera mount by Ace01
...runcam camera mount by ace01
thingiverse
runcam camera mount
M12
turbosquid
$10

M12 Rifle
... available on turbo squid, the world's leading provider of digital 3d models for visualization, films, television, and games.
turbosquid
$2

Eye Nut M12
...yalty free 3d model eye nut m12 for download as sldpr and stl on turbosquid: 3d models for games, architecture, videos. (1677968)
3ddd
free

Шторы m12
...шторы m12
3ddd
рюши
polys: 79398
модель декора:http://3ddd.ru/3dmodels/show/vietochki_lozy
turbosquid
$12

Samsung Galaxy M12
...axy m12 for download as max, 3ds, dwg, fbx, obj, wrl, and dxf on turbosquid: 3d models for games, architecture, videos. (1693494)
turbosquid
$12

Samsung Galaxy M12
...axy m12 for download as max, 3ds, dwg, fbx, obj, dxf, and wrl on turbosquid: 3d models for games, architecture, videos. (1693498)
3d_export
$45

BMW Nazca M12 3D Model
...design nazca m12 european italy mental ray sport concept bmw model 3ds max 3d obj fbx
bmw nazca m12 3d model laguf 28424 3dexport
3ddd
$1

Полотенца m12
...олотенец:
500mm.x900mm.
340mm.x780mm.
цвет меняется картой tow_color, можно с рисунком.
дополнительное сглаживание по группам.
3d_export
$18

samsung galaxy m12
...e so that the exported files (.dae, .stl, .usdc, .obj and .fbx) is ok please tell me in private message if you have any problems.
3d_export
$8
shaft bearing
...shaft bearing 3dexport shaft bearing m10, m12m16, m20 and...
3d_export
$10

ring nuts din582
...nuts din582 3dexport din 582 ring nuts respectively : m8,m10,m12m16 m20 dimensions according to...
Lens
3d_ocean
$16
Lens
...lens
3docean
camera film lens video widescreen
a standard camera lens with reflections.
3d_export
$15

Lens optical lens 3D Model
...odel
3dexport
lens optical accessories for the tablet accessories electronics
lens optical lens 3d model sergio108 76763 3dexport
turbosquid
$1

Lens
... available on turbo squid, the world's leading provider of digital 3d models for visualization, films, television, and games.
3ddd
free
Massive / Len
...massive / len
3ddd
massive , встроенный
светильник потолочный massive len
3d_ocean
$9
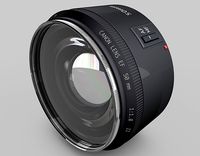
50mm Canon lens
...50mm canon lens
3docean
50mm canon foto lens photo
canon lens 50mm 1.8 the most practical affordable lens to start with
turbosquid
$20
Camera Lens
...osquid
royalty free 3d model camera lens for download as c4d on turbosquid: 3d models for games, architecture, videos. (1414988)
turbosquid
$2

Axicon Lens
...osquid
royalty free 3d model axicon lens for download as max on turbosquid: 3d models for games, architecture, videos. (1169215)
turbosquid
free

Camera Lens
...quid
royalty free 3d model camera lens for download as blend on turbosquid: 3d models for games, architecture, videos. (1546983)
turbosquid
$2

MAGNIFYING LENS
...y free 3d model magnifying lens for download as blend and fbx on turbosquid: 3d models for games, architecture, videos. (1633553)
turbosquid
$1

MAGNIFYING LENS
...y free 3d model magnifying lens for download as blend and fbx on turbosquid: 3d models for games, architecture, videos. (1633707)
Camera
archibase_planet
free
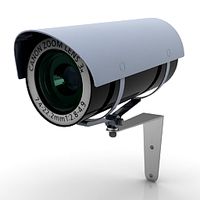
Camera
...base planet
camera surveillance camera video camera
camera surveillance n090211 - 3d model (*.3ds) for interior 3d visualization.
archibase_planet
free

Camera
...hibase planet
camera security camera video camera
camera security n210515 - 3d model (*.gsm+*.3ds) for exterior 3d visualization.
archibase_planet
free
Camera
...se planet
camera web camera webcam
camera butterfly usb pc camera n090713 - 3d model (*.gsm+*.3ds) for interior 3d visualization.
archibase_planet
free
Camera
...mera
archibase planet
surveillance camera video camera camcorder
camera n011211 - 3d model (*.3ds) for exterior 3d visualization.
archibase_planet
free
Camera
...camera
archibase planet
camera digital camera
camera canon digital n041211 - 3d model (*.3ds) for interior 3d visualization.
archibase_planet
free
Camera
...camera
archibase planet
camera film camera phototechnique
camera n100214 - 3d model (*.gsm+*.3ds) for interior 3d visualization.
archibase_planet
free

Camera
...amera
archibase planet
camera video camera camcorder
camera video n070315 - 3d model (*.gsm+*.3ds) for interior 3d visualization.
archibase_planet
free

Camera
...rchibase planet
camera video camera camcorder
camera studio n101213 - 3d model (*.gsm+*.3ds+*.max) for interior 3d visualization.
archibase_planet
free
Camera
...ibase planet
digital camera camera phototechnique
camera canon ixus 400 n310311 - 3d model (*.3ds) for interior 3d visualization.
archibase_planet
free
Camera
...ase planet
photocamera video camera camera
camera sony t300 black n291010 - 3d model (*.gsm+*.3ds) for interior 3d visualization.
Body
3d_ocean
$39

Heart and body
...heart and body
3docean
blood body heart human organ
heart and body highpoly heart inside human body.
3ddd
$1

body
...body
3ddd
маникен
corona mtl
turbosquid
$50

body
... available on turbo squid, the world's leading provider of digital 3d models for visualization, films, television, and games.
turbosquid
$45

Body
... available on turbo squid, the world's leading provider of digital 3d models for visualization, films, television, and games.
turbosquid
$25
bodies
... available on turbo squid, the world's leading provider of digital 3d models for visualization, films, television, and games.
turbosquid
$20

Body
... available on turbo squid, the world's leading provider of digital 3d models for visualization, films, television, and games.
turbosquid
$5

Body
... available on turbo squid, the world's leading provider of digital 3d models for visualization, films, television, and games.
turbosquid
$3

body
... available on turbo squid, the world's leading provider of digital 3d models for visualization, films, television, and games.
turbosquid
$1

body
... available on turbo squid, the world's leading provider of digital 3d models for visualization, films, television, and games.
turbosquid
free
Body
... available on turbo squid, the world's leading provider of digital 3d models for visualization, films, television, and games.
1
turbosquid
$15

ring 1+1
... available on turbo squid, the world's leading provider of digital 3d models for visualization, films, television, and games.
turbosquid
$10

chair(1)(1)
... available on turbo squid, the world's leading provider of digital 3d models for visualization, films, television, and games.
turbosquid
$8

Chair(1)(1)
... available on turbo squid, the world's leading provider of digital 3d models for visualization, films, television, and games.
turbosquid
$2

RING 1(1)
... available on turbo squid, the world's leading provider of digital 3d models for visualization, films, television, and games.
turbosquid
$1

Table 1(1)
... available on turbo squid, the world's leading provider of digital 3d models for visualization, films, television, and games.
turbosquid
$1

house 1(1)
... available on turbo squid, the world's leading provider of digital 3d models for visualization, films, television, and games.
design_connected
$11

No 1
...no 1
designconnected
sibast no 1 computer generated 3d model. designed by sibast, helge.
turbosquid
$2

desert house(1)(1)
...3d model desert house(1)(1) for download as 3ds, max, and obj on turbosquid: 3d models for games, architecture, videos. (1055095)
turbosquid
$50
door 1 darkwood 1
... available on turbo squid, the world's leading provider of digital 3d models for visualization, films, television, and games.
turbosquid
$15

Barrel Barricade 1-1
... available on turbo squid, the world's leading provider of digital 3d models for visualization, films, television, and games.