Thingiverse
Shapeoko 3 Gravity Feed Coolant Dripper for Aluminum Cutting by hemocyanin
by Thingiverse
Last crawled date: 3 years ago
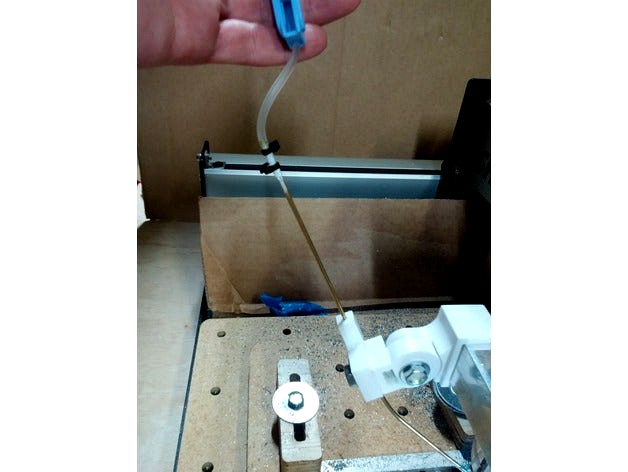
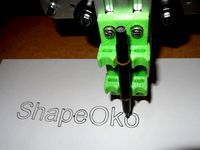
I've been cutting aluminum on my Shapeoko 3 and I wanted a method to drip coolant on the piece during the process. I was initially intrigued by the youtube video of a WD40 can being used as the basis for this system, but it required a lot of brazing and it also adds weight to the tool head. So instead I made my own and since I have a 3D printer, it was actually much easier.
This project will require
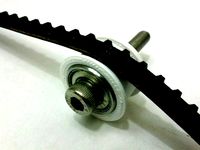
two 1/4" bolts (1" long) and two each nuts and washers.
1 brass 1/16" inner diameter tube (like this: https://www.amazon.com/5125-Round-Brass-Tube-Peggable/dp/B0009ILF6G -- the amazon price is crazy high, try a local hardware store) (unfortunately I tossed the packaging but when I measure the outside diameter with calipers, it measures 0.091").
One medical IV set (like this: https://www.amazon.com/Baxter-IV-Set-Extra-Port/dp/B003VP2MR0/ ) -- all I really wanted was the shutoff valve and some flexible tube and there are probably cheaper ways to make this happen, but I was lazy.
One 4oz bottle of 3in1 oil with the telescoping tip (the IV tube fits perfectly over this tip and makes a very snug seal) (like this: https://www.amazon.com/3-ONE-100703WD4-Multi-Purpose-Telescoping/dp/B01LRH9B04 -- the amazon price is insanely high, I paid about $3.50 for that at a local hardware store).
A sealant for the joint between the brass tube and the IV tube (I have a boat so I had 5200 laying around -- that will seal anything and doesn't mind oil or solvents once it is cured). I have no doubt that wrapping the joint with electrical tape would work too as I did something similar in my proof-of-concept.
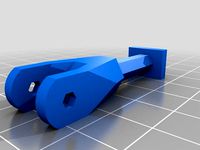
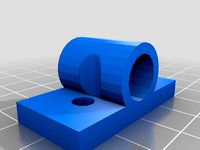
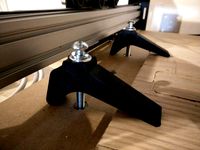
To set this up you want something above your printer from which you can hang things. You screw the bottle holder to that. On the Shapeoko, the base mount is a tight fit (I used PETG because it is flexible yet strong) -- it doesn't need adhesive or anything. Depending on your nuts, they may be tight or may need some epoxy to hold in place. This adds very little weight to the tool head because the liquid is kept secured above the machine rather than on it.
To bend the brass tube, make a cone out of paper and tape it to one end. Tape the other end closed. Fill the paper cone with salt and shake and tap till the tube is filled with salt. You can then bend into the shape you need. Once it is bent, it is inserted into the printed end piece -- you'll likely have to drill this out if you print it flat, but it should be a stronger piece printed flat. I used a #41 drill bit to get a snug fit which would also allow me to move the tube up and down in the holder for different heights. It will also rotate in the holder. You can also adjust the bolt-together joints. This gives a lot of degrees of freedom making it easy to get the spout right where you need it.
Cut enough of the IV tube to suit your setup, keep the roller shutoff mechanism, attach one end to the extendable tip of the 3in1 bottle. For the end that goes on the brass tube, apply some sealant and then push down what seems an appropriate amount of tubing over that. I secured in place with some zip ties, but you could accomplish the same goal with electrical tape and no sealant.
Lastly, take a needle and poke a tiny hole in the bottom of the oil bottle. This will prevent vacuum from interfering with flow.
When you don't want the oiler in place, you can remove it at one of the joints and hang it up by your bottle. I made a little holder for a magnet I had laying around -- the steel bolt provides plenty for it to grab on. With the spout up at the bottle height, it won't drip.
I have included the source files, made with FreeCAD ( https://www.freecadweb.org/ ) so you easily make any changes you want to this. A sort of printed Z adjustment would be nice because sliding the tube up or down in the end piece is a bit fiddly.
The roller shutoff valve will allow you regulate the rate of flow coolant.
Once the 3in1 oil is gone, I'll try refilling it with real aluminum cutting fluid but as it is, it seems to work fine - nice finish, hasn't caught fire, haven't had any aluminum weld to the millend since I started doing this.
This project will require
two 1/4" bolts (1" long) and two each nuts and washers.
1 brass 1/16" inner diameter tube (like this: https://www.amazon.com/5125-Round-Brass-Tube-Peggable/dp/B0009ILF6G -- the amazon price is crazy high, try a local hardware store) (unfortunately I tossed the packaging but when I measure the outside diameter with calipers, it measures 0.091").
One medical IV set (like this: https://www.amazon.com/Baxter-IV-Set-Extra-Port/dp/B003VP2MR0/ ) -- all I really wanted was the shutoff valve and some flexible tube and there are probably cheaper ways to make this happen, but I was lazy.
One 4oz bottle of 3in1 oil with the telescoping tip (the IV tube fits perfectly over this tip and makes a very snug seal) (like this: https://www.amazon.com/3-ONE-100703WD4-Multi-Purpose-Telescoping/dp/B01LRH9B04 -- the amazon price is insanely high, I paid about $3.50 for that at a local hardware store).
A sealant for the joint between the brass tube and the IV tube (I have a boat so I had 5200 laying around -- that will seal anything and doesn't mind oil or solvents once it is cured). I have no doubt that wrapping the joint with electrical tape would work too as I did something similar in my proof-of-concept.
To set this up you want something above your printer from which you can hang things. You screw the bottle holder to that. On the Shapeoko, the base mount is a tight fit (I used PETG because it is flexible yet strong) -- it doesn't need adhesive or anything. Depending on your nuts, they may be tight or may need some epoxy to hold in place. This adds very little weight to the tool head because the liquid is kept secured above the machine rather than on it.
To bend the brass tube, make a cone out of paper and tape it to one end. Tape the other end closed. Fill the paper cone with salt and shake and tap till the tube is filled with salt. You can then bend into the shape you need. Once it is bent, it is inserted into the printed end piece -- you'll likely have to drill this out if you print it flat, but it should be a stronger piece printed flat. I used a #41 drill bit to get a snug fit which would also allow me to move the tube up and down in the holder for different heights. It will also rotate in the holder. You can also adjust the bolt-together joints. This gives a lot of degrees of freedom making it easy to get the spout right where you need it.
Cut enough of the IV tube to suit your setup, keep the roller shutoff mechanism, attach one end to the extendable tip of the 3in1 bottle. For the end that goes on the brass tube, apply some sealant and then push down what seems an appropriate amount of tubing over that. I secured in place with some zip ties, but you could accomplish the same goal with electrical tape and no sealant.
Lastly, take a needle and poke a tiny hole in the bottom of the oil bottle. This will prevent vacuum from interfering with flow.
When you don't want the oiler in place, you can remove it at one of the joints and hang it up by your bottle. I made a little holder for a magnet I had laying around -- the steel bolt provides plenty for it to grab on. With the spout up at the bottle height, it won't drip.
I have included the source files, made with FreeCAD ( https://www.freecadweb.org/ ) so you easily make any changes you want to this. A sort of printed Z adjustment would be nice because sliding the tube up or down in the end piece is a bit fiddly.
The roller shutoff valve will allow you regulate the rate of flow coolant.
Once the 3in1 oil is gone, I'll try refilling it with real aluminum cutting fluid but as it is, it seems to work fine - nice finish, hasn't caught fire, haven't had any aluminum weld to the millend since I started doing this.
Similar models
grabcad
free

Sealant Nozzle with conical needle and 45° cutted T output profile
...le's end shape make a clean sealant profile without masking tape,
sealant flow is activated by pushing the end of needle tip.
grabcad
free

tape holder
...thought of it i know the point on the tape cutting piece aren't good maybe someone can make a better one? at least i tried :p
thingiverse
free

Tube Cutting Tool by mkeveney
...g tool by mkeveney
thingiverse
this fixture makes it easy to cut small gauge brass or aluminum tubing with a regular hobby knife
thingiverse
free

EASY Brass Mod Short Dart - Nerf Rival Knockout by jzwzjeff
... as a guide).
close the knockout breech and the dart will be pushed fully into the brass tube by the pushrod. now ready to fire!
thingiverse
free

Printable Viking Drinking Horn by fattox4189
...t into pieces, once i have printed the pieces i will be working out how to join it up, likely with some pinning/gluing or taping.
thingiverse
free
Parametric rostock rod-end printed u-joint jaws for hollow tubes by hyperair
...m/thing:39662, but thingiverse seems wonky and i can't mark this piece as a remix of that so i'm just linking it for now.
thingiverse
free
Bulbasaur Table Lamp
...nl2/ref=cm_sw_r_tw_dp_u_x_c9kzebq6h71jv
at some point, i'll make a squirtle version since my other kid really likes squirtle.
grabcad
free

Taig Coolant Block
...r cooling tubes to flood the end mill and work piece. it has two machine screw holes for mounting to the taig mill spindle block.
thingiverse
free

Cut-away hot-end by glen
...together for making print heads on a lathe. this is my first attempt at using openscad so editing the original won't be easy.
grabcad
free

flexible oil coolant pipe
...flexible oil coolant pipe
grabcad
flexible oil coolant pipe hose for cnc machine lathe milling cooling tube
Hemocyanin
turbosquid
$49

Hemocyanin
...
royalty free 3d model hemocyanin for download as ma and obj on turbosquid: 3d models for games, architecture, videos. (1238350)
turbosquid
$16

Hemocyanin
... available on turbo squid, the world's leading provider of digital 3d models for visualization, films, television, and games.
turbosquid
$49

Hemocyanin Structure
...free 3d model hemocyanin structure for download as ma and obj on turbosquid: 3d models for games, architecture, videos. (1238351)
turbosquid
$16

Hemocyanin(1)
... available on turbo squid, the world's leading provider of digital 3d models for visualization, films, television, and games.
thingiverse
free

Hole Test 6mm and 3mm Diameters by hemocyanin
...the 3d equivalent of hello world, but if you want to see how freecad works at the most basic level, it might be worth looking at.
thingiverse
free
Mallet, Weighted Head by hemocyanin
...handle up a tiny bit to correct that. you'll also probably want to flip the heads over so the wide end is on the buildplate.
thingiverse
free

SSD Adapter for Lenovo TS130 Series by hemocyanin
... the holes don't match up to your specific ssd, i have included the freecad source to make modification of the design easier.
thingiverse
free

Shoe for Hakko FX888D Iron Stand by hemocyanin
...ll enough in that.
i've included the freecad source file to make modifications easier if you want to customize or improve it.
thingiverse
free

Handle for thread making taps by hemocyanin
... i figure the extra holes are there to be used when i eventually strip a screw hole.
made with freecad -- source file included.
thingiverse
free

Screw Mount Cable Clamps by hemocyanin
...ke them stronger, but these are good enough for my purposes so i'm quitting here.
edit: fixed a small error in 10mm files.
Dripper
3ddd
$1

Hario Cold Water Dripper
...per
3ddd
hario
http://chubbyhubby.net/style/zen-and-the-art-of-cold-brew-coffee-review-of-the-hario-cold-water-dripper/
turbosquid
$19

Pour Over Coffee Stand
...over coffee stand turbosquid royalty free 3d model coffee dripper for download as c4d and fbx on turbosquid: 3d...
thingiverse
free

Coffee Dripper by mwojo
...coffee dripper by mwojo
thingiverse
the coffee dripper
thingiverse
free

Coffee Dripper by thanaphan
...coffee dripper by thanaphan
thingiverse
simple coffee dripper
thingiverse
free

Dripper Dock by loiseaucreatif
...lectronique.
une version pour un seul dripper, et une autre pour 5.
adapté pour des drippers de 24mm de diamètre externe maximum.
thingiverse
free

Coffee Dripper by fthaltnts
...coffee dripper by fthaltnts
thingiverse
simple coffee dripper. i remixed it from a project on bechance called orea.
thingiverse
free

drippers and atomizers stand by mtbox
...drippers and atomizers stand by mtbox
thingiverse
a stand to organize your drippers, atomizers and driptips
thingiverse
free

Halo dripper by trav91
...ipper by trav91
thingiverse
dripper for garden uses 13mm or 1/2" tube for inlet and 10mm or 3/8" tube/dowel for stands
thingiverse
free

V60 COFFEE DRIPPER by elayas84
...v60 coffee dripper by elayas84
thingiverse
the best way to brew coffee , scale and print this dripper and enjoy the best coffee
thingiverse
free

Single Cup Coffee Dripper by Corosis
...single cup coffee dripper by corosis
thingiverse
cup top coffee dripper
Shapeoko
3d_export
free

shapeoko cnc laser mount for opt lasers
...ind out the opportunities that adding a cutting and engraving laser head to your cnc can bring, take a look at the website below:
thingiverse
free

Shapeoko Bitsetter
...shapeoko bitsetter
thingiverse
a bitsetter to be used with a shapeoko touch probe.
thingiverse
free

Feet for ShapeOko by SeaShadow
...feet for shapeoko by seashadow
thingiverse
an .stl and 123d design file for some feet for the shapeoko cnc router.
thingiverse
free
Shapeoko Idler by thatch
...dler by thatch
thingiverse
an idler pulley that goes on ball bearings, roughly compatible with the ones that come with shapeoko.
thingiverse
free
Shapeoko Pen Mount by cfaulkingham
...shapeoko pen mount by cfaulkingham
thingiverse
shapeoko pen mount.
thingiverse
free
ShapeOko rubberband Penholder by nischi
...shapeoko rubberband penholder by nischi
thingiverse
shapeoko rubberband penholder
thingiverse
free

ShapeOko Penholder Collection by nischi
...iverse
shapeoko penholders for different pensizes
penholder for shapeoko open source cnc milling machine
http://www.shapeoko.com
thingiverse
free

ShapeOko Main Toolholder by nischi
...by nischi
thingiverse
shapeoko main toolholder
can be directly connected to the case
for all the tools you get with you shapeoko
thingiverse
free

Shapeoko NEMA17 Mount by jossgray
...shapeoko nema17 mount by jossgray
thingiverse
nema 17 mount for shapeoko cnc
thingiverse
free
Shapeoko Clamp by JeffKubascik
...peoko clamp by jeffkubascik
thingiverse
a simple clamp assembly to hold down parts for your shapeoko. use with 1/4" bolts.
Coolant
3d_export
$25
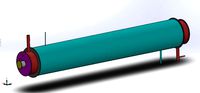
heat exchanger
...process fluid flow. outer & center cylinder is for coolant ...
3d_export
$25

Car Radiator 3D Model
...mercedes sport radiator car engine cooling fan speed water coolant ignition chasis front crash part replace leak car radiator...
3d_export
$20
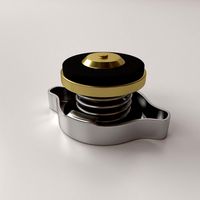
Radiator Cap 3D Model
...radiator cap 3d model 3dexport radiator cap coolant engine pressure cover automobile car fill valve cooling system...
3d_export
$80
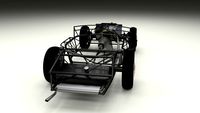
Full Mercedes 300SL chassis 3D Model
...mercedes sport radiator car engine cooling fan speed water coolant ignition chasis front crash part replace leak full mercedes...
3d_ocean
$15

Car Radiator
...car radiator 3docean car chasis coolant cooling crash engine fan front ignition leak mercedes part...
3d_ocean
$39

Full Mercedes 300SL chassis
...full mercedes 300sl chassis 3docean car chasis coolant cooling crash engine fan front ignition leak mercedes part...
3d_export
$10
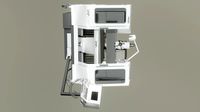
MILLING MACHINE GAME READY 3D MODEL
...automatic tool changers, tool magazines or carousels, cnc capability, coolant systems, and enclosures. milling centers are generally classified as...
thingiverse
free

CNC Coolant nozzle
...cnc coolant nozzle
thingiverse
coolant nozzle. for toolholders with 15mm coolant nozzle. (like doosan)
3dfindit
free

Single-Coolant-Plate
...single-coolant-plate
3dfind.it
catalog: zero ev
thingiverse
free

Coolant Pump Housing by JBFromOZ
...inspection, the cover has corroded through, so the impeller is not generating any coolant flow. this is my replacement part (abs)
Gravity
3d_export
free

gravity
...gravity
3dexport
3ddd
$1

Gravity balans
...зводитель: varier
модель: gravity balans
дизайнер: peter opsvikhttp://www.varier.ru/collections/relax/gravity-balans-r/
design_connected
$16

Gravity Balans
...gravity balans
designconnected
varier furniture gravity balans armchairs computer generated 3d model. designed by peter opsvik.
turbosquid
$20

Gravity Gun
...osquid
royalty free 3d model gravity gun for download as c4d on turbosquid: 3d models for games, architecture, videos. (1376026)
turbosquid
$10

Gravity Gun
... available on turbo squid, the world's leading provider of digital 3d models for visualization, films, television, and games.
turbosquid
$1

Gravity Hammer
... available on turbo squid, the world's leading provider of digital 3d models for visualization, films, television, and games.
turbosquid
$1

Gravity Tank
... available on turbo squid, the world's leading provider of digital 3d models for visualization, films, television, and games.
design_connected
$13

Gravity Table Lamp
...gravity table lamp
designconnected
gubi gravity table lamp computer generated 3d model. designed by space copenhagen.
design_connected
$11

Gravity Floor Lamp
...gravity floor lamp
designconnected
gubi gravity floor lamp computer generated 3d model. designed by space copenhagen.
turbosquid
$3

Anti gravity drone
...
royalty free 3d model anti gravity drone for download as obj on turbosquid: 3d models for games, architecture, videos. (1311361)
Feed
3d_export
$10
Feed chang
...feed chang
3dexport
turbosquid
$10

Feed-Pump
...lty free 3d model feed-pump for download as 3ds, obj, and c4d on turbosquid: 3d models for games, architecture, videos. (1456492)
3d_export
$10
Hydraulic in-feed out-feed support roller
...s at adjustable height, while machining such as cutting, drilling and etc. it is operated by hydraulic and modeled in nx siemens.
turbosquid
$5

Feeding Troughs and Buckets
...free 3d model feeding troughs and buckets for download as fbx on turbosquid: 3d models for games, architecture, videos. (1582798)
3d_export
$180
Boiler Feed Unit 3D Model
...boiler feed unit 3d model
3dexport
boiler feed unit
boiler feed unit 3d model briancrosdale 76895 3dexport
turbosquid
$6

Bird Feed House
... available on turbo squid, the world's leading provider of digital 3d models for visualization, films, television, and games.
3d_export
$7
Conveyor belt feeding punching machine
...conveyor belt feeding punching machine
3dexport
conveyor belt feeding punching machine
3d_export
$6
automatic feeding and pipe cutting machine
...automatic feeding and pipe cutting machine
3dexport
automatic feeding and pipe cutting machine
3d_export
$6
ore feeding equipment mining machinery
...ore feeding equipment mining machinery
3dexport
ore feeding equipment mining machinery
3d_export
$5
feed system
...omponent and the executive element constitute the mechanical transmission system, the detection element and the feedback circuit.
Aluminum
3d_export
$5

aluminum crutch
...aluminum crutch
3dexport
aluminum crutch
3d_export
free

aluminum cane
...aluminum cane
3dexport
aluminum cane
3d_export
$5

the aluminum canister
...
3dexport
the aluminum canister is designed for storing and transporting liquids( water), fuels and lubricants (gasoline, oils).
turbosquid
$2
Aluminum Wheel
...uid
royalty free 3d model aluminum wheel for download as fbx on turbosquid: 3d models for games, architecture, videos. (1371918)
turbosquid
$2
aluminum pulley
...
royalty free 3d model aluminum pulley for download as sldpr on turbosquid: 3d models for games, architecture, videos. (1671716)
turbosquid
$40

Aluminum Can
... free 3d model aluminum can for download as 3ds, max, and obj on turbosquid: 3d models for games, architecture, videos. (1301606)
turbosquid
$15

Curved aluminum
...ee 3d model curved aluminum for download as max, obj, and fbx on turbosquid: 3d models for games, architecture, videos. (1260293)
turbosquid
$12

Aluminum pot
... free 3d model aluminum pot for download as max, fbx, and obj on turbosquid: 3d models for games, architecture, videos. (1653492)
3d_export
$5

Aluminum Bottle
... for shampoo, conditioner or any liquids (500ml 17floz) separated all parts, able to customize any color, material and finishing.
turbosquid
$19

Aluminum windows
...model aluminum windows for download as max, max, fbx, and obj on turbosquid: 3d models for games, architecture, videos. (1646740)
Cutting
design_connected
$11
e15 Cut Cutting Boards
...e15 cut cutting boards
designconnected
e15 cut cutting boards computer generated 3d model.
design_connected
$16

Cut
...cut
designconnected
lapalma cut computer generated 3d model. designed by rota, francesco.
3d_export
$5
cutting machine
...cutting machine
3dexport
crop cutting machine
3d_export
$5

cutting board
...cutting board
3dexport
12 models for cutting boards
3d_export
$20
wire laser cutting peeling cutting machine ffc cutting machine
...and receiving machine, with the structure of this drawing, you don't need to draw by yourself, welcome to collect, thank you.
3ddd
$1

Lapalma CUT
... cut
фабрика: lapalma
коллекция: cut
размер:↑ 74 cm, ↔ 55 см.
описание: стул, ткань, кожа, дерево.
сайт: www.lapalma.it
3ddd
$1

стул lapalma cut
...стул lapalma cut
3ddd
lapalma , cut
стул lapalma cut
3ddd
$1

Lapalma CUT
...
коллекция: cut
размер:↑ 74 cm, ↔ 55 см.
описание: стул, порошковое покрытие, черный, белый, ткань, пластик.
сайт: www.lapalma.it
design_connected
$16

Hi Cut
...hi cut
designconnected
kartell hi cut computer generated 3d model. designed by starck, philippe.
3ddd
$1
Vorwerk Cut
...vorwerk cut
3ddd
ковер
vorwerk cut
прямоугольный:
размеры : 2400mm x 3200mm
круглый:
размеры : 2400mm
3
turbosquid
$10

Mountain Bike 3 -3 of 3
...model mountain bike 3 (#3 of 3) for download as fbx and blend on turbosquid: 3d models for games, architecture, videos. (1438752)
turbosquid
$6

Rock 3-3
...urbosquid
royalty free 3d model rock 3-3 for download as obj on turbosquid: 3d models for games, architecture, videos. (1628065)
turbosquid
$29

Books 150 pieces 3-3-3
...books 150 pieces 3-3-3 for download as max, obj, fbx, and stl on turbosquid: 3d models for games, architecture, videos. (1384033)
turbosquid
$3

Genesis 3 Clothing 3
... available on turbo squid, the world's leading provider of digital 3d models for visualization, films, television, and games.
3d_export
$5

hinge 3
...hinge 3
3dexport
hinge 3
3ddd
$1

Розетка 3
...розетка 3
3ddd
розетка
розетка 3
turbosquid
$50

is-3
... available on turbo squid, the world's leading provider of digital 3d models for visualization, films, television, and games.
turbosquid
$10

Mountain Bike 3 -2 of 3
...model mountain bike 3 (#2 of 3) for download as fbx and blend on turbosquid: 3d models for games, architecture, videos. (1438750)
turbosquid
$10

Mountain Bike 1 -3 of 3
...model mountain bike 1 (#3 of 3) for download as fbx and blend on turbosquid: 3d models for games, architecture, videos. (1438743)
3d_export
$5

3 CATS
...3 cats
3dexport
3 cats pen holder