Thingiverse
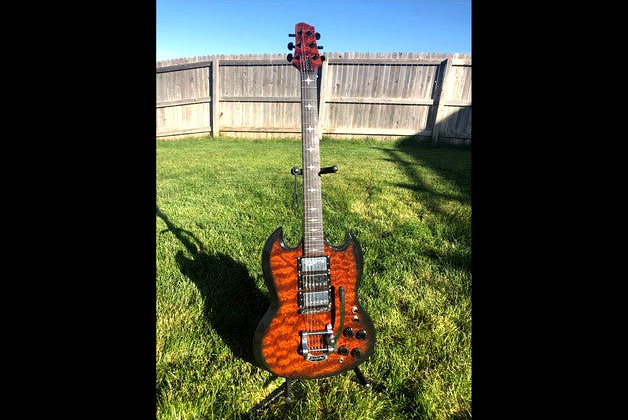
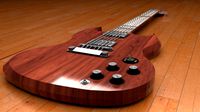
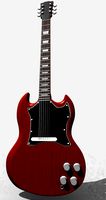
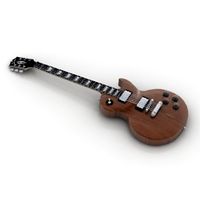
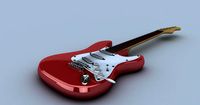
SG style playable electric guitar by Vogon_Captain
by Thingiverse
Last crawled date: 3 years ago
Version 2 is out!
Notes:
After playing this guitar as my “working” guitar for about a
year, I made some improvements based on real-world use:
significantly
improved structural strength
re-aligned
pickups (a glitch had them off a millimeter left to right)
adjusted
intonation and created pre-formed Gotoh holes
added/re-sized
control holes
added
Bigsby mount braces
added
air escape holes for easier structure rod assembly
Even
without these upgrades, IMO the initial version was still the best
guitar I owned until now :). I made Version 2 so I won’t have to
“baby” my guitar as much in order to protect it from damage
during long-term use.
Directions:
Print parts
All parts are
now recommended at 80% infill. This higher amount lowers the
resonance slightly but greatly improves durability. 80% is the
best balance between strength, weight, and resonance.
Assemble
centerblock:
Sand joints
flush.
Run a drill
through rod holes to clear them out, then press rods in neck
pocket. DO NOT HAMMER the rods in, you will split the print.
Getting the rods in is the hardest part of the build. Make sure
your holes are clean and big enough, but avoid oversizing them. Be
patient.
Slide pickup
block up rods and press to neck pocket.
Repeat for
bridge and tailpiece.
TEST YOUR
INTONATION.
Gotoh sockets
can be pressed in (not hammered) or you can position a bridge,
adding shims for height, and have it held down by string tension.
Attach a
temporary tailpiece (You can use drywall screws in the provided
test holes on the tailpiece block to hold the tailpiece).
Attach a
guitar neck, string it up, and make sure intonation is right for
your neck, strings, tuning, and bridge height. If intonation is
wrong this is your only chance to re-print a corrected bridge
piece by itself.
If using a
non-Gotoh bridge, mark the correct mounting holes on the blank
bridge piece and drill them after intonation is set.
Disassemble
centerblock and then re-assemble with glue between joints.
Clean out pin
holes on all parts. Sand all joint surfaces flush.
Test-fit parts
with pins BEFORE gluing.
Join left top
and left middle with pins and glue. Repeat for right.
I recommend a
drop of wood glue in each pin hole before final assembly as it
lubricates the pin for insertion and then locks it in.
Attach left and
right sections to centerblock with glue and pins.
Join bottom
left and right with glue and pins.
Join bottom
section to top with glue and pins.
Seal all joint
lines with filler, let dry, then sand or file smooth.
Finish as
desired.
If veneering,
score the guitar well before applying veneer glue because the wood
PLA does not absorb as much glue as real wood.
I did not have a vacuum press for veneering. Instead I pressed the guitar's veneer by sandwiching it between paper, two sheets of high-density foam, approx 1.5" of boards on both sides, and 250lbs of weight on top.
Attach neck,
then add hardware and electronics to taste. Don’t forget your
ground wire before your final press-in of the Gotoh post socket
(ground wire hole provided).
Version
1 description:
After
seeing the incredible work by TechSupportGo (Jessie Sassser) at
https://www.thingiverse.com/thing:1068688, I realized what was
possible. Unfortunately, while those plans are amazing and
groundbreaking for sure, I am more a fan of the SG-style body shape.
So, I decided to design and print my own electric guitar from
scratch. My dream was to create a playable high-end 3D-printed
guitar in the style of the Gibson SG, but with three pickups and a 24
fret neck. I also wanted the ability to use a bolt-on custom neck,
such as one from Warmoth.com. I settled on a 25.5" scale
intonation. This allows using a standard bolt-on 25.5" necks
(including the Warmoth 24 fret neck), or any conversion neck that
fits a fender pocket. You can choose from two centerblock files:
one with two pickups or the other with three. Also, I wanted to
integrate sound chambering similar to the Gibson Elegant series.
Chambering would be very difficult for me to manually route from a
true wood block. 3d printing seemed like a logical alternative, and
more appealing than buying a pre-cut or solid block wood kit model
that did not have the acoustic chambering.
Bolt-on
necks are not easy to mesh with the SG design, which is why it is
hard to find an SG with a bolt-on neck. Traditionally, you either
have to sacrifice neck access by dropping the fingerboard into the
body of the guitar (e.g. the cheaper Epiphone SG versions and most SG
precut wood kits), or, if you keep with the true SG neck placement,
you will encounter structural issues. This is why true SGs are
traditionally made with a set neck, providing a strong neck plus
retaining fret accessibility. However, I wanted something more:
specifically, I wanted the ability to use a custom-built neck
tailored to my exact wishes AND an have an SG body style. I wanted
to have my cake and eat it too, and spent a long time analyzing and
designing. Also, I didn't want to spend $6k for a custom shop
guitar that still might not have everything I wanted.
I
succeeded by using a compromise in my design--only the 22nd fret is
below the neckline on the body, but to attach a bolt-on neck this
high above the body I had to extend a pad from the pocket for
bolting. I kept some pocket for alignment and reinforcement, but
nowhere near what the Epiphones are doing. Because I was 3D
printing, I was able to easily create holes for two 1/4"
stainless steel dowels through the neck pocket back for support
strength. I got a 24” rod on Amazon and sawed it in half. I had
to use a drill and coat hanger to get the supports out of the holes
so the rods would fit all the way in. I was originally not happy
extending the pad for the neck bolts, but I'm now seeing that even
with the extension pad, the neck at the 20th fret is still almost
half the thickness of my Les Paul. So, not 100% SG purist but still
incredible neck access. The 3D printed wood is SOLID. For guitar
resonance it sounds similar to a guitar made out of really hard, very
dense wood. A simple sound demo is available at
https://youtu.be/8V14xpDhN2o with the caveat that I don't have any
recording equipment so I just recorded some goofy blues runs using my
phone (and I don't claim to be the best guitar player in the world).
So it should go without saying it sounds better live.
I
printed with Hatchbox Wood PLA over about 3 weeks to get everything
printed. I printed with 100% infill for the centerblock and 60% for
the body. I used stainless steel center rods and steel dowel pins,
I don't know if it would work well without them. I bought a cheap
$100 fender squire for neck testing. I test assembled the parts and
added the junky fender neck and a cheap bridge to try it out. It
worked! I verified the guitar is structurally sound and passed the
important mechanical/functionality test. The added strength support
bonus of the dowels/rods is very nice. It is solid with these
additions! The pilot holes were a little wide for my
bridge/tailpiece but I drilled new holes for the tailpiece.
Intonation is perfect but I initially just set the bridge on a shim
for testing, without drilling it. It feels and sounds exactly like a
wood guitar, and with lots of sustain like you would get from a
really hard wood. I've discovered a huge amount of variance in
saddle sockets so I made the 25.5" scale bridge block with
simple pilot holes instead of pre-cut holes. The blank version is
still available for more flexibility. Weight is about the same as I
would expect for a wood guitar.
After
testing the design, I veneered, then sealed with shellac, then
nitrocellulose. The resonance is incredible. The body vibrates for
ages, kind of like a tuning fork. When I first tested it I was a
little worried I might have to mute it a little with tape or cotton
on the inside if it started causing feedback problems when amplified,
but the veneer and nitrocellulose tamed it a little. Acoustically
(not plugged in) it's about 2x louder than my Gibson LP and just a
little louder than my Gretsch Electromatic, and a lot brighter than
the Gretsch. Having played for a bit now I can say this is a killer
guitar. It has better playability and neck access than my Gibson Les
Paul, and I can make it sound like (or even better than) either the
Gibson or the Gretsch. I did have to modify the final design with
braces in the control area (I found holding the guitar at some angles
would flex the body, breaking the veneer) and also across the seams
inside the guitar to hold the sections together stronger. I did have
to re-veneer because of the cracks, but it is solid now that I
re-enforced the seams to prevent them from pulling. If you want to
make a quality guitar, it is possible, but be prepared to put in time
to do it right. Turning this into a high-end guitar was not a quick
process. As pictured the total cost for all materials was ~ $1200,
but I think someone could probably make it for as little as $200.
Just depends on how nice you want it to be and how many tools/parts
you have laying around.
I
used Blender, my own guitars, and several reference blueprints to
create this design. I have about 80 hours into the electronic design
alone, and probably 80 or more hours building the guitar (including
re-veneering and re-finishing the new veneer). I've learned an
incredible amount about building guitars. I admit I'm not skilled
enough nor do I have the right tools to do it in real wood, but now I
don’t need to be skilled in woodworking. 3D printing has opened up
a ton of new possibilities for me. I did learn that superglue works
great for assembly and repairs, and that scoring the PLA and using
sufficient amounts of veneer glue will help immensely with adhering
the veneer (initially I did not use enough glue, hence another reason
I had to re-veneer).
Printing
was done on an Ender 3 with Hatchbox wood PLA at 200/33 temp and 100%
fan. Initially I had a lot of warping; you’ll have to really know
your printer/filament to get the solid parts to print without
warping. I've added holes for using 1/8"x1" dowel pins to
help align and strengthen the final design and to identify any minor
warping so it can be fixed during finishing. Stainless steel pins
are only ~$4 per 25 on Amazon. I bought the veneer (I chose figured
bubinga) from veneersupplies.com, as well as the veneer glue and
veneer softener. I just clamped the veneer on the body, I did not
use a veneer press.
Neck
scale: I originally designed it with the Gibson 24.75" neck in
mind, but realized this is not easily feasible. I moved the
bridge/saddle holes to accommodate the neck for proper intonation
since I had to drop the neck slightly for better structural
integrity. I uploaded a "blank" saddle block for those who
want to drill holes for a different saddle or a different scale neck,
or if you want to precisely set your intonation. Keep in mind the
neck pocket creates a 2.5 degree neck tilt--check your saddle/bridge
if you want to use something other than gotoh tune o' matic. I
installed a bigsby B5 with a roller saddle bridge. I also braced the
bottom two holes of the bigsby with a thin piece of wood on the
inside of the guitar (the top two holes are in the centerblock).
Assembly:
press fit the neck to the centerblock to make sure it fits and the
saddle scale length is correct BEFORE gluing parts, so if it doesn't
work you can adjust the model, and reprint only the heel pocket or
the saddle block and not the whole guitar. Using superglue, put the
centerblock together first, then the sides, and the bottom two
pieces, so you have four parts. Attach assembled sides to
centerblock (using dowel pins and glue) and then attach the bottom
assembly to the centerblock and sides. If you're brave enough to not
use dowel pins you can put this together in almost any order;
however, I've found that my printer always has a small amount of
variability in the bottom layer so the pins are immensely helpful. I
don’t think I would veneer this without pins—the seams just won’t
be strong enough. I needed to run a 1/8" drill through the
holes to clear them out or the pins would have been too tight to get
the pieces together. The easiest way to set intonation is to
initially screw in the tailpiece but just lay the bridge under the
strings, and then tune it up. The tension will hold it on. Then you
can adjust forward or back and mark drill holes when it’s right.
MAKE SURE YOU DRILL THE RIGHT SIZE HOLE FOR YOUR BRIDGE. Don't make
the hole a little smaller for press fit like you would with real
wood. Wood PLA does not expand like real wood. If the hole is even
a tiny bit too small you will not be able to press or hammer the post
in like you could with real wood. You will end up with it stuck
halfway in, or break the guitar trying to make it go in. Also don't
forget to drill a hole and add a grounding wire before you press the
post in, or your guitar will buzz when you touch the strings. Or
worse, it will pick up a radio station.
Finishing:
Remove the hardware you installed for testing/intonation. Fill any
gaps and then sand/stain and finish as desired. One note: I have
made both the face and back (not the bevels) 1/42" (0.61mm)
short from the blueprint spec to allow addition of veneer (quilted
maple, burled, etc.) without it interfering with setting the neck.
If you don't want veneer you can either raise the top surface 1/42"
or just ignore the fact that the fingerboard will be half a
millimeter higher from the body.
Future
plans: I need to enlarge the switch hole and perhaps add a version
with a second switch hole. I didn't realize the switch needs 1/2"
opening, the current hole is too small and has to be drilled out.
Also, I will add the supplemental seam braces into the design if
possible.
Thank
you for looking/making, and please make constructive comments! I'm
super excited to see this come together in a way that makes people
happy. I truly believe this is the wave of the future for people
like me who can't properly handle a wood router to make the custom
sound cavity that this design has.
Similar models
thingiverse
free
Gipsy Jazz guitar bridge - chevalet guitare manouche by Pekele
... wood filament, i will try in plain abs to see the sound or tone differencies
but in wood it's more cute anyway ;)
good print
thingiverse
free

Guitar bridge to fix sharp intonation by AWS3D
... you would like the fusion 360 files or would like me to edit the design for your needs please contact me at my email in the bio.
grabcad
free

Guitar Fixed Bridge (Gotoh GTC-101)
...unting holes are taken from drawing on gotoh website and supposed to be 100% correct. designed in rhino 5, rendered in keyshot 6.
3dwarehouse
free
acoustic guitar
...e what you think. #3d #acoustic #acoustic_guitar #bridge #fret #guard #guitar #maple #neck #pick #quilted #rosewood #saddle #wood
grabcad
free

Tele Bridge saddle
...tele bridge saddle
grabcad
bridge saddle for fender telecaster or alike, metric dimensions, 7° slant for better intonation.
thingiverse
free

Guitar neck with support pins by singharmony
...ortable and playable guitar.
thanks to solstie and pxt for the original design and for reuploading solstie's original files.
3dwarehouse
free

Guitar Bridge
...guitar bridge
3dwarehouse
bridge, saddle and pins #bridge_pins #guitar_bridge #guitar_saddle
thingiverse
free

Guitar Routing Template by Hubaer
... to mill it with the printed template you have to reduce it in the fist step with the reduction part.
have fun and let's rock
thingiverse
free

Sound Hole Preamp Mount for Fishman 301 presys in Camps M1S guitar by zedonetx
...2 holes in the guitar: 6.5mm output jack at the bottom of the guitar and tiny piezo hole under the saddle of guitar.
enjoy music!
3dwarehouse
free

Kevs Drill press stand
...kevs drill press stand
3dwarehouse
i have made this all measurements are correct. i used a pocket hole jig for the butt joints.
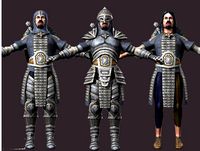
Vogon
3dwarehouse
free

Vogon crew
...vogon crew
3dwarehouse
42 #crew_member #guide #vogon
3dwarehouse
free

Vogon ship
...vogon ship
3dwarehouse
vogon ship from hitchhiker's guide
3dwarehouse
free

Vogon Constructor Ship
...vogon constructor ship
3dwarehouse
vogon ship from the hitchhiker's guide to the galaxy, 1980's tv series
3dwarehouse
free

Vogon ship
...tor #death #destroyer #fleet #galaxy #guide #hitchhikers #junk #planet #rusty #ship #slab #space #spaceship #star #the #to #vogon
3dwarehouse
free

The Hitchhiker's Guide to the galaxy (COMPLETE!!)UPGRADED And Stand
...#ford #guide #hiker #hitch #hitchhiker #maghratea #space #towel #universe #vogon ...
Playable
3d_export
$10

Eagle Eye View Map Bundle
...this collection of crazy rides maps items includes various map-playable items. this set of crazy rides maps items include...
3d_ocean
$49
4 Different Low Poly Maps
...2755 faces each objects are separated (not attached eachothers) playable ...
3d_export
$20

yoda
...the years in eight different sets and is a playable character in all four lego star wars video games...
3d_export
$15

samantha maxis death bride
...ops until the map moon, where she becomes a playable character during richtofen's grand scheme. in call of duty:...
3d_export
$60

Vampire Cyborg
...a different number of polygons, the minimum for a playable character is<br>faces - 14 902<br>triangles - 29 061<br>maximum is<br>faces...
3d_export
$45

EMMy GIRL CHARACTER RIGGED ANIMATED 99 ANIMATIONS INCLUDED
...fantasy vii remake.<br>update 4/9/2022: new ue4 template project with playable blueprint and hair/cloth/body physic<br>+low poly, game ready, rigged, pbr...
3d_export
$90

Azura Cyber Girl Constructor
...a different number of tris, the minimum for a playable character is 23 164, maximum - 67 394 with...
unity_asset_store
$35
Hero Playable Character
...ith the hero playable character asset from mister necturus. find this & other humanoids options on the unity asset store.
unity_asset_store
$25

Warlock Playable Character
... the warlock playable character asset from mister necturus. find this & other humanoids options on the unity asset store.
unity_asset_store
free

Low Poly Playable Vehicles
... with the low poly playable vehicles asset from odd stone games. find this & other land options on the unity asset store.
Sg
3ddd
$1
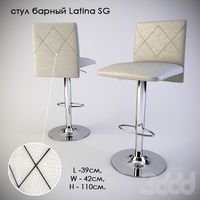
Latina SG
...latina sg
3ddd
барный
стул барный latina sg
3ddd
$1

SGS / OZ
...sgs / oz
3ddd
sgs
http://www.ceramicagsg.com/washbasins-and-shower-tray-oz/washbasin-oz.html
3d_export
$5

electric guitar sg
...electric guitar sg
3dexport
3d model electric guitar sg.
design_connected
$18

SG Padded Vases
...sg padded vases
designconnected
smallaccents sg padded vases computer generated 3d model.
turbosquid
$21
Gibson SG
... available on turbo squid, the world's leading provider of digital 3d models for visualization, films, television, and games.
turbosquid
free
Gibson SG
... available on turbo squid, the world's leading provider of digital 3d models for visualization, films, television, and games.
3ddd
$1
Suffolk | SG-1260
...g-1260
3ddd
urban electric
the urban electric
suffolk sg-1260
lustrehttp://www.urbanelectricco.com/mobile/suffolk.html
3ddd
$1
Kolarz Maschera 0228.62.SG
...kolarz maschera 0228.62.sg
3ddd
kolarz
бра kolarz maschera 0228.62.sg
3ddd
$1

Kolarz Maschera 0228.16.SG
...kolarz maschera 0228.16.sg
3ddd
kolarz , maschera
kolarz maschera 0228.16.sg
3d_export
$78
Gibson SG 3D Model
...ort
guitar music play gibson sg rock jazz electric pickup sound instrument string
gibson sg 3d model eric apanowicz 2196 3dexport
Captain
3ddd
free

Captain
... captain , кресло
кресло captain от мебельной фабрики sinetica.
материалы corona.
3d_export
$5
captain-america-
...captain-america-
3dexport
captain-america-
3d_export
$5

captain marvel
...captain marvel
3dexport
captain marvel
3d_export
$5

captain america
...captain america
3dexport
captain america for 3d print
turbosquid
$99

Captain
... available on turbo squid, the world's leading provider of digital 3d models for visualization, films, television, and games.
design_connected
$13

Captain Flint
...captain flint
designconnected
captain flint computer generated 3d model. designed by anastassiades, michael.
3d_export
$5

Shield of captain america
...shield of captain america
3dexport
keychain of shield of captain america
3d_export
$7

captain america shield
...captain america shield
3dexport
captain america shield made by me
turbosquid
$25

Captain Chair
...quid
royalty free 3d model captain chair for download as obj on turbosquid: 3d models for games, architecture, videos. (1500418)
3ddd
$1

Captain Cork S
... captain , пробка
диаметр - 14,5см
высота - 19см
Guitar
archibase_planet
free
Guitar
...guitar
archibase planet
guitar electric guitar
guitar n200912 - 3d model (*.gsm+*.3ds) for interior 3d visualization.
archibase_planet
free

Guitar
...
archibase planet
guitar electric guitar musical instrument
guitar dean n290411 - 3d model (*.3ds) for interior 3d visualization.
archibase_planet
free
Guitar
...archibase planet
guitar electric guitar musical instrument
guitar n171112 - 3d model (*.gsm+*.3ds) for interior 3d visualization.
archibase_planet
free

Guitar
...archibase planet
guitar electric guitar musical instrument
guitar n300513 - 3d model (*.gsm+*.3ds) for interior 3d visualization.
3d_export
$5

Guitar
...guitar
3dexport
yellow guitar
archibase_planet
free
Guitar
...ase planet
guitar electric guitar musical instrument
guitar n101213 - 3d model (*.gsm+*.3ds+*.max) for interior 3d visualization.
archibase_planet
free

Guitar
...ase planet
guitar musical instrument electric guitar
guitar n111213 - 3d model (*.gsm+*.3ds+*.max) for interior 3d visualization.
archibase_planet
free
Guitar
...planet
guitar electric guitar musical instrument
guitar gibson les paul n070111 - 3d model (*.3ds) for interior 3d visualization.
archibase_planet
free
Guitar
... planet
guitar electric guitar musical instrument
guitar les paul n280113 - 3d model (*.gsm+*.3ds) for interior 3d visualization.
3d_export
$11
guitar
...guitar
3dexport
guitar model with texture
Electric
3d_export
$5
Electric pole
...electric pole
3dexport
electric pole for street, electricity line
3ddd
$1

electric mixer
...electric mixer
3ddd
electric mixer , миксер
electric mixer
3ddd
$1

electrical installation
...electrical installation
3ddd
electrical installation , розетка
electrical installation
turbosquid
$19
The electric water heater electric
... available on turbo squid, the world's leading provider of digital 3d models for visualization, films, television, and games.
turbosquid
free
Electrical Outlet electric splitter
... available on turbo squid, the world's leading provider of digital 3d models for visualization, films, television, and games.
3d_ocean
$20
Electric Guitar
...electric guitar
3docean
electric electric guitar guitar music music instrument
model of a electric guitar created in maya.
3d_ocean
$12

Electric Shaver
...electric shaver
3docean
electric electric shaver hair removal personal care shaver shaving
electric shaver created in 3ds max.
3ddd
$1

electrical switch
...h
3ddd
electrical , розетка
electrical switch from bticino company
series livinglight
3d_export
$7
Electric Conveyor
...electric conveyor
3dexport
electric conveyor
3d_export
$5
electric drums
...electric drums
3dexport
electric drums
Style
3ddd
$1

style
...style
3ddd
манекен , одежда
style
3ddd
$1
BM Style
...bm style
3ddd
bm style
кресло bm style с материалами и тестурами
3d_export
$5
style handle
...style handle
3dexport
style handle
3d_export
$6

new style
...new style
3dexport
new style room
turbosquid
$1

style
... available on turbo squid, the world's leading provider of digital 3d models for visualization, films, television, and games.
3d_export
$5

Roman style
...roman style
3dexport
roman style architecture house
3ddd
$1

Ceppi Style
...ceppi style
3ddd
ceppi style
качественная модель классического стола ceppi style с текстурами и материалами v-ray
3ddd
$1

Kolo Style
...kolo style
3ddd
kolo
умывальник kolo style, арт. l21950
3ddd
$1
Banos Style
... style
производитель banos
модель style
в архиве присутствует дополнительная версия с материалами для corona
3ddd
$1

Кухня Free-style
...кухня free-style
3ddd
free-style
кухня free-style