Thingiverse
Servobelt Y-drive for LowRider2 CNC
by Thingiverse
Last crawled date: 4 years, 2 months ago
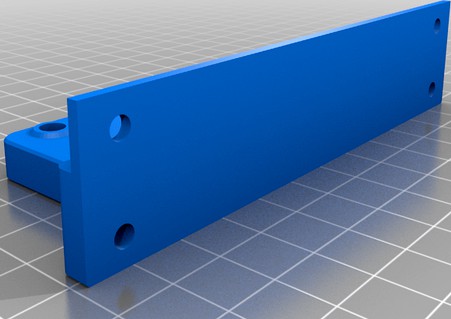
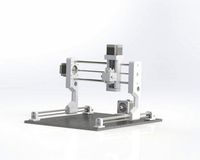
This setup replaces the Y-drive on the Lowrider2 CNC from http://www.v1engineering.com
My setup uses 80/20 15 series on the outer rails (3"x3").
The servobelt drive engages the drive belt with a static belt so that the only area of stretch is between the rollers and the drive motor. The other advantages:
a) it gets the belt out of the way from getting caught on things
b) the belt rollers keep the rig aligned and rigid in X axis (and take some load)
c) the Y plate doesn't actually need the center hole cut for the motor (stiffer plate)
The main disadvantage is that it takes twice as much belt
The belt is bonded to the 80/20 with 10mm 3M VHB tape. It's not a super strong bond, but the total surface area makes up for that, and the end clamps keep it from peeling away
I also use one of the top YZ rollers upside-down on the bottom side with a printed T-wheel to add Z rigidity.
Extra parts needed:
(2) M5x10mm hex-head bolt to adjust tension (no room for an allen key).
(2) M5 bolt and nut for toothed idler (same as smooth idler bolts)
(2) GT2 x 10mm wide toothed idler
(4) 80/20 t-slot nuts for belt clamps
extra 10mm wide GT2 belt
10mm wide 3M VHB tape
(2) 5/16"x3.75" bolt for lower Y idler
(4) bearings
Similar models
grabcad
free

GT2 Pulleys, 80 tooth, 20 tooth, idlers 6 & 9 mm wide
...ers 6 & 9 mm wide
grabcad
gt2 pulleys, 80 tooth and 20 tooth. 20 tooth idlers for 6 & 9 mm wide belts. drawn in freecad.
grabcad
free

Gates GT2 Toothed Idler 9mm M-IDLER-T-GT2-P20-9-A-P5-H140
...gates gt2 toothed idler 9mm m-idler-t-gt2-p20-9-a-p5-h140
grabcad
toothed idler as sold by e3d.
with gates gt2 belt on.
thingiverse
free

Y-belt tensioner by ludodg
...ioner by ludodg
thingiverse
has to be mounted under the bed, replacing one y-belt fixation clamp.
needs an extra 3m-bolt and nut
thingiverse
free

GT2 2mm Idler Pully by Timelord83
...gt2 2mm idler pully by timelord83
thingiverse
40 tooth idler 608 pulley for gt2 2mm x 6mm wide gt2 belts
thingiverse
free

10mm GT2 Belt Tensioner by CoolNamesAllTaken
...ilable with the tooth grooves oriented on either side). tighten the m3 bolt into the nut until the belt has the desired tension.
thingiverse
free

Anet A8 X axis belt tensioner by RedSector
...2-idler-pulley-toothed-and-smooth-3mm-bore-for-6mm-wide-belt-/191972288792?var=&hash=item2cb270a918:m:md9fboxwy_8duyehbjmbk6a
thingiverse
free

Improvement X Idler for GT2 pulley-belt by nntuan
... pulley 20 tooth, therefore i improvement small thing for that. hope helful for you.
many thank simhopp for design with sketchup.
thingiverse
free

Hictop 3dp11 Adjustable Y Idler Mount 2.0 by SaberShip
...ler pulley for 6mm wide gt2 belt
1x m5 x30 bolt
1x m5 nylon lock insert nut (regular m5 nut may work)
2x m3 x10 screws
2x m3 nuts
thingiverse
free

XY idler 10mm Y 20T Pulley
...back and forward work during print moves.
suitable for :
gt2 20t pulleys
10mm y axis
i'm also update the version for 8mm rods
grabcad
free

GT2 idler pulley, 10mm belt, 8mm bore.
...gt2 idler pulley, 10mm belt, 8mm bore.
grabcad
smooth idler pulley for 10mm gt2 belt. 8mm internal bore.
Lowrider2
thingiverse
free

LowRider2 Z-Endstop by 4noxx
...lowrider2 z-endstop by 4noxx
thingiverse
lowrider2 z-endstop for 25mm and 25.4 pipes
thingiverse
free

LowRider2 / MPCNC Autosquare Case by 4noxx
...lowrider2 / mpcnc autosquare case by 4noxx
thingiverse
lowrider2 / mpcnc autosquare
potentiometer 5mm
push button 16mm
thingiverse
free

LowRider2 belt tensioner by 4noxx
....thingiverse.com/thing:3026040https://www.thingiverse.com/thing:3064287
spanner_fest_v2.stl
hole for m4 is 20mm deep instead 4mm
thingiverse
free

LowRider2 Dust Shoe by 4noxx
...shoe
bom:
front and back part
18x m3x10 or larger
tablecloth pvc transparent 1-2mm
02.01.2021
add a second version for m3 inserts
thingiverse
free

Rails for LowRider2 CNC by swepeter
...this:https://www.thingiverse.com/thing:2368805
thanks godler
alos modded the y plate fromhttp://www.thingiverse.com/thing:3064287
thingiverse
free

65 mm Spindle Mount for LowRider2 by quirxi
... a 65 mm watercooled (china) spindle to the original 611-plate of the lowrider2 (see: https://www.thingiverse.com/thing:3064287).
thingiverse
free

Lowrider2 separación extra wheels by pericomart
...- aporta más estabilidad al mantener la rueda a 90º gradospermite mantener la ruedas a 90º con respecto al eje y.
se necesitan 4.
thingiverse
free

lowrider2-611-plate-2_25.4mm by peterfosseus
...e, then a new aluminum one :)
https://docs.v1engineering.com/lowrider/
openscad file for your convenience. - http://openscad.org/
thingiverse
free

Lowrider2 eje Y Tirantes by pericomart
...or estabilidad al eje y
incluyo versión para 25mm y para 25,4mm
se debe imprimir con soporte, el de tipo árbol da buen resultado.
thingiverse
free
LowRider2 Vac Adapoter for 1.875 Hose by C6SUMMER
...lowrider2 vac adapoter for 1.875 hose by c6summer
thingiverse
hose adapter to fit the lowrider vacuum base fitting.
Drive
turbosquid
$90
Drive
...turbosquid
royalty free 3d model drive for download as blend on turbosquid: 3d models for games, architecture, videos. (1654393)
3d_export
$10

cycloidal drive
...cycloidal drive
3dexport
cycloidal drive
3d_ocean
$5

Flash Drive
...h drive included : – materials – scene ( lighs / room ) – .c4d + .obj for any questions please feel free to contact me thank you.
3d_ocean
$5

Usb drive
...s shaders and a lighting setup. it also has a small animation of it going in and out. i saved it out as both a .blend file and...
3d_ocean
$5

Pen Drive
...est computer drive game model good low poly new pen pen drive textured unwrapped uv very low poly
a very beautiful low poly model
3d_ocean
$10

External hard drive
... is a detailed model of a trekstor external hard drive. you can easily modify the label on the top. simply edit the text objects.
turbosquid
$60

Star Drive
...squid
royalty free 3d model star drive for download as blend on turbosquid: 3d models for games, architecture, videos. (1254314)
turbosquid
$50

Star Drive
...squid
royalty free 3d model star drive for download as blend on turbosquid: 3d models for games, architecture, videos. (1263524)
turbosquid
$45

Star Drive
...squid
royalty free 3d model star drive for download as blend on turbosquid: 3d models for games, architecture, videos. (1287060)
turbosquid
$40
Star Drive
...squid
royalty free 3d model star drive for download as blend on turbosquid: 3d models for games, architecture, videos. (1261902)
Cnc
3d_export
$35

Cnc
...cnc
3dexport
the cnc machine is unfinished
3d_export
$10
cnc router
...cnc router
3dexport
prototipe cnc router
3d_export
$10

cnc machine
...cnc machine
3dexport
cnc machine model with individual model files with assembly
3d_export
$5
Cnc 3D Model
...cnc 3d model
3dexport
cnc
cnc 3d model csiszar 61289 3dexport
turbosquid
$10

cnc bedroom
...osquid
royalty free 3d model cnc bedroom for download as max on turbosquid: 3d models for games, architecture, videos. (1494981)
turbosquid
$9
cnc(wood)
...rbosquid
royalty free 3d model cnc(wood) for download as max on turbosquid: 3d models for games, architecture, videos. (1189189)
turbosquid
$1

CNC Frame
...rbosquid
royalty free 3d model cnc frame for download as stl on turbosquid: 3d models for games, architecture, videos. (1371706)
turbosquid
free
cnc table
...rbosquid
royalty free 3d model cnc table for download as max on turbosquid: 3d models for games, architecture, videos. (1500926)
turbosquid
$30

CNC Lathe
...
royalty free 3d model cnc lathe for download as max and obj on turbosquid: 3d models for games, architecture, videos. (1284634)
turbosquid
$25

CNC Machine
...
royalty free 3d model cnc machine for download as ma and fbx on turbosquid: 3d models for games, architecture, videos. (1307199)
Y
turbosquid
$1

Tetera y Galletas y Caf
... available on turbo squid, the world's leading provider of digital 3d models for visualization, films, television, and games.
3ddd
$1

Смеситель Y-CON
...смеситель y-con
3ddd
смеситель , y-con
смеситель y-con
3ddd
$1

Y-Chair
...y-chair
3ddd
tom dixon
y-chair designed by tom dixon,
3ds max + obj, corona
3ddd
$1

Y Chair compilation
....net/products/us/y-chair-sled-base
y chair swivel basehttp://www.tomdixon.net/products/us/y-chair-swivel-base
turbosquid
$190

Y-8
...y-8
turbosquid
royalty free 3d model y-8 for download as max on turbosquid: 3d models for games, architecture, videos. (1658891)
turbosquid
$7

Bench Y
...turbosquid
royalty free 3d model bench y for download as obj on turbosquid: 3d models for games, architecture, videos. (1488746)
turbosquid
$15

bonePile Y
...oyalty free 3d model bonepile y for download as blend and obj on turbosquid: 3d models for games, architecture, videos. (1546374)
turbosquid
$7

Y for Yarn
...d
royalty free 3d model y for yarn model for download as max on turbosquid: 3d models for games, architecture, videos. (1699732)
turbosquid
$2

FONT Y
...quid
royalty free 3d model font y for download as ma and obj on turbosquid: 3d models for games, architecture, videos. (1549457)
3ddd
$1

WOOD-y
...wood-y
3ddd
wooden guy