Thingiverse
Sequential Shifter Simracing (no Electronics) by davebrave
by Thingiverse
Last crawled date: 3 years ago
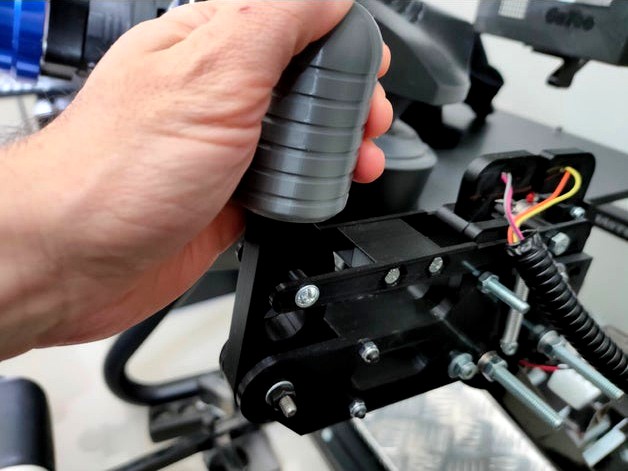
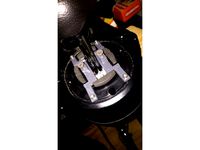
This is my "heavy duty" sequential shifter for simracing. It's based on a ball bearing that is pushed against two microswitches. I have not included electronics in the design but you can use an Arduino Micro pro (with USB support) or even use an old gamepad and solder the two microswitches directly to the board.
There are two diferent levers for a shorter or longer grip.
Materials:
1x 6000 ZZ ball bearing
2x 626 zz ball bearing (optional)
2x 55mm springs
2x 20mm microswitch on-off 3-pin
Screws, nuts and washers:
m4 2x 20mm
m5 2x 35mm, 5x 45mm
m6 2x 35mm, 2x45, 1x55mm
Print:
20% infill
0.2 and 4 wall lines.
Although it's not crucial, you should have the XY expansion properly adjusted so holes have the right size.
Assembly:
It should be quite straight forward:
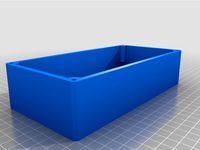
You start with left_base, screw both switch holders using m4 screws and nuts. Solder the cables before installing the switches. They are just pushed into the holder.
Screw the right_base and insert the m5 55mm screw that is going to be used for the springs.
Insert the 2 ball bearings into the lever. You can choose either short or longer lever. Alternatively, you can use the dummy bearings instead, but I haven't tried myself. Put a m6 screw through the base and the lever.
The push arm is quite simple but pay attention to the springs, they both form a "V" on each side, so you mount the springs in different angles but sharing the same base point. Look at the assembly pictures for more clarification.
Then you can use the remaining holes to attach the shifter to your rig using m8 or m6 depending on your needs.
Enjoy!
There are two diferent levers for a shorter or longer grip.
Materials:
1x 6000 ZZ ball bearing
2x 626 zz ball bearing (optional)
2x 55mm springs
2x 20mm microswitch on-off 3-pin
Screws, nuts and washers:
m4 2x 20mm
m5 2x 35mm, 5x 45mm
m6 2x 35mm, 2x45, 1x55mm
Print:
20% infill
0.2 and 4 wall lines.
Although it's not crucial, you should have the XY expansion properly adjusted so holes have the right size.
Assembly:
It should be quite straight forward:
You start with left_base, screw both switch holders using m4 screws and nuts. Solder the cables before installing the switches. They are just pushed into the holder.
Screw the right_base and insert the m5 55mm screw that is going to be used for the springs.
Insert the 2 ball bearings into the lever. You can choose either short or longer lever. Alternatively, you can use the dummy bearings instead, but I haven't tried myself. Put a m6 screw through the base and the lever.
The push arm is quite simple but pay attention to the springs, they both form a "V" on each side, so you mount the springs in different angles but sharing the same base point. Look at the assembly pictures for more clarification.
Then you can use the remaining holes to attach the shifter to your rig using m8 or m6 depending on your needs.
Enjoy!
Similar models
thingiverse
free
Gearbox Hanger for 20mm Extrusions
...o the gearbox before assembling to the extrusion. if done in the opposite order, it will be impossible to place the top m6 screw.
thingiverse
free
Dual Extruder by Psycho1981
...ng:
4x allen screw m5
4x square nut m5
4x washer m5
electronic:
-ramps 1.4 board
-atx power supply
-firmware "marlin"
thingiverse
free
TH8RS Sequential Shifter mod
...ed: 20mm 7.5mm * 1.2mm (https://tinyurl.com/s4sbl6c)
original concept by dukethirteen: https://www.thingiverse.com/thing:3406574
thingiverse
free

Custom Spring Shifter by Gianotto
...spring diameter: 7.5mm
bolts (per shifter):
1x m5 25mm (lever)
2x m3 8mm (paddle)
2x m3 15mm to fix into the steering wheel case.
thingiverse
free

Paddle shifter by annttu
...ww.thingiverse.com/thing:4706673 but can be attached to other mounts too.
assembly instruction video https://youtu.be/-902n7sj2le
thingiverse
free

Sequential shifter
...50 mm screw
4x m3 nut
8x m3 washer
2x foam rubber 28x25x20 mm
2x m6 15 mm wood screw
2x micro switch 16a 30x15x10 mm
wire 3 m
thingiverse
free

Calspinner the fast handspinner by FRED67X
...rse
this fidget spinner only needs :
1x 608 zz ball bearing, use wd40 for make it faster !
6x m5 20mm screw
6x m5 nuts (or 12x).
grabcad
free

Slide Bearing with 625 ZZ
...meter of a m5 washer - 9 to 10 mm
fix bearings with m5 sink-screws.
it can be also chained "sidewards" with a m5 rod
grabcad
free

625 ZZ Single Slide Bearing
...ing with hole for m5 threat.
use two units and mount it to a surface.
you need 3x 625 zz bearings and m5x25 counter-sink screws.
thingiverse
free

IEC320-C14 3030 mount by montematico
... hammer nuts
print face down
required materials
2x m4 screws
2x m4 nuts
1x iec320-c14 recectacle
2x m5 screws
2x m5 hammer nuts
Davebrave
thingiverse
free

Ninco Slot track inner curve border by davebrave
...an print it at 10% infill and in your prefered material and 0.2 to 0.3 layer height. i chose abs just for the colour and finish.
thingiverse
free

QuickRelease for T500/T300 Steering Wheel base by davebrave
... layer adhesion than abs like petg. or if you use abs, make sure that the settings allow the best layer adhesion you can achieve.
Simracing
thingiverse
free

boite a bouton simracing by PixL36100
...boite a bouton simracing by pixl36100
thingiverse
boite a bouton simracing
thingiverse
free

Officechair Blockbrakes for Simracing by the_lone_Nomad
...blockbrakes for simracing by the_lone_nomad
thingiverse
two blocks to put under an officechair to lock it in place for simracing
thingiverse
free

Handbrake Simracing by Javi91ac
...handbrake simracing by javi91ac
thingiverse
work in progress
thingiverse
free
Button Box Simracing by ImHyp3D
...simracing by imhyp3d
thingiverse
a 21 button box for simracing
not print tested yet
maybe you can test it and give me criticism
thingiverse
free

Simracing Labels by Fred2112
...112
thingiverse
the size are for popular plastic button find on aliexpress.
ajust the size for your button.
i use tac if nedded.
thingiverse
free

VoCore / USBD480 Simracing Dash by denned
... remix without leds!
check out original by morguux: https://www.thingiverse.com/thing:4535313
also check out original for mounts.
thingiverse
free

Simracing Dashboard by simersion
...mersion
thingiverse
dashboard for 4.3" nextion display, arduino micro and 16x 5mm leds
feel fre to contact me for more info
thingiverse
free

Dashboard for simracing CSL by Pekpo96
...dashboard for simracing csl by pekpo96
thingiverse
remix made for fanatec csl wheel. distance between legs 55mm (midcenter).
thingiverse
free

HandBrake Handle (Simracing) by AtoMic09
...?ie=utf8&psc=1
i have used epoxy to firmly join together the 2 covers.
.step included. feel free to modify it. post results !
thingiverse
free

Headphone holder simracing-rig by storemaster
...headphone holder simracing-rig by storemaster
thingiverse
a simple headphone mount for my sim-racing rig
Sequential
3d_export
$15

Sequential Blow Off Valve BOV 3D Model
...ow off valve bov 3d model
3dexport
blow off valve sequential bov
sequential blow off valve bov 3d model streetking 51230 3dexport
3d_export
$20

sequential prophet 5
...cuits ..etc)<br>blender version 2.91.0 png textures (obj, fbx,dae,blend)<br>please check out my other models. thanks.
3d_export
$10

Tecnologica Collection by Kerama Marazzi
...technical innovations of the collection:<br>the movement of the hand sequentialy turns on, adjusts the glow (cold, warm, neutral) and...
thingiverse
free
Sequential Gearbox by NateTG
...tg
thingiverse
constant mesh sequential gearbox using emmet's gear bearings. i need to work out how to make it printable...
thingiverse
free
Sequential shifter
...50 mm screw
4x m3 nut
8x m3 washer
2x foam rubber 28x25x20 mm
2x m6 15 mm wood screw
2x micro switch 16a 30x15x10 mm
wire 3 m
thingiverse
free

Sequential expanding mechanism box by Frolgo
...o
thingiverse
this is a nice box with a twist. to open the upper lid has to be turned. then the three leavers expand sequential.
thingiverse
free

TH8 SEQUENTIAL KNOB by Fox_85
...th8 sequential knob by fox_85
thingiverse
this is my thrustmaster th8 secuantial knob
thingiverse
free

Sequential Shifter bracket for Logitech G27 by TacosForJesus
...
slips on the mounting knobs and secured with elastics to pull the lever out of gear in order to use it as a sequential shifter.
thingiverse
free
sequential shifter MOD g27 by elgh33
...t + right model
makes the gated to sequential shifter inspired by madlap but made with 100% own measurements from the g27 shifter
thingiverse
free

Weighted Sequential Shift Knob by E_Elisio
... fanatec clubsport ssq shifter. has a slot to fit a 3/4" x 2" bolt and x3 hex nuts of the same size to act as a weight.
Shifter
turbosquid
free

Gear Shifters
...quid
royalty free 3d model gear shifters for download as max on turbosquid: 3d models for games, architecture, videos. (1661839)
cg_studio
$100
Shifter Kart3d model
...shifter kart3d model
cgstudio
.max - shifter kart 3d model, royalty free license available, instant download after purchase.
turbosquid
$14

Logitech G29 Shifter
...oyalty free 3d model logitech g29 shifter for download as c4d on turbosquid: 3d models for games, architecture, videos. (1220158)
turbosquid
$3

Bycicle Front Shifter Shimano XTR
... available on turbo squid, the world's leading provider of digital 3d models for visualization, films, television, and games.
3d_export
$39
Go Kart 3D 3D Model
...car gokart go-kart road transport ride quad vehicle racing shifter cart go kart 3d 3d model codethislab 55170...
3d_export
$10

Clutch 3D Model
...3d model animated rigged phyzics simulated low poly gear shifter clutch 3d model florincristian 97692...
3d_sky
free

shifter
...shifter
3dsky
mixer
corona
thingiverse
free
shifter plates for a shifter im making by stockcar
...shifter plates for a shifter im making by stockcar
thingiverse
making a shifter for online racing.
unity_asset_store
$15

Shifter
...m dary palasky and speed up your game development process. find this & other characters options on the unity asset store.
thingiverse
free
Skull Shifter by ColeDowns
...skull shifter by coledowns
thingiverse
just a shifter
Electronics
turbosquid
$1

electron
...urbosquid
royalty free 3d model electron for download as max on turbosquid: 3d models for games, architecture, videos. (1157488)
turbosquid
$50

electronic
...
royalty free 3d model electronic for download as max and obj on turbosquid: 3d models for games, architecture, videos. (1289427)
turbosquid
$40

Electron
... available on turbo squid, the world's leading provider of digital 3d models for visualization, films, television, and games.
3d_ocean
$8
Electronic game
...electronic game
3docean
electronic games nu pogody wait a minute well
electronic game “well, wait a minute”, “nu pogody”
3ddd
$1
Brilux Electronic
...brilux electronic
3ddd
подвес. brilux electronic. польша. материалы настроены.
3d_export
free

electronic shop
...lectronic shop with high quality interior and exterior. it has tvs smartphone play station printer and many more electronic item.
3ddd
$1

Термостаты OJ Electronics
...ермостаты oj electronics
3ddd
oj electronics , термостат
термостаты фирмы oj electronics
3d_export
$8

electron 714
...electron 714
3dexport
game ready model for export to unreal engine soviet tv electron 714 pbr 4k
3ddd
$1

Термостат OJ Electronics
... oj electronics
3ddd
oj electronics , термостат
термостат occ2-1991 фирмы oj electronics
turbosquid
$60
Electronics Stuff
...
royalty free 3d model electronics stuff for download as max on turbosquid: 3d models for games, architecture, videos. (1624680)