GrabCAD
Self powered bicycle lights systems ( Eco Bike )
by GrabCAD
Last crawled date: 1 year, 11 months ago
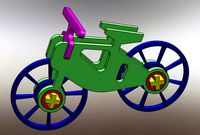
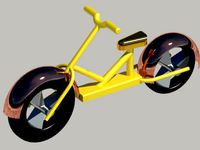
From childhood I have been passionate of computer science, electronics and electricity and I create a lot of projects but from now I will present to you this self powered lights system for bicycles. There are more accessories in one but all accessories have one goal: NOT TO PAY ANY MORE MONEY FOR BATTERIES AGAIN.
Sorry for my poor english but I`am romanian living in Spain from about 14 years and in my head is a really languages mess.
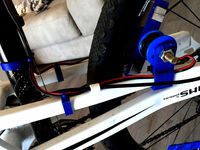
This project is based on magnetic induction to generate electricity (as a simple dynamo) but this system has NO FRICTION and for this is more RELIABLY than a dynamo. I like that in everything I create to include recyclable components and make sure that all my projects have 100 % functionality.
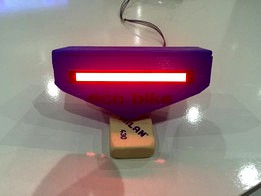
Electronic components like wire coil, diode, capacitor and LED lights on the back, are from an old TV (Cathode Ray Tube TV) that was thrown in the trash. The LED front lights are from an old and broken ceiling light (see the picture). I added the schematic, is a very simple bridge rectifier (see the picture). The capacitor have 2 purposes: the first is to filtrate the current and the second is to storage the current and actuate like a battery.
The bridge rectifier has the purpose to convert the alternative current generated from the coil to continuous current that is used for the LED lights. This system could have a lot of purposes: to charge a mobile phone, to charge an action camera and for those who want to recharge the electric bicycle while riding just contact me and I will provide the schematics for the voltage amplifier/charger.
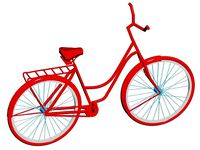
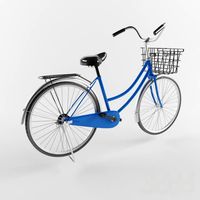
All the measures have taken from my bike (MOMA BIKE) but I created all accessories with more dimensions and if that does not suit you contact me and I will make the drawing with your measures.
The rear lights box we are going to used for 2 purposes: 1 to mounts the rear light and 2 to have a conexion box and storage the electronics.
Attention are parts that need support for creating a good Printing. I printed all accessories with an infill between 30 % and 60 % depending on the functionality given to each component, for example supports for lights, coil and magnets, need to be tough and I used more infill, printing velocity 30 ( for my printer )
The only component that I believe that we not all have in our house are the neodymium magnets (N52 the most powerful Gauss grade) but do not worry for this there are cheap from the aliexpress webpage, from where I have buy it a time ago for my other projects.
LIST OF COMPONENTS:
Neodymium magnets, you will need 24 pieces : https://www.banggood.com/20pcs-N50-Strong-Block-NdFeb-Magnets-20-x10x-5-mm-Rare-Earth-Neodymium-Magnets-p-980595.html?p=T5241491383602017022
Enameled copper wire: I have used 0.40 mm wire from scraping an old TV. The formula for this coils is very simple: tinier is the diameter of the wire=longest wire=more voltage (from my 2 coils I have 12 volts: 6v per coil)
Capacitor: 1 piece between 25v-50v and 1000uf to 3000uf (more microfarads=more current storage=more power of charging/lighting)
Diodes: 4 pieces, I assure you that all most any type of diode will do this job all you need is to respect the schematics (see picture).
Screws: 10 pieces 4x30 mm and 2 pieces 12mm x (depends of the coil dimension in my case 40mm with 30mm coil axe).
Big LED (6v) bicolor red/blue 8mmx76mm mine is from scraping but also you can use 8 pieces of normal red led on the second rear light version.
Connections wire: 2,5m piece, just the typical parallel wire (red and black: red is + and black is -) that uses the speaker will do the job.
Old led dichroic for the front light: 1 piece
Sorry for my poor english but I`am romanian living in Spain from about 14 years and in my head is a really languages mess.
This project is based on magnetic induction to generate electricity (as a simple dynamo) but this system has NO FRICTION and for this is more RELIABLY than a dynamo. I like that in everything I create to include recyclable components and make sure that all my projects have 100 % functionality.
Electronic components like wire coil, diode, capacitor and LED lights on the back, are from an old TV (Cathode Ray Tube TV) that was thrown in the trash. The LED front lights are from an old and broken ceiling light (see the picture). I added the schematic, is a very simple bridge rectifier (see the picture). The capacitor have 2 purposes: the first is to filtrate the current and the second is to storage the current and actuate like a battery.
The bridge rectifier has the purpose to convert the alternative current generated from the coil to continuous current that is used for the LED lights. This system could have a lot of purposes: to charge a mobile phone, to charge an action camera and for those who want to recharge the electric bicycle while riding just contact me and I will provide the schematics for the voltage amplifier/charger.
All the measures have taken from my bike (MOMA BIKE) but I created all accessories with more dimensions and if that does not suit you contact me and I will make the drawing with your measures.
The rear lights box we are going to used for 2 purposes: 1 to mounts the rear light and 2 to have a conexion box and storage the electronics.
Attention are parts that need support for creating a good Printing. I printed all accessories with an infill between 30 % and 60 % depending on the functionality given to each component, for example supports for lights, coil and magnets, need to be tough and I used more infill, printing velocity 30 ( for my printer )
The only component that I believe that we not all have in our house are the neodymium magnets (N52 the most powerful Gauss grade) but do not worry for this there are cheap from the aliexpress webpage, from where I have buy it a time ago for my other projects.
LIST OF COMPONENTS:
Neodymium magnets, you will need 24 pieces : https://www.banggood.com/20pcs-N50-Strong-Block-NdFeb-Magnets-20-x10x-5-mm-Rare-Earth-Neodymium-Magnets-p-980595.html?p=T5241491383602017022
Enameled copper wire: I have used 0.40 mm wire from scraping an old TV. The formula for this coils is very simple: tinier is the diameter of the wire=longest wire=more voltage (from my 2 coils I have 12 volts: 6v per coil)
Capacitor: 1 piece between 25v-50v and 1000uf to 3000uf (more microfarads=more current storage=more power of charging/lighting)
Diodes: 4 pieces, I assure you that all most any type of diode will do this job all you need is to respect the schematics (see picture).
Screws: 10 pieces 4x30 mm and 2 pieces 12mm x (depends of the coil dimension in my case 40mm with 30mm coil axe).
Big LED (6v) bicolor red/blue 8mmx76mm mine is from scraping but also you can use 8 pieces of normal red led on the second rear light version.
Connections wire: 2,5m piece, just the typical parallel wire (red and black: red is + and black is -) that uses the speaker will do the job.
Old led dichroic for the front light: 1 piece
Similar models
thingiverse
free
Self powered bicycle lights systems ( Eco Bike ) by Nelujones
... i like that in everything i create to include recyclable components and make sure that all my projects have 100 % functionality.
grabcad
free

"Power bank" for bike
...s from 3.7 to 5.2v. the batteries were taken in the service center after repairs ipad, the total capacity of the assembly 20 ah.
grabcad
free

Coil
...asically when the neodymium magnet moves, it generate electricity and light up the leds.
led
neodymium
circuit board
copper wire
grabcad
free

Bicycle_Accessory_dyanamo_charging.stp
... accessory in which we can charge mobile and we use power for front and back lights
thanks and best regards
karthikeyan arumugam
3dwarehouse
free

Bicycle Dynamo
...bicycle dynamo
3dwarehouse
a small dynamo for powering your lights on old fashioned bicycles by having it run against the tyre.
grabcad
free

Self Powered LED bike light
...have 32 light blinks per rim revolution. this is similar idea of a digital cyclometer sensor with one small...
thingiverse
free

Generator by ztwillis
...t will be used for magnet wire, bearings, neodymium magnets, and other related materials to further refine my designs. thank you!
3dwarehouse
free

Induction Charger
...obbnob's magnetic induction charger. #charge #coil #electric #electron #hobbnob #induction #magnet #magnetic #neutron #proton
3dwarehouse
free

Red diode
...red diode
3dwarehouse
led light emitting diode- sends light #current #lemon #light #red_diode #volt
grabcad
free

Air Core Coil with 0.25 Enamelled wire and Neodymium Magnet
...air core coil with 0.25 enamelled wire and neodymium magnet
grabcad
enjoying what i do
Eco
design_connected
$11
Eco
...eco
designconnected
iform eco computer generated 3d model. designed by karpf, peter.
3ddd
$1

Eco-BorasTapeter
...eco-borastapeter
3ddd
eco
шведские обои eco-borastapeter
коллекции artist,design #3, velvet
3ddd
$1
Eco стол
...eco стол
3ddd
обеденный
eco стол
3ddd
free

Nowodvorski / ECO
...nowodvorski / eco
3ddd
nowodvorski
лампа польского производителя nowodvorski
модель линейки eco
сайт www.nowodvorski.com
3ddd
$1
Eco Light Group
...eco light group
3ddd
eco light group , emme pi light
люстра eco light group
3ddd
$1
Eco Plast Kontener
...eco plast kontener
3ddd
контейнер
eco plast kontener
3ddd
$1
eco light 45
...eco light 45
3ddd
eco
1.0002.71 люстра классическая eco light хром цветной кристалл + коричневый оттенок 5xe14 40w 375x660
turbosquid
$12
Eco parking
...osquid
royalty free 3d model eco parking for download as max on turbosquid: 3d models for games, architecture, videos. (1476951)
turbosquid
$3

Chair ECO
...lty free 3d model chair eco for download as max, obj, and fbx on turbosquid: 3d models for games, architecture, videos. (1248981)
3ddd
$1

Люстра Vistosi | Ecos
... ecos , скотч ребята здоровенный
присутствует 3ds файл
Bicycle
3d_export
$15
bicycle
...bicycle
3dexport
simple bicycle
3ddd
$1
bicycle
...bicycle
3ddd
велосипед
bicycle
archibase_planet
free

Bicycle
...ibase planet
bicycle bike cycle two-wheeled bicycle
bicycle n080115 - 3d model (*.gsm+*.3ds+*.max) for exterior 3d visualization.
archibase_planet
free
Bicycle
...bicycle
archibase planet
bicycle cycle bike
bicycle n120411 - 3d model (*.3ds) for 3d visualization.
3d_export
$10
Bicycle
...bicycle
3dexport
bicycle toy or technique for children.
3d_export
$5
bicycle
...bicycle
3dexport
this is 3d model toy bicycle,
archibase_planet
free

Bicycle
...bicycle
archibase planet
bicycle cycle bike
bicycle n270309 - 3d model (*.3ds) for interior 3d visualization.
archibase_planet
free
Bicycle
...bicycle
archibase planet
bicycle cycle bike
bicycle n090211 - 3d model (*.3ds) for exterior 3d visualization.
archibase_planet
free
Bicycle
...bicycle
archibase planet
bicycle cycle bike
bicycle n011211 - 3d model (*.3ds) for exterior 3d visualization.
archibase_planet
free

Bicycle
...bicycle
archibase planet
bicycle cycle bike
bicycle n120608 - 3d model (*.gsm+*.3ds) for interior 3d visualization.
Self
3ddd
$1
Self
... банкетка
каталог minotti 2010модель selfдизайнер rodolfo dordoniш\д\в 60\120\42
3ddd
$1

Minotti Self
...minotti self
3ddd
minotti
банкетка minotti self
3ddd
$1
Minotti Self
...minotti self
3ddd
minotti , self
текстуры и материалы прилагаются.
3ddd
$1
Self cleaning ashtrays
...self cleaning ashtrays
3ddd
пепельница
self cleaning ashtrays
turbosquid
$15
Book self
...
royalty free 3d model book self for download as max and fbx on turbosquid: 3d models for games, architecture, videos. (1502520)
3d_export
free
self-tapping screw
...self-tapping screw
3dexport
self-tapping screw 55 мм
turbosquid
$12

Book Self
...lty free 3d model book self for download as max, obj, and fbx on turbosquid: 3d models for games, architecture, videos. (1473695)
turbosquid
$4
Self with Desk
...d model self with desk for download as 3ds, max, obj, and fbx on turbosquid: 3d models for games, architecture, videos. (1511139)
turbosquid
$2

Book Self
...ree 3d model book self for download as max, fbx, 3ds, and obj on turbosquid: 3d models for games, architecture, videos. (1544366)
turbosquid
$2

Book self
...ree 3d model book self for download as 3ds, max, fbx, and dwg on turbosquid: 3d models for games, architecture, videos. (1300384)
Bike
3d_ocean
$18
Bike
...bike
3docean
bicycles bike sports transport
3d model bike
3d_export
$5
bike
...bike
3dexport
bike
3d_export
$50
bike
...bike
3dexport
3d bike model
turbosquid
free
bike-bike-rack
... available on turbo squid, the world's leading provider of digital 3d models for visualization, films, television, and games.
archibase_planet
free

Bike
...bike
archibase planet
bike bicycle cycle
bike n161113 - 3d model (*.gsm+*.3ds+*.max) for exterior 3d visualization.
archibase_planet
free
Bike
...bike
archibase planet
bike bicycle cycle
bike and rack n220613 - 3d model (*.gsm+*.3ds+*.max) for exterior 3d visualization.
archibase_planet
free
Bike
...rchibase planet
bike bicycle cycle two-wheeled bicycle
bike n031213 - 3d model (*.gsm+*.3ds+*.max) for exterior 3d visualization.
archibase_planet
free
Bike
...rchibase planet
bike bicycle cycle two-wheeled bicycle
bike n180714 - 3d model (*.gsm+*.3ds+*.max) for exterior 3d visualization.
3d_ocean
$35
Batpod Bike
...cean
batman batman bike batpod bike bike motorcycle stylish bike
detailed model of a famous batpod bike used in the movie batman.
3d_export
$5
exercise bike
...exercise bike
3dexport
exercise bike, spin bike, bike, gym equipment, exerciser
Powered
turbosquid
$100

power
...ower
turbosquid
royalty free 3d model power for download as on turbosquid: 3d models for games, architecture, videos. (1421990)
3d_export
$5

Power
...power
3dexport
3d_export
$5

power outlets
...power outlets
3dexport
power outlets
3ddd
$1

lion power
...lion power
3ddd
лев , статуя
lion power gold sculpture
3ddd
$1

Sea Power
...
компас , море , часы
часы с компасом sea power
3ddd
free

Meridiani / Power
...power
3ddd
meridiani , круглый
стол power производитель meridiani, диаметр 120,высота 67
3d_export
$5

Power Surge
...power surge
3dexport
the power surge is a all mesh carnival ride to lower in game part count and lag
turbosquid
$8

Airport Ground Power Unit (AXA Power )
... available on turbo squid, the world's leading provider of digital 3d models for visualization, films, television, and games.
turbosquid
$50

Power Houser
...rbosquid
royalty free 3d model power houser for download as on turbosquid: 3d models for games, architecture, videos. (1333800)
3d_export
$5

power outlet
...power outlet
3dexport
power outlet<br>format file maya 2018, 3d max 2017, obj, fbx
Systems
archibase_planet
free

System
...m
archibase planet
fire alarm system fire alarm box
security light system - 3d model (*.gsm+*.3ds) for interior 3d visualization.
archibase_planet
free

Spider system
...stem spider glass system
spider system to fix glass stefano galli n050912 - 3d model (*.gsm+*.3ds) for interior 3d visualization.
3ddd
$1

Euforia System
...euforia system
3ddd
euforia
euforia system
3d_export
$50

Roof system Truss system 3D Model
...oof system truss system 3d model
3dexport
roof system truss truss stage
roof system truss system 3d model aleksbel 38970 3dexport
3ddd
$1

DVD System
...dvd system
3ddd
dvd , schneider
dvd system
design_connected
free

Seating system
...seating system
designconnected
free 3d model of seating system
3d_export
$5

solar system
...solar system
3dexport
solar system in c4d, with 8k nasa textures
3ddd
$1

Quanta System
...quanta system
3ddd
медицина
quanta system.
лазерное оборудование для медицинских центров
3d_export
$15

solar system
...nd the other the sun, the earth and the moon, the latter has an animation with camera movement included, the files are in spanish
3d_export
$14

missile system
...missile system
3dexport
Lights
archibase_planet
free

Light
...light
archibase planet
lamp lighting light
light - s2 - 3d model for interior 3d visualization.
archibase_planet
free

Light
...light
archibase planet
light luminaire lighting
light l0465 - 3d model (*.gsm+*.3ds) for interior 3d visualization.
3d_export
$5

lighting
...lighting
3dexport
lighting
3d_export
$5

lighting
...lighting
3dexport
lighting in livingroom
turbosquid
$3

Lighting Tree with Lights
...d model lighting tree with lights for download as max and 3ds on turbosquid: 3d models for games, architecture, videos. (1585507)
archibase_planet
free

Light
...light
archibase planet
luster lighting solution
light - s - 3d model for interior 3d visualization.
archibase_planet
free

Light
...light
archibase planet
luster lamp lighting
light 1 - 3d model for interior 3d visualization.
archibase_planet
free

Lights
...lights
archibase planet
surgical lights surgical lamp
surgical lights (floor) - 3d model for interior 3d visualization.
archibase_planet
free

Light
...light
archibase planet
lighting luminaire candlelight
light l0463 - 3d model (*.gsm+*.3ds) for interior 3d visualization.
3d_export
$18

street light-lighting-light-xia bing
...
3dexport
street light-lighting-light-xia bing<br>max 2015 v-ray 3 max 2015<br>textures<br>all files in zip...