Thingiverse
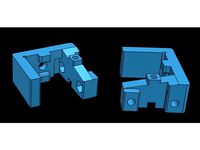
Seckit SK-GO² starter upgrade set - endstop bumper, cable mount, BL-touch, xy optical endstop, filament holder, clips - may als work for other SecKit printers by caesar_1111
by Thingiverse
Last crawled date: 3 years, 3 months ago
DISCLAIMER:
This is the v0.1 of this thing, so it may contain errors. Please let me know immediately if you stumble across some errors or inconsistencies, so I can improve the thing for all the others!
I do not guarantee that the things and Marlin configuration are working with your printer! If you are using any of those things or Marlin configuration you are doing it on our own risk!
First of all:
I want to thank Ernest Lin for providing such great printers and all the support you need to get up and running.
For those who are thinking of ordering a printer and will go along with the credo “SecKit, Your Second 3D Printer Kit the overkill CoreXY platform to get you out of endless repair-tweak-upgrade loop and get things done” it’s definitely worth the wait when ordering at https://seckit3dp.design/ since you will get a complete set which contains all the necessary parts to build (it took me around 20hrs) a working industry grade printer. During the build I already started to work on some upgrades I found on thingiverse and also designed myself. So I created this thing to:
Share the list/links of self printed parts I added to the printer including the stl files of some additionally designed parts I added to the printer. Some of the files will replace the files Ernest is providing on his github page, so you may always doublecheck which design you prefer. This also includes the optional Frame mounted filament holder DELUXE
Share the details about applying the optional optical endstops to my printer running 2209 stepper drivers (files and Marlin 2.x changes)
Share the details about adding an optional BL-Touch to my printer (files and Marlin 2.x changes)
Upgrades for direct drive setup with E3D V6 hotend
Some of the parts of the Shopping list might already be included in the SecKit kit.
Basic setup
Parts to be printed:
SK-Go2_Z-Rail_Lower_Endstop.stl (this protects the linear rail block from the z rail from sliding of the rail while assembly)
Shopping list:
-- 2 pcs M4x8 bolt
-- 2 pcs M4 t-nut
SK_Go2_X_min_sensorless_homing_bumper_and_assembly_bumper.stl (applied on both sides of the x axis this protects the linear rail block from the x rail from sliding of the rail while assembly; it is replacing the original SK-Go X-min sensorless homing bumper from SecKit github)
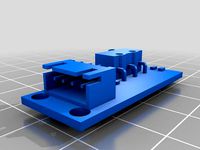
SK-Go2_Position_A_Y-Endstop_Railmounted.stl (This endstop ensures that the part cooling fan is not touching the upper frontal 20x20 aluminum extrusion if raised to the top, see picture of how I set up the frame)
Shopping list:
-- 2 pcs M3x20 bolt
-- 2 pcs M3 washers
SK-Go2_5mm_Shorter_Nylontube_Replacement_for_Bedlevellingscrew.stl (this replaces the 10mm nylon spacer for the left and right bed leveling screw at the z rails)
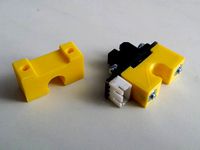
SK-Go2_Fanduct_Nut_Holder_LH.stl & SK-Go2_Fanduct_Nut_Holder_RH.stl (this clips are holding the M3 nuts for the fanduct assembly in place while clipping on the lower carriage spacers, see also picture; this will come in handy if you are tuning the hotend and have to reassemble the duct multiple times)
SK-Go2_Z-Axis_assembly_gauge_Lead_Screw_Only.stl & SK-Go2_Z-Axis_assembly_gauge_Lead_Screw_Nut.stl (this helps to allign the z-axis with the lead screw. First use the gauges to center the linear rail on the 2020 extrusion (this replaces the original gauge) then place the lead screw nut in the lower part, the lead screw in the upper part to assemble the lower lead screw bearing. Before tightening the bearing to the lower 2020 extrusion, just revolve the lead screw multiple times to make sure the bearing with the leadscrew in it is alligned to the linear rail)
SK-Go2_Z-Rail_Lower_Endstop.stl (this protects the linear rail block from the z rail from sliding of the rail while assembly)
SK-Go2_Extruder_Frame_Cable_Bracket.stl (This bracket can be attached to the extruder and the frame at the back. It is featuring a 4mm hole to apply a standard PTFE tube for better cable guidance)
Shopping list:
-- 4 pcs M3x10 bolt (use M3x15 bolts if you also plan to go with the X and Y optical endstop)
-- 4 pcs M3 washers
-- 4 pcs M3 nut
-- 2 pcs M4x8 bolt
-- 2 pcs M4 t-nut
-- approx 50cm PTFE tube 4mm outer diameter
SK-Go2_Reverse_Bowden_Extruder_Bracket.stl (This bracket will take away the bending from the BMG extruder fitting where the reverse bowden tube is attached)
Shopping list:
-- 2 pcs M3x10 bolt (M3x15 will also fit)
-- 2 pcs M3 nut
SK-Go2_PTFE_Tube_antibend_50mm.stl and SK-Go2_PTFE_Tube_antibend_100mm.stl (optional) (If you are planning to replace the original reverse bowden tube with a softer one and experience some bending, just clip those on the outside of the tube where it should not bend)
SK-Go filament sensor holder by Michael Laws.stl (taken from printed parts STL folder from SecKit github)
Shopping list:
-- 2 pcs M4x10 bolt
-- 2 pcs M4 t-nut
-- 2 pcs M2 washers
-- 2 pcs M3x15 bolt
-- 2 pcs M3 washers
SK-Go fan duct.v2.direct.stl (taken from printed parts STL folder from SecKit github)
Shopping list:
-- 2 pcs M3x10 bolt
-- 2 pcs M3 nut
12864 display cover with slope.stl (taken from printed parts STL folder from SecKit github)
Shopping list:
-- 2 pcs M3x20 bolt
-- 2 pcs M3 nut
-- 2 pcs M4x10 bolt
-- 2 pcs M4 t-nut
-- 2 pcs M4 washers
SG-Go2_20x20_angled_Bracket_for_Display_Cover.stl (fits only to the two additinal holes of the 12864 display cover with slope.stl)
Shopping list:
-- 2 pcs M4x8 bolt
-- 2 pcs M4x10 bolt
-- 2 pcs M4 t-nut
-- 2 pcs M4 nut
-- 2 pcs M4 washers
Seckit Go 2 - ZMount Shims (from Thingiverse Some z-leadscrew bearing tend to grind into the horizontal 2020 extrusion. alpokemon designed mulitple diameters. just put them under the bearing, tighten the nuts and make sure, the inner bearing is turing without any contact to the extrusion)
Meanwell LRS-350-24 cover for SecKit SK-GO (from Thingiverse)
Shopping list:
-- 2 pcs M4x8 bolt
-- 2 pcs M4 washers
SecKit open angled cover with logo (from Thingiverse)
Shopping list:
-- 2 pcs M3x15 bolt
-- 2 pcs M3 nut
Belt Tensioner for sk go 3d printer (from Thingiverse)
Shopping list:
-- 4 pcs M3x20 bolt
-- 4 pcs M3 nut
SKR v1.3 Ducted Stepper Driver Cooler (from Thingiverse replaces SK-Go driver cooling fan mount.stl)
Shopping list:
-- 4 pcs M3x15 bolt
-- 4 pcs M3 nut
SKR 1.3 Board Drivercooler Clips for Things 3576392 and 4163812 - SKR_1.3_Board_Drivercooler_Clip.stl and SKR_1.3_Board_Drivercooler_Fan_Side_Clip_thing_4163812.stl ([from Thingiverse]( https://www.thingiverse.com/thing:4570496) clips the SKR v1.3 Ducted Stepper Driver Cooler to the board)
YACC (Yet Another Cable Clip) for 20x20 Aluminum Extrusion 8mm (from Thingiverse)
Frame mounted filament holder DELUXE (optional)
Parts to be printed
SK-Go2_Filament_Holder_DELUXE_Bracket.stl (to mount the Ender 3 - Filament holder DELUXE to the frame. Replacing Mounting_bracket.stl and Mounting_bracket_nut.stl)
SG-Go2_20x20_angled_Bracket.stl (optional if you assemble the SK-Go2_Filament_Holder_DELUXE_Bracket.stl to the 20x20 rail)
Ender 3 - Filament holder DELUXE - Filament_holder.stl, Filament_nut.stl and Optional_thread_guide.stl (from Thingiverse)
Shopping list:
-- 16 cm long M8 threadbar
-- 2 pcs 608Z bearings
-- 2 pcs M8 nylon lock nuts
-- 2 pcs M8 washers
-- 4 pcs M4x10 bolt
-- 2 pcs M4x8 bolt
-- 4 pcs M4 t-nut
-- 2 pcs M4 nut
-- 6 pcs M4 washers
SK-Go2_Filament_Guide.stl (Mounts just above the SK-Go2_Filament_Holder_DELUXE_Bracket.stl on the vertical 2020 extrusion. It will stop the filament from getting tangled around the Filament_Holder_DELUXE bracket when having a new spool.)
Shopping list:
-- 2 pcs M3x10 bolt
-- 2 pcs M3 washers
-- 2 pcs M3 t-nut
X and Y optical endstop (optional)
Parts to be printed
SK_Go2_X_min_sensorless_homing_bumper_and_assembly_bumper_with_optical_endstop_trigger.stl (this is replacing the left SK_Go2_X_min_sensorless_homing_bumper_and_assembly_bumper.stl)
SK-Go2_X_Optical_Endstop_Mount_Addon_Bracket.stl (to be attached at the back of the SK-Go2_Extruder_Frame_Cable_Bracket.stl)
Shopping list:
-- 1 pcs LERDGE Optical Endstop (one is included in the kit)
-- 2 pcs M3x8 bolt
-- 2 pcs M3 nut
Y optical endstop mount.stl (taken from printed parts STL folder from SecKit github)
Shopping list:
-- 2 pcs M3x8 bolt
-- 2 pcs M3 nut
-- 2 pcs M4x8 bolt
-- 2 pcs M4 t-nut
Y optical endstop trigger.stl (taken from printed parts STL folder from SecKit github)
Connecting to mainboard
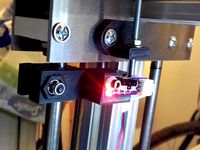
Unplug the xst and yst jumper on the SKR 1.3 board for the optical sensors to work with the board (board connect an pin layout picture included). Connect the Sensor to the x- and y- endstop pin. Make sure that the pins are matching up (see also assembly manual). you might have to change the order of the wires to have the V, G and S pin at the sensor matching the V, G and S pin at the board. If the sensor is wired up correctly, you will a a green LED shining as soon as you put an object into the sensor gap.
Fun fact : Consider the material you are using to print the SK_Go2_X_min_sensorless_homing_bumper_and_assembly_bumper_with_optical_endstop_trigger.stl and Y optical endstop trigger.stl endstop triggers. I was using SUNLU PETG green and it was somehow not triggering the sensor. I had to wrap it in black tape to make it work.
BL-Touch (optional)
Parts to be printed
SKGO Fan Duct with BLTouch (from Thingiverse replaces SK-Go fan duct.v2.direct.stl)
Shopping list:
-- ANTCLABS BL Touch V3.1 https://www.antclabs.com/bltouch-v3 (e.g. from Aliexpress )
-- Alternatively a cheaper clone like the 3D touch (e.g. from Aliexpress this one comes already with a 1m cable extension )
-- 5x 1m cable with cable to female dupont pins. (needed to extend the BL Touch wires. Some bundles are already including this cable)
Connecting to mainboard
Thanks to Chris Riley’s YouTube tutorial I was able to get this done easily.
Unplug the zst jumper on the SKR 1.3 board for the BLToouch to work with the board (board connect an pin layout picture included). Connect the your black/white cable to the z- endstop pins. Connect the brown/red/orange cable to the SERVOS pins on the SKR 1.3 board. Make sure that the pins are matching up (BLTouch wiring picture included). You have to exchange the red and the brown wire if you are using an 3 pin extension plug for the SERVOS cable.
Configuration of Marlin for X and Y optical endstop and BL-Touch
I included my current versions of:
Configuration.h
Configuration_adv.h
Make sure not to copy those files but use a text editor to compare those files with your original ones to identify the changes and modify your original files.
Every change is commented with “// upgrade_set:” so you also can search for all the changes if comparing is no good for you.
Octoprint on raspberry (octopi) with the 7″ touchscreen monitor for Raspberry Pi using the TouchUI with the Boot-To-Browser option. (optional)
If you were puzzled about the screen assembled to the top of my frame…..
Since I have done a lot of customizing on my octoprint to control my SK-Go² (e.g. temperature presents, movement and bed levelling support) by using the Terminal Commands Extended plugin, I now wanted to be able to use this without having a computer up and running.
And again thanks to Chris Rileys YouTube tutorial https://www.youtube.com/watch?v=rqy3dVZ4JH4 it was easy to utilize my 7″ touchscreen monitor for Raspberry Pi I had laying around to get it done.
Shopping list:
-- Raspberry pi incl. power supply (I used a 3B+)
-- approx.. 1.5m USB A cable (e.g. from AliExpress)
-- 7″ touchscreen monitor for Raspberry Pi (I used the original bought from Amazon which came with a housing I could directly mount to the 20x20 extrusion using 2x M4x8 bolt and 2x M4 t-nuts) you can also use other screens and sizes and for some you should find housings on thingiverse. I just had some trouble trying it with a 3.5″ touchscreen form KUMAN since the driver was somehow stopped my PiCamera from working.
-- Raspberry pi camera (I used a fisheye one from Amazon) you will need to also by a longer camera cable approx. 30-100cm, depending on where you want to mount your camera and you raspberry pi. Depending on your camera type you will already find some printable mounts fitting on a 20x20 extrusion (e.g. https://www.thingiverse.com/thing:434600 , https://www.thingiverse.com/thing:2804612 or https://www.thingiverse.com/thing:3565707
-- USB LED strip (e.g. 2m non remote from AliExpress) I just put the strip in the slot of the extrusions.
Octoprint configuration
I uploaded my octoprint configuration, so you just have to use the octoprint setting Backup & Restore to get all my add-ons and commands for the SK-Go². Since I am also running a Anet A8, Geeetech A10M and a Creality CR10sPRO you will also find some commands for those printers. Just delete the commands in the octoprint settings by configuring the Terminal Commands Extended plugin.
Dual Z-Axis Setup incl. Marlin 2.0.x for SKR 1.4 Turbo and S42B closed loop steppers
I decided to further upgrade my printer. You can find the details at my new thing :https://www.thingiverse.com/thing:4631780
Updates:
1.
I did some tuning the
Configuration.h
Configuration_adv.h
files, adjusting the bed position and size to my assembly. I also adjusted the filament preheat settings and some minor stuff. Again all the changes are flagged with “// upgrade_set:”.
2.
I added some commands to octoprint Terminal Commands Extended in order to follow the UBL procedure described by Chris Riley’s YouTube tutorial for UBL.
3.
I added some tiny clips which will hold the M3 nuts of the fanduct in place. (while tuning the hotend I had to reassemble the extruder some times and every time the two M3 nuts were a pain to hold in place for assembly) The clips will go on the lower spacers of the carriage.
4.
I create some gauges to help assembly the z-axis. You will also find the FreeCAD model if you have to adjust the tolerances for yourself.
5.
I tuned the reverse bowden setup. The SK-Go2_Filament_Guide.stl will prevent the filament from getting tangled around the filament holder deluxe. The SK-Go2_Reverse_Bowden_Extruder_Bracket.stl will allow you to take away the bending from the PTFE tube fitting at the BMG extruder. Since I had to replace the original, stiff reverse bowden tube with a standard PTFE tube to feed TPU (it would just not go through) I experienced a lot of bending due to the softness of my tube, so I did the SK-Go2_PTFE_Tube_antibend_50mm.stl and SK-Go2_PTFE_Tube_antibend_100mm.stl clips. Just put them around the tube where there should be no bending.
6.
Due to feedback I remoddled the z-axis assembly gauges (increased the hole size to improve the tolerances). I also included the step files for the gauges so you can tune it if you still have issues with the size of the holes.
This is the v0.1 of this thing, so it may contain errors. Please let me know immediately if you stumble across some errors or inconsistencies, so I can improve the thing for all the others!
I do not guarantee that the things and Marlin configuration are working with your printer! If you are using any of those things or Marlin configuration you are doing it on our own risk!
First of all:
I want to thank Ernest Lin for providing such great printers and all the support you need to get up and running.
For those who are thinking of ordering a printer and will go along with the credo “SecKit, Your Second 3D Printer Kit the overkill CoreXY platform to get you out of endless repair-tweak-upgrade loop and get things done” it’s definitely worth the wait when ordering at https://seckit3dp.design/ since you will get a complete set which contains all the necessary parts to build (it took me around 20hrs) a working industry grade printer. During the build I already started to work on some upgrades I found on thingiverse and also designed myself. So I created this thing to:
Share the list/links of self printed parts I added to the printer including the stl files of some additionally designed parts I added to the printer. Some of the files will replace the files Ernest is providing on his github page, so you may always doublecheck which design you prefer. This also includes the optional Frame mounted filament holder DELUXE
Share the details about applying the optional optical endstops to my printer running 2209 stepper drivers (files and Marlin 2.x changes)
Share the details about adding an optional BL-Touch to my printer (files and Marlin 2.x changes)
Upgrades for direct drive setup with E3D V6 hotend
Some of the parts of the Shopping list might already be included in the SecKit kit.
Basic setup
Parts to be printed:
SK-Go2_Z-Rail_Lower_Endstop.stl (this protects the linear rail block from the z rail from sliding of the rail while assembly)
Shopping list:
-- 2 pcs M4x8 bolt
-- 2 pcs M4 t-nut
SK_Go2_X_min_sensorless_homing_bumper_and_assembly_bumper.stl (applied on both sides of the x axis this protects the linear rail block from the x rail from sliding of the rail while assembly; it is replacing the original SK-Go X-min sensorless homing bumper from SecKit github)
SK-Go2_Position_A_Y-Endstop_Railmounted.stl (This endstop ensures that the part cooling fan is not touching the upper frontal 20x20 aluminum extrusion if raised to the top, see picture of how I set up the frame)
Shopping list:
-- 2 pcs M3x20 bolt
-- 2 pcs M3 washers
SK-Go2_5mm_Shorter_Nylontube_Replacement_for_Bedlevellingscrew.stl (this replaces the 10mm nylon spacer for the left and right bed leveling screw at the z rails)
SK-Go2_Fanduct_Nut_Holder_LH.stl & SK-Go2_Fanduct_Nut_Holder_RH.stl (this clips are holding the M3 nuts for the fanduct assembly in place while clipping on the lower carriage spacers, see also picture; this will come in handy if you are tuning the hotend and have to reassemble the duct multiple times)
SK-Go2_Z-Axis_assembly_gauge_Lead_Screw_Only.stl & SK-Go2_Z-Axis_assembly_gauge_Lead_Screw_Nut.stl (this helps to allign the z-axis with the lead screw. First use the gauges to center the linear rail on the 2020 extrusion (this replaces the original gauge) then place the lead screw nut in the lower part, the lead screw in the upper part to assemble the lower lead screw bearing. Before tightening the bearing to the lower 2020 extrusion, just revolve the lead screw multiple times to make sure the bearing with the leadscrew in it is alligned to the linear rail)
SK-Go2_Z-Rail_Lower_Endstop.stl (this protects the linear rail block from the z rail from sliding of the rail while assembly)
SK-Go2_Extruder_Frame_Cable_Bracket.stl (This bracket can be attached to the extruder and the frame at the back. It is featuring a 4mm hole to apply a standard PTFE tube for better cable guidance)
Shopping list:
-- 4 pcs M3x10 bolt (use M3x15 bolts if you also plan to go with the X and Y optical endstop)
-- 4 pcs M3 washers
-- 4 pcs M3 nut
-- 2 pcs M4x8 bolt
-- 2 pcs M4 t-nut
-- approx 50cm PTFE tube 4mm outer diameter
SK-Go2_Reverse_Bowden_Extruder_Bracket.stl (This bracket will take away the bending from the BMG extruder fitting where the reverse bowden tube is attached)
Shopping list:
-- 2 pcs M3x10 bolt (M3x15 will also fit)
-- 2 pcs M3 nut
SK-Go2_PTFE_Tube_antibend_50mm.stl and SK-Go2_PTFE_Tube_antibend_100mm.stl (optional) (If you are planning to replace the original reverse bowden tube with a softer one and experience some bending, just clip those on the outside of the tube where it should not bend)
SK-Go filament sensor holder by Michael Laws.stl (taken from printed parts STL folder from SecKit github)
Shopping list:
-- 2 pcs M4x10 bolt
-- 2 pcs M4 t-nut
-- 2 pcs M2 washers
-- 2 pcs M3x15 bolt
-- 2 pcs M3 washers
SK-Go fan duct.v2.direct.stl (taken from printed parts STL folder from SecKit github)
Shopping list:
-- 2 pcs M3x10 bolt
-- 2 pcs M3 nut
12864 display cover with slope.stl (taken from printed parts STL folder from SecKit github)
Shopping list:
-- 2 pcs M3x20 bolt
-- 2 pcs M3 nut
-- 2 pcs M4x10 bolt
-- 2 pcs M4 t-nut
-- 2 pcs M4 washers
SG-Go2_20x20_angled_Bracket_for_Display_Cover.stl (fits only to the two additinal holes of the 12864 display cover with slope.stl)
Shopping list:
-- 2 pcs M4x8 bolt
-- 2 pcs M4x10 bolt
-- 2 pcs M4 t-nut
-- 2 pcs M4 nut
-- 2 pcs M4 washers
Seckit Go 2 - ZMount Shims (from Thingiverse Some z-leadscrew bearing tend to grind into the horizontal 2020 extrusion. alpokemon designed mulitple diameters. just put them under the bearing, tighten the nuts and make sure, the inner bearing is turing without any contact to the extrusion)
Meanwell LRS-350-24 cover for SecKit SK-GO (from Thingiverse)
Shopping list:
-- 2 pcs M4x8 bolt
-- 2 pcs M4 washers
SecKit open angled cover with logo (from Thingiverse)
Shopping list:
-- 2 pcs M3x15 bolt
-- 2 pcs M3 nut
Belt Tensioner for sk go 3d printer (from Thingiverse)
Shopping list:
-- 4 pcs M3x20 bolt
-- 4 pcs M3 nut
SKR v1.3 Ducted Stepper Driver Cooler (from Thingiverse replaces SK-Go driver cooling fan mount.stl)
Shopping list:
-- 4 pcs M3x15 bolt
-- 4 pcs M3 nut
SKR 1.3 Board Drivercooler Clips for Things 3576392 and 4163812 - SKR_1.3_Board_Drivercooler_Clip.stl and SKR_1.3_Board_Drivercooler_Fan_Side_Clip_thing_4163812.stl ([from Thingiverse]( https://www.thingiverse.com/thing:4570496) clips the SKR v1.3 Ducted Stepper Driver Cooler to the board)
YACC (Yet Another Cable Clip) for 20x20 Aluminum Extrusion 8mm (from Thingiverse)
Frame mounted filament holder DELUXE (optional)
Parts to be printed
SK-Go2_Filament_Holder_DELUXE_Bracket.stl (to mount the Ender 3 - Filament holder DELUXE to the frame. Replacing Mounting_bracket.stl and Mounting_bracket_nut.stl)
SG-Go2_20x20_angled_Bracket.stl (optional if you assemble the SK-Go2_Filament_Holder_DELUXE_Bracket.stl to the 20x20 rail)
Ender 3 - Filament holder DELUXE - Filament_holder.stl, Filament_nut.stl and Optional_thread_guide.stl (from Thingiverse)
Shopping list:
-- 16 cm long M8 threadbar
-- 2 pcs 608Z bearings
-- 2 pcs M8 nylon lock nuts
-- 2 pcs M8 washers
-- 4 pcs M4x10 bolt
-- 2 pcs M4x8 bolt
-- 4 pcs M4 t-nut
-- 2 pcs M4 nut
-- 6 pcs M4 washers
SK-Go2_Filament_Guide.stl (Mounts just above the SK-Go2_Filament_Holder_DELUXE_Bracket.stl on the vertical 2020 extrusion. It will stop the filament from getting tangled around the Filament_Holder_DELUXE bracket when having a new spool.)
Shopping list:
-- 2 pcs M3x10 bolt
-- 2 pcs M3 washers
-- 2 pcs M3 t-nut
X and Y optical endstop (optional)
Parts to be printed
SK_Go2_X_min_sensorless_homing_bumper_and_assembly_bumper_with_optical_endstop_trigger.stl (this is replacing the left SK_Go2_X_min_sensorless_homing_bumper_and_assembly_bumper.stl)
SK-Go2_X_Optical_Endstop_Mount_Addon_Bracket.stl (to be attached at the back of the SK-Go2_Extruder_Frame_Cable_Bracket.stl)
Shopping list:
-- 1 pcs LERDGE Optical Endstop (one is included in the kit)
-- 2 pcs M3x8 bolt
-- 2 pcs M3 nut
Y optical endstop mount.stl (taken from printed parts STL folder from SecKit github)
Shopping list:
-- 2 pcs M3x8 bolt
-- 2 pcs M3 nut
-- 2 pcs M4x8 bolt
-- 2 pcs M4 t-nut
Y optical endstop trigger.stl (taken from printed parts STL folder from SecKit github)
Connecting to mainboard
Unplug the xst and yst jumper on the SKR 1.3 board for the optical sensors to work with the board (board connect an pin layout picture included). Connect the Sensor to the x- and y- endstop pin. Make sure that the pins are matching up (see also assembly manual). you might have to change the order of the wires to have the V, G and S pin at the sensor matching the V, G and S pin at the board. If the sensor is wired up correctly, you will a a green LED shining as soon as you put an object into the sensor gap.
Fun fact : Consider the material you are using to print the SK_Go2_X_min_sensorless_homing_bumper_and_assembly_bumper_with_optical_endstop_trigger.stl and Y optical endstop trigger.stl endstop triggers. I was using SUNLU PETG green and it was somehow not triggering the sensor. I had to wrap it in black tape to make it work.
BL-Touch (optional)
Parts to be printed
SKGO Fan Duct with BLTouch (from Thingiverse replaces SK-Go fan duct.v2.direct.stl)
Shopping list:
-- ANTCLABS BL Touch V3.1 https://www.antclabs.com/bltouch-v3 (e.g. from Aliexpress )
-- Alternatively a cheaper clone like the 3D touch (e.g. from Aliexpress this one comes already with a 1m cable extension )
-- 5x 1m cable with cable to female dupont pins. (needed to extend the BL Touch wires. Some bundles are already including this cable)
Connecting to mainboard
Thanks to Chris Riley’s YouTube tutorial I was able to get this done easily.
Unplug the zst jumper on the SKR 1.3 board for the BLToouch to work with the board (board connect an pin layout picture included). Connect the your black/white cable to the z- endstop pins. Connect the brown/red/orange cable to the SERVOS pins on the SKR 1.3 board. Make sure that the pins are matching up (BLTouch wiring picture included). You have to exchange the red and the brown wire if you are using an 3 pin extension plug for the SERVOS cable.
Configuration of Marlin for X and Y optical endstop and BL-Touch
I included my current versions of:
Configuration.h
Configuration_adv.h
Make sure not to copy those files but use a text editor to compare those files with your original ones to identify the changes and modify your original files.
Every change is commented with “// upgrade_set:” so you also can search for all the changes if comparing is no good for you.
Octoprint on raspberry (octopi) with the 7″ touchscreen monitor for Raspberry Pi using the TouchUI with the Boot-To-Browser option. (optional)
If you were puzzled about the screen assembled to the top of my frame…..
Since I have done a lot of customizing on my octoprint to control my SK-Go² (e.g. temperature presents, movement and bed levelling support) by using the Terminal Commands Extended plugin, I now wanted to be able to use this without having a computer up and running.
And again thanks to Chris Rileys YouTube tutorial https://www.youtube.com/watch?v=rqy3dVZ4JH4 it was easy to utilize my 7″ touchscreen monitor for Raspberry Pi I had laying around to get it done.
Shopping list:
-- Raspberry pi incl. power supply (I used a 3B+)
-- approx.. 1.5m USB A cable (e.g. from AliExpress)
-- 7″ touchscreen monitor for Raspberry Pi (I used the original bought from Amazon which came with a housing I could directly mount to the 20x20 extrusion using 2x M4x8 bolt and 2x M4 t-nuts) you can also use other screens and sizes and for some you should find housings on thingiverse. I just had some trouble trying it with a 3.5″ touchscreen form KUMAN since the driver was somehow stopped my PiCamera from working.
-- Raspberry pi camera (I used a fisheye one from Amazon) you will need to also by a longer camera cable approx. 30-100cm, depending on where you want to mount your camera and you raspberry pi. Depending on your camera type you will already find some printable mounts fitting on a 20x20 extrusion (e.g. https://www.thingiverse.com/thing:434600 , https://www.thingiverse.com/thing:2804612 or https://www.thingiverse.com/thing:3565707
-- USB LED strip (e.g. 2m non remote from AliExpress) I just put the strip in the slot of the extrusions.
Octoprint configuration
I uploaded my octoprint configuration, so you just have to use the octoprint setting Backup & Restore to get all my add-ons and commands for the SK-Go². Since I am also running a Anet A8, Geeetech A10M and a Creality CR10sPRO you will also find some commands for those printers. Just delete the commands in the octoprint settings by configuring the Terminal Commands Extended plugin.
Dual Z-Axis Setup incl. Marlin 2.0.x for SKR 1.4 Turbo and S42B closed loop steppers
I decided to further upgrade my printer. You can find the details at my new thing :https://www.thingiverse.com/thing:4631780
Updates:
1.
I did some tuning the
Configuration.h
Configuration_adv.h
files, adjusting the bed position and size to my assembly. I also adjusted the filament preheat settings and some minor stuff. Again all the changes are flagged with “// upgrade_set:”.
2.
I added some commands to octoprint Terminal Commands Extended in order to follow the UBL procedure described by Chris Riley’s YouTube tutorial for UBL.
3.
I added some tiny clips which will hold the M3 nuts of the fanduct in place. (while tuning the hotend I had to reassemble the extruder some times and every time the two M3 nuts were a pain to hold in place for assembly) The clips will go on the lower spacers of the carriage.
4.
I create some gauges to help assembly the z-axis. You will also find the FreeCAD model if you have to adjust the tolerances for yourself.
5.
I tuned the reverse bowden setup. The SK-Go2_Filament_Guide.stl will prevent the filament from getting tangled around the filament holder deluxe. The SK-Go2_Reverse_Bowden_Extruder_Bracket.stl will allow you to take away the bending from the PTFE tube fitting at the BMG extruder. Since I had to replace the original, stiff reverse bowden tube with a standard PTFE tube to feed TPU (it would just not go through) I experienced a lot of bending due to the softness of my tube, so I did the SK-Go2_PTFE_Tube_antibend_50mm.stl and SK-Go2_PTFE_Tube_antibend_100mm.stl clips. Just put them around the tube where there should be no bending.
6.
Due to feedback I remoddled the z-axis assembly gauges (increased the hole size to improve the tolerances). I also included the step files for the gauges so you can tune it if you still have issues with the size of the holes.
Similar models
thingiverse
free
SecKit SK-Go linear rail end stop
...eed to print 4 of these which use the existing screw holes for position a rail setup.
designed to fit m3 screw 16mm+ and m3 nut.
thingiverse
free

Seckit Sk-go cable chain mount
...m3s.
find the cable chain here: https://www.amazon.com/gp/product/b07wdvjb8w/ref=ppx_yo_dt_b_asin_title_o00_s02?ie=utf8&psc=1
thingiverse
free

Universal Short Ender-3 Z-axis optical endstop by Mike_Toff
...olts м3х12 - 2 pcs for sensor mounting
m3 nuts - 2 pcs for sensor mounting
washers м3 - 2 pcs for sensor mounting
fits everything
thingiverse
free

SecKit Go Cable Manager
...seckit go cable manager
thingiverse
skr 1.3 cable management for the seckit go.
thingiverse
free
Seckit SK-Go Optical X and Y Endstops by oflithing
...39;s what can be seen in the pictures. in that latter configuration the endstop will only fit in position b for the linear rails.
thingiverse
free
Seckit SK-GO Filament Sensor Mount
... (two for the spacer on the m3x16)
2 m3x8 bolts
2 m3 t-nuts
the nuts on the back are a tight fit, i used pliers to press them in.
thingiverse
free

Hypercube EVO z-max sensor mount by rjcuomo1
...0 screws
(2) m5 t-nuts for 3030 extrusion
(2) m5 t-nuts for 2020 extrusion
(1) optical endstop (this style: http://a.co/4d1igfr )
thingiverse
free

Tevo Black Widow - Z Endstop Adjustable by bdwalker1
... as well)
m3 washer
m3 thumb screw nut
parts for attaching mount to printer:
m4x8 screw (x2)
m4 washer (x2)
m4 drop-in t-nut (x2)
thingiverse
free

Mechanical Endstop Side Mount and M3 Superman Pusher by ngoconwood
...ake it more fun, i decided to make a flying superman push it. for the reach3d printer, a m3x16 bolt and 2 m3 nuts will be needed.
thingiverse
free
Adjustable Endstop holder for Delta Kossel with 2020 AL by JanN_H
..." to interrupt the beam in the optical switch - find the best of thousands in thingiverse or construct one by yourself ;-).
Seckit
thingiverse
free
SecKit Go Cable Manager
...seckit go cable manager
thingiverse
skr 1.3 cable management for the seckit go.
thingiverse
free

Seckit SKGo2 Foot by stevenvo
...seckit skgo2 foot by stevenvo
thingiverse
printed foot that makes the base higher for customized z stepper placement.
thingiverse
free

SecKit Z Watch by Dude2475
...an color it with a pen.
the pointer: needs support
have fun with it :-)
youtube video:https://www.youtube.com/watch?v=jh0skkztefc
thingiverse
free

Seckit SkGo2 stepper support by L33dpl
...k and simple design.
step included, feel free to edit.
compatible with mount/tensioner:https://www.thingiverse.com/thing:4659141
thingiverse
free

SecKit Sk-Go2 Powercord connector box by tlex
...ctor box by tlex
thingiverse
power cord cover with the seckit logo.
printed with 0.6mm nozzle.
uses 2 t-nut to attach the frame.
thingiverse
free

Seckit Go Raspberry Pi Mount
...s for any raspberry pi case with mount screws at 68mm x 98mm. you can either press fit m3 nuts on the mount or screw in m3 bolts.
thingiverse
free

Seckit SkGo2 Z End stop by stevenvo
...seckit skgo2 z end stop by stevenvo
thingiverse
z end stop for alignment of bed
thingiverse
free

SecKit SK GO 350 Railcover by Dude2475
...es are for the left side - just mirror it in your slicer for the right side.
feel free to modify - the fusion360 file is included
thingiverse
free

Seckit Sk-Go2 Benoît Bed Bracket by sanblangar
...seckit sk-go2 benoît bed bracket by sanblangar
thingiverse
brackets for sk-go2 bed
thingiverse
free
Seckit SK-GO Camera holder by Marcelofs13
...-go camera holder by marcelofs13
thingiverse
for mounting the camera you need to print the screw mount that your camera supports
Caesar
turbosquid
$6

Caesars
...id
royalty free 3d model caesars for download as obj and c4d on turbosquid: 3d models for games, architecture, videos. (1423454)
turbosquid
$39

Caesar
... available on turbo squid, the world's leading provider of digital 3d models for visualization, films, television, and games.
3ddd
$1

Кровать CAESAR Ipe Cavalli Visionnaire CAESAR BED
...re
кровать caesar ipe cavalli visionnaire caesar bed
стиль: арт-деко / гламур
размеры:
(дхшхв): 222x235x118
(дхшхв): 242x235x118
3ddd
free

Smania Caesar Train
...d
caesar , smania , train
текстуры присутствуют
turbosquid
$9

Caesar Coin
... available on turbo squid, the world's leading provider of digital 3d models for visualization, films, television, and games.
3d_export
$35

caius julius caesar
...caius julius caesar
3dexport
caius julius caesar 3d model, multiple import formats.<br>thank you for reading
3ddd
$1
Caesar Palace armchair
...assical feeling, this single sofa is crafted from top-grade material, quite popular among customers.
dimensions: 1170*900*1050mm
3d_export
$12

Caesar 3D Model
...xport
dining set furniture chair table cupboard plate vase glass vray max hdri material
caesar 3d model dexter_hus 10592 3dexport
turbosquid
free

Bed Smania Caesar
...odel bed smania caesar for download as max, max, fbx, and obj on turbosquid: 3d models for games, architecture, videos. (1537972)
3ddd
$1
Кресло Caesar PLCAESAR01 Smania
...100x81 арт.plcaesar01
подробнее:http://italini.ru/mebel/smania/kreslo_caesar_plcaesar01
полигонов: 74149
вершин: 74803
1111
3d_export
$33

mountain 1111
...mountain 1111
3dexport
mountain 3d model
turbosquid
$30

1111.max
... available on turbo squid, the world's leading provider of digital 3d models for visualization, films, television, and games.
turbosquid
$15

human-1111
... available on turbo squid, the world's leading provider of digital 3d models for visualization, films, television, and games.
turbosquid
free

vaz 1111
... available on turbo squid, the world's leading provider of digital 3d models for visualization, films, television, and games.
3d_export
$20
Ring 1111 3D Model
...3d model
3dexport
ring 1111
ring 1111 3d model download .c4d .max .obj .fbx .ma .lwo .3ds .3dm .stl gorgsalvatore 113325 3dexport
turbosquid
$119
Vaz -1111 Oka
... available on turbo squid, the world's leading provider of digital 3d models for visualization, films, television, and games.
3ddd
free

Light Prestige Melbourne 1111-03
...ht prestige , восток
подвесной светильник light prestige серии melbourne артикул 1111-03
turbosquid
$10

Chelini Console Art. 1111
... available on turbo squid, the world's leading provider of digital 3d models for visualization, films, television, and games.
humster3d
$75
3D model of Lada Oka 1111 1989
... detailed 3d model of lada oka 1111 1989 in various file formats. all our 3d models were created maximally close to the original.
3d_export
$50

3D Home 1111 3D Model
...chair furniture texture table lamp apartment rug carpet restaurant hotel sitting
3d home 1111 3d model richard3015 45247 3dexport
Sk
3d_export
$5
rifle sks
...rifle sks
3dexport
rifle sks simonov
turbosquid
$13

sks
... available on turbo squid, the world's leading provider of digital 3d models for visualization, films, television, and games.
turbosquid
$5

SK CAR
...
turbosquid
royalty free 3d model sk car for download as fbx on turbosquid: 3d models for games, architecture, videos. (1320169)
3ddd
free

Braun sk 2
...braun sk 2
3ddd
braun , радиоприемник.
легендарный braun sk 2.
turbosquid
$15

SK Kitchen
... available on turbo squid, the world's leading provider of digital 3d models for visualization, films, television, and games.
3d_export
$5
lowpoly sks
...lowpoly sks
3dexport
contact me if you need cheap lowpoly models
turbosquid
$26

SK-16 Kit
... free 3d model sk-16 kit(1) for download as max, obj, and fbx on turbosquid: 3d models for games, architecture, videos. (1281106)
humster3d
$75

3D model of SKS 45
...ter3d
buy a detailed 3d model of sks 45 in various file formats. all our 3d models were created maximally close to the original.
3ddd
$1

Дверь межкомнатная sk-001d
...ная sk-001d
3ddd
дверь
дверь межкомнатная sk-001d
дизайн от ооо "ск-студия"
сайт студии:http://1sk-studio.ru/
turbosquid
$2

Computer Desk SK-22
...el computer desk sk-22 for download as 3ds, max, obj, and fbx on turbosquid: 3d models for games, architecture, videos. (1190666)
Xy
3ddd
$1

Вешалка напольная XY-027
...а штанги: 171 см
диаметр основания: 38 смhttp://mebelshopos.ru/aksessuary-ofisnye/veshalka-napolnaya-xy-027-detail.html
turbosquid
$9
XY Rectangular Dining Table
... available on turbo squid, the world's leading provider of digital 3d models for visualization, films, television, and games.
3ddd
$1
holly hunt xy bench
...eight: 17.75 in
width: 45 in, 26 in
depth: 18 in
больше превьюhttps://www.behance.net/gallery/24983999/bench-3d-model?
turbosquid
$8
Xy fine tuning handle adjusts the module
...odule for download as 3ds, max, ige, obj, fbx, stl, and sldas on turbosquid: 3d models for games, architecture, videos. (1331394)
3ddd
$1

pillows bed 2
...pillows bed 2 3ddd подушка , круглая dimensions: xy ...
3ddd
$1
Honeycomb Floor
...паркет parquet with metalic honeycomb floor demensions 500x500 cm xy multitexture +...
3d_export
$7

positioning screw mechanism
...and lead screw, constitute a double displacement adjustable mechanism, xy axis double position adjustable positioning.<br>**************************************<br>files format contains<br>-solidworks 2017<br>-step<br>-iges<br>- and...
3d_export
$9
positioning mechanism of heavy-duty platform
...activity -- ball mechanism activity ---- drive heavy load xy axis movement -- positioning completed<br>**************************************<br>files format contains<br>-solidworks 2017<br>-step<br>-iges<br>- and...
3d_export
$180
optical fiber laser marking machines assembly
...fiber laser marking machine<br>automatic loading and unloading laser marking machine<br>xy platform adjustable laser marking machine<br>laser marking machine used with...
thingiverse
free
XY ROBOT by ymtlab
...xy robot by ymtlab
thingiverse
xy robot
Bl
3ddd
$1

Blest bl
...blest bl
3ddd
blest
blest bl 2880х1500 мм
design_connected
$11

Hase BL
...hase bl
designconnected
kalmar hase bl computer generated 3d model. designed by j.t kalmar design team.
turbosquid
$49

Peterbilt BLS
...quid
royalty free 3d model peterbilt bls for download as max on turbosquid: 3d models for games, architecture, videos. (1349236)
turbosquid
$69

Sandra BL
...
royalty free 3d model sandra bl 3d model for download as fbx on turbosquid: 3d models for games, architecture, videos. (1575281)
turbosquid
$10

BL Skylark
... available on turbo squid, the world's leading provider of digital 3d models for visualization, films, television, and games.
turbosquid
$10

BL Breezy
... available on turbo squid, the world's leading provider of digital 3d models for visualization, films, television, and games.
3ddd
$1

Blest BL 101
...blest bl 101
3ddd
blest
три конфигурации модульного дивана bl 101, от фабрики blest
3ddd
free

ITALUX EMPORIO V2305-BL
...italux emporio v2305-bl
3ddd
italux , emporio
italux emporio v2305-bl
3ddd
free

BILLY BL FLOOR LAMP
...billy bl floor lamp
3ddd
monoqi
billy bl floor lamp
kalmar werkstaetten
turbosquid
$10

pivotal 51799-bl
...d
royalty free 3d model pivotal 51799-bl for download as max on turbosquid: 3d models for games, architecture, videos. (1400644)
Starter
turbosquid
$12

Starter old
...royalty free 3d model starter old for download as obj and fbx on turbosquid: 3d models for games, architecture, videos. (1293428)
turbosquid
free

Cream Starter
...free 3d model cream starter for download as fbx, dae, and stl on turbosquid: 3d models for games, architecture, videos. (1408178)
turbosquid
$2

Fire Starter
...ree 3d model fire starter for download as obj, fbx, and blend on turbosquid: 3d models for games, architecture, videos. (1371386)
turbosquid
$11
starter castle.dxf
... available on turbo squid, the world's leading provider of digital 3d models for visualization, films, television, and games.
turbosquid
$10

Fluorescent Starter
... available on turbo squid, the world's leading provider of digital 3d models for visualization, films, television, and games.
turbosquid
$6

Philips starter
... available on turbo squid, the world's leading provider of digital 3d models for visualization, films, television, and games.
turbosquid
free

Starter Spider
... available on turbo squid, the world's leading provider of digital 3d models for visualization, films, television, and games.
turbosquid
$5

starter wheel for the brushcutter
...d model starter wheel for the brushcutter for download as stl on turbosquid: 3d models for games, architecture, videos. (1586931)
turbosquid
$1
man Head starter
...yalty free 3d model man head 3d starter for download as blend on turbosquid: 3d models for games, architecture, videos. (1575541)
turbosquid
$11

starter castle.3ds
... available on turbo squid, the world's leading provider of digital 3d models for visualization, films, television, and games.
Endstop
thingiverse
free
Endstop-holder for endstop v1.2 by albiuz
...endstop-holder for endstop v1.2 by albiuz
thingiverse
endstop-holder designed for mech endstop v1.2
thingiverse
free
Endstop by 3dboxpro
...endstop by 3dboxpro
thingiverse
endstop
thingiverse
free
Endstop by 1sPiRe
...endstop by 1spire
thingiverse
endstop model for conceptions
thingiverse
free

Endstop holder for Opto or Mechanical endstops by LulzBot
... endstops by lulzbot
thingiverse
these are the standard 1.0 prusa endstops with an added mounting hole for mechanical endstops.
thingiverse
free

Endstop Holder by onurhamdiuzun
...endstop holder by onurhamdiuzun
thingiverse
endstop holder for makerbot endstop and other endstops
thingiverse
free

Endstop Cover
...endstop cover
thingiverse
cover for endstop boards for makerbot design.
thingiverse
free
Endstop Mount for optical Endstops by Whitehawk2000
...whitehawk2000
thingiverse
use two 20mm m3 screws and nuts to screw the endstop onto the mount and just clip it onto the 8mm rod.
thingiverse
free

C-beam endstop mount for Makerbot type endstops
...c-beam endstop mount for makerbot type endstops
thingiverse
c-beam endstop mount for makerbot type endstop boards.
thingiverse
free

Endstop Mount for MakerBot Mecanical Endstop. by nka
...v-slots carriage.
endstop is screw with m3 (8mm) tapped hole and the endstop hold on the extrusion using a m5 (8mm) and t-nuts.
thingiverse
free
ENDSTOP 10mm by desert500
...endstop 10mm by desert500
thingiverse
endstop
Optical
design_connected
$9

Optic
...optic
designconnected
alessi optic computer generated 3d model. designed by colombo, joe.
3ddd
$1
обои OPTIC
...обои optic
3ddd
в архиве текстуры и фото обоев из коллекции optic.
archive3d
free
Optics 3D Model
...optics 3d model
archive3d
optics
optics - 3d model (*.gsm+*.3ds) for interior 3d visualization.
turbosquid
$49

optical eyewear
...id
royalty free 3d model optical eyewear for download as max on turbosquid: 3d models for games, architecture, videos. (1592243)
3d_ocean
$5

optical mouses
...al mouses
3docean
3d models computer electronics mouse
optical mouses 3d models. realistic mouse model. custom and unique design.
turbosquid
$10
Optic cross
...yalty free 3d model optic cross for download as sldas and ige on turbosquid: 3d models for games, architecture, videos. (1683403)
turbosquid
$7

OPTIC Mirror
... free 3d model optic mirror for download as max, obj, and fbx on turbosquid: 3d models for games, architecture, videos. (1223927)
turbosquid
free

Fiber optics
...d model fiber optics for download as 3ds, obj, fbx, and blend on turbosquid: 3d models for games, architecture, videos. (1211912)
turbosquid
$8

Mouse optical
...3d model mouse optical for download as 3ds, obj, c4d, and fbx on turbosquid: 3d models for games, architecture, videos. (1504476)
turbosquid
free

Optical puzzle
... optical puzzle for download as max, ige, fbx, stl, and sldas on turbosquid: 3d models for games, architecture, videos. (1405925)
Bumper
turbosquid
free
Bumper
... available on turbo squid, the world's leading provider of digital 3d models for visualization, films, television, and games.
turbosquid
$10
Bumper Front
...squid
royalty free 3d model bumper front for download as obj on turbosquid: 3d models for games, architecture, videos. (1550133)
turbosquid
$15

bumper car.br3
... available on turbo squid, the world's leading provider of digital 3d models for visualization, films, television, and games.
3d_export
$5
bumper arb toyota fortuner
...bumper arb toyota fortuner
3dexport
bumper arb toyota fortuner
3d_export
$7

front bumper
... it to use in other car, here it is for you. also if you need some help, tell us, and we will be happy to give you want you need.
turbosquid
$28
bumper chair by HermanMiller
...ree 3d model bumper chair by hermanmiller for download as max on turbosquid: 3d models for games, architecture, videos. (1642341)
turbosquid
$15

Dodgem Bumper car
...
royalty free 3d model dodgem bumper car for download as obj on turbosquid: 3d models for games, architecture, videos. (1418034)
turbosquid
$95

Bumper Pool Table
... 3d model bumper pool table for download as 3ds, max, and obj on turbosquid: 3d models for games, architecture, videos. (1298512)
turbosquid
$20

Red Bumper Car
...model red bumper car for download as 3ds, obj, fbx, and blend on turbosquid: 3d models for games, architecture, videos. (1322171)
turbosquid
$70
Bumper WAC rocket
... available on turbo squid, the world's leading provider of digital 3d models for visualization, films, television, and games.
Upgrade
turbosquid
$15

Upgraded Glock
...e 3d model upgraded glock for download as obj, fbx, and blend on turbosquid: 3d models for games, architecture, videos. (1185950)
3ddd
$1

Calligaris / UPGRADE
...calligaris / upgrade
3ddd
calligaris
c материалом
3d_export
free

cz upgrade
...cz upgrade
3dexport
https://www.buymeacoffee.com/mestrezen3d https://linktr.ee/mestrezen3
turbosquid
$80

Custer Tank upgrade
... available on turbo squid, the world's leading provider of digital 3d models for visualization, films, television, and games.
turbosquid
$39

Domestos 1 upgrade
... available on turbo squid, the world's leading provider of digital 3d models for visualization, films, television, and games.
3d_export
$10

Upgraded tea cup
...upgraded tea cup
3dexport
a cup with an unusual design and a unique shape for a more enjoyable tea experience
3d_export
$8

dixy outlander classic style upgraded poplar wood lounge chair
...utlander classic style upgraded poplar wood lounge chair
3dexport
dixy outlander classic style upgraded poplar wood lounge chair
turbosquid
free

AK-12 + Upgrades low-poly 3D model
...ow-poly 3d model for download as fbx, blend, and unitypackage on turbosquid: 3d models for games, architecture, videos. (1501145)
evermotion
$700

Upgrade from V-ray 1.5 to 3.5 for 3ds max
...here is no need to purchase a new dongle - your current dongles will be reprogrammed to carry v-ray 3. evermotion 3d models shop.
evermotion
$300

Upgrade from V-Ray 2.0 to V-ray 3.5 for 3ds Max
... interface (gui) for editing settings on one machine and one render node for rendering on one machine. evermotion 3d models shop.
Als
design_connected
$11

Ales
...ales
designconnected
willisau ales computer generated 3d model. designed by kössl , ulrich.
3ddd
$1

GINGER ALE CHAIR
...ginger ale chair
3ddd
ginger , ale
ginger ale chair
turbosquid
$100
abed al kader al jaziery house
... available on turbo squid, the world's leading provider of digital 3d models for visualization, films, television, and games.
turbosquid
$20

Jaber Al-Ahmad Al-Sabah trophy
... available on turbo squid, the world's leading provider of digital 3d models for visualization, films, television, and games.
turbosquid
$3

Ale Horn
...turbosquid
royalty free 3d model ale horn for download as ma on turbosquid: 3d models for games, architecture, videos. (1390503)
3ddd
$1
Стол Bene AL
...водителя bene al
длина 2000, ширина 1000, высота 755http://bene.com/ru/ofisnye-reshenija/ofisnye-interery/al-executive/
3ddd
$1

stool al
...stool al
3ddd
барный
www.tsinos.gr
turbosquid
$20

als AutoLoading.max
... available on turbo squid, the world's leading provider of digital 3d models for visualization, films, television, and games.
turbosquid
$14

Bene Al
... available on turbo squid, the world's leading provider of digital 3d models for visualization, films, television, and games.
3d_export
$10

al-jazeera representative
...al-jazeera representative
3dexport
colgante alusivo a la isla- al jazeera. diseño sencillo pero audaz
Touch
3ddd
$1

Touch
...touch
3ddd
touch , альфа банк
электронный терминал для очереди
3ddd
$1

GSG / Touch
... ванна
http://www.ceramicagsg.com/sanitaryware-touch/bathtub-touch-free-standing.html
turbosquid
$10

Oculus Touch
...squid
royalty free 3d model oculus touch for download as skp on turbosquid: 3d models for games, architecture, videos. (1462433)
turbosquid
$64

iPod Touch
...ty free 3d model ipod touch for download as 3ds, max, and obj on turbosquid: 3d models for games, architecture, videos. (1299603)
3ddd
$1

iPod Touch 5
...ipod touch 5
3ddd
apple , плеер
модель ipod touch 5
3ddd
$1

Asnaghi "Touch"
...asnaghi "touch"
3ddd
asnaghi , touch
фабрика: asnaghi
модель: touch
3ddd
free

Japanese stone touch
...japanese stone touch
3ddd
фонарь
japanese stone garden touch
японский садовый фонарь
икеокоми-гата
3d_ocean
$15

IPOD TOUCH 5
...apple blender ipad iphone ipod mp3 nano player touch
3d model of ipod touch 5 in 3 colours. available in .3ds, .blend, .obj, .x3d
3d_ocean
$12

iPod touch 5G
...pod jobs nano steve touch
ipod touch 3d model. formats, fbx, obj, max(2010) textures and materials with multiple colors included.
3ddd
$1
HTC Touch HD
...http://www.gsmarena.com/htc_touch_hd-2525.php фото:http://i.smartphone.ua/img/phones/htc-touch-hd/foto_001.jpg
Clips
archibase_planet
free
Clip
...clip
archibase planet
paper-clip clip office equipment
clip band - 3d model for interior 3d visualization.
3d_export
$5
screw clip
...screw clip
3dexport
screw clip
3d_ocean
$4

Butterfly clip
... a butterfly clip, it comes with a ready to render set for out of the box rendering. obj version and max alones version included.
turbosquid
$2

clip
...
royalty free 3d model clip for download as ma, obj, and fbx on turbosquid: 3d models for games, architecture, videos. (1358622)
turbosquid
$5

Clip
...lty free 3d model clip for download as c4d, 3ds, fbx, and obj on turbosquid: 3d models for games, architecture, videos. (1521355)
turbosquid
$19
Clip
... available on turbo squid, the world's leading provider of digital 3d models for visualization, films, television, and games.
turbosquid
$4
Clips
... available on turbo squid, the world's leading provider of digital 3d models for visualization, films, television, and games.
turbosquid
$3
clip
... available on turbo squid, the world's leading provider of digital 3d models for visualization, films, television, and games.
turbosquid
$2

clips
... available on turbo squid, the world's leading provider of digital 3d models for visualization, films, television, and games.
turbosquid
free

Clip
... available on turbo squid, the world's leading provider of digital 3d models for visualization, films, television, and games.
Cable
3d_export
free

Cables
...cables
3dexport
cables for your purposes
3d_export
free
cable belt for cable organization
...ze your cables in 3d printers. it will bend only to one direction. the area to put the cables per piece is aprox. 1,6cmx2,6cmx1cm
3d_ocean
$16

Ethernet Cable
...ethernet cable
3docean
cable computer electronics ethernet internet network connected
ethernet cable 3d model
3d_export
$65

cable
...cable
3dexport
simple rendering of the scene file
turbosquid
$14

Cable
...l cable for download as ma, max, fbx, 3ds, gltf, obj, and stl on turbosquid: 3d models for games, architecture, videos. (1631358)
3ddd
$1
Cable Cover
...cable cover
3ddd
кабель
vertebra passacavo - cable cover
max + vray 2.20.03
3d_export
$15
Cable reel
...without cable. textures 4k 4096x4096 targa, png, jpeg.<br>number of polygons without cable: 2896<br>with cable: 35328
3d_export
$7

short cable
...short cable
3dexport
rubber cord. very detailed. cable thickness: 2.55 mm total length: 55mm
3d_export
$5

USB CABLE
...usb cable
3dexport
turbosquid
$30
Cable Reels
...osquid
royalty free 3d model cable reels for download as fbx on turbosquid: 3d models for games, architecture, videos. (1439507)
Filament
3ddd
$1

Filament Cage
...filament cage
3ddd
лофт , filament cage
модель бра, делалась по фото!
turbosquid
$3

FILAMENT COUNTER
...d
royalty free 3d model filament counter for download as stl on turbosquid: 3d models for games, architecture, videos. (1563049)
3d_export
$5

Filament lamp 3D Model
...filament lamp 3d model
3dexport
filament lamp 3d model kevin 54161 3dexport
3d_export
$5

Filament bulb candle 3D Model
...filament bulb candle 3d model
3dexport
filament bulb-candle
filament bulb candle 3d model kevin 54163 3dexport
3d_export
$5

Filament led light bulb
...filament led light bulb
3dexport
realistic 3d model of filament light bulb with v-ray materials.
3d_export
$5

Filament led light bulb
...filament led light bulb
3dexport
realistic 3d model of filament light bulb with v-ray materials.
3d_export
$5

Filament led light bulb
...filament led light bulb
3dexport
realistic 3d model of filament light bulb with v-ray materials.
3d_export
$5

Filament led light bulb
...filament led light bulb
3dexport
realistic 3d model of filament light bulb with v-ray materials.
3d_export
$5

Filament led light bulb
...filament led light bulb
3dexport
realistic 3d model of filament light bulb with v-ray materials.
3ddd
$1

Factory filament metal shade
...factory filament metal shade
3ddd
restoration hardware
restoration hardware. 20th c. factory filament metal shade.
Go²
turbosquid
$3

Going Merry Go
...e 3d model going merry go for download as blend, fbx, and obj on turbosquid: 3d models for games, architecture, videos. (1669967)
3ddd
$1
GO chair
...go chair
3ddd
go , bernhardt design
stacking chair,
design_connected
$18

Go Chair
...go chair
designconnected
danerka go chair computer generated 3d model. designed by lovegrove, ross.
3ddd
$1

GO IN barista
...ta
3ddd
barista , барный
стул барный go in barista
h112cm, d51cm, w42cm, seatheight 81cm
turbosquid
$40

Pixelbook GO
... free 3d model pixelbook go for download as obj, c4d, and fbx on turbosquid: 3d models for games, architecture, videos. (1473349)
turbosquid
$10
Go boy
...royalty free 3d model go boy for download as ma, obj, and fbx on turbosquid: 3d models for games, architecture, videos. (1292463)
turbosquid
$5

JBL GO
...alty free 3d model jbl go for download as obj, fbx, and blend on turbosquid: 3d models for games, architecture, videos. (1501036)
turbosquid
$1
Go-kart
... free 3d model go-kart for download as jpg, 3ds, obj, and md3 on turbosquid: 3d models for games, architecture, videos. (1501040)
turbosquid
$40
Go Cart.c4d
... available on turbo squid, the world's leading provider of digital 3d models for visualization, films, television, and games.
turbosquid
$35

Go kart
...e 3d model go kart for download as ma, max, obj, c4d, and fbx on turbosquid: 3d models for games, architecture, videos. (1388925)
Printers
archibase_planet
free

Printer
...inter
archibase planet
printer laser printer pc equipment
printer n120614 - 3d model (*.gsm+*.3ds) for interior 3d visualization.
archibase_planet
free

Printer
...rchibase planet
laser printer office equipment computer equipment
printer - 3d model (*.gsm+*.3ds) for interior 3d visualization.
turbosquid
$100

Printer
...er
turbosquid
royalty free 3d model printer for download as on turbosquid: 3d models for games, architecture, videos. (1487819)
turbosquid
$3

Printer
...turbosquid
royalty free 3d model printer for download as max on turbosquid: 3d models for games, architecture, videos. (1670230)
turbosquid
$1

printer
...turbosquid
royalty free 3d model printer for download as max on turbosquid: 3d models for games, architecture, videos. (1595546)
turbosquid
$1

printer
...turbosquid
royalty free 3d model printer for download as max on turbosquid: 3d models for games, architecture, videos. (1595105)
turbosquid
$10

Printer
...id
royalty free 3d model printer for download as max and 3dm on turbosquid: 3d models for games, architecture, videos. (1607146)
turbosquid
$7

Printer
...royalty free 3d model printer for download as ma, ma, and obj on turbosquid: 3d models for games, architecture, videos. (1644580)
turbosquid
$30

Printer
... available on turbo squid, the world's leading provider of digital 3d models for visualization, films, television, and games.
turbosquid
$20

Printer
... available on turbo squid, the world's leading provider of digital 3d models for visualization, films, television, and games.
May
3ddd
$1

MAIS
...mais
3ddd
mais
описание отсутствует)
design_connected
$9

May
...may
designconnected
bonaldo may computer generated 3d model. designed by carollo, gino.
design_connected
$11

May Day
...may day
designconnected
may day computer generated 3d model. designed by grcic, konstantin.
3ddd
$1

May-lily lamp
... table lamp , may , lily
may-lily, table lamp
turbosquid
$150

jinja mai
... available on turbo squid, the world's leading provider of digital 3d models for visualization, films, television, and games.
3d_export
$10

Mai Shiranui 3D Model
...mai shiranui 3d model
3dexport
mai shiranui king of fighters
mai shiranui 3d model enryke01 25350 3dexport
3ddd
$1
полочки APRIL, MAY, JUNE
...а
полочки april, may, june
vray, max 2014, 2011, obj
http://www.archiproducts.com/ru/продукты/126395/april-may-june-bonaldo.html
turbosquid
$5

Souvenir of the May beetle
... souvenir of the may beetle for download as max, obj, and fbx on turbosquid: 3d models for games, architecture, videos. (1304506)
turbosquid
$45

Mai Dragon Nao
... available on turbo squid, the world's leading provider of digital 3d models for visualization, films, television, and games.
turbosquid
$1

Bryant and May Matches
... available on turbo squid, the world's leading provider of digital 3d models for visualization, films, television, and games.
Holder
archibase_planet
free

Holder
...holder
archibase planet
holder toilet paper holder
holder paper n070712 - 3d model (*.gsm+*.3ds) for interior 3d visualization.
archibase_planet
free

Holder
...e planet
holder rack toilet paper holder
holder toilet roll n240715 - 3d model (*.gsm+*.3ds+*.max) for interior 3d visualization.
archibase_planet
free

Holder
...holder
archibase planet
pen holder support prop
pen holder - 3d model for interior 3d visualization.
archibase_planet
free

Holder
...holder
archibase planet
pole post holder
сhurch cross pole holder - 3d model for interior 3d visualization.
archibase_planet
free

Holder
...holder
archibase planet
holder bathroom ware
shower holder - 3d model (*.gsm+*.3ds) for interior 3d visualization.
archibase_planet
free

Holder
...oilet paper holder
holder paper devon&devon; time black n241113 - 3d model (*.gsm+*.3ds+*.max) for interior 3d visualization.
archibase_planet
free

Holder
...holder
archibase planet
holder hanger hanger for towel
holder 7 - 3d model (*.gsm+*.3ds) for interior 3d visualization.
archibase_planet
free

Holder
...holder
archibase planet
holder hanger hanger for towel
holder 3 - 3d model (*.gsm+*.3ds) for interior 3d visualization.
archibase_planet
free

Holder
...holder
archibase planet
holder towel rack towel-horse
holder - 3d model (*.gsm+*.3ds) for interior 3d visualization.
archibase_planet
free

Holder
...lder
archibase planet
holder hanger hanger for towel
holder towel n250912 - 3d model (*.gsm+*.3ds) for interior 3d visualization.
Mount
3d_export
free

mounting bracket
...mounting plate is the portion of a hinge that attaches to the wood. mounting plates can be used indoors, cabinetry and furniture.
turbosquid
$2

MOUNTING
... available on turbo squid, the world's leading provider of digital 3d models for visualization, films, television, and games.
turbosquid
free

Mounts
... available on turbo squid, the world's leading provider of digital 3d models for visualization, films, television, and games.
turbosquid
free

Mount Fuji
...fuji
turbosquid
free 3d model mount fuji for download as obj on turbosquid: 3d models for games, architecture, videos. (1579977)
3d_export
$5

Headphone mount LR
...headphone mount lr
3dexport
headphone mount l+r
turbosquid
$39

Mount rainier
...quid
royalty free 3d model mount rainier for download as fbx on turbosquid: 3d models for games, architecture, videos. (1492586)
turbosquid
$5

pipe mounting
...quid
royalty free 3d model pipe mounting for download as obj on turbosquid: 3d models for games, architecture, videos. (1293744)
turbosquid
$3

Mounting Tires
...uid
royalty free 3d model mounting tires for download as fbx on turbosquid: 3d models for games, architecture, videos. (1708511)
3d_export
$5

Magnetic GoPro Mount
...pro mount
3dexport
cool magnetic mount for gopro. allows you to mount the camera on flat metal surfaces and get exclusive shots.
turbosquid
$5

Stone Mount
...ty free 3d model stone mount for download as ma, obj, and fbx on turbosquid: 3d models for games, architecture, videos. (1370306)
Work
3d_export
$5
WORKING PLATFORM
...working platform
3dexport
working platform 4000x3000x1500mm
design_connected
$16

Working set
...working set
designconnected
smallaccents working set computer generated 3d model.
3ddd
free
Pinao / Stelar Works
...pinao / stelar works
3ddd
stelar works , stellar works
стулья pinao от stelar works
design_connected
$13

Work Lamp
...work lamp
designconnected
design house stockholm work lamp computer generated 3d model. designed by form us with love.
turbosquid
$6

Road Works
...turbosquid
royalty free 3d model road works for download as on turbosquid: 3d models for games, architecture, videos. (1151328)
3ddd
free

Stellar Works Lumar
...llar works , lumar , барный
stellar works lumar
turbosquid
$20
Work boots
...bosquid
royalty free 3d model work boots for download as stl on turbosquid: 3d models for games, architecture, videos. (1313566)
turbosquid
$8
Desk Work
...osquid
royalty free 3d model desk work for download as blend on turbosquid: 3d models for games, architecture, videos. (1381338)
turbosquid
$5

Work Desk
...osquid
royalty free 3d model work desk for download as blend on turbosquid: 3d models for games, architecture, videos. (1435344)
turbosquid
$1

Plant for work
...uid
royalty free 3d model plant for work for download as obj on turbosquid: 3d models for games, architecture, videos. (1557514)
Set
archibase_planet
free

Setting
...setting
archibase planet
setting cover place setting
setting - 3d model (*.gsm+*.3ds) for interior 3d visualization.
archibase_planet
free
Setting
...setting
archibase planet
setting place setting cover
setting - 3d model (*.gsm+*.3ds) for interior 3d visualization.
archibase_planet
free

Setting
...setting
archibase planet
setting place setting cover
setting - 3d model (*.gsm+*.3ds) for interior 3d visualization.
3d_export
$8

decorative set mens set
...decorative set mens set
3dexport
decorative set men's set
archibase_planet
free
Set
...anet
set kitchen ware kitchen set kitchen tools
set kitchen tools n281114 - 3d model (*.gsm+*.3ds) for interior 3d visualization.
archibase_planet
free
Set
...set
archibase planet
beer set bar equipment
beer set - 3d model for interior 3d visualization.
archibase_planet
free

Set
...set
archibase planet
cover place setting
set - 3d model (*.gsm+*.3ds) for interior 3d visualization.
archibase_planet
free

Set
...set
archibase planet
kitchen set kitchen ware
set - 3d model (*.gsm+*.3ds) for interior 3d visualization.
archibase_planet
free

Set
...set
archibase planet
set cup glass kitchen ware
set - 3d model (*.gsm+*.3ds) for interior 3d visualization.
archibase_planet
free

Set
...set
archibase planet
flatware cover place setting
set n311210 - 3d model (*.gsm+*.3ds) for interior 3d visualization.
Other
design_connected
$16

ST12 Other
...signconnected
photo-realistic 3d models of the st12 other stool from e15 for 3d architectural and interior design presentations.
turbosquid
$26

Oar and Other
...quid
royalty free 3d model oar and other for download as fbx on turbosquid: 3d models for games, architecture, videos. (1473409)
turbosquid
$5
chair with other
...id
royalty free 3d model chair with other for download as ma on turbosquid: 3d models for games, architecture, videos. (1171468)
3ddd
$1

parfume and other
...parfume and other
3ddd
тумбочка
create by sametyuzer
turbosquid
$79

The Others Collection
...others collection for download as 3ds, max, obj, fbx, and dae on turbosquid: 3d models for games, architecture, videos. (1480228)
turbosquid
$25

Other Man
... available on turbo squid, the world's leading provider of digital 3d models for visualization, films, television, and games.
turbosquid
$15

other car.max
... available on turbo squid, the world's leading provider of digital 3d models for visualization, films, television, and games.
turbosquid
$2
Other Mothers Hand
... 3d model other mothers hand for download as ma, fbx, and obj on turbosquid: 3d models for games, architecture, videos. (1663825)
turbosquid
$8

other sport wheel
... available on turbo squid, the world's leading provider of digital 3d models for visualization, films, television, and games.
turbosquid
$2

pool and other elements
... available on turbo squid, the world's leading provider of digital 3d models for visualization, films, television, and games.