Thingiverse
Sapphire Plus - NF Crazy Plus Mount by olevelo
by Thingiverse
Last crawled date: 3 years ago
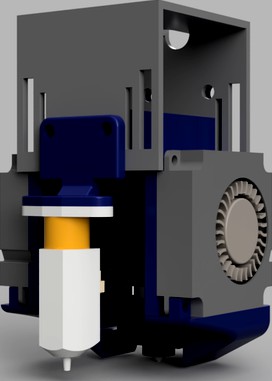
I accidentally bought a Mellow NF Crazy Plus, thinking it was just an improved NF Crazy. But it has a completely different mount, and it's longer! So the Mosquito and Clone mounts I was looking at wouldn't work. In addition, there are very few Prusa/Ender type mounts for the Sapphire, particularly ones that don't cause you to loose build area. So I made one!
Thanks to the excellent V6 design I remixed, I saved a lot of time starting from scratch. Unfortunately, I did have to make EXTREME modifications! While in theory the groove mount could be used for this hotend, one of the selling points is one-handed nozzle changes, so I wanted to secure the hotend better. Also, since it's longer, I needed to move it higher, which also meant moving it slightly forward so it could fit under the existing metal bracket. In the end, you gain a couple of millimeters of build space over the stock hotend! And no change in X/Y. Also you save 45 grams in weight!
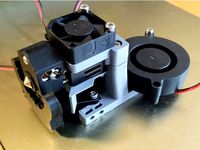
No additional hardware needed! There are slots for nuts for the heatsink mounting if you decide to use longer screws than come with the NF Crazy Plus, but they're not necessary, and I'm not using them. All 3 stock fans are used, including the 30mm hotend fan. Make sure to turn it around! The stock configuration has the fan blowing away from the hotend; you want it blowing toward the hotend! I also recommend reversing the heatsink as I have pictured so the heater and thermister attach behind the mount instead of underneath. If you want to just use the groove mounts and not screw it together, you may want to use the "tight tolerance" version.
I am using the 3D Touch and mount that was shipped with my printer, which not all have. The screws are long and work to secure the mount from the front as well as the 3D Touch. You may need to procure screws if you do not have this mount. I modified the printable BLTouch mount, however I have NOT tested it! Fusion 360 and STEP files are included if you need to make modifications.
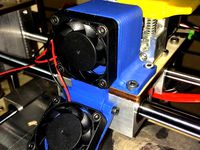
I've included larger fan ducts that are easier to print. I had to print those initially, until I installed the new hotend, then was able to reprint the normal sized ducts which give better visibility and save a few grams of weight.
I modified the fan duct openings from the original design to be more wide and cover more area in front of and behind the nozzle. I also did CFD analysis on the adjustments and results look good. In practice, so far, I'm getting far better bridging than I ever got before.
Thanks to the excellent V6 design I remixed, I saved a lot of time starting from scratch. Unfortunately, I did have to make EXTREME modifications! While in theory the groove mount could be used for this hotend, one of the selling points is one-handed nozzle changes, so I wanted to secure the hotend better. Also, since it's longer, I needed to move it higher, which also meant moving it slightly forward so it could fit under the existing metal bracket. In the end, you gain a couple of millimeters of build space over the stock hotend! And no change in X/Y. Also you save 45 grams in weight!
No additional hardware needed! There are slots for nuts for the heatsink mounting if you decide to use longer screws than come with the NF Crazy Plus, but they're not necessary, and I'm not using them. All 3 stock fans are used, including the 30mm hotend fan. Make sure to turn it around! The stock configuration has the fan blowing away from the hotend; you want it blowing toward the hotend! I also recommend reversing the heatsink as I have pictured so the heater and thermister attach behind the mount instead of underneath. If you want to just use the groove mounts and not screw it together, you may want to use the "tight tolerance" version.
I am using the 3D Touch and mount that was shipped with my printer, which not all have. The screws are long and work to secure the mount from the front as well as the 3D Touch. You may need to procure screws if you do not have this mount. I modified the printable BLTouch mount, however I have NOT tested it! Fusion 360 and STEP files are included if you need to make modifications.
I've included larger fan ducts that are easier to print. I had to print those initially, until I installed the new hotend, then was able to reprint the normal sized ducts which give better visibility and save a few grams of weight.
I modified the fan duct openings from the original design to be more wide and cover more area in front of and behind the nozzle. I also did CFD analysis on the adjustments and results look good. In practice, so far, I'm getting far better bridging than I ever got before.
Similar models
thingiverse
free

Artillery Sidewinder X1 Stepper Cooler Stock Fan Duct for 80x80x20 and x25 fans by Tronicpixel
...talled, screw the screws into the duct once. makes it easier to install it..
reupload because of wrong stl
stock fan 80x80x20 24v
thingiverse
free

Tevo Tornado Coldend / Hotend Fan Holder Remix by PaX_78
...on the lower end of the hotend fan holder, similar to the original design, that screws inbetween the hotend...
thingiverse
free

60mm fan mount for a gregs wade extruder. by Luke02
...e screws that hold your hotend to secure it.
dont hesitate to leave a comment if you need longer or shorter arms for the duct.
grabcad
free

NF-Crazy Plus Hotend
...r creality cr-10/ender 3d printer stock hotends, but its dimensions are notably wider. this version has the high-flow heat break.
thingiverse
free
Printrbot Plus 1404 Extruder Fan Mount by FooFighter94
...e extruder. this design is especially useful if you are running a hotend which is shorter than the stock ubis (i have an e3d v6).
thingiverse
free

mosquito fan shroud by jalusk
...illet hotend mount from https://www.preciseprinterparts.com/product-page/mosquito-dragon-hotend-mount-for-mrk8-mrk10-type-hotends
thingiverse
free
BIQU B1 easy V6 mount by Empse
...threaded v6 heatsink, i cannot guarantee compatibility with other similar parts. i recommend buying the heatsink and a v6...
thingiverse
free

V5 Hotend Clamp with 40mm Fan mount for FLSUN i3 c 2017 by Wursterland
...h extra mounting holes for the stock fan,
fan shroud and cooler duct.
the low profile heatsink shroud is missing in the pictures.
thingiverse
free
Nf-crazy (Mosquito clone) hotend adapter for HyperCube 25mm/30mm fan
... fan duct nuts:https://www.thingiverse.com/thing:4129240
p.i.n.d.a. mount for hypercube:https://www.thingiverse.com/thing:4129417
thingiverse
free

Anet ET4 Stock Duct Phaetus Dragonfly by Zachary101078
...
if you want to install the phaetus dragonfly hotend, you need a bit different fan duct. for that reason, i have created this one
Olevelo
thingiverse
free

3DR Solo Gimbal Adapter by olevelo
...ttp://www.thingiverse.com/thing:2024247) will also be needed to properly balance the camera and reduce wear on the gimbal motors.
thingiverse
free

Cobra HISS Larger Wheels by olevelo
...cale.
original hiss model: https://www.thingiverse.com/thing:4297470
flexible treads: https://www.thingiverse.com/thing:4517670
thingiverse
free

3DR Solo Gimbal Balance by olevelo
...ct. my printer didn't print the holes perfectly, which is why one of the weights in the photos is crooked, but it is secure.
thingiverse
free

PiTFT50 Easy Stand Compact Case by olevelo
... stability.
fusion 360 source included for modifications. thanks to j741 for including the source for his that this is based on!
Nf
cg_studio
$15

Nexx NF 8103d model
...nexx nf 8103d model
cgstudio
.max - nexx nf 810 3d model, royalty free license available, instant download after purchase.
3ddd
$2
Cenrury furniture nf wd4
...rury furniture
2000 полигонов. сайтhttp://www.centuryfurniture.com/gallery/showitem.aspx?sku=nf-wd4§ion;=office
3d_export
$5

fordgt nikki nfs carbon
...fordgt nikki nfs carbon
3dexport
3d_export
$99

Hyundai Sonata NF 2008 3D Model
... cvvt-i transform embera sonica 2008 2009 2010 4-door sedan saloon south
hyundai sonata nf 2008 3d model humster3d 99390 3dexport
humster3d
$75

3D model of Hyundai Sonata (NF) 2008
...led 3d model of hyundai sonata (nf) 2008 in various file formats. all our 3d models were created maximally close to the original.
cg_studio
$99

Hyundai Sonata (NF) 20083d model
...obj .mb .lwo .fbx .c4d .3ds - hyundai sonata (nf) 2008 3d model, royalty free license available, instant download after purchase.
3d_ocean
$89

Hyundai Sonata (NF) 2008
...y, in real units of measurement, qualitatively and maximally close to the original. model formats: - *.max (3ds max 2008 scanl...
3ddd
$1
W.Schillig Gooja
...w.schillig gooja 3ddd w.schillig , gooja w.schillig gooja nf 85 200x114x72x46...
3ddd
free

Стул (пень)
...стул (пень) 3ddd ehtn?ciat , nf стул (пенёк) фабрики ciat...
3ddd
$1
NF_Nigretti_Fumagalli
..._nigretti_fumagalli
3ddd
fumagalli , nigretti
nf nigretti & fumagalli 3ds max 8 vray
Crazy
3ddd
$1

Crazy Bunny
...crazy bunny
3ddd
кролик
crazy bunny
3d_export
$12

crazy fly
...crazy fly
3dexport
a shiny and amazing crazy fly.
3d_ocean
$12

Crazy Golf
...ni sports stroke
this set contains the basics for a crazy mini golf park. 6 different holes/strokes 6 different obstacles a flag
turbosquid
$12

Crazy House
...osquid
royalty free 3d model crazy house for download as 3ds on turbosquid: 3d models for games, architecture, videos. (1639894)
turbosquid
$2

Crazy Dave
...bosquid
royalty free 3d model crazy dave for download as fbx on turbosquid: 3d models for games, architecture, videos. (1178843)
turbosquid
$29

Crazy Bee
...ree 3d model crazy bee for download as max, obj, fbx, and dae on turbosquid: 3d models for games, architecture, videos. (1297202)
turbosquid
$63
Crazy Dog
... available on turbo squid, the world's leading provider of digital 3d models for visualization, films, television, and games.
turbosquid
$20
Crazy Cube
... available on turbo squid, the world's leading provider of digital 3d models for visualization, films, television, and games.
turbosquid
$15

Crazy orange
... available on turbo squid, the world's leading provider of digital 3d models for visualization, films, television, and games.
turbosquid
$1

Crazy tallboy
... available on turbo squid, the world's leading provider of digital 3d models for visualization, films, television, and games.
Sapphire
turbosquid
$30

Sapphire
...alty free 3d model sapphire for download as obj, fbx, and dae on turbosquid: 3d models for games, architecture, videos. (1304434)
turbosquid
$9

Sapphire
... available on turbo squid, the world's leading provider of digital 3d models for visualization, films, television, and games.
3d_export
free

sapphire pro
...sapphire pro
3dexport
sapphire pro 3d printer head mask
turbosquid
$35

Sapphire ring
...quid
royalty free 3d model sapphire ring for download as 3dm on turbosquid: 3d models for games, architecture, videos. (1320838)
turbosquid
$22

Ring with sapphires
...royalty free 3d model ring with sapphires for download as 3dm on turbosquid: 3d models for games, architecture, videos. (1375607)
turbosquid
$20

sapphire ring
...quid
royalty free 3d model sapphire ring for download as 3dm on turbosquid: 3d models for games, architecture, videos. (1306560)
turbosquid
$3

Zora Sapphire
... free 3d model zora sapphire for download as ma, fbx, and obj on turbosquid: 3d models for games, architecture, videos. (1613795)
turbosquid
$50

sapphire ring
... available on turbo squid, the world's leading provider of digital 3d models for visualization, films, television, and games.
turbosquid
$20

Sapphire ring
... available on turbo squid, the world's leading provider of digital 3d models for visualization, films, television, and games.
turbosquid
$8

Sapphire Lode
... available on turbo squid, the world's leading provider of digital 3d models for visualization, films, television, and games.
Plus
turbosquid
$2
plus-plus puzzle and lego
...d model plus-plus puzzle and lego for download as stl and obj on turbosquid: 3d models for games, architecture, videos. (1662633)
3ddd
$1
Стенка Plus
...стенка plus
3ddd
plus , модная мебель
фабрика "модная мебель", модель plus
3ddd
$1
Спальня METIS plus
... hulsta , metis , спальня
спальня metis plus
design_connected
$11
be plus B+
...be plus b+
designconnected
blå station be plus b+ chairs computer generated 3d model. designed by börge lindau.
design_connected
$11
Bank Plus
...bank plus
designconnected
röthlisberger kollektion bank plus coffee tables computer generated 3d model. designed by atelier oi.
3ddd
$1
elos Plus
... candela
elos plus — мультифункциональный аппарат для проведения лазерного и ipl лечений
3ddd
$1
Calligaris Even Plus
...calligaris even plus
3ddd
calligaris
calligaris_chair_even plus
design_connected
$29

Basket Plus
...nconnected
photo-realistic 3d models of the basket plus bed from bonaldo for 3d architectural and interior design presentations.
3ddd
free
Artpole Faktum Plus
... артполе , панель
artpole faktum plus
размеры:
высота 625мм
ширина 800мм
глубина 17мм
3ddd
$1

Мария / Jazz Plus
...мария / jazz plus
3ddd
мария
кухня фабрики мария модель__jazz plus
Mount
3d_export
free

mounting bracket
...mounting plate is the portion of a hinge that attaches to the wood. mounting plates can be used indoors, cabinetry and furniture.
turbosquid
$2

MOUNTING
... available on turbo squid, the world's leading provider of digital 3d models for visualization, films, television, and games.
turbosquid
free

Mounts
... available on turbo squid, the world's leading provider of digital 3d models for visualization, films, television, and games.
turbosquid
free

Mount Fuji
...fuji
turbosquid
free 3d model mount fuji for download as obj on turbosquid: 3d models for games, architecture, videos. (1579977)
3d_export
$5

Headphone mount LR
...headphone mount lr
3dexport
headphone mount l+r
turbosquid
$39

Mount rainier
...quid
royalty free 3d model mount rainier for download as fbx on turbosquid: 3d models for games, architecture, videos. (1492586)
turbosquid
$5

pipe mounting
...quid
royalty free 3d model pipe mounting for download as obj on turbosquid: 3d models for games, architecture, videos. (1293744)
turbosquid
$3

Mounting Tires
...uid
royalty free 3d model mounting tires for download as fbx on turbosquid: 3d models for games, architecture, videos. (1708511)
3d_export
$5

Magnetic GoPro Mount
...pro mount
3dexport
cool magnetic mount for gopro. allows you to mount the camera on flat metal surfaces and get exclusive shots.
turbosquid
$5

Stone Mount
...ty free 3d model stone mount for download as ma, obj, and fbx on turbosquid: 3d models for games, architecture, videos. (1370306)