Thingiverse
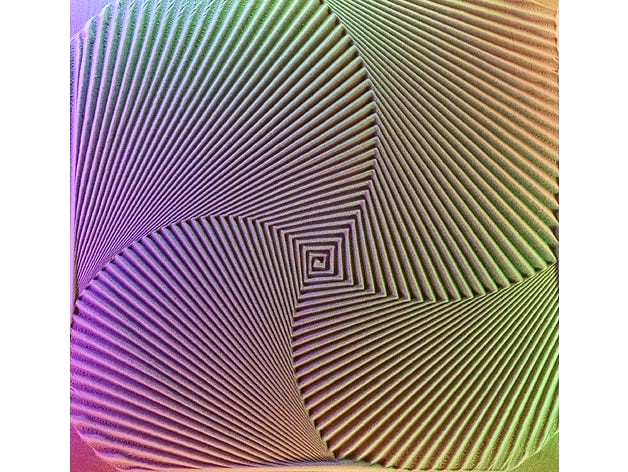
SandBot by quasithinking
by Thingiverse
Last crawled date: 3 years ago
——
Update 19.5.2019
Don’t build this right now, I have a version coming based on Openbuild Rails that is more robust, quieter, faster and about the same price, maybe slightly more.
This design was not as robust as I hoped in the long term, the Igus Bearing have to much friction and the ball bearings are too loud for me.
I made some very promising test‘s with the new design today and hope to upload the design within the next few weeks.
—-—
Inspired by the awesome Sisyphus Table by Bruce Shapiro (http://www.sisyphus-industries.com) and Allted's ZenXY (https://www.thingiverse.com/thing:2477901).
Video of some early version on YouTube: https://youtu.be/HYPNrCDei-Y
I built the ZenXY, but it turned out difficult and rather expensive (well, more expensive then the 8mm rods) to find those 23.5mm Alu Tubes here in Switzerland. I wanted a design that would be quieter and get me more axis range within the limited space of an Ikea Lack table. Everything can be ordered in, including the table :-)
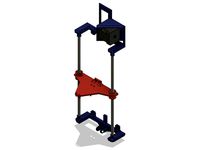
So here my own attempt based upon 8mm rods with the following design goals:
uses low cost 8mm x 500mm rods.
optimized for maximum working area (420mmx420mm)
as quiet as possible (Igus Bearings and Trinamic drivers)
only three screw types (Motors: M3x8mm (8x), Idlers: M3x20mm(8x) and wood screws 3mm Dia x 10mm(12x))
no belt twisting, rubbing or crossing (two level belt routing)
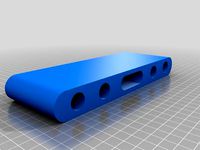
nice belt mounts on carriage with no short radius to damage them
BOM:
4x 8mm rod 500mm long (https://www.banggood.com/Outer-Diameter-8mm-x-300380400500mm-Cylinder-Liner-Rail-Linear-Shaft-Optical-Axis-p-993100.html) (around $5 each), the cheap chinese one I got were straight and hardended, but the cut's were awful. Be prepared to do some grinding first, so you don't damage the bearings when pushing them on.
7 IGUS RJ4JP-01-08 polymer bearings (around $1.20 each)
3.5m GT2 Belt (about $4)
8 x GT2 16T idler wheel with bearing, 3mm bore (around $1.20 each)
2x GT2 16T 5mm bore pulley for stepper motors (around $1.50 each)
2x NEMA 17 stepper motor, you don't need the stronge ones, .32NM is fine (around $9)
optional: 2x Trinamics 2208 or 2130 stepper drivers (around $10 each), you can get "louder" stepper drivers for much less.
Ikea Lack table, 55cmx55cm (around $10)
2m WS2812B LED strip (optional, around $6 per meter)
1x RAMPS1.4 and ArduinoMEGA (around $20)
1x 12mm diameter, 10mm high magnet, N45 (around $1.50)
1 Steel ball 5-30mm diameter, I currently use 12mm. Different size, different effect (1.50 to $7)
optional: silicon ruber mat at least 430 x 430mm
TBD: 2x end switchs (https://eu.banggood.com/Wholesale-Warehouse-10Pcs-Micro-Limit-Switch-Roller-Lever-5A-125V-Open-Close-Switch-wp-Eu-945733.html) (about $0.50 each)
Total: around $100
It's designed to go under a Ikea Lack table, just cut out a top section of ~440mmx440mm and remove the cardboard(!) inside. There is some epoxy that holds down the honeycomb cardboard pattern. A little sanding will go a long way to get a smooth surface (an electrical one comes handy). For added effect, mount WS2812B light strips with double sided tape inside the table
Firmware will be up soon (Marlin with some WS2812 Modifications, so LED's are individually adressable over G-Code), but standard marlin with corexy config works. I haven't added the end switches yet, I will probably go ahead without them and use the sensorless homing of the trinamics drivers. If there is enough interest, I'll do a revision for mechanical end switches.
Tips:
Sand: The baking powder recommended by Allted didn't work too well for me. It tended to "break" instead of flow and clumped up with time. I used very fine sand (.1mm grains) from an art supply store. It flows very nicely. There seems to be sand with "rounded" grains or "edgy" grains. Make sure you get sand with round grains, like beach sand, but it needs to be very fine for best effect.
Dust: the fines pieces of dust or dirt show up in the sand pattern, so keep it clean and best cover it with some plexy glas. Nice side effect: makes your sand table into a real table again.
Noise: use a silicon mat 1-2mm thick under the steel ball (shore hardness around 40-50, think pencil eraser), it will be a lot quieter and the ball will move smooth instead of all jerky
play with speed. There seems to be an optimum for the nicest plotting with acceptable noise.
Noise the 2nd; It's worthwile to go for the trinamics TMC2208 or TMC2130 driver. It makes a huge difference in noise. I modified a RAMPS 1.4 Board for 24V. It doesn't make much difference in noise though... Just set the current to the minimum that works and the driver's will have enough overhead with 12V and you can use an old PC powersupply (12V for the motors, 5V for the LED stripe)
a display isn't striclty necessary, but helps a lot when tuning speed and such.
Patterns: Sandify (https://jeffeb3.github.io/sandify/) is a nice start
Please let me know if you have any issues building it, or if you need more instructions... I hope the pic's give you enough hints. Print time is less than 17h for everything. You need one of each, and 4 of the belt plugs. Two of the rods (where the carriage with the magnet sits on) will need to be ground down to about 485mm length. http://corexy.com/theory.html will give you some guidance on how to route the belts, the belts always stay on the same level, no crossing. Remove the legs and just screw some wood plate to the sides, otherwise working space suffers (you loose 90mm on each dimension, and need to grind/cut the other rods as well)
Please share your patterns :-)
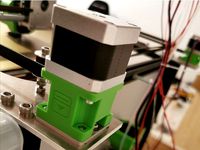
Update 21.5.2018. The clearance between idler and printed part was not great on the Motor L+R parts. I uploaded a new version to fix that. If you already printed the old part's, just use some M3 spacer's between motor and bracket.
My first prototype is up and running. It would be nice to get some pattern sharing going, I'll upload a few soon. If I find some time, I'll do some work on marlin, to get something akin of a playlist going, and switching on different light modes over the menu. A Raspberry Pi is also waiting to add WiFi :-) Also, getting a clock mode would be cool... so many ideas, so little time....
currently working on the enclosure, power supply mounting, creating patterns... updates coming.
Update 19.5.2019
Don’t build this right now, I have a version coming based on Openbuild Rails that is more robust, quieter, faster and about the same price, maybe slightly more.
This design was not as robust as I hoped in the long term, the Igus Bearing have to much friction and the ball bearings are too loud for me.
I made some very promising test‘s with the new design today and hope to upload the design within the next few weeks.
—-—
Inspired by the awesome Sisyphus Table by Bruce Shapiro (http://www.sisyphus-industries.com) and Allted's ZenXY (https://www.thingiverse.com/thing:2477901).
Video of some early version on YouTube: https://youtu.be/HYPNrCDei-Y
I built the ZenXY, but it turned out difficult and rather expensive (well, more expensive then the 8mm rods) to find those 23.5mm Alu Tubes here in Switzerland. I wanted a design that would be quieter and get me more axis range within the limited space of an Ikea Lack table. Everything can be ordered in, including the table :-)
So here my own attempt based upon 8mm rods with the following design goals:
uses low cost 8mm x 500mm rods.
optimized for maximum working area (420mmx420mm)
as quiet as possible (Igus Bearings and Trinamic drivers)
only three screw types (Motors: M3x8mm (8x), Idlers: M3x20mm(8x) and wood screws 3mm Dia x 10mm(12x))
no belt twisting, rubbing or crossing (two level belt routing)
nice belt mounts on carriage with no short radius to damage them
BOM:
4x 8mm rod 500mm long (https://www.banggood.com/Outer-Diameter-8mm-x-300380400500mm-Cylinder-Liner-Rail-Linear-Shaft-Optical-Axis-p-993100.html) (around $5 each), the cheap chinese one I got were straight and hardended, but the cut's were awful. Be prepared to do some grinding first, so you don't damage the bearings when pushing them on.
7 IGUS RJ4JP-01-08 polymer bearings (around $1.20 each)
3.5m GT2 Belt (about $4)
8 x GT2 16T idler wheel with bearing, 3mm bore (around $1.20 each)
2x GT2 16T 5mm bore pulley for stepper motors (around $1.50 each)
2x NEMA 17 stepper motor, you don't need the stronge ones, .32NM is fine (around $9)
optional: 2x Trinamics 2208 or 2130 stepper drivers (around $10 each), you can get "louder" stepper drivers for much less.
Ikea Lack table, 55cmx55cm (around $10)
2m WS2812B LED strip (optional, around $6 per meter)
1x RAMPS1.4 and ArduinoMEGA (around $20)
1x 12mm diameter, 10mm high magnet, N45 (around $1.50)
1 Steel ball 5-30mm diameter, I currently use 12mm. Different size, different effect (1.50 to $7)
optional: silicon ruber mat at least 430 x 430mm
TBD: 2x end switchs (https://eu.banggood.com/Wholesale-Warehouse-10Pcs-Micro-Limit-Switch-Roller-Lever-5A-125V-Open-Close-Switch-wp-Eu-945733.html) (about $0.50 each)
Total: around $100
It's designed to go under a Ikea Lack table, just cut out a top section of ~440mmx440mm and remove the cardboard(!) inside. There is some epoxy that holds down the honeycomb cardboard pattern. A little sanding will go a long way to get a smooth surface (an electrical one comes handy). For added effect, mount WS2812B light strips with double sided tape inside the table
Firmware will be up soon (Marlin with some WS2812 Modifications, so LED's are individually adressable over G-Code), but standard marlin with corexy config works. I haven't added the end switches yet, I will probably go ahead without them and use the sensorless homing of the trinamics drivers. If there is enough interest, I'll do a revision for mechanical end switches.
Tips:
Sand: The baking powder recommended by Allted didn't work too well for me. It tended to "break" instead of flow and clumped up with time. I used very fine sand (.1mm grains) from an art supply store. It flows very nicely. There seems to be sand with "rounded" grains or "edgy" grains. Make sure you get sand with round grains, like beach sand, but it needs to be very fine for best effect.
Dust: the fines pieces of dust or dirt show up in the sand pattern, so keep it clean and best cover it with some plexy glas. Nice side effect: makes your sand table into a real table again.
Noise: use a silicon mat 1-2mm thick under the steel ball (shore hardness around 40-50, think pencil eraser), it will be a lot quieter and the ball will move smooth instead of all jerky
play with speed. There seems to be an optimum for the nicest plotting with acceptable noise.
Noise the 2nd; It's worthwile to go for the trinamics TMC2208 or TMC2130 driver. It makes a huge difference in noise. I modified a RAMPS 1.4 Board for 24V. It doesn't make much difference in noise though... Just set the current to the minimum that works and the driver's will have enough overhead with 12V and you can use an old PC powersupply (12V for the motors, 5V for the LED stripe)
a display isn't striclty necessary, but helps a lot when tuning speed and such.
Patterns: Sandify (https://jeffeb3.github.io/sandify/) is a nice start
Please let me know if you have any issues building it, or if you need more instructions... I hope the pic's give you enough hints. Print time is less than 17h for everything. You need one of each, and 4 of the belt plugs. Two of the rods (where the carriage with the magnet sits on) will need to be ground down to about 485mm length. http://corexy.com/theory.html will give you some guidance on how to route the belts, the belts always stay on the same level, no crossing. Remove the legs and just screw some wood plate to the sides, otherwise working space suffers (you loose 90mm on each dimension, and need to grind/cut the other rods as well)
Please share your patterns :-)
Update 21.5.2018. The clearance between idler and printed part was not great on the Motor L+R parts. I uploaded a new version to fix that. If you already printed the old part's, just use some M3 spacer's between motor and bracket.
My first prototype is up and running. It would be nice to get some pattern sharing going, I'll upload a few soon. If I find some time, I'll do some work on marlin, to get something akin of a playlist going, and switching on different light modes over the menu. A Raspberry Pi is also waiting to add WiFi :-) Also, getting a clock mode would be cool... so many ideas, so little time....
currently working on the enclosure, power supply mounting, creating patterns... updates coming.
Similar models
thingiverse
free

2D Delta Drawbot by pittance
...arts' excellent pulley library, the arm pulleys are modified from the library so i've marked this whole thing as a remix.
thingiverse
free
Belt-Driven NEMA 17 Linear Motion System
...scad file modified to fit up to 5.5" objects, while being driven by a standard cheap servo motor. original thingiverse link
thingiverse
free
Sanding block for a 3"x18" belt sandpaper by acelerson
..., and everyone wants one. maybe some of you do too.
the belt fits pretty tight so i sanded the sides and it works extremely well.
thingiverse
free

Nema 17 stepper motor Belt tensioner by Flytech81
...that mounts to a nema 17 stepper motor using m3 screws. for the tensing hardware i used two 8mm bearings with a 1/4-20 inch bolt.
thingiverse
free

Centering Dummy bearing for Universal Filament Spool Holder by racer_asl
...too loose on a 8mm threaded rod.
this is also much quieter than a metal bearing on a metal threaded rod, so use it as a silencer.
thingiverse
free
Noise Reducing Stepper Motor Mount WITHOUT Belt Tensioner by SwissDarky
...ter now.
you'll need 16 of m3x10-screws and 8 of m3 nuts to mount it together. i also used some washers on the upper screws.
thingiverse
free

Microscope Support from cheap drill press with electronic adjustment. by IeC
...30cm threaded rod
-1x d8mm flange bearing
-1x 8mm nema17 coupling
-1x nema17 mottor
-1x stepper motor driver
-1x arduino mini pro
thingiverse
free

Motor and pulley for belt inside 3030 extrusion.
...y to print, no supports needed.
2 halves make a whole.
the pictures should also give a clear idea on how to install the thingy :)
thingiverse
free

Any Size Core XY Table by MaJaDev
...d of course a microcontroller and motor drivers.
you could of course just hand turn it and remember the fun of an etcha-sketcher.
thingiverse
free

Tronxy x5sa-400 3-Z Upgrade Including Stepper Mount and Leadscrew Adapters **V2** by clearchris
...ll need longer ones, possibly 4mx16 or 4mx20.
freecad design files included.
original: https://www.thingiverse.com/thing:4523395
Sandbot
thingiverse
free
Sandbot parts by animoose
...sandbot parts by animoose
thingiverse
variant parts for rob dobson's sandbot
thingiverse
free

Lego Candle Mold Pattern by sandbot
...lego-like building block candles that can be stacked on each other. this pattern creates a two part mold for casting wax candles.