Thingiverse
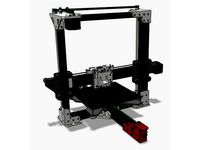
RyBot (my D-Bot) by rkrammes
by Thingiverse
Last crawled date: 3 years, 1 month ago
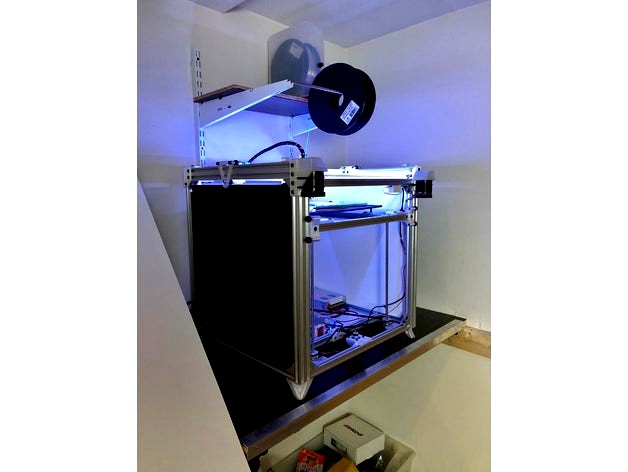
First, I want to say this is just meant to be a reference to my particular build based off of the D-Bot design. I have a few parts I designed and people may be curious as to the choices others have made to upgrade their printer. It is not instructions on how to build it or my attempt to present a new “better” version of the D-Bot. I don’t know if my parts will work on your printer but just incase they might help someone I wanted to make them available and give credit to the designers who helped me through this build.
Anyway, I started by figuring out my own cut list.I was planning to use a 300mm x 300mm heated bed so I wanted to be able to cover that. Looking over the D-Bot 300mm x 300mm cut list and taking into consideration that 2 x 500mm extrusions from Open Builds was the same price as 1 x 1000mm I figured I could go a little longer on the X/Y and a little shorter on the Z So, I decided I would let them do some of my cuts and left the X/Y/Z at 500mm. The image of a cut list is just an example I made. I didn’t actually write down the cuts as I was building my bot.
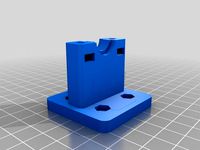
Then I started scouring Thingiverse for upgrades and builds. I decided I wanted to use a Titan Aero and I already had the Titan and V.6 so I just needed the upgrade kit. I decided I was going to support the bed on all 4 corners and use a 3 lead screw design for the Z axis. I didn’t want the Z to be over constrained so I found some Oldhams for the bed to ride on. Now it’s a lot more stable so I could take the bed frame down to 2020 and gain back that 20mm of Z. I found a low profile stepper mount and designed the spacer to align the guide bearings with the Oldhams. I also designed the middle idler bracket on the Z that can be adjusted by moving the cross bar. I bought a 1524mm continuous belt and still kept everything well under the clearance needed for the Z guides to bottom out on the frame. I used 40 tooth pulleys on the lead screws and a 20 tooth pulley on the stepper for a 2:1 ratio.
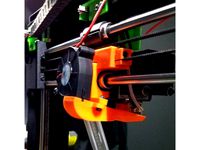
Up top I printed the stepper brackets with zip tie supports, the stepper covers, the angled LED bracket, the original rear idler brackets, the Re-D-Bot Y brackets, and of course the Re-X-Carriage for the Titan Aero. On the Re-X-Carriage I snipped out a corner of the front cover to give more clearance for the heater cartridge and thermistor wires.
On the bed I designed the bracket for the glass to fit with the heated bed and cork. I found some bed spring brackets for 2020, the Oldhams and the 3 wheeled guides for 2020. To accomodate a piezo sensor for the Z probe I removed the leveling springs and went to a steal bed support plate.
For the electronics, I am running a Duet Wifi with the 10A 24V power supply on the left and the 12V buck converter in front to power 12V fans through the Duet. The 20A 24V power supply on the right is running through an external MOSFET to power the Keenovo 24V bed heater. I designed stand-offs for the Duet and MOSFET that gave 10mm clearance and allowed for a cover. I attached a 40mm fan to blow over and under the drivers on the Duet. From the X carriage, I extended the Mini Differential IR Height Precision Piezo Sensor, the fans, and thermistor with some CAT5 and alarm wire. I extended the heater cartridge with wire I clipped from an older heater cartridge. I also extended the stepper wires with alarm wire. I chose to use the sensorless homing feature of the Duet Wifi for X/Y end stops. I also designed some physical “end stops” to control the collision with the carriage.
I found some feet I printed a part of and scaled down on the Z to leave the right amount of space for my Z stepper. Everything was printed with Inland brand "natural" PETG. The electronics and the bed support are cut from finished hardboard and the side walls are foam core.
Thanks to all the original designers!
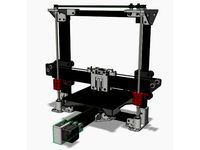
D-Bot https://www.thingiverse.com/thing:1001065
3 wheeled 2020 Z guide https://www.thingiverse.com/thing:2357801
3 wheeled Y guide https://www.thingiverse.com/thing:1930200
Titan Aero X carriage https://www.thingiverse.com/thing:2590868
Oldham lead screw mounts https://www.thingiverse.com/thing:2449886
Z stepper mount https://www.thingiverse.com/thing:2676531
X/Y stepper mounts w/zip ties https://www.thingiverse.com/thing:2369292
Motor covers https://www.thingiverse.com/thing:2254713
Feet https://www.thingiverse.com/thing:1126329
Bed spring mounts https://www.thingiverse.com/thing:2471033
LED bracket https://www.thingiverse.com/thing:2284126
As an example of print quality, I attached pictures of Baby Groot (my fourth print on this machine). .15 layer height, 2/3 scale
*Update: I added a belt tensioner and a version with looser tolerances that will accommodate belts with a twist in them too keep the toothed side of the belt from causing artifacts by riding on the smooth idlers. Also, a graphic showing how I twisted them.
*Update: Added Re-X-Carriage Adjustable Mount for Mini Differential IR Height Sensor and the sensor carriage. Will need an M3 x 20 bolt, M3 nut, and a spring. These and the belt tensioners can also be found under remixes for the Re-X-Carriage.
*Update 4/27: I have added a wiring harness support that I designed and a remix of the wires mount for the Re-X Carriage that is stronger. I also added remixes to fit a 27mm drilled piezo and the Universal PCB v2.x. The IR height sensor was not performing well with Printbite+ and piezos are just so cool.
Anyway, I started by figuring out my own cut list.I was planning to use a 300mm x 300mm heated bed so I wanted to be able to cover that. Looking over the D-Bot 300mm x 300mm cut list and taking into consideration that 2 x 500mm extrusions from Open Builds was the same price as 1 x 1000mm I figured I could go a little longer on the X/Y and a little shorter on the Z So, I decided I would let them do some of my cuts and left the X/Y/Z at 500mm. The image of a cut list is just an example I made. I didn’t actually write down the cuts as I was building my bot.
Then I started scouring Thingiverse for upgrades and builds. I decided I wanted to use a Titan Aero and I already had the Titan and V.6 so I just needed the upgrade kit. I decided I was going to support the bed on all 4 corners and use a 3 lead screw design for the Z axis. I didn’t want the Z to be over constrained so I found some Oldhams for the bed to ride on. Now it’s a lot more stable so I could take the bed frame down to 2020 and gain back that 20mm of Z. I found a low profile stepper mount and designed the spacer to align the guide bearings with the Oldhams. I also designed the middle idler bracket on the Z that can be adjusted by moving the cross bar. I bought a 1524mm continuous belt and still kept everything well under the clearance needed for the Z guides to bottom out on the frame. I used 40 tooth pulleys on the lead screws and a 20 tooth pulley on the stepper for a 2:1 ratio.
Up top I printed the stepper brackets with zip tie supports, the stepper covers, the angled LED bracket, the original rear idler brackets, the Re-D-Bot Y brackets, and of course the Re-X-Carriage for the Titan Aero. On the Re-X-Carriage I snipped out a corner of the front cover to give more clearance for the heater cartridge and thermistor wires.
On the bed I designed the bracket for the glass to fit with the heated bed and cork. I found some bed spring brackets for 2020, the Oldhams and the 3 wheeled guides for 2020. To accomodate a piezo sensor for the Z probe I removed the leveling springs and went to a steal bed support plate.
For the electronics, I am running a Duet Wifi with the 10A 24V power supply on the left and the 12V buck converter in front to power 12V fans through the Duet. The 20A 24V power supply on the right is running through an external MOSFET to power the Keenovo 24V bed heater. I designed stand-offs for the Duet and MOSFET that gave 10mm clearance and allowed for a cover. I attached a 40mm fan to blow over and under the drivers on the Duet. From the X carriage, I extended the Mini Differential IR Height Precision Piezo Sensor, the fans, and thermistor with some CAT5 and alarm wire. I extended the heater cartridge with wire I clipped from an older heater cartridge. I also extended the stepper wires with alarm wire. I chose to use the sensorless homing feature of the Duet Wifi for X/Y end stops. I also designed some physical “end stops” to control the collision with the carriage.
I found some feet I printed a part of and scaled down on the Z to leave the right amount of space for my Z stepper. Everything was printed with Inland brand "natural" PETG. The electronics and the bed support are cut from finished hardboard and the side walls are foam core.
Thanks to all the original designers!
D-Bot https://www.thingiverse.com/thing:1001065
3 wheeled 2020 Z guide https://www.thingiverse.com/thing:2357801
3 wheeled Y guide https://www.thingiverse.com/thing:1930200
Titan Aero X carriage https://www.thingiverse.com/thing:2590868
Oldham lead screw mounts https://www.thingiverse.com/thing:2449886
Z stepper mount https://www.thingiverse.com/thing:2676531
X/Y stepper mounts w/zip ties https://www.thingiverse.com/thing:2369292
Motor covers https://www.thingiverse.com/thing:2254713
Feet https://www.thingiverse.com/thing:1126329
Bed spring mounts https://www.thingiverse.com/thing:2471033
LED bracket https://www.thingiverse.com/thing:2284126
As an example of print quality, I attached pictures of Baby Groot (my fourth print on this machine). .15 layer height, 2/3 scale
*Update: I added a belt tensioner and a version with looser tolerances that will accommodate belts with a twist in them too keep the toothed side of the belt from causing artifacts by riding on the smooth idlers. Also, a graphic showing how I twisted them.
*Update: Added Re-X-Carriage Adjustable Mount for Mini Differential IR Height Sensor and the sensor carriage. Will need an M3 x 20 bolt, M3 nut, and a spring. These and the belt tensioners can also be found under remixes for the Re-X-Carriage.
*Update 4/27: I have added a wiring harness support that I designed and a remix of the wires mount for the Re-X Carriage that is stronger. I also added remixes to fit a 27mm drilled piezo and the Universal PCB v2.x. The IR height sensor was not performing well with Printbite+ and piezos are just so cool.
Similar models
thingiverse
free

Modified R_Z_Top bracket & L_Z Top bracket - Dual Z by jimwooly
...l 'z' drive steppers together with the bottom brackets designed by elzariant - https://www.thingiverse.com/thing:2039503
thingiverse
free
Modified X Tensioner to fit with Thorped Mounting Bracket (Wanhao i3 v2.1) by GruntWork
.../thing:1820493
thorped mounting brackethttp://www.thingiverse.com/thing:1904493
fan duct:http://www.thingiverse.com/thing:1621937
thingiverse
free
Prusa i3 Bowden x carriage (x-carriage) e3d v6 by davidwyl
....thingiverse.com/thing:1326909
x-carriage ball bearing mount can be found here: www.thingiverse.com/thing:119616
(x-carriage.stl)
thingiverse
free

Piezo electric Auto bed leveling sensor installed on my Dual head nozzel
...//www.thingiverse.com/thing:2161827
link to my dual head design including direct drive: https://www.thingiverse.com/thing:3578669
thingiverse
free

18mm Inductive Sensor Rear Mount by The3dPress
...tical location of the sensor if you need to dis-assemble the x-carriage and do not want to lose fine-tuning of the z-stop height.
thingiverse
free
Oldham coupler for TEVO Tarantula by Elzariant
...) : http://www.thingiverse.com/_msa_/designs
bruce walker (bdwalker1) : http://www.thingiverse.com/bdwalker1/designs
doron shalev
thingiverse
free

Piezo Mount Under Bed by Suggy
... (https://www.thingiverse.com/thing:2446460)
design to fit the piezo's i had and fit flat under the bed and over the bed arms
thingiverse
free

TEVO Tarantula Oldham Couplar for 3-Wheel X Brackets by Katalikitci
...you will be able to use this oldham coupler with 3-wheel x brackets
3-wheel x brackets: https://www.thingiverse.com/thing:3068978
thingiverse
free
Belt tensioner for TEVO Tarantula by Elzariant
...) : http://www.thingiverse.com/_msa_/designs
bruce walker (bdwalker1) : http://www.thingiverse.com/bdwalker1/designs
doron shalev
thingiverse
free

Anet A8 SN05-N z-probe bracket by Bustenchops
... with the carriage.
the hole above the sensor fits a 3mm bolt which is useful in making small lowering adjustments to the sensor.
Rkrammes
thingiverse
free

Positive nipple for Microfusion Cell. by rkrammes
... the reference images i was looking at had this nipple that was missing from the original model. should just snap into the hole.
thingiverse
free

Stronger Wires Guide by rkrammes
...our top cover or print the one i included. the photo is of the version i made for a piezo but it shows the stronger wires guide.
thingiverse
free

Dampening Feet for 2020 Extruded Aluminum by rkrammes
...e design and the footprint of appjaws' anti vibration and noise feet stands for ormerod, but i wanted to attach them to 2020.
thingiverse
free

Wire Harness Support for 2040 and D-Bot by rkrammes
...ut is just as applicable to any printer with 2040 extruded aluminum. i suggest using supports similar to what is pictured above.
thingiverse
free
Wavy Football by rkrammes
...getting to turn off the parts cooling fan when i printed it but otherwise it's surprisingly solid for having just .4mm walls.
thingiverse
free

Easy print relaxed grip for the pipe revolver by 3dprintforhellofit by rkrammes
...t supports. they are in the original scale of his design which seems to be oversized. i found 75% scale to be a reasonable size.
thingiverse
free

Re-X Carriage Belt Tensioner for Twisted Belts by rkrammes
...e belts to come into the re-x carriage without a second twist. i also included one with larger tolerances if it's too tight.
thingiverse
free

Re-X Carriage Adjustable Mount for Mini Differential IR Height Sensor by rkrammes
...ll fit. the bolt should move freely in the hole at the top of the bracket but should be tight where it screws into the carriage.
thingiverse
free

Dampening Feet for 2020 Extruded Aluminum by rennwaffen
...two to print them individually. big thank you to rkrammes for the...
thingiverse
free

Re-D-Bot Fan Duct With DC42 IR Sensor Mount by Maxbo123
...maxbo123 thingiverse re-d-bot fan duct by nickrimmer configured with rkrammes rybot dc42 ir sensor mount. built for the e3dv6...
Bot
turbosquid
$19

Bot
... available on turbo squid, the world's leading provider of digital 3d models for visualization, films, television, and games.
turbosquid
free

Bot
... available on turbo squid, the world's leading provider of digital 3d models for visualization, films, television, and games.
3d_export
$10

scanner bot
...scanner bot
3dexport
cool scanner bot who scans for fixing things...
3d_ocean
$9

Apc Bot
...n bot games toys
an all-purpose-constructo-bot. for cartoon purposes. the model is not rigged. please use vray adv for rendering.
3d_export
$75
Bot 3D Model
...bot 3d model
3dexport
robot bot man kiborg character
bot 3d model evgen 19504 3dexport
turbosquid
free

Eye Bot
...eye bot
turbosquid
free 3d model eye bot for download as fbx on turbosquid: 3d models for games, architecture, videos. (1514059)
turbosquid
$29

Gorill-bot
...bosquid
royalty free 3d model gorill-bot for download as fbx on turbosquid: 3d models for games, architecture, videos. (1239456)
turbosquid
$25

Lamp Bot
...bosquid
royalty free 3d model lamp bot for download as blend on turbosquid: 3d models for games, architecture, videos. (1230121)
turbosquid
$10
Spectre Bot
...osquid
royalty free 3d model spectre bot for download as fbx on turbosquid: 3d models for games, architecture, videos. (1616378)
turbosquid
$8

Ultra Bot
...urbosquid
royalty free 3d model ultra bot for download as ma on turbosquid: 3d models for games, architecture, videos. (1330752)