Thingiverse
Rotary Encoder Mount for MAME Control Panel by PL1
by Thingiverse
Last crawled date: 4 years, 6 months ago
Originally posted on the Build Your Own Arcade Controls (BYOAC) forums.
http://forum.arcadecontrols.com/index.php/topic,165028.msg1740098.html#msg1740098
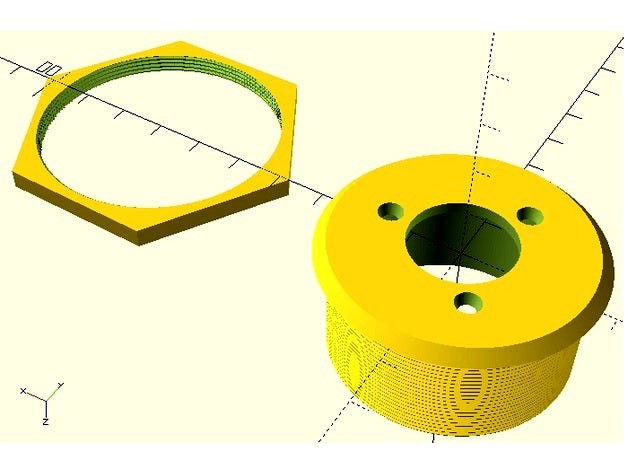
Here are two parametric rotary encoder mounts designed for use on a 3/4" (or thinner) control panel.
One has a chamfered edge.
One has a roundover edge.
The .STL files have been reoriented so they are ready-to-print.
You'll need to print the desired mount and nut.
The OpenSCAD files generate both a mount and a nut.
Flip the mount face down before printing it.
Separate the .STL into two separate objects so they can sit flat on the print surface.
Tools:
2" or 50mm hole saw
Screwdriver
Hardware:
M3-0.5 x 8mm screws (3 ea.)
OpenSCAD Software: (optional)http://www.openscad.org/
Printing instructions:
Print the mount face down. No supports needed.
Installation instructions:
Install the mount and nut, then the encoder and screws, then the knob.
Drill a 2"/50mm hole in your 3/4" thick (or less) control panel.
Fasten the mount to the panel using the nut.
Keep in mind that it is very easy to cross-thread.
Use the "turn the nut backward until you hear a click then turn it forward" trick to avoid cross-threading.
After that, insert the encoder into the mount, align with the correct (outermost) set of screw holes, and fasten the encoder to the mount using M3-0.5 x 8mm screws.
install the knob.
Play some Tempest or Arkanoid . . . just to be sure everything is working OK. :)
Customizing the mount in OpenSCAD:
Open the .scad file in OpenSCAD.
Make any desired changes to the variable values on lines 52-67.
If the threaded part is too tall and hits the cable, adjust "ThreadedRodHeight".
If you want countersunk screw holes, change "ScrewHoleTop".
There must be a ";" after the variable.
-- Think of it like the game "Simon Says". No ";" = not saying "Simon says" = don't do it.
"//" indicates a comment or disabled code.
Preview
(toolbar icon or F5)
If there is a syntax error like a missing ";", preview will crash and flag the next line of code
Render
(toolbar icon or F6)
Prepares the object for export.
Export as STL
(toolbar icon or File -- Export -- Export as STL . . .)
http://forum.arcadecontrols.com/index.php/topic,165028.msg1740098.html#msg1740098
Here are two parametric rotary encoder mounts designed for use on a 3/4" (or thinner) control panel.
One has a chamfered edge.
One has a roundover edge.
The .STL files have been reoriented so they are ready-to-print.
You'll need to print the desired mount and nut.
The OpenSCAD files generate both a mount and a nut.
Flip the mount face down before printing it.
Separate the .STL into two separate objects so they can sit flat on the print surface.
Tools:
2" or 50mm hole saw
Screwdriver
Hardware:
M3-0.5 x 8mm screws (3 ea.)
OpenSCAD Software: (optional)http://www.openscad.org/
Printing instructions:
Print the mount face down. No supports needed.
Installation instructions:
Install the mount and nut, then the encoder and screws, then the knob.
Drill a 2"/50mm hole in your 3/4" thick (or less) control panel.
Fasten the mount to the panel using the nut.
Keep in mind that it is very easy to cross-thread.
Use the "turn the nut backward until you hear a click then turn it forward" trick to avoid cross-threading.
After that, insert the encoder into the mount, align with the correct (outermost) set of screw holes, and fasten the encoder to the mount using M3-0.5 x 8mm screws.
install the knob.
Play some Tempest or Arkanoid . . . just to be sure everything is working OK. :)
Customizing the mount in OpenSCAD:
Open the .scad file in OpenSCAD.
Make any desired changes to the variable values on lines 52-67.
If the threaded part is too tall and hits the cable, adjust "ThreadedRodHeight".
If you want countersunk screw holes, change "ScrewHoleTop".
There must be a ";" after the variable.
-- Think of it like the game "Simon Says". No ";" = not saying "Simon says" = don't do it.
"//" indicates a comment or disabled code.
Preview
(toolbar icon or F5)
If there is a syntax error like a missing ";", preview will crash and flag the next line of code
Render
(toolbar icon or F6)
Prepares the object for export.
Export as STL
(toolbar icon or File -- Export -- Export as STL . . .)