Thingiverse
Rostock Max V2 Enclosure by paulhut
by Thingiverse
Last crawled date: 4 years, 7 months ago
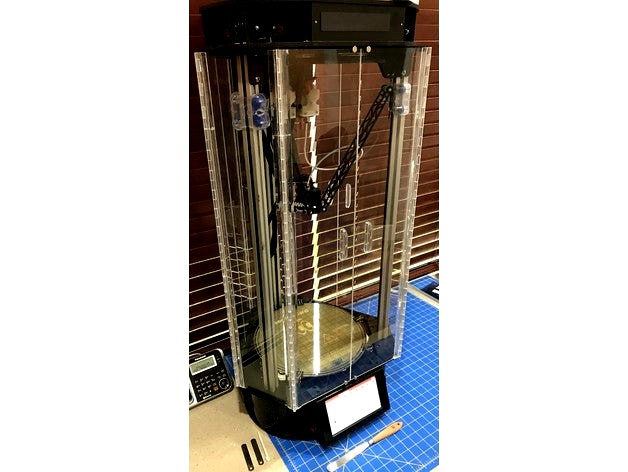
This is a full enclosure for the SeeMeCNC Rostock Max V2.
It has double doors on all three sides that swing open fully allowing easy access to the build area.
I designed this enclosure to create a heated chamber and to (hopefully) capture the noxious fumes from ABS printing. It was created using the CAD files for the printer that are available on the SeeMeCNC GitHub.
To make your own enclosure you will need:
3 bottom pieces, 3 top pieces, 6 middle pieces, and 6 spacers
Clear acrylic: There are 6 door pieces and 3 fixed pieces, 15 hinges, and 6 handles. I took measurements to a local plastics dealer and had them cut for me. They also sold the hinges, door handles, and glue.
Rare earth magnets: Size: 3/8" x 1/10" Qty: 24 I bought mine here. These are installed into the middle pieces through a hold in the bottom BEFORE installing on the printer.
18 screws and Tee nuts as well as a drill to make holes in the bottom and top of the printer to attach the printer parts. I took one of the screws from the bottom middle of the printer to the hardware store to ensure that they matched.
After the parts are printed you will need to install them. The bottom corner pieces as well as all 6 pieces on the top attach using the screws mentioned above. The 3 middle pieces on the bottom attach using the screws that are already in the printer. When drilling the holes make sure that they are in the right place. A few of the holes on my printer are a bit oversized now because I didn't get it right the first time.
Once the printed parts are mounted you can take measurements for the acrylic pieces and have them cut to size.
Now make 6 long hinges from the 15 short ones. There are longer hinges available that use a flexible strip of rubber instead of the traditional hinges that I show in the pictures. I tried those first and had to scrap them. The flexible rubber just isn't flexible enough. Holfing the doors closed was difficult and they didn't want to stay open. Esentially, the doors were always in my way. This was an expensive mistake for me.
Start by cutting 3 of the hinges in half. Once done you will notice that the hinge rod can fall out of one of the halves. Put a drop of glue on one end of the hinge rod after making sure that it is alligned.
Now carefully glue 2 and a half hinges together using a straight edge to ensure that they are alligned.
The next step is to glue it all together. Install the 6 spacers on the verticle arms of the printer with 2 on each arm evenly spaced. Install and center the 3 fixed panels. Use 2 business cards to create a space between 2 door panels and tape them together. Tape the other door panels together in the same manner and then center and tape them to the printer.
Allign a hinge on the bottom edge of the acrylic and tape it to the enclosure. Do this for all 6 hinges. You will notice that the hinge is too long. This is OK as you will cut it to the correct length later.
Now comes the tricky part. Carufully apply glue to each hinge ONLY WHERE SUPPORTED BY A SPACER OR THE TOP AND BOTTOM. The acrylic will flex if you press on it while glueing. If it is not supported it will create a bend in the plastic that will make the hinges flex while in use. Trust me, you don't want this to happen.
After the hinges have been tacked at the top, bottom, and by each of the 2 spacers remove the 3 acrylic parts by carefully flexing them out of the top and bottom holders. Once out, pleace them on a flat surface and glue the hinges alont their full lenght, cut the hinges to length, and reinstall on the printer. Make sure that the 3 acrylic pieces go back into the same place on the printer. They are not identical and if you install them in the wrong order the doors will not close properly.
Now you just need to add handles and the magnets on the doors.
That's it. Easy, right?