Thingiverse
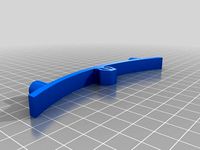
RoBo3D Feet Remix with 92mm RAMPS fan by galaxius
by Thingiverse
Last crawled date: 2 years, 12 months ago
PLEASE READ ALL
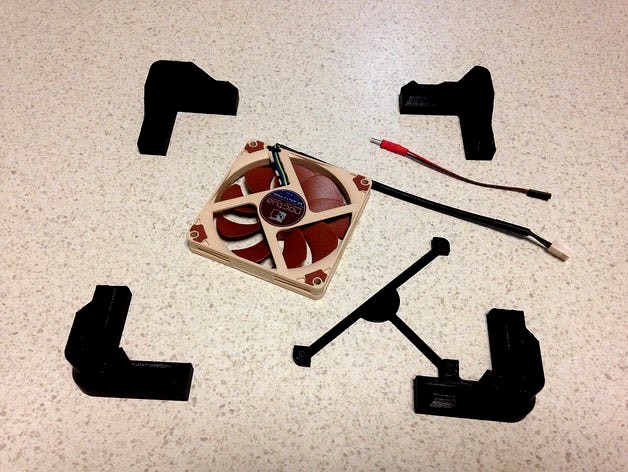
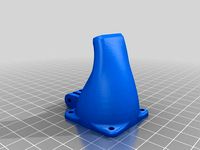
My 40mm RAMPS fan would vibrate through the RAMPS clip on fan mounts and amplify through the base of the printer, most annoying. So I remixed Mike Kelly's 10mm feet to integrate a mount for a Noctua 92mm low profile (14mm) fan. It works awesome, so quiet with no vibration.
I also remixed all the screw holes for M3 bolts. the outer hole is 3mm and the inner hole is 2.5mm. Use a drill to make sure the outer 3mm hole is 3mm so the M3 bolt slips through and tap the inner 2.5mm hole. Using the foot as a guide by putting it on the printer, create a center divit in the base of the printer's corner using a 3mm bit (just enough to leave a tiny dint for the 2.5mm bit to center on DO NOT DRILL THROUGH with the 3mm bit). Remove the foot then complete the hole with a 2.5mm bit and tap it. Install the foot and a 10mm or 12mm M3 bolt. I only use 1 bolt per foot but there allocation for 2.
NOTE: 10mm M3 bolt(s) are required in the PSU corner as there's no clearance for a 12mm M3 bolt.
To mount the fan tap the 3 2.5mm holes of the mounting bracket and attach the fan with 20mm M3 bolts, the bolt should not protrude through the bottom. The bracket allows 6mm clearance under the fan for air intake.
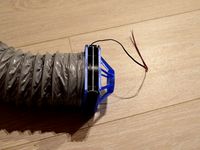
For wiring (details are for the Noctua PWM fan) you can cut the fan's plug and connect a female jumper plug to the black (negative) and yellow (positive) wires (the other wires are unused), or if you're like me and want to keep the fan plug intact make a jumper lead instead. The jumper's black wire goes to the fan's black, and the jumper's red wire goes to the fan's yellow. Make sure you secure other wires out of the way of the fan, kapton tape did the trick for me.
NOTE: There's 2 versions of the fan mount foot where v4a has the front bolt tab chamfer 3mm closer to the corner to allow more room for my LCD mounting bracket. There's also 2 versions of the power plug foot. My plug must be different to Mike's as I needed more clearance (I haven't printed or test fit v2 as I modified Mike's with a Dremel but decided to create v2 for other users). Print 1 "fan" foot, 1 "plug" foot, and 2 normal feet.
That's it, quiet and cool. Printed in PLA with 2 perimeters, 3 top/bottom layers, at 0.3mm layer height, with 25% honeycomb fill (better strength than rectilinear), sliced with Slic3r.
My 40mm RAMPS fan would vibrate through the RAMPS clip on fan mounts and amplify through the base of the printer, most annoying. So I remixed Mike Kelly's 10mm feet to integrate a mount for a Noctua 92mm low profile (14mm) fan. It works awesome, so quiet with no vibration.
I also remixed all the screw holes for M3 bolts. the outer hole is 3mm and the inner hole is 2.5mm. Use a drill to make sure the outer 3mm hole is 3mm so the M3 bolt slips through and tap the inner 2.5mm hole. Using the foot as a guide by putting it on the printer, create a center divit in the base of the printer's corner using a 3mm bit (just enough to leave a tiny dint for the 2.5mm bit to center on DO NOT DRILL THROUGH with the 3mm bit). Remove the foot then complete the hole with a 2.5mm bit and tap it. Install the foot and a 10mm or 12mm M3 bolt. I only use 1 bolt per foot but there allocation for 2.
NOTE: 10mm M3 bolt(s) are required in the PSU corner as there's no clearance for a 12mm M3 bolt.
To mount the fan tap the 3 2.5mm holes of the mounting bracket and attach the fan with 20mm M3 bolts, the bolt should not protrude through the bottom. The bracket allows 6mm clearance under the fan for air intake.
For wiring (details are for the Noctua PWM fan) you can cut the fan's plug and connect a female jumper plug to the black (negative) and yellow (positive) wires (the other wires are unused), or if you're like me and want to keep the fan plug intact make a jumper lead instead. The jumper's black wire goes to the fan's black, and the jumper's red wire goes to the fan's yellow. Make sure you secure other wires out of the way of the fan, kapton tape did the trick for me.
NOTE: There's 2 versions of the fan mount foot where v4a has the front bolt tab chamfer 3mm closer to the corner to allow more room for my LCD mounting bracket. There's also 2 versions of the power plug foot. My plug must be different to Mike's as I needed more clearance (I haven't printed or test fit v2 as I modified Mike's with a Dremel but decided to create v2 for other users). Print 1 "fan" foot, 1 "plug" foot, and 2 normal feet.
That's it, quiet and cool. Printed in PLA with 2 perimeters, 3 top/bottom layers, at 0.3mm layer height, with 25% honeycomb fill (better strength than rectilinear), sliced with Slic3r.
Similar models
thingiverse
free

Fan Grills by leaftye
...grills work with m3 screws or noctua silicone fan mounts. the 92mm fan grill was designed for noctua na-sav4 silicone fan mounts.
thingiverse
free

Noctua 60mm x 25mm Fan Cover Shroud by Skoopsy
...er 3 pro psu.
there is no hole for the fan wire, as i routed the fan wire through an unused fan bolt hole back into the psu case.
thingiverse
free

FrSky D4R-II mount with foldable antenna and attachments by hakk4me
... drilled through with 3.5 mm drill bit. see attached pictures on how 4x m3 nylon bolts are used (shown mount is printed in petg).
grabcad
free

92mm Fan Guard
...92mm fan guard
grabcad
wire guard mounts over cooling fan. hole centers are 92mm (3.25") apart.
thingiverse
free
Mount for RAMBo controller. by ian_in_the_midlands
... thing 39952.
pillars lengthened to 10mm and holes in pillars reduced to 2.5mm diameter.
pillars can now be tapped for m3 bolts.
thingiverse
free
120mm fan grill with 2.5mm fan clearance by squirrelf
...tting it.
even thought it's 4mm thick, mounting holes are recessed a bit so you can use your standard fan self tapping screw.
thingiverse
free
Simple Fan Mount for Makerfarm Prusa i3/Greg's Accessible Extruder by beefinator
... a bit for the models i uploaded here.
there's a scad file if you want to edit it, but i didn't document it at all... :/
thingiverse
free

Wanhao Di3 30mm to 40mm fan adapter by austingeorge
...#39;s not neccessary
pictures show how to use the nuts and tapped threads.
let me know if there's any improvements i can make
thingiverse
free

40mm Rubber Feet by RickyGode
...ua fans. really super quiet!
i printed these in black tpu one at a time since tpu is a bit stringy.
https://youtu.be/z1dpnnxoycu
thingiverse
free
Fan duct for MarkerFarm Prusa i3, i3v and Pegasus with larger M3 holes by gregington
...rse
i wanted clough42's fan duct but with m3 holes sized for clearance fit rather than tap fit. that is the only difference.
Galaxius
thingiverse
free
Triton Dust Collector Bucket Hose End by galaxius
... bucket hose end by galaxius
thingiverse
this is the hose adapter for the end that connects to the triton dust collector bucket.
thingiverse
free

Vertical blind end stop by galaxius
...decided it was a good opportunity to design and print replacements. i hope someone else will find this replacement design useful.
thingiverse
free

Dog Tags for Infill by galaxius
...the photo with the numbers.)
printed in pla, 2 perimeters, 2 bottom layers, 0 top layers, infill set to the number of the tag.
thingiverse
free

Knob for the Full Graphic Smart LCD Controller by galaxius
...on't fall off. i suggest printing at 100% and do a test fit then increase from there if you need. 3% was a good guess for me.
thingiverse
free

Filament Oiler/Cleaner by galaxius
...it'll so for now. the oiler is free to slide from side to side on the wire and the wire can swing back and forward if needed.
thingiverse
free
Robo3D Z Stabiliser by galaxius
...y stock stabilisers. please comment and add photos if you use these.
printed in pla with 4 perimeters. i think my infill was 95%.
thingiverse
free
Robo3D Z Rod Constraint by galaxius
...still has to slide onto the smooth rod.
slide onto the smooth rod and adjust so the threaded z rod is verticle.
tighten the bolt.
thingiverse
free

adapter for Dremel4000 for Dremel drill Press by Galaxius by Fuintur
...0-holder-bottom but for dremel4000 instead of dremel3000. i haven't tried it yet, but i will try it and report in a few days.
thingiverse
free

Spool holder bracket for topless Robo3D by galaxius
...nd 55mm high. the robo3d cover mounting bracket is 25mm high so that leaves 30mm for mounting your uprights or whatever you like.
thingiverse
free

My S3D Process FFF File by galaxius
...use to initially test various settings before moving on to more complicated calibration prints.
i hope this proves to be useful.
92Mm
3d_export
$16

Wine Bottle Mockup 13
...more than 5 edges: 0<br>object:<br>- dimension mm: 91mm x 92mm x 296mm<br>- dimension inches: 3.6" x 3.61" x 11.67"<br>-...
3d_export
$16

Wine Bottle Mockup 14 Screw Cap
...more than 5 edges: 0<br>object:<br>- dimension mm: 91mm x 92mm x 301mm<br>- dimension inches: 3.6" x 3.62" x 11.83"<br>-...
3d_export
$19

Standard Beverage Can 250 Ml 845 Oz
...5 edges: 0<br>object:<br>- dimension mm: 66mm x 66mm x 92mmlt;br>- dimension inches: 2.6" x 2.6" x 3.62"<br>- model parts:...
thingiverse
free

Chaos star fan protection (fan 92mm x 92mm)
...chaos star fan protection (fan 92mm x 92mm)
thingiverse
fan protection (92mm x 92mm)
thingiverse
free

RAM cooler bracket 92mm by iperov
...ram cooler bracket 92mm by iperov
thingiverse
ram cooler bracket for 92mm fan.
thingiverse
free
92mm fan adapter
...90mm hvac flexible tubing.
i use it to pump the hot air from the front (driving part) of a camper-van to the back of the vehicle.
thingiverse
free

120mm to 92mm fan adapter by Sylar97
...120mm to 92mm fan adapter by sylar97
thingiverse
flat fan adapter plate for 92mm fans
thingiverse
free

Stand for 92mm Fan by 0mma
...4 m5 fan screws or zip ties for the fan
some form of powersupply
92mm fan
optional:
fanprotection (there are some on thingiverse)
thingiverse
free

Fan Cover 92mm for Ikea Stuva
...fan cover 92mm for ikea stuva
thingiverse
this part is a panel for a 92mm left or right mounted fan on an ikea stuva body.
thingiverse
free

Computer Fan Adapter - 120mm-92mm by gnif
...computer fan adapter - 120mm-92mm by gnif
thingiverse
computer fan adapter - 120mm-92mm
Robo3D
turbosquid
$2

Robo3D Feet
... available on turbo squid, the world's leading provider of digital 3d models for visualization, films, television, and games.
thingiverse
free

Robo3d Filament Guide by sjreggel
...robo3d filament guide by sjreggel
thingiverse
robo3d filament guide, to be used with the default robo3d spool holder
thingiverse
free
Robo3D USB Support by GipsyEureka
...robo3d usb support by gipsyeureka
thingiverse
robo3d usb support.
thingiverse
free
Robo3D Camera Mount by robro
...robo3d camera mount by robro
thingiverse
mount for a logitech c270 webcamto a robo3d printer
thingiverse
free
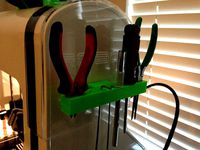
Robo3D Tool Holder by huntergrayson
...robo3d tool holder by huntergrayson
thingiverse
an out of the way place for your tools on the robo3d printer
thingiverse
free
Robo3D Top Mount by ThorMJ
...o the robo3d.
added a version with longer posts so it clears the robo3d handle from the http://www.thingiverse.com/thing:234939
thingiverse
free

Screws' holder Robo3D by GalloEnricoDesign
...screws' holder robo3d by galloenricodesign
thingiverse
a easy support used as holder for screws' extruder
for robo3d.
thingiverse
free
ROBO3D Spool Cap by portdog77
...robo3d spool cap by portdog77
thingiverse
this is a cap i made for my robo3d to hold the filliment next to the machine.
thingiverse
free

ROBO3D OILER HOLDER by Prefab
...robo3d oiler holder by prefab
thingiverse
holds your robo3d oilers so you can always find them
thingiverse
free

robo3d feet simple version by Windpower
...robo3d feet simple version by windpower
thingiverse
robo3d feet remember to print 4.
Ramps
turbosquid
$3
Kicker Ramp - Skate Ramp
...ramp - skate ramp for download as 3ds, obj, c4d, fbx, and dae on turbosquid: 3d models for games, architecture, videos. (1153575)
turbosquid
$2
Ramp
...squid
royalty free 3d model ramp for download as obj and fbx on turbosquid: 3d models for games, architecture, videos. (1494204)
turbosquid
$5
ramp
... available on turbo squid, the world's leading provider of digital 3d models for visualization, films, television, and games.
3d_export
$5
Ramp 3D Model
...ramp 3d model
3dexport
ramp jump carjump carramp car
ramp 3d model ryisnelly100 83186 3dexport
turbosquid
$10
Ramp and Barrels
...d
royalty free 3d model ramp and barrels for download as fbx on turbosquid: 3d models for games, architecture, videos. (1263040)
turbosquid
$19
Skate Ramp
...ty free 3d model skate ramp for download as dxf, obj, and fbx on turbosquid: 3d models for games, architecture, videos. (1187602)
turbosquid
$19
Skate Ramp
...ee 3d model skate ramp for download as dxf, obj, c4d, and fbx on turbosquid: 3d models for games, architecture, videos. (1187673)
turbosquid
$45
ramp door_center
... available on turbo squid, the world's leading provider of digital 3d models for visualization, films, television, and games.
turbosquid
$40
Ramp.3DS
... available on turbo squid, the world's leading provider of digital 3d models for visualization, films, television, and games.
turbosquid
$20
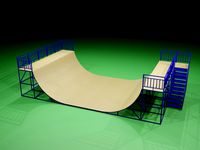
Skater Ramp
... available on turbo squid, the world's leading provider of digital 3d models for visualization, films, television, and games.
Feet
3d_export
$30

Legs and feet High feet 3D Model
...t high feet 3d model
3dexport
feet shoes sandal barefoot leg women
legs and feet high feet 3d model adrianaamerina 96817 3dexport
3ddd
$1
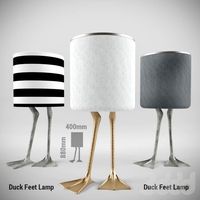
DUCK FEET LAMP
...duck feet lamp
3ddd
утка
duck feet lamp
turbosquid
$19
Feets 01
...3d model feets 01 for download as max, max, max, fbx, and obj on turbosquid: 3d models for games, architecture, videos. (1624047)
turbosquid
$2
Robo3D Feet
... available on turbo squid, the world's leading provider of digital 3d models for visualization, films, television, and games.
turbosquid
free

Hands and Feet
... available on turbo squid, the world's leading provider of digital 3d models for visualization, films, television, and games.
turbosquid
free

Feet study
... available on turbo squid, the world's leading provider of digital 3d models for visualization, films, television, and games.
turbosquid
$9

Female Feet 01
...oyalty free 3d model feet 01 for download as ma, obj, and fbx on turbosquid: 3d models for games, architecture, videos. (1446069)
turbosquid
$19

The feet of Hercules trainer
... feet of hercules trainer for download as , stl, fbx, and obj on turbosquid: 3d models for games, architecture, videos. (1684923)
turbosquid
$79
Hand and Feet (Rigged)
... available on turbo squid, the world's leading provider of digital 3d models for visualization, films, television, and games.
turbosquid
$15

Viabizzuno Big Feet
... available on turbo squid, the world's leading provider of digital 3d models for visualization, films, television, and games.
Fan
3d_export
$5

fan
...fan
3dexport
fan 3d model, table fan, fan, electric fan, ventilator
archibase_planet
free

Fan
...fan
archibase planet
fan large fan
fan out n260707 - 3d model for interior 3d visualization.
archibase_planet
free

Fan
...fan
archibase planet
fan ceiling fan ventilator
fan stealth n300615 - 3d model (*.gsm+*.3ds) for interior 3d visualization.
3d_export
$15

fan
...fan
3dexport
is an ancient fan
3ddd
$1

Fan-C-Fan by marco gallegos
...n-c-fan by marco gallegos
3ddd
вентилятор , marco gallegos
fan-c-fan by marco gallegos
3d_export
$10

fan
...fan
3dexport
a detailed fan designed for home or space blowing is now available for only 19.99!
turbosquid
$1

Fan
...fan
turbosquid
free 3d model fan for download as on turbosquid: 3d models for games, architecture, videos. (1427865)
turbosquid
$14

Fan
...fan
turbosquid
royalty free 3d model fan for download as on turbosquid: 3d models for games, architecture, videos. (1415642)
3ddd
$1

Светильник Fan
...светильник fan
3ddd
fan , italamp
светильник fan, производитель italamp
turbosquid
$25

Fan
...fan
turbosquid
royalty free 3d model fan for download as c4d on turbosquid: 3d models for games, architecture, videos. (1483246)
Remix
turbosquid
$5

MODA Collection Remix Chair
... available on turbo squid, the world's leading provider of digital 3d models for visualization, films, television, and games.
3d_export
$12

remix yamaha rm1x
...remix yamaha rm1x
3dexport
geometry triangles 15.2k vertices 7.6k pbr no textures 1 materials 1 uv layers yes
3d_ocean
$5

Vray fabric Kvadrat remix green - tileable
...th vray and 3dsmax. high-resolution texture images (2000×2000 px) file included: shader vray 2.40 texture image 3ds max 2011 file
3d_export
$10

multicolored remix parametric table furniture
... fbx, obj, mtl, archive with textures. the model has no glitches. render and materials - vray . without using plugins. good use!
3ddd
$1

Barovier&Toso / Manhattan Remix 7192
... 004293-142405
в коллекции есть люстры 7, 9, 12 рожковые. диаметр соответственный 1000, 1250, 1500 мм.
3ddd
$1

Muuto fiber chair
...grey/grey, dusty green/dusty green, nature/oak, natural white/oak upholstery options remix 183/black, remix 133/grey, remix 643/dusty red leather options black...
3ddd
$1

Barovier&Toso 7190-7195
...7190-7195 3ddd barovier&toso потолочнай люстра фабрики barovier&toso;, коллекция manhattan remix артикул 7190-7195. размеры в inches: 39"...
3d_export
$5

3D Locking Handle Weatherproof Storage Box Container
...handle weatherproof storage box container 3dexport new, improved and remixd! no screws required. print-in-place. weatherproof. parametric. 2 parts. easy...
cg_studio
$49

HTC One Mini 2 Amber Gold3d model
...cell phone mobile cellular super lcd touchscreen touch screen remix amber gold .max .obj .mb .lwo .fbx .c4d .3ds...
cg_studio
$49

HTC One Mini 2 Gunmetal Gray3d model
...cell phone mobile cellular super lcd touchscreen touch screen remix gunmetal grey silver .max .obj .mb .lwo .fbx .c4d...