Thingiverse

Rigidbot 2 - 20 tooth pulley upgrade by swoolsten
by Thingiverse
Last crawled date: 3 years, 1 month ago
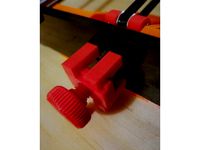
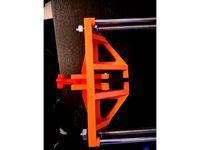
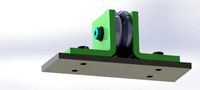
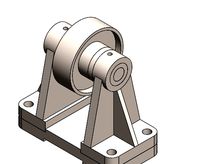
This is my rigidbot 2 upgrade to 20 tooth pulleys. No permanent modifications to the original rigidbot 2 frame is required. The idler pulley adapters just snap in to place, and the idler pulley is secured with a m5 bolt. To align the belt I used spacers that snap in place behind the original belt holders and are held in place by friction. The spacers also serve as tensioners, you will need to install your belts 2-3 teeth loose, then install the spacers. If the belt tension seems too tight, remove spacers and loosen the belt another tooth, and vice-versa if the belt seems too loose.
This upgrade does not affect the build volume 254 x 254 x 254. (barely). UPDATE - After adjusting my firmware, I found it does actually decrease my build volume in the X axis by 4mm. Giving a 250 x 254 x 254 build volume.
After printing the parts, carefully remove your idler bearings so as to not damage the plastic retaining clip. Install the bottom adapters first.
The X axis lower adapter snaps on underneath the idler mount and the top adapter snaps on in place of the idler bearing.
The Y axis lower adapter slides in underneath the idler mount, and should fit pretty snug. push it in until it is fully seated. The top adapter is similar to the x-axis and will snap on in place of the idler bearing.
When installing the X-axis belt spacers/tensioners, install the shorter spacer first. That is the spacer on the idler side. It will have to be pressed up into place. The longer spacer will slide in from the side.
The Y-axis spacer/tensioner should be pretty straight forward.
Let me know how this works for you, or if there are any improvements you would like to see.
Update! 3/16/18 - After flashing my firmware and testing it out, I discovered that my build volume has actually been decreased slightly in the X axis from 254mm to 250mm. I chose to adjust my firmware to a 250 x 250 x 250 build volume.
Update 11/11/18 - After several months of heavy use the belt shims deformed. I realized I had used too low of an infill setting, so I reprinted the shims at 100% infill. It has now been several more months and there is no sign of fatigue in the parts.
Similar models
thingiverse
free

CR-10 X-axis tensioner shim spacer by Goblins
...im for the x-axis right mount bearing.
it will center the belt at the center of the rail and not on the side as in stock machine.
thingiverse
free
Anet A8 Y-Axis Belt Tension Improver by MrPollardsOpus
...ully on the idler pulley as opposed to just on the crown of each tooth. in some cases, this can eliminate fine chatter in prints.
thingiverse
free

X carrige belt idler for GEEETech prusa i3 x by sender86
...x by sender86
thingiverse
this is belt tensioning for x axies if pulley bearing fails. i designed it around two 624 zz bearings.
thingiverse
free

Makergear Prusa simple X-axis belt tensioner by Prestonf
...adjustable x-axis belt tensioner for the makergear prusa that takes the place of the two 8mm washers for the x-axis idler pulley.
thingiverse
free

X-Axis Tensioner Arm for toothed Idler Pulley by Loneguard
...m diameter, 8.5mm with, m3 axis).
note: i only created the longer arm as it fits my setup and i have no need for the shorter arm.
thingiverse
free

anet a2 y-axis mount no extra parts needed by dan1d
... default to provide a bit more clearance room. it also requires some cleanup post-print.https://www.thingiverse.com/thing:2099608
thingiverse
free

Anet A8 Y-Axis Belt Tensioner for GT2 20 Tooth Metal Pulley by Mr_Dabrudda
...ulley with ball bearings bought from ebay on my y-axis.
how to counter-sink a hex nut into a 3d printhttps://youtu.be/qx_bx5um4yg
thingiverse
free

Quick release X-belt tensioner for Prusa i3 by O_Lampe
...on to prolong the live of the belt and the x-carrier bearings.
the toothed idler fits on the 10x5 idler bearings and is optional.
thingiverse
free
Prusa I3 Pro B Frame brace with front plate by Syngenta
... or the idler pulley should be able to rotate freely. the screw shouldn´t be larger than 34mm. i recommend using a 30mm m4 screw.
thingiverse
free

ANET A8 X Axis Belt Tensioner for GT2 20 Tooth Metal Pulley by Mr_Dabrudda
...ooth metal pulley by mr_dabrudda
thingiverse
this is a remix which fits a gt2 20 tooth metal pulley instead of the two bearings.
Swoolsten
thingiverse
free

Noodle Sword by swoolsten
...are pool noodle to give you and your kids the perfect tool to sort out your differences, use imagination, and not break too much.
thingiverse
free

Toy Train Caboose by swoolsten
... stl files for printing single wheels, in case anybody didn't want to print them together, or wanted to use a different axle.
thingiverse
free

Passenger Coach Toy Train by swoolsten
... stl files for printing single wheels, in case anybody didn't want to print them together, or wanted to use a different axle.
thingiverse
free

Toy Train Tanker Car by swoolsten
... stl files for printing single wheels, in case anybody didn't want to print them together, or wanted to use a different axle.
thingiverse
free

Toy Train Flatbed Car by swoolsten
... stl files for printing single wheels, in case anybody didn't want to print them together, or wanted to use a different axle.
thingiverse
free

Kenmore Refrigerator bottom trim retaining clip by swoolsten
... i'm not sure what models it would fit. it would probably be ideal to print it in nylon, but i used pla and it worked great.
thingiverse
free

Iphone 6/6s Flexible phone case - Superman by swoolsten
...great. i printed it with .8mm borders and 20% infill. supports are required for some of the overhangs, but not much was needed.
thingiverse
free

Iphone 6/6s Flexible phone case by swoolsten
...e. i printed my superman version of this case with a .8mm wall thickness and a 20% infill. printed in tpu. supports are needed.
thingiverse
free

Open Boxcar W/ optional roof by swoolsten
... stl files for printing single wheels, in case anybody didn't want to print them together, or wanted to use a different axle.
thingiverse
free

Ski Trailer Kit by swoolsten
...imate that i have put about 60 miles on it. everything is holding up well! it's great to be able to ski with my little one.
Rigidbot
thingiverse
free

z_bracket rigidbot
...z_bracket rigidbot
thingiverse
z_bracket for 4 screws
thingiverse
free

Rigidbot Side Brackets by MKAY666
...rigidbot side brackets by mkay666
thingiverse
rigidbot side and z brackets
thingiverse
free

RigidBot Caliber Holder by dafes
...rigidbot caliber holder by dafes
thingiverse
caliber holder for the rigidbot frame
thingiverse
free

Rigidbot printerbed by nickbernstein
... printerbed by nickbernstein
thingiverse
build plate for rigidbot 3d printer. intended to be be c&c fabricated from aluminum
thingiverse
free

Filament Guide for Rigidbot by omegdadi
...filament guide that clips onto the frame of a rigidbot 3d printer. inspired by the rigidbot side cutter tool holder by steve0605.
thingiverse
free

Rigidbot End Cap by pdidonna
...rigidbot end cap by pdidonna
thingiverse
end cap to plug up the ends of the rigidbot frame
thingiverse
free

RigidBot monitor by EremaStar
...rigidbot monitor by eremastar
thingiverse
lcd
thingiverse
free

RigidBot Z-Axis Support by dafes
...rigidbot z-axis support by dafes
thingiverse
support structure for the z-axis upgraded rigidbot.
thingiverse
free

RigidBot Bar End Cap by tchotchke
...rigidbot bar end cap by tchotchke
thingiverse
push in end cap for covering the ends of the rigidbot bars.
thingiverse
free

Rigidbot Hex Key Holder by Steve0605
...rigidbot hex key holder by steve0605
thingiverse
a place to keep your hex keys handy for the rigidbot printer.
Tooth
3d_export
$10

tooth
...tooth
3dexport
tooth 3d model
archibase_planet
free

Tooth
...tooth
archibase planet
tooth
tooth n260111 - 3d model (*.gsm+*.3ds) for interior 3d visualization.
3d_ocean
$4
tooth paste
...tooth paste
3docean
amouth brushing teeth helty teeth tooth tooth paste
3d model tooth paste
turbosquid
$29

Tooth
...h
turbosquid
royalty free 3d model tooth for download as max on turbosquid: 3d models for games, architecture, videos. (1533290)
turbosquid
$29

Tooth
...h
turbosquid
royalty free 3d model tooth for download as max on turbosquid: 3d models for games, architecture, videos. (1529951)
turbosquid
$26

Tooth
...h
turbosquid
royalty free 3d model tooth for download as fbx on turbosquid: 3d models for games, architecture, videos. (1486108)
turbosquid
$13

Tooth
...ty free 3d model tooth for download as dae, obj, stl, and fbx on turbosquid: 3d models for games, architecture, videos. (1611126)
archibase_planet
free

Tooth brush
...tooth brush
archibase planet
tooth-brush sanitary ware
tooth brush - 3d model (*.gsm+*.3ds) for interior 3d visualization.
turbosquid
$40

Tooth Paste and Tooth Brush Models
... available on turbo squid, the world's leading provider of digital 3d models for visualization, films, television, and games.
archive3d
free
Tooth 3D Model
... 3d model
archive3d
tooth
tooth n260111 - 3d model (*.gsm+*.3ds) for interior 3d visualization.
Pulley
3d_export
$1

pulley
...pulley
3dexport
3d_export
$30
Pulley export
...pulley export
3dexport
pulley export design render 3d modelling
3d_export
free
Pulley
...ort
this is a pulley<br>formats: ".3ds", ".fbx", ".obj", ".stl", "blend"
3d_export
$6
roller pulley
...r pulley
3dexport
this is the roller pulley 3d model its used for 3d printers and some other uses for toys and usefull things .
turbosquid
$2
aluminum pulley
...
royalty free 3d model aluminum pulley for download as sldpr on turbosquid: 3d models for games, architecture, videos. (1671716)
turbosquid
$29

pulley wheel
...d model pulley wheel for download as obj, wrl, fbx, and blend on turbosquid: 3d models for games, architecture, videos. (1319384)
turbosquid
free

Pulley.3ds
... available on turbo squid, the world's leading provider of digital 3d models for visualization, films, television, and games.
3d_export
$10
design and assembly of pulley
...design and assembly of pulley
3dexport
design and assembly of pulley 3d model which is used for drive and driven
3d_export
$10
Pulley 3D Model
...y sewing sewingmachine c4d fbx metal
pulley 3d model download .c4d .max .obj .fbx .ma .lwo .3ds .3dm .stl dixiony 107270 3dexport
3d_export
$10

Pulley 3D Model
...trial machine c4d fbx cinema4d metal
pulley 3d model download .c4d .max .obj .fbx .ma .lwo .3ds .3dm .stl dixiony 107271 3dexport
Upgrade
turbosquid
$15

Upgraded Glock
...e 3d model upgraded glock for download as obj, fbx, and blend on turbosquid: 3d models for games, architecture, videos. (1185950)
3ddd
$1

Calligaris / UPGRADE
...calligaris / upgrade
3ddd
calligaris
c материалом
3d_export
free

cz upgrade
...cz upgrade
3dexport
https://www.buymeacoffee.com/mestrezen3d https://linktr.ee/mestrezen3
turbosquid
$80

Custer Tank upgrade
... available on turbo squid, the world's leading provider of digital 3d models for visualization, films, television, and games.
turbosquid
$39

Domestos 1 upgrade
... available on turbo squid, the world's leading provider of digital 3d models for visualization, films, television, and games.
3d_export
$10

Upgraded tea cup
...upgraded tea cup
3dexport
a cup with an unusual design and a unique shape for a more enjoyable tea experience
3d_export
$8

dixy outlander classic style upgraded poplar wood lounge chair
...utlander classic style upgraded poplar wood lounge chair
3dexport
dixy outlander classic style upgraded poplar wood lounge chair
turbosquid
free

AK-12 + Upgrades low-poly 3D model
...ow-poly 3d model for download as fbx, blend, and unitypackage on turbosquid: 3d models for games, architecture, videos. (1501145)
evermotion
$700

Upgrade from V-ray 1.5 to 3.5 for 3ds max
...here is no need to purchase a new dongle - your current dongles will be reprogrammed to carry v-ray 3. evermotion 3d models shop.
evermotion
$300

Upgrade from V-Ray 2.0 to V-ray 3.5 for 3ds Max
... interface (gui) for editing settings on one machine and one render node for rendering on one machine. evermotion 3d models shop.
20
3d_export
$15
rocks 20
...rocks 20
3dexport
rocks 3d model 20
3ddd
$1

DECOR MEDIEVO 20*20 MIX
...ллекция: bolonia
фабрика: mainzu
страна: испания
размер: 20x20 см
ссылка:http://www.mainzu.com/bolonia.php#prettyphoto
3d_export
$6
tap-20
...tap-20
3dexport
3ddd
$1

Bed 20
...bed 20
3ddd
постельное белье
bed 20. i hope you like it
software : 3dsmax + md + vray 2.4
turbosquid
$40

20 Shields
...turbosquid
royalty free 3d model 20 shields for download as on turbosquid: 3d models for games, architecture, videos. (1305068)
3d_export
$5

houseberg home 20
...houseberg home 20
3dexport
houseberg home 20
turbosquid
$96

J-20
...20
turbosquid
royalty free 3d model j-20 for download as max on turbosquid: 3d models for games, architecture, videos. (1658873)
turbosquid
$10

Decor 20
...urbosquid
royalty free 3d model decor 20 for download as stl on turbosquid: 3d models for games, architecture, videos. (1677149)
turbosquid
$10

building 20
...osquid
royalty free 3d model building 20 for download as max on turbosquid: 3d models for games, architecture, videos. (1362227)
turbosquid
$6
Bedcloth 20
...osquid
royalty free 3d model bedcloth 20 for download as max on turbosquid: 3d models for games, architecture, videos. (1522681)
2
design_connected
$11

No 2
...no 2
designconnected
sibast no 2 computer generated 3d model. designed by sibast, helge.
turbosquid
$6

Cliff Rock 2-2
...uid
royalty free 3d model cliff rock 2-2 for download as obj on turbosquid: 3d models for games, architecture, videos. (1619161)
turbosquid
$29

Book variation 2 2
...3d model book variation 2 2 for download as max, obj, and fbx on turbosquid: 3d models for games, architecture, videos. (1366868)
turbosquid
$22

Classic baluster (2) (2)
...assic baluster (2) (2) for download as max, obj, fbx, and stl on turbosquid: 3d models for games, architecture, videos. (1483789)
turbosquid
$99

Smilodon 2 Pose 2
... available on turbo squid, the world's leading provider of digital 3d models for visualization, films, television, and games.
turbosquid
$20

Barrel Barricade 2-2
... available on turbo squid, the world's leading provider of digital 3d models for visualization, films, television, and games.
turbosquid
$6

Wall Trophy (2) (2)
... available on turbo squid, the world's leading provider of digital 3d models for visualization, films, television, and games.
turbosquid
free

Tire label 2 of 2
... available on turbo squid, the world's leading provider of digital 3d models for visualization, films, television, and games.
3ddd
$1

Кровать, 2 тумбочки, 2 светильника
...кровать, 2 тумбочки, 2 светильника
3ddd
кровать, 2 тумбочки, 2 светильника
нормальное качество
формат 3ds max
без текстур
3ddd
free

Кровать, 2 тумбочки, 2 светильника
...кровать, 2 тумбочки, 2 светильника
3ddd
кровать, 2 тумбочки, 2 светильника
нормальное качество
формат 3ds max
без текстур