Thingiverse
Reworked / Enhanced components for JKSniper's universal 3D printer Cabinet by moggieuk
by Thingiverse
Last crawled date: 3 years ago
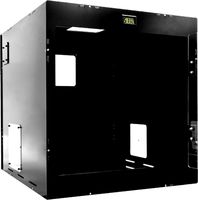
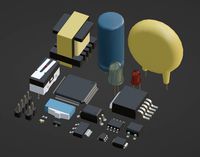
Dump of reworked / upgraded parts I created when building JKSniper's universal 3D printer enclosure (https://www.thingiverse.com/thing:2792618 "3D Printer Enclosure")
Parts include:
Remote on/off switch mount (that switches the wireless module detailed here. I had fun and changed the filament color on the first bridging layer behind the text (and for a few subsequent layers) to make the text stand out. I used 12mm & 19mm push switches (here & here ). You will need a 1k - 2k resister in series with the LED for the higher 24v voltage.
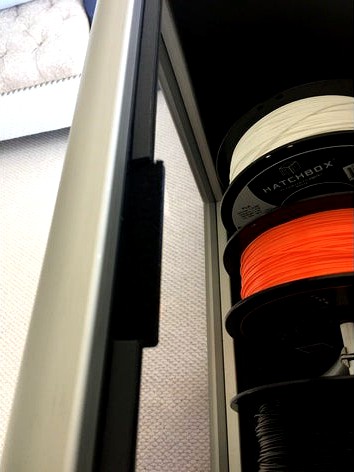
Clips to neatly mount internal cables
Threaded vents that stay open. Can easily be scaled in X-Y direction to fit your preferred hole size. I'm in America with mixture of non-metric and metric hardware!
Magnet door handles and catches that match door seals (use 8x3mm round magnets)
Hinges (use M3 round head bolts as pins). Mounts to side of extrusion and front of panel. Use 'hinge door plate' as captive for nuts. I used black 10-32 Button Head Socket Cap Screws to fasten. Note that the hinge is fitted with one half "flipped" so when closed it is at 90 degrees and 180+ degrees when open. I notched the edges of the door to fit.
LED lighting mounts (to support ends of strip to prevent peeling)
Door seal that is modeled to fit the 80/20 1.5" extrusion slot covers -- can be easily fastened with superglue and then covered with 1/8" neoprene foam seal. Will need to print with supports for the little lip at the end -- print a bunch and cut to fit frame. Miter corners. The 1/8" seal will bring the surface up to the inside plane of the door if use use my hinges.
Also see my dual PSU mount
I printed in PLA at .2mm layers expect for the threaded vent parts where I used .15mm layers. It should be obvious which orientation to print. You will need to enable support for the end of the door strip to hold up the overlapping section. Hopefully photos show how parts are used.
Update 6/25/2018: FIxed "Hinge Frame Side.stl" which was erroneously uploaded
Parts include:
Remote on/off switch mount (that switches the wireless module detailed here. I had fun and changed the filament color on the first bridging layer behind the text (and for a few subsequent layers) to make the text stand out. I used 12mm & 19mm push switches (here & here ). You will need a 1k - 2k resister in series with the LED for the higher 24v voltage.
Clips to neatly mount internal cables
Threaded vents that stay open. Can easily be scaled in X-Y direction to fit your preferred hole size. I'm in America with mixture of non-metric and metric hardware!
Magnet door handles and catches that match door seals (use 8x3mm round magnets)
Hinges (use M3 round head bolts as pins). Mounts to side of extrusion and front of panel. Use 'hinge door plate' as captive for nuts. I used black 10-32 Button Head Socket Cap Screws to fasten. Note that the hinge is fitted with one half "flipped" so when closed it is at 90 degrees and 180+ degrees when open. I notched the edges of the door to fit.
LED lighting mounts (to support ends of strip to prevent peeling)
Door seal that is modeled to fit the 80/20 1.5" extrusion slot covers -- can be easily fastened with superglue and then covered with 1/8" neoprene foam seal. Will need to print with supports for the little lip at the end -- print a bunch and cut to fit frame. Miter corners. The 1/8" seal will bring the surface up to the inside plane of the door if use use my hinges.
Also see my dual PSU mount
I printed in PLA at .2mm layers expect for the threaded vent parts where I used .15mm layers. It should be obvious which orientation to print. You will need to enable support for the end of the door strip to hold up the overlapping section. Hopefully photos show how parts are used.
Update 6/25/2018: FIxed "Hinge Frame Side.stl" which was erroneously uploaded
Similar models
thingiverse
free

Door Handles for Prusa Printer Enclosure V2 (Pressure Fit) by joeltrondotcom
...
i also removed the end support to allow the door to close easier when using two handles.
print as is in petg, no supports needed
thingiverse
free

MPMD door hinge or corner piece
...g a bit inaccurate when i printed this design.
use support material and print the part on edge like it is oriented in the design.
thingiverse
free

Snapmaker Enclosure Door Hinge Pull-tab by rtrski
...od adhesion (clean your bed, use hairspray, good heat, whatever) or the circular legs will attempt to curl up a bit during print.
thingiverse
free

Lift-off hinge for plexiglass door on 2020 aluminium extrusion enclosure by rackley
...h for the hinge to rotate on.
optionally lightly sand the rod of the plexiglass side, again, for easy/smooth rotation.
assemble!
thingiverse
free
Prusa enclosure door knob and hole plugs by derelict267
...magnets to the enclosure door exterior and the enclosure interior wall so the door stays shut and is more sealed when it is shut.
thingiverse
free

Switch box enclosure for 2040 extrusion mount by vinito
...inito
thingiverse
i made this to mount a 42mm x 27mm (1-5/8" x 1-1/16") switched power connector to my ordbot printer.
thingiverse
free

Weight Holding HInge for Anet A8 Enclosure or any horizontal door. by hostedathome
...ement store.
when printing the flat mount side of it you need to pause print and insert a nut and continue print and let finish..
thingiverse
free

Ultimaker 2 & 3 door hinge by The_Printing_Dutchman
...the door to the upper hinge part.
if you like this design follow me on instagram https://www.instagram.com/the_printing_dutchman/
thingiverse
free

3D Printer enclosure hinge (for 4mm acrylic)
...or a 3d printer enclosure.
it's made for a 4mm acrylic door
i used wood screws cuted to length to screw the door in the hinge
thingiverse
free

Ikea Lack Enclosure Parts by idnarbjm
...or my wanhao i3 enclosure.
i use 10mm magnets to hold the door on when printing abs.
supports used on handles and door clips.

Jksniper
thingiverse
free

Pool Skimmer Basket by JKSniper
...rts and it will take a lot of time.
i recommend printing with petg as it's very resistant to pool water and chemicals in it.
thingiverse
free

Garmin Vivoactive3 Bike / Bicycle Mount by JKSniper
...also .step file attached.
it works really well and it's tested design with 500km+ of mtb cycling.
best regards,
jure korber
thingiverse
free

Pepper Spray Holder - Bike / Bicycle Attachment by JKSniper
...ot; diameter.
added .stl and modifiable .step format if you need to adjust the size or something.
have a safe ride!
jure korber
thingiverse
free
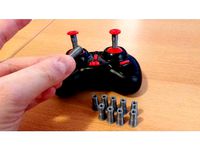
Optimal Extensions for Transmitter - E010, Makerfire, H36... by JKSniper
.... :)
edit: 5 different pilots have this extensions and confirmed that this is actually the best size.
happy flying!
jure korber
thingiverse
free
![Stinger x210 Racing Quad [OPENSOURCE] by JKSniper](/t/8710259.jpg)
Stinger x210 Racing Quad [OPENSOURCE] by JKSniper
...7
added v2 canopy files that fits 4in1 esc+fc 19.6.2017
ps!: not all parts are 3d printed! only the canopy!
have fun!
jure korber
thingiverse
free

STINGER ZMR250 Conversion by Smarac
...thanks for stinger, completely awesome design made by jksniper (https://www.thingiverse.com/jksniperabout). no modification on canopy, just designed plates and camera...
thingiverse
free

Prusa I3 Noctua Full Fan Cover by JKSniper
...econd one black. who will be the first one to make it? :)
noctua fan: http://noctua.at/en/nf-a4x10-flx
best regards,
jure korber
thingiverse
free
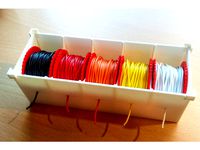
Wire Dispenser - Easy and Stackable - Organizer by JKSniper
....gl/harfi8
if you find my design useful, you can tip me with a $ or 2 :)https://www.paypal.me/jurekorber
have fun! =)
jure korber
thingiverse
free

TUTORIAL: How to get perfect 3D printed surface! by JKSniper
...surface smooth and shiny!
choose any color, matt or glossy finish or even metallic finish!
have fun & good luck!
jure korber
thingiverse
free

Lab Power Supply (Cheap & Powerful) by JKSniper
...king or misusing this. better to leave a comment if you're not sure what to do than fry something.
best regards,
jure korber
Reworked
3d_export
$25
riva aquarama 1970
...visualization, as well as, if desired, it can be reworked for 3d printing. in the near future, a model...
3d_export
$8

Mosaic 1 3D Model
...outdoor indoor vector ceramic glass mosaic decorative mosaic manually reworked into a vector. the image is then modified in...
3d_export
$65
sci-fi scene for rendering restyling - tesla
...colors with the name, metal, light metal, dark metal, reworked renders for preview and processed in photoshop using a...
3d_export
$22
a filter assembly and inspection line
... by solidworks, proe, ug and other three-dimensional software. the details are detailed. welcome to download.<br>报错 笔记 双语对照
3d_export
$19

muuto raw chair
...ths: 54<br>depth: 51<br>height: 76<br>textures: 3000x4000 jpeg.<br>scene objects are organized by groups.
3d_export
$12

desert rocks stock in blender
...cement and bump" feature, for the "surface" tab of the material<br>packlist: 3 blender files, 8 textures 2k.
3d_export
$10

arclinea principia
...the essence, with the basic principles of the kitchen, reworked new steel technology and natural wood cutting. the extraordinary...
thingiverse
free

Doughnut Rework by Johhnny
...doughnut rework by johhnny thingiverse i reworked tzani's mobius doughnut for dual...
thingiverse
free

Beanie the Transformer rework by Whirl55
...beanie the transformer rework by whirl55 thingiverse found and reworked head pin and all...
thingiverse
free
AM10 - am8 rework Y
...am10 - am8 rework y
thingiverse
totaly rework to turn your am8 into an am10 with only 2 pieces
Enhanced
turbosquid
free

Enhance Flame.max
... available on turbo squid, the world's leading provider of digital 3d models for visualization, films, television, and games.
turbosquid
$1

Enhanced Arwing with Original
... available on turbo squid, the world's leading provider of digital 3d models for visualization, films, television, and games.
turbosquid
$40

Airbus A380 aircraft enhanced
... available on turbo squid, the world's leading provider of digital 3d models for visualization, films, television, and games.
turbosquid
$5

Rapidlash Eyelash Enhancing Serum
... available on turbo squid, the world's leading provider of digital 3d models for visualization, films, television, and games.
turbosquid
$119

Sig Sauer P226 Enhanced Elite 9mm
... available on turbo squid, the world's leading provider of digital 3d models for visualization, films, television, and games.
turbosquid
$119

Sig Sauer P229 Enhanced Elite 9mm
... available on turbo squid, the world's leading provider of digital 3d models for visualization, films, television, and games.
3d_export
$23

bio-enhanced soldier
... shoulders_roughness stuff_base_color stuff_height stuff_metallic stuff_mixed_ao stuff_normal stuff_normal_opengl stuff_roughness
humster3d
$75
3D model of Mk 14 Enhanced Battle Rifle
... 3d model of mk 14 enhanced battle rifle in various file formats. all our 3d models were created maximally close to the original.
turbosquid
$29

Star Trek TNG Voyager Transporter Pattern Enhancers
...rter pattern enhancers for download as max, dwg, fbx, and obj on turbosquid: 3d models for games, architecture, videos. (1629422)
turbosquid
$165

Alvar Aalto's Furnitures Collection 1 Enhanced Edition
... available on turbo squid, the world's leading provider of digital 3d models for visualization, films, television, and games.
Universal
3d_export
$20
university
...university
3dexport
university model with textures.
3d_export
free

steven universe
...steven universe
3dexport
steven universe
3ddd
free

Quasar Universe
...quasar universe
3ddd
quasar
люстра quasar universe
turbosquid
$65
Universal
... available on turbo squid, the world's leading provider of digital 3d models for visualization, films, television, and games.
turbosquid
$65

University
... available on turbo squid, the world's leading provider of digital 3d models for visualization, films, television, and games.
turbosquid
$5

Universal
... available on turbo squid, the world's leading provider of digital 3d models for visualization, films, television, and games.
3d_export
$40
Graphics Universe Universe Flares 3D Model
...graphics universe universe flares 3d model
3dexport
textures
graphics universe universe flares 3d model crashangel 97554 3dexport
3d_export
$65

universe
...universe
3dexport
simple rendering of the scene file
3d_export
$65

university
...university
3dexport
simple rendering of the scene file
3ddd
$1
Gala Universal раковина
...universal раковина
3ddd
gala , universal
раковина
производитель gala
коллекция universal
Components
design_connected
$20
Butterfly Components
...rfly components
designconnected
b&b italia butterfly components computer generated 3d model. designed by urquiola, patricia.
turbosquid
$33

Kitchen Components
...
royalty free 3d model kitchen components for download as max on turbosquid: 3d models for games, architecture, videos. (1309298)
turbosquid
$4

Cyl component
...id
royalty free 3d model cyl component for download as blend on turbosquid: 3d models for games, architecture, videos. (1390103)
turbosquid
$12

Ev3 Component
...oyalty free 3d model ev3 component for download as ma and obj on turbosquid: 3d models for games, architecture, videos. (1378651)
turbosquid
$133

room components
... available on turbo squid, the world's leading provider of digital 3d models for visualization, films, television, and games.
turbosquid
$9

Component Shelf
... available on turbo squid, the world's leading provider of digital 3d models for visualization, films, television, and games.
turbosquid
$5
road component
... available on turbo squid, the world's leading provider of digital 3d models for visualization, films, television, and games.
turbosquid
$1
Electronic components
... available on turbo squid, the world's leading provider of digital 3d models for visualization, films, television, and games.
3d_export
$15
SMD electronic components
...smd electronic components
3dexport
smd electronic components<br>verts 7.322<br>faces 12.728
3d_export
$13

SMD electronic components
...smd electronic components
3dexport
smd electronic components<br>verts 6.251<br>faces 10.674
Cabinet
3d_ocean
$5
Cabinet
...cabinet
3docean
cabinet furniture
a lowpoly cabinet .
3d_ocean
$5

Cabinet
...cabinet
3docean
cabinet furniture
a lowpoly cabinet.
3d_ocean
$5
Cabinet
...cabinet
3docean
cabinet furniture
a lowpoly cabinet .
3d_ocean
$6
Cabinet
...cabinet
3docean
cabinet furniture
a high quality cabinet .
3d_ocean
$5
Cabinet
...cabinet
3docean
cabinet furniture
a high quality cabinet .
3d_ocean
$5
Cabinet
...cabinet
3docean
cabinet furniture
a high quality cabinet ready to use .
3ddd
free
cabinet
...cabinet
3ddd
cabinet
3d_ocean
$12
Cabinet
...cabinet
3docean
cabinet furniture
a high quality cabinet with high quality textures.
3ddd
$1
cabinet
...cabinet
3ddd
тумба
cabinet
3ddd
$1
The cabinet
...the cabinet
3ddd
тумба
the cabinet
Printer
archibase_planet
free

Printer
...inter
archibase planet
printer laser printer pc equipment
printer n120614 - 3d model (*.gsm+*.3ds) for interior 3d visualization.
archibase_planet
free

Printer
...rchibase planet
laser printer office equipment computer equipment
printer - 3d model (*.gsm+*.3ds) for interior 3d visualization.
turbosquid
$100

Printer
...er
turbosquid
royalty free 3d model printer for download as on turbosquid: 3d models for games, architecture, videos. (1487819)
turbosquid
$3

Printer
...turbosquid
royalty free 3d model printer for download as max on turbosquid: 3d models for games, architecture, videos. (1670230)
turbosquid
$1

printer
...turbosquid
royalty free 3d model printer for download as max on turbosquid: 3d models for games, architecture, videos. (1595546)
turbosquid
$1

printer
...turbosquid
royalty free 3d model printer for download as max on turbosquid: 3d models for games, architecture, videos. (1595105)
turbosquid
$10

Printer
...id
royalty free 3d model printer for download as max and 3dm on turbosquid: 3d models for games, architecture, videos. (1607146)
turbosquid
$7

Printer
...royalty free 3d model printer for download as ma, ma, and obj on turbosquid: 3d models for games, architecture, videos. (1644580)
turbosquid
$30

Printer
... available on turbo squid, the world's leading provider of digital 3d models for visualization, films, television, and games.
turbosquid
$20

Printer
... available on turbo squid, the world's leading provider of digital 3d models for visualization, films, television, and games.