Thingiverse

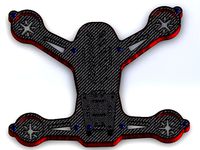
REV5 G2s Pro E3D V6 Maxmount by Haabilo
by Thingiverse
Last crawled date: 3 years, 2 months ago
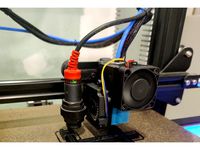
Revision 5 of the G2s Pro E3D V6 Maxmount!
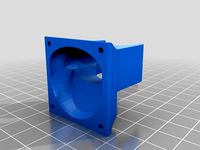
Now with detachable layer cooling duct!STEP-files included!
Parts needed:
2x 30mm fans. The E3D fans and the G2s stock "heatsink" fan will do fine.
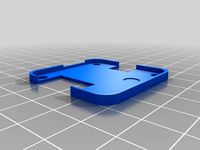
The M3-variants require M3x15-20 bolts for fan mounting, the bolts should thread themselves into the plastic.
2x M3x10 bolts for fastening the halves together.
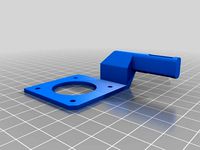
3x M3x20 bolts for affixing the mount to the effector.
5x M3 nuts for fastening the halves together and to affix the mount to the effector.
Obviously an E3D v6-style hotend.
Disclaimer: These are the parts that I used, if you now what you are doing, you can use just about anything to mount the hotend and the mount to the effector. (I would advice against using industrial contact cement since that makes stuff....well, kinda permanent.)
Design goals:
Mount the hotend as high as possible to maximize z-height. (name->Maxmount)
Have adequate cooling even for >250C printing.
Have part cooling incorporated as neatly as possible.
REV5
Have the part/layer cooler as a separate piece to accomodate wider range of duct designs.
Simplify the design of Rev4.2
Support Volcano heater blocks
Notes:
The silicone sock is almost a must for any print that uses part cooling.Due to the "as sleek as possible" design goal, the part/layer cooling nozzles are right up to the heater block and could cool it down too much for any decent printing.
TODO:
A Volcano fan duct version.
Now with detachable layer cooling duct!STEP-files included!
Parts needed:
2x 30mm fans. The E3D fans and the G2s stock "heatsink" fan will do fine.
The M3-variants require M3x15-20 bolts for fan mounting, the bolts should thread themselves into the plastic.
2x M3x10 bolts for fastening the halves together.
3x M3x20 bolts for affixing the mount to the effector.
5x M3 nuts for fastening the halves together and to affix the mount to the effector.
Obviously an E3D v6-style hotend.
Disclaimer: These are the parts that I used, if you now what you are doing, you can use just about anything to mount the hotend and the mount to the effector. (I would advice against using industrial contact cement since that makes stuff....well, kinda permanent.)
Design goals:
Mount the hotend as high as possible to maximize z-height. (name->Maxmount)
Have adequate cooling even for >250C printing.
Have part cooling incorporated as neatly as possible.
REV5
Have the part/layer cooler as a separate piece to accomodate wider range of duct designs.
Simplify the design of Rev4.2
Support Volcano heater blocks
Notes:
The silicone sock is almost a must for any print that uses part cooling.Due to the "as sleek as possible" design goal, the part/layer cooling nozzles are right up to the heater block and could cool it down too much for any decent printing.
TODO:
A Volcano fan duct version.
Similar models
thingiverse
free

Layer fan-duct for E3D V6 Volcano by KooLru
...layer fan-duct for e3d v6 volcano by koolru
thingiverse
fan duct with extra 10mm length for volcano hotend
grabcad
free

E3D V6 Hotend Mount
...e3d v6 hotend mount
grabcad
e3d v6 hotend mount to mgn9h slide block, turbine fan 50mm air duct for layer cooling
thingiverse
free

G2s Pro E3D V6 Maxmount (Now with BL-touch!) by Haabilo
... the most benefit. leave a comment if you'd like one.
probably would be a bit clumsy, but a version that takes 5015 fans too.
thingiverse
free
Raise3D E3D v6 adapter 35mm fan duct by Firesped
...e raise3d n-series printers.
so far35mm fan duct for cold end only35mm fan duct with "always on" volcano hotend cooling
thingiverse
free
Creality Ender 3 - E3D v6 Volcano Mount and Fan Adapter by malamaker
...shcs
2x - m3 nuts
3x - m3 x 8mm shcs
4x - m3 x 15mm shcs see photos for hardware locations. all hardware threads into the plastic
thingiverse
free

E3D J-Head V6 Simple Hotend Mount for Anet ET4 ET4+ ET4 Pro ET4X by gruch4
...urbine with 4x m3 bolts, 4x m3 inserts and printed duct (note that duct is designed for e3d volcano and it needs lots of updates)
thingiverse
free

Smart Effector Fan Assembly
...* of the aforementioned brass parts
print the part-cooling-mounts-no-brass 2 times
print the e3d-ducts once and one more mirrored
thingiverse
free

E3D v6 vulcano fan duct by rmoro
...o's, was bought at robotdigg.
link to the tinkercad page:https://www.tinkercad.com/things/3e2fqngtfsp-e3d-v6-vulcano-fan-duct
thingiverse
free

Kossel Pro Delta E3D V6 End Effector Version 8 by calviniba
...nd print super slow (30mm/s) to be able to print the overhangs properly with no support.
dimensions:
arm width: 41mm
radius: 30mm
thingiverse
free
E3D Titan Mount for Volcano hotend with 40mm fan duct by gyrex
...is. let me know if it works.
requires 4xm3 screws for mounting the fan
1xm3 screw & m3 nut for attaching the fan to the mount
Maxmount
3d_ocean
$19

MaxMounts
...ds max, in a single click. several tweak-able parameters have been provided to get an infinite variety. the script also has an...
thingiverse
free
G2s Pro E3D V6 Maxmount (Now with BL-touch!) by Haabilo
... the most benefit. leave a comment if you'd like one.
probably would be a bit clumsy, but a version that takes 5015 fans too.
grabcad
free

Repeat Drive Max - Mount
...simple carbon fiber mount for repeat drive max gearmotors https://repeat-robotics.com/buy/maxmount ...
3dwarehouse
free

Meade Max Mount 20-inch ACF Telescope RCX400
...mark #20_inch #acf #adjustable #advanced_coma_free #astronomy #declination #latitude #max #maxmount #meade #mount #pier #rcx_400 #rcx400 #right_ascension...
Haabilo
thingiverse
free

30A 12V Universal PSU shroud + switch mount by Haabilo
... switching power supply 360w"
amazon link (no affiliation, or not sure? just the amazon share link):http://amzn.eu/fkmorxb
thingiverse
free

MKS TFT32 CR-10 front mount by Haabilo
...one in a few hours, so any improvements on the design are welcome.
it should be oriented in the way that it is supposed to print.
thingiverse
free

Anycubic Kossel Stock PSU Shroud by Haabilo
...itions moved.
you will need longer screws, as the stock ones are made for thin metal shroud and won't reach through this one.
thingiverse
free

Anycubic Kossel Power Supply (PSU) Shroud/Cover by Nitek
...by nitek thingiverse i modified the psu shroud by haabilo to provide venting without me having to look at...
thingiverse
free
G2s Pro E3D V6 Maxmount (Now with BL-touch!) by Haabilo
... the most benefit. leave a comment if you'd like one.
probably would be a bit clumsy, but a version that takes 5015 fans too.
Rev5
thingiverse
free

naze32 rev5 box by mifau
...s a box for naze32 multicopter flight controller (rev5).
it's made for straight connectors.
just print and remove supports.
thingiverse
free

naze32 rev5 box By mifau Split by FlyingMashedPotatoes
...ngmashedpotatoes
thingiverse
split the top and bottom to separate files because he didn't get around to answering a request.
thingiverse
free
Naze32 Rev5 FunFly & Acro Flight Controller 2g Cover by MichaelErwin
...ill make a version with the additional pins.
will work with straight or right angle esc pins.
not compatible with any dji frame.
thingiverse
free

mini 180 by bauerman
...helices 4' prise lipo xt60 un spacer pour naze32 rev5 et rev6 son maintenant...
thingiverse
free
mini 210 "beta" by bauerman
...multstar 2306 1150 kv hélices 5 pouces max naze32 rev5 camera 32x32mm ccd mise à jour: les spacers intègrent...
thingiverse
free

Shendrones Mixuko shroud by Flypilot
...rev6 fc. added a new design for the naze32 rev5 with the usb port out the...
thingiverse
free

Hex Socket Bit Holder by MrRip
...sort. it says rev2 but it is more like rev5 with all the little tweaks. printed at 300 micron...
thingiverse
free

LED bar holder for Prusa i3
...led bar holder rev4.stl - short led bar holder rev5stl - long festo fittings:https://shop.prusa3d.com/en/mmu2mmu2s/165-festo-fitting-qsm-m5.html tappex...
thingiverse
free

Male Strap Buckle Clip With Adjustable No-Sew Straps by aylr
...point, including notes about the problems of each. only rev5 is worth printing, but they are there if you...
G2S
3ddd
$1
Stand G2
..., stand , ar3
комод-паттерн (g2) design by ar3+
turbosquid
$25
Ring G2
...turbosquid
royalty free 3d model ring g2 for download as stl on turbosquid: 3d models for games, architecture, videos. (1215199)
turbosquid
$19

FAMAS G2
...urbosquid
royalty free 3d model famas g2 for download as fbx on turbosquid: 3d models for games, architecture, videos. (1537479)
3d_ocean
$14

Mobile phone LG G2
... animation and rendering was done in softimage 2013. i am uploading obj. file with textures as well as softimage 2013 file whi...
turbosquid
$29

Pindad G2 Elite
...ree 3d model pindad g2 elite for download as ma, obj, and fbx on turbosquid: 3d models for games, architecture, videos. (1446515)
3d_export
$99

FAMAS G2 3D Model
...ic famas g2 france french fully gun mas rifle semi weapon 3d models assault weapon gun
famas g2 3d model humster3d 94303 3dexport
3d_export
$49

LG G2 3D Model
...g 3g android droid smartphone cell phone mobile cellular tft lcd touchscreen touch screen
lg g2 3d model humster3d 85156 3dexport
turbosquid
$100
Canon PowerShot G2
... available on turbo squid, the world's leading provider of digital 3d models for visualization, films, television, and games.
3d_export
$49

TMobile G2 3D Model
...se gingerbread 233 droid cell phone mobile cellular tft lcd touchscreen touch screen
tmobile g2 3d model humster3d 51180 3dexport
3ddd
$1
Ковёр G2
...ковёр g2
3ddd
ковёр
форматы в архиве:
max.2014
max.2011
obj
fbx
все текстуры присутствуют
E3D
turbosquid
$23

E3D - Google Home
... 3d model e3d - google home for download as max, obj, and c4d on turbosquid: 3d models for games, architecture, videos. (1192509)
cg_studio
free

e3d model
...e3d model
cgstudio
- e 3d model, royalty free license available, instant download after purchase.
turbosquid
$2

Syringe C4D (E3D Ready)
...lty free 3d model syringe c4d (e3d ready) for download as c4d on turbosquid: 3d models for games, architecture, videos. (1336720)
turbosquid
$12

Microphone USB E3D and C4D
...ree 3d model microphone usb e3d & c4d for download as c4d on turbosquid: 3d models for games, architecture, videos. (1568216)
turbosquid
$29

E3D - OnePlus 6 Black
...model e3d - oneplus 6 black for download as max, obj, and c4d on turbosquid: 3d models for games, architecture, videos. (1358534)
turbosquid
$29

E3D - Motorola One 2018
...del e3d - motorola one 2018 for download as max, obj, and c4d on turbosquid: 3d models for games, architecture, videos. (1358533)
turbosquid
$29

E3D - Disney MagicBands 2
...l e3d - disney magicbands 2 for download as max, obj, and c4d on turbosquid: 3d models for games, architecture, videos. (1355515)
turbosquid
$29

E3D - Samsung Z4 Smartphone
...e3d - samsung z4 smartphone for download as max, obj, and c4d on turbosquid: 3d models for games, architecture, videos. (1182179)
turbosquid
$23

E3D - Razer Phone model
...del e3d - razer phone model for download as max, obj, and c4d on turbosquid: 3d models for games, architecture, videos. (1231207)
turbosquid
$23

E3D - Alcatel Idol 5
... model e3d - alcatel idol 5 for download as max, obj, and c4d on turbosquid: 3d models for games, architecture, videos. (1212799)
V6
3d_export
$100

v6 engine
...engine
3dexport
complete v6 engine modeled on solidworks 2017 along with .stl, .sldprt and .sldasm of all th parts and assembly.
3d_export
$10

V6 engine
... the first v6 engines were designed and produced independently by marmon motor car company, deutz gasmotoren fabrik and delahaye.
3d_export
$35

v6 engine
...s a complete model of a v6 engine containing over 400 components. you can contact me for a video of all the components assembling
3d_export
$10

v6 engine
...v6 engine
3dexport
turbosquid
$25

Bed1001-v6
... available on turbo squid, the world's leading provider of digital 3d models for visualization, films, television, and games.
turbosquid
$22

Chair2-v6
... available on turbo squid, the world's leading provider of digital 3d models for visualization, films, television, and games.
turbosquid
$20

V6.mb
... available on turbo squid, the world's leading provider of digital 3d models for visualization, films, television, and games.
3d_export
$20

V6 engine
...rovided in this package is all the parts in sldprt format and assembly in sldasm format. i can also convert the format on demand.
3ddd
$1

Стол V6
...6" в стиле дизельпанк изготовлен из блока двигателя, 4х поршней и 4х шатунов.
столешница изготовлена из стекла толщиной 8мм.
cg_studio
$199

V6 VVTi3d model
...v6 vvti3d model
cgstudio
.3ds - v6 vvti 3d model, royalty free license available, instant download after purchase.
Pro
turbosquid
$29

Pro
...ree 3d model mac pro for download as obj, c4d, fbx, and blend on turbosquid: 3d models for games, architecture, videos. (1505782)
turbosquid
$15

Apple Mac Pro and Pro Display
...ee 3d model apple mac pro and pro display for download as max on turbosquid: 3d models for games, architecture, videos. (1417078)
3d_export
$5

iphone 13 pro max and pro
...3 pro max and 13 pro the model is made in four colors (graphite, gold, silver, and blue), all of which are attached in the files.
3d_export
free

sapphire pro
...sapphire pro
3dexport
sapphire pro 3d printer head mask
3d_export
$4

macbook pro
...macbook pro
3dexport
macbook pro 13" inch 2020 years model
3ddd
free

GentleLase Pro
... syneron , candela
gentlelase pro аппарат для лазерной эпиляции
turbosquid
$25

PRO frame
...rbosquid
royalty free 3d model pro frame for download as max on turbosquid: 3d models for games, architecture, videos. (1148329)
turbosquid
$5

Alien pro
...osquid
royalty free 3d model alien pro for download as blend on turbosquid: 3d models for games, architecture, videos. (1678446)
turbosquid
$5

iphone11 pro
...uid
royalty free 3d model iphone11 pro for download as blend on turbosquid: 3d models for games, architecture, videos. (1562707)
3ddd
$1

Mac Pro (appel)
...mac pro (appel)
3ddd
компьютер , apple
mac pro