Thingiverse
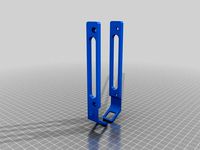
Replicator 2X Fan Duct by jmcskixc
by Thingiverse
Last crawled date: 2 years, 12 months ago
ATTN: Work-In-Progress!! I'm still working out some details in the model. Also this design may not blow enough air to be very effective. Tubeaxial fans can move a lot of air (CFM) but they aren't very good at generating pressure (as in through a nozzle). I'm working on a second design using a blower-style fan which generates about 6x the pressure, which may work better.
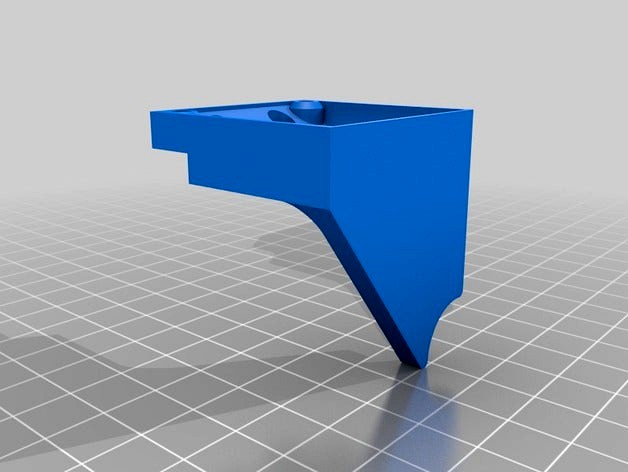
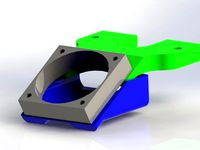
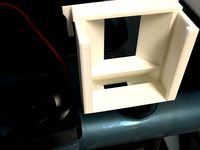
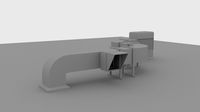
This thing allows you to add the third cooling fan to a Replicator 2X. The third fan cools the freshly extruded plastic, which is critical for successful PLA printing.
It cools only the right-side nozzle. If you want to cool the left side, just mirror the part before printing. I may add a mirrored version soon.
This part requires no modifications to the Replicator itself. However, you will need to snip off one of the mounting ears on each of the fan grilles or the screws may not be long enough to thread into the stepper motors.
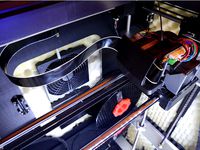
I added a wire to the unused fan output on the factory board and ran it up and around to the extruder. I bought a 24v fan on Digikey (the Rep's fans are all 24v fans) as well as the plug-in connectors for the wiring. This way you can unplug the fan as needed, and the wire simply plugs in to the Replicator's board.
Wiring:
You'll need to solder two of the crimp connectors to one end of your 2-conductor wire. Trim the fan leads down to about 2 inches long and solder two crimp connectors to the fan as well. Insert the crimp fittings into the plastic housings to make a plug. Plug this end of the wire into the fan output on the board and run the wire up and over to the extruder. I zip-tied it in place along the existing wiring harness. Then cut the wire to rough length and solder on the female connector that receives the fan's plug (this connector already has the pins in it). Watch your polarities here, you don’t want the fan to run in reverse. You may choose to add some very small heat shrink tubing on these solder joints, but it’s not critical depending on how you have things arranged.
Mechanical assembly:
Remove the middle two long screws that go through the fans, through the extruder, and back into the stepper motors. Use wire cutters and snip off the mounting ears for the fan grilles in these two locations. Don't worry, one screw is more than sturdy enough to keep each grille in place (or just get rid of the grilles altogether). The tension in the assembly should keep the plastic spacers in place between the fans and the heatsinks. Insert the screws in the middle holes of the duct. Insert the screws back where they go and push the whole assembly back together. The thickness of the duct replaces the space previously occupied by the grille mounting ears. Tighten the screws snugly but not too tight.
(If the spacers fall out, you may need to remove the other two screws and slide everything together first, then install the whole deal onto the heater block. You can also just tack the spacers to the fans with a little CA glue.)
Mount the fan to the duct in the remaining holes. I used some small #6 screws and nuts, commonly available at any hardware store, Lowes, Home Depot, McMaster-Carr, etc. Plug the fan into the plug on the wire you installed earlier and that's it.
With the combination of stock firmware and Makerbot Desktop, the cooling fan is controlled manually with the on-board menu on the Replicator 2X. I just wait until the first layer or two is down, then manually turn the fan on and leave it on. I'm sure there's a more sophisticated way to handle the fan control, but up to this point I was more concerned with getting it wired and mounted. Comments are suggestions are welcome.
Part Numbers:
Fan:
Digi-Key Part Number P15610-ND Manufacturer Part Number
1606KL-05W-B30-L00
Connectors:
Digi-Key Part Number 455-2266-ND Manufacturer Part Number
XHP-2
Digi-Key Part Number 455-2879-ND Manufacturer Part Number
B2B-XH-A-M(LF)(SN)
Digi-Key Part Number 455-2261-1-ND Manufacturer Part Number
SXH-002T-P0.6
Wire:
I used some leftover fine 2-conductor wire I had laying around. Other good choices are the cord from an old mouse, or fan wires from the inside of an old PC. Just use something thin enough to be flexible and fir the application appropriately. These fans don't draw much current, esp at 24 volts.
This thing allows you to add the third cooling fan to a Replicator 2X. The third fan cools the freshly extruded plastic, which is critical for successful PLA printing.
It cools only the right-side nozzle. If you want to cool the left side, just mirror the part before printing. I may add a mirrored version soon.
This part requires no modifications to the Replicator itself. However, you will need to snip off one of the mounting ears on each of the fan grilles or the screws may not be long enough to thread into the stepper motors.
I added a wire to the unused fan output on the factory board and ran it up and around to the extruder. I bought a 24v fan on Digikey (the Rep's fans are all 24v fans) as well as the plug-in connectors for the wiring. This way you can unplug the fan as needed, and the wire simply plugs in to the Replicator's board.
Wiring:
You'll need to solder two of the crimp connectors to one end of your 2-conductor wire. Trim the fan leads down to about 2 inches long and solder two crimp connectors to the fan as well. Insert the crimp fittings into the plastic housings to make a plug. Plug this end of the wire into the fan output on the board and run the wire up and over to the extruder. I zip-tied it in place along the existing wiring harness. Then cut the wire to rough length and solder on the female connector that receives the fan's plug (this connector already has the pins in it). Watch your polarities here, you don’t want the fan to run in reverse. You may choose to add some very small heat shrink tubing on these solder joints, but it’s not critical depending on how you have things arranged.
Mechanical assembly:
Remove the middle two long screws that go through the fans, through the extruder, and back into the stepper motors. Use wire cutters and snip off the mounting ears for the fan grilles in these two locations. Don't worry, one screw is more than sturdy enough to keep each grille in place (or just get rid of the grilles altogether). The tension in the assembly should keep the plastic spacers in place between the fans and the heatsinks. Insert the screws in the middle holes of the duct. Insert the screws back where they go and push the whole assembly back together. The thickness of the duct replaces the space previously occupied by the grille mounting ears. Tighten the screws snugly but not too tight.
(If the spacers fall out, you may need to remove the other two screws and slide everything together first, then install the whole deal onto the heater block. You can also just tack the spacers to the fans with a little CA glue.)
Mount the fan to the duct in the remaining holes. I used some small #6 screws and nuts, commonly available at any hardware store, Lowes, Home Depot, McMaster-Carr, etc. Plug the fan into the plug on the wire you installed earlier and that's it.
With the combination of stock firmware and Makerbot Desktop, the cooling fan is controlled manually with the on-board menu on the Replicator 2X. I just wait until the first layer or two is down, then manually turn the fan on and leave it on. I'm sure there's a more sophisticated way to handle the fan control, but up to this point I was more concerned with getting it wired and mounted. Comments are suggestions are welcome.
Part Numbers:
Fan:
Digi-Key Part Number P15610-ND Manufacturer Part Number
1606KL-05W-B30-L00
Connectors:
Digi-Key Part Number 455-2266-ND Manufacturer Part Number
XHP-2
Digi-Key Part Number 455-2879-ND Manufacturer Part Number
B2B-XH-A-M(LF)(SN)
Digi-Key Part Number 455-2261-1-ND Manufacturer Part Number
SXH-002T-P0.6
Wire:
I used some leftover fine 2-conductor wire I had laying around. Other good choices are the cord from an old mouse, or fan wires from the inside of an old PC. Just use something thin enough to be flexible and fir the application appropriately. These fans don't draw much current, esp at 24 volts.
Similar models
thingiverse
free

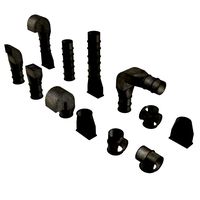
SK-GO AF-1 Cooling duct
...n place of the stock 24v cooling fan. you will need two 3m x 20 screws to mount the fan and two 3m x 12 screws to mount the duct.
grabcad
free

Flange Mount SMA Connector
...flange mount sma connector
grabcad
manufacturer product number:9376-9113-001
digi-key part number:2201-9376-9113-001-nd
grabcad
free

Flange Mount(4 hole) SMA Connector
...flange mount(4 hole) sma connector
grabcad
manufacturer product number:9376-9113-001
digi-key part number:2201-9376-9113-001-nd
thingiverse
free
Wade extruder J-head fan mount by Dainis
...n.
added air duct that cools the upper part of hot end (cold end). it makes it really cool, if you use additional radiators...
thingiverse
free

Replicator Ducted Fans Clip-on to (a) cool Print by funbart
...ingiverse
push these fan ducts in the gap between extruder fan and mounting. the fans will cool your print as well the extruder.
thingiverse
free

Reinforced Dual Fan mount for Prusa i3 MK3S by MrToyz
...the two extra wires and refit the original mounting.
if printing in abs, i recommend using localized brims for under the corners.
thingiverse
free
QIDI X-Plus X-Max Extruder Fan Upgrade by humebeam
...qidi x-plus x-max advanced extruder cover: https://www.thingiverse.com/thing:4607027 it has similar functions and features an upgraded 40 mm fan, a...
thingiverse
free
Solidoodle Pico Hot-End Cooling Fan Duct (with mk5 mount) by eckerj
...onnectors, etc) but the 40mm fan that comes with the pico fits in nicely, and the duct mounts nicely to lawsy's mk5 extruder.
thingiverse
free

FlashForge Creator & Pro Connectors by agilliam
...9;s quality control.
if i have missed something or have any questions please contact me. hope this helps someone else out there.
thingiverse
free
Male Fan Connectors by MakerBlock
...ecided to design a connector that both pieces could fit into.
the stl creates four of these connectors, you'll only need one.
Jmcskixc
thingiverse
free

Orange peeler tool by jmcskixc
...ler tool by jmcskixc
thingiverse
my design for a simple tool to make peeling citrus fruits easier. this one seems to work well.
thingiverse
free
Lenovo C20 Hard Drive Rails by jmcskixc
...lenovo c20 hard drive rails by jmcskixc
thingiverse
slide-in mounting rails for a lenovo c20 computer hard drive.
thingiverse
free

National Instruments DAQ chassis mounting bracket by jmcskixc
... instruments daq chassis mounting bracket by jmcskixc
thingiverse
basic bracket to mount a ni daq chassis to a test rig or cart.
thingiverse
free

NI DAQ Chassis mounting spacer by jmcskixc
...e says it all. tubular spacers for mounting a daq chassis to a flat surface. allows airflow and wires to pass beneath the unit.
thingiverse
free

Simple Keg Tap Handle by jmcskixc
... use some washers or cardboard shims to fix the rotation if the thing doesn't face forward when it's fully screwed down.
thingiverse
free

Paper tower dispenser key by jmcskixc
...ecause it has to be so thin it's pretty flimsy. works great in a pinch. the stiffness of pla seems to work better than abs.
thingiverse
free

First-gen Miata side mirror ball mount by jmcskixc
...nt replacement for first-gen miata. modeled and used by one of the engineers here on his personal vehicle. seems to work great.
thingiverse
free

Bicycle freewheel pin spanner wrench by jmcskixc
...ns (roll pins or split-pins should work well) into the two holes. current model has 1.5" center-to-center between the pins.
thingiverse
free

Universal Phone Desk Stand by jmcskixc
...r x-acto knife.
simply scale it up to use with a tablet.
update: reduced the size of the stl file to a more reasonable 17mb.
thingiverse
free
Classy Keg Tap Handle with Plaque by jmcskixc
... use some washers or cardboard shims to fix the rotation if the thing doesn't face forward when it's fully screwed down.
Replicator
turbosquid
$5

Bucati USB Stick "replic"
... available on turbo squid, the world's leading provider of digital 3d models for visualization, films, television, and games.
3d_export
$75

3D Scania S730 8x4 Recovery SWS Edition
... of work with custom made parts to replicate the real truck unit<br>textures included<br>format available : obj files
3ddd
$1

Restoration Hardware - 1950s Dutch Shipyard Triple Shelving
...right to access the lofty upper shelves. crafted from solid walnut and iron, its antiqued finish replicates an aged, worn patina.
3d_export
$50

3D Scania Vabis 110 Model
...s 110 truck<br>very detailed and accurate replicated model<br>textures included<br>format available : obj files
3d_export
$11

Batman
...eled to replicate the original lego model to meet the highest quality , each part are arranged in hierarchy and parented objects.
3d_export
$85

3D Scania S730T Omars Recovery Truck Model
...ded<br>format available: obj file<br>on request,after purchase,i can offer other file formats the customer is in need
3d_ocean
$10

Star Wars: Anakin Skywalker Lightsaber
...tsaber of anakin skywalker. it contains a fairly high amount of polygons, suitable for semi-close up renders. main focus is it...
3d_ocean
$30

Ashley Jaidyn Poster Bedroom Set
...esser, mirror, chest. all models are made in compliance with the proportions and sizes of real furniture. with the replicated ...
3d_ocean
$10
Ashley Stages Chest
...w x 16”d x 49”h. material: wood products and other. color: replicated pine grain. this model is made in accordance with the pr...
3d_ocean
$6

Ashley Stages Table Lamp
...other. color: replicated pine grain. this model is made in accordance with the proportions and sizes of real furniture. the di...
Duct
turbosquid
$19
Duct Set
...d
royalty free 3d model duct set for download as max and fbx on turbosquid: 3d models for games, architecture, videos. (1145038)
turbosquid
$10
Duct Tape
...id
royalty free 3d model duct tape for download as ma and ma on turbosquid: 3d models for games, architecture, videos. (1580351)
turbosquid
free
Duct Tape
...
free 3d model duct tape for download as obj, fbx, and blend on turbosquid: 3d models for games, architecture, videos. (1486518)
3d_ocean
$7
Air-duct
... ventilation
high quality industrial air duct ventilation model. created in cinema 4d but comes in various other formats as well.
turbosquid
$20
Air ducts
...lty free 3d model air ducts for download as max, obj, and fbx on turbosquid: 3d models for games, architecture, videos. (1262476)
3d_export
$10

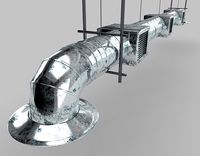
Supply air duct
...supply air duct
3dexport
supply air duct with two axial fans and hangers
turbosquid
$2
Duct Tape
...e 3d model duct tape for download as obj, fbx, blend, and dae on turbosquid: 3d models for games, architecture, videos. (1473972)
turbosquid
free

Duct Tape
... available on turbo squid, the world's leading provider of digital 3d models for visualization, films, television, and games.
3d_ocean
$3
Duct tape
...polys. includes: cinema 4d project. model in 3 formats (obj, fbx, 3ds). 6 .tga texture maps (albedo, ambient occlusion, diffus...
turbosquid
$40
Ventilation Duct PACK
...tion duct pack for download as ma, obj, fbx, and unitypackage on turbosquid: 3d models for games, architecture, videos. (1287068)
2X
3ddd
$1
modular u shape 2x
...modular u shape 2x
3ddd
modular
точечный светильник modular u shape 2x
turbosquid
$20

Modern Sofa 2x
... available on turbo squid, the world's leading provider of digital 3d models for visualization, films, television, and games.
turbosquid
$7

Spartan Helmets 2x
... available on turbo squid, the world's leading provider of digital 3d models for visualization, films, television, and games.
turbosquid
$4

Grenade Pack 2x
... available on turbo squid, the world's leading provider of digital 3d models for visualization, films, television, and games.
3d_ocean
$17

Modern Sofa 2x
...only tri and quad polygons) • real-world sizes and proportions • the model is grouped for easy selection and placing in your s...
archive3d
free
Sofa 2x 3D Model
...sofa 2x 3d model
archive3d
sofa divan
archive3d
free

Bed 2x 3D Model
...bed 2x 3d model
archive3d
bed beds
archive3d
free

Sofa 2x 3D Model
...sofa 2x 3d model
archive3d
sofa silik
archive3d
free

Case 2x 3D Model
...case 2x 3d model
archive3d
wardrobe case
3ddd
$1

Butterfly Sofa 2x
...butterfly sofa 2x
3ddd
butterfly
полезный диванчик для гостиной. в двух цветовых решениях
Fan
3d_export
$5

fan
...fan
3dexport
fan 3d model, table fan, fan, electric fan, ventilator
archibase_planet
free

Fan
...fan
archibase planet
fan large fan
fan out n260707 - 3d model for interior 3d visualization.
archibase_planet
free

Fan
...fan
archibase planet
fan ceiling fan ventilator
fan stealth n300615 - 3d model (*.gsm+*.3ds) for interior 3d visualization.
3d_export
$15

fan
...fan
3dexport
is an ancient fan
3ddd
$1

Fan-C-Fan by marco gallegos
...n-c-fan by marco gallegos
3ddd
вентилятор , marco gallegos
fan-c-fan by marco gallegos
3d_export
$10

fan
...fan
3dexport
a detailed fan designed for home or space blowing is now available for only 19.99!
turbosquid
$1

Fan
...fan
turbosquid
free 3d model fan for download as on turbosquid: 3d models for games, architecture, videos. (1427865)
turbosquid
$14

Fan
...fan
turbosquid
royalty free 3d model fan for download as on turbosquid: 3d models for games, architecture, videos. (1415642)
3ddd
$1

Светильник Fan
...светильник fan
3ddd
fan , italamp
светильник fan, производитель italamp
turbosquid
$25

Fan
...fan
turbosquid
royalty free 3d model fan for download as c4d on turbosquid: 3d models for games, architecture, videos. (1483246)