Thingiverse
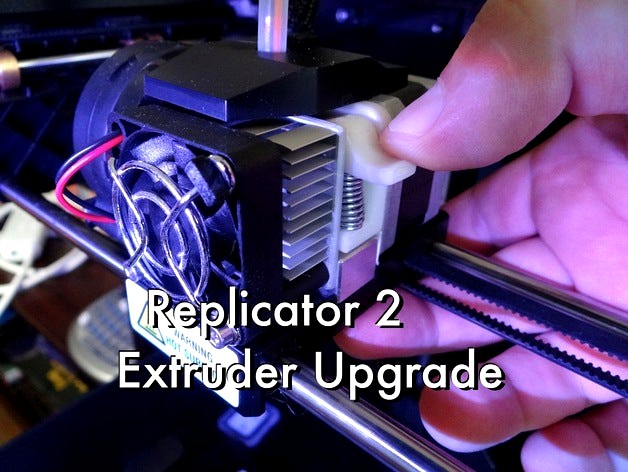
Replicator 2 Extruder Upgrade by whpthomas
by Thingiverse
Last crawled date: 2 years, 11 months ago
This extruder upgrade for the Replicator 2 replaces the Delrin plunger with a pinch roller. Using the spring specified in the parts list below, this pinch roller provides about 60N of force on the filament, which provides enough driving pressure on the filament, in combination with the stepper drive gear to prevent stripping.
Unlike other designs, this one uses a pin style bush on which the pinch arm rotates. This provides a large lower friction surface for the pinch wheel arm to rotate on, and allows the mounting screw to be fully tightened so there is no chance of it working loose.
I have extensively tested this design, which has evolved through numerous iterations, and I have also tested several different springs. With the specified spring I can hold the drive gear with my thumb and pull hard on the filament without it stripping, and its done numerous unattended prints with troublesome clear PLA filament - so I can confidently say it works.
UPDATE (Mar 4th 2013)
In v7 I have added a filament guide slot to the bottom of the backing plate. I added a spring channel to hold the spring in place and stiffen the backing plate. I redesigned the arm geometry to make it pivot better - compressed and uncompressed. I altered the pin so one side now holds the base plate down against the stepper motor.
This extruder upgrade was designed using an ACIS solid in Shark FX/ViaCAD (vc3 file included) so will behave well with Makerware, ReplicatorG and skeinforge. There are also STEP files that can be imported into other CAD programs.
Print and source parts, disassemble extruder, upgrade and reassemble, enjoy life 3D printing.
Now that the Replicator 2 ships with an injection moulded version of this extruder upgrade, much of what I have stated below is moot. I hope the current crop of the Replicator 2 owners run into less problems than we early adopters experienced.
RATIONALE
I have come to the considered view that the design of the Delrin plunger drive arrangement on the MakerBot Replicator 2 is defective. It uses a grub screw seated on a rubber O-ring to provide pressure on the filament to keep it in contact with the drive gear (see picture). The problem with using a rubber elastomer as a spring is that it will tend to seat-in over time, loosing some of its 'springiness' and requiring adjustment. However on the Replicator 2, adjustment of the plunger grub screw also requires the extruder unit to be partially disassembled. Now that the blower fan uses self-tapping screws, it doesn't seem like a good idea to be constantly removing and inserting those screws into plastic threads. More to the point, the amount of spring travel provided by the rubber elastomer is not sufficient to accommodate variations in filament diameter from 1.7mm to 1.8mm and maintain even drive pressure. Unfortunately some rolls of filament contain this degree of variation within the roll. In my experience, clear and white PLA are particularly troublesome. Failure of this plunger mechanism to maintain consistent drive pressure during printing leads to failed prints, wasted filament and printer downtime.
The MakerBot website claims that "Replicator 2 has been engineered with the professional designer in mind". I am a professional product designer, and I do not feel that the Replicator 2 Delrin plunger drive arrangement, with these inherent problems, fulfils this usability objective.
So I set about to design an upgrade that used parts which were readily available, an upgrade that could be printed reliably, and one that worked as expected.
PRINTED PARTS
I printed the Mk8-Upgrade-Base and Mk8-Upgrade-Arm using my 100 micron ReplicatorG profile thingiverse.com/thing:39050 with the following settings:
Infill 100%
Layer Height 0.15mm
Number of shells 1
Feedrate 80 mm/s
Travel Feedrate 150 mm/s
Make sure you use a PLA that prints reliably on your machine. However, some more experienced Makerbot operators are recommending printing these parts in Black PLA because black has a higher melting point. Nevertheless, solid parts printed in Black PLA are prone to warping, so I have added ear tabs to hold them down on the build plate better. Seeing these have 100% infill, its not a bad idea to print these bit leaner than you normally would by increasing the filament diameter in Print-O-Matic by +0.03mm.
Once printed, ream out the holes on the arm with an M6 and M8 reamer (if you have them) or similarly sized drill bits. This will ensure the parts mate without friction. You can ream out the filament feed hole with the second smallest hex wrench provided with your Replicator 2.
There is also a snap-off support on the bottom of the Base that is there to act as a bridge to support the printing of the recessed area. Carefully use a sharp knife to cut this off and use a small flat file to clean the area of any loose strands of filament. There is 0.5mm clearance here so it doesn't need to be perfect.
I printed the Mk8-Upgrade-Pin using my 100 micron ReplicatorG profile with the following settings:
Infill 100%
Layer Height 0.1mm
Number of shells 1
Feedrate 80 mm/s
Travel Feedrate 150 mm/s
If you don't have a set of metric reamers or drill bits I recommend printing two of these Pins and use the first one with a pair of pliers to ream out the holes. Insert it into each hole separately and twist it around, the flat edge on the pin will tend to act like a reamer and clean out the hole for you. I have tested this approach just to make sure it works.
SPRING
You will need a 3/8" x 1-1/8" x 0.041" compression spring.
This is available from Home Depot (see photo). It is the middle sized one in the pack but check the dimensions on the pack to ensure you buy the right pack. The same spring is also available in the US at True Value hardware stores.
It is also made by Century Spring Corp. The model number on a store bought packet is C-624, but on the website a similar spring has model number on 519. Phone 800-237-5225http://www.centuryspring.com/Store/item_detail.php?StockNumber=519
The C-624 has been spotted on Amazon herehttp://www.amazon.com/gp/product/B000LNXYHC/
and on eBayhttp://www.ebay.com/sch/i.html?_nkw=C-624+spring
If you live in Australia the C-624 has been sited in Bunnings Hardware Stores.
Sodemann Industrial Springs has a metric spring that provides a similar 30N of force, its model number is C03600401120S.http://www.industrial-springs.com/online-shop/search.aspx?pid=C03600401120S
BEARING
623Z - 3mm ID, 10mm OD, 4mm width
You can get these on ebay, some hobby shops, and small industrial part suppliers. In the US you can pick up one at your local Fastenal store. In Australia, they are available online from BilbyCNC http://www.bilbycnc.com.au
This bearing has also been spotted on Amazon herehttp://www.amazon.com/gp/product/B002BBAYDY
MOUNTING HARDWARE
You will need two M3 x 10mm counter sunk hex head screws, just like the ones Makerbot uses to hold the plunger assembly on, only shorter. If you can't get hex head, M3 phillips head countersunk screws will also do. If you can't get 10mm lengths, then an 8mm and a 12mm will suffice.
UPGRADE INSTRUCTIONS
Unload the filament form your extruder and wait for it to cool down. Wait until the heat-sink fan stops spinning.
Turn off the power to your Replicator 2.
Unplug the stepper motor and unscrew the two stainless steel hex head cap screws on the front of the heat-sink fan using the second biggest hex wrench provided. This will allow the extruder stepper motor and plunger assembly to be removed.
Using the second smalest hex wrench, unscrew the Delrin plunger assembly from the stepper motor. Keep one of the hex head screws for the upgrade, the remaining parts can be placed in a Ziploc bag for safe keeping.
Make sure the base plate and parts all fit together - sand and file as required. Make sure that the holes in the plate and arm have been reamed so the pin can be inserted with moderate force and has a firm fit (see instructions above for details).
Use the 10mm (or 8mm) counter sunk hex head screw to mount the Base plate on the stepper motor (see picture). I orientate the wiring block on the left hand side because I think having it on the top is rather unsightly.
Push the bearing into the slot in the arm and use the 10mm (or 12mm) counter sunk hex head screw hold it in place.
Push the pin into the pinch wheel arm, and mount it onto the base plate. Now take the long counter sunk hex head screw left over from the Delrin plunger assembly and insert it into the hole in pin and tighten until snug. I recommend that the flat edge of the pin be orientated so its facing away from the drive gear wheel (see photos) that way all of the load is spread evenly against the curved face.
Compress the spring and insert it into place.
Position the upgraded assembly on the back of the extruder and mate it with the two stainless steel hex head cap screws, then gradually tighten using finger pressure, making sure not to cross thread. They just need to be snug, so don't over tighten them.
If you live in a hot tropical climate, consider making a gasket out of some card to isolate the stepper from the cooling block (see photo).
LOADING AND UNLOADING FILAMENT
You can just use the preheat menu now if you like.
To load, grab the extruder with your right hand and supporting it underneath with your fingers, press down on the pinch wheel arm with the tip of your thumb. This releases the pinch pressure. You should be able insert the filament right down into the extruder tube, and see it oozing out the tip.
To unload, wait for the preheat to reach 230c, then do the same thing as above to release the pinch pressure and pull the filament out.
STILL HEARING CLICKS AND EXPERIENCING STALLS
Check your packing density in skeinforge Dimension is 0.97 ~ 1.0 then measure and update your filament diameter in Print-O-Matic, it should be 173 +/- 2. You can also download my 100 and 200 micron skeinforge profiles here: thingiverse.com/thing:39050
Finally if you are still struggling with stubborn PLA filament, try a drop of olive or canola oil on your finger, lift up the filament feed tube on your extruder and rub a light film of oil over the first 50mm ~ 100mm of filament. That should do the trick :)
I had wondered at first if vegetable oil would effect the print strength, but I see no evidence of this. So I look at it like this, PLA is like high-tech cheese - if you melt cheese in a pan with oil, the oil and cheese separate, and the cheese melts and bonds together - I figure the hot PLA and vegetable oil do a similar thing - the oil ( and it is only a very small amount we are talking about) moves to the outer surface as the filament bonds due to the oils lower viscosity and the changing surface tension.
From what I understand these vegetable oils only burn above 246c ~ 266c (See http://en.wikipedia.org/wiki/Smoke_point), so while it may be adding some sort of a patina inside the heating chamber (much like you season a cast iron pan), it shouldn't cause any burnt deposits that might gum up the system - but be cautious, I would apply vegetable oil very very sparingly, and only when you think you need to.
REMEDIAL ACTION
If your extruder stepper motor should happen to overheat in 45 degree c summer heat, it may cause the PLA arm to soften and bend out of shape. If this happens to you, don't be alarmed there is a quick remedy. Remove the arm from the stepper motor and holding it by the bearing screw, dip it into a cup of boiling hot water for about a minute (make sure not to wet the bearing). Once soft, bend the arm back to how it should be and allow to cool, then re-install - good as new!
Similar models
thingiverse
free

Delrin Plunger Replacement for Replicator 2 MK8 Extruder by FunbieStudios
...pgrade to arrive, we designed and printed out a replacement head for it. it still makes use of the stock screw and rubber o-ring.
3dwarehouse
free

Spring plunger hex socket and pressure pin...- pin in Delrin - M10 standard spring
...pin long-lok secured - steel - pin in delrin #03000__indexing_and_locating #03051110 #green_standard_tooling #norelem #traceparts
3dwarehouse
free

Spring plunger hex socket and pressure pin...- pin in Delrin - M16 standard spring
...pin long-lok secured - steel - pin in delrin #03000__indexing_and_locating #03051116 #green_standard_tooling #norelem #traceparts
3dwarehouse
free

Spring plunger hex socket and pressure pin...- pin in Delrin - M12 standard spring
...pin long-lok secured - steel - pin in delrin #03000__indexing_and_locating #03051112 #green_standard_tooling #norelem #traceparts
3dwarehouse
free

Spring plunger hex socket and pressure pin...steel - pin in Delrin - M5 standard spring
...pin long-lok secured - steel - pin in delrin #03000__indexing_and_locating #03051105 #green_standard_tooling #norelem #traceparts
3dwarehouse
free

Spring plunger hex socket and pressure pin...steel - pin in Delrin - M8 standard spring
...pin long-lok secured - steel - pin in delrin #03000__indexing_and_locating #03051108 #green_standard_tooling #norelem #traceparts
3dwarehouse
free

Spring plunger hex socket and pressure pin...steel - pin in Delrin - M6 standard spring
...pin long-lok secured - steel - pin in delrin #03000__indexing_and_locating #03051106 #green_standard_tooling #norelem #traceparts
3dwarehouse
free

Spring plunger hex socket and pressure pin...secured - steel - pin in Delrin - M10
... pin long-lok secured - steel - pin in delrin #03000__indexing_and_locating #0305110 #green_standard_tooling #norelem #traceparts
3dwarehouse
free

Spring plunger hex socket and pressure pin...secured - steel - pin in Delrin - M16
... pin long-lok secured - steel - pin in delrin #03000__indexing_and_locating #0305116 #green_standard_tooling #norelem #traceparts
3dwarehouse
free

Spring plunger hex socket and pressure pin...secured - steel - pin in Delrin - M12
... pin long-lok secured - steel - pin in delrin #03000__indexing_and_locating #0305112 #green_standard_tooling #norelem #traceparts
Whpthomas
thingiverse
free

Cello Donut for Carpet by whpthomas
...mas
thingiverse
this spiked cello donut is compact and light and holds the endpin firmly in place on carpeted music room floors.
thingiverse
free

Gnome Gears by whpthomas
...sh challenge. this is another object mashup created with my pla gear kit, this time using makerbot's gnome as the stl object.
thingiverse
free
Tardis Gears by whpthomas
...pins remain the same, it is only the outer shells that changes. this will allow the creation of all sorts of gear object mashups.
thingiverse
free

Totoro Gears by whpthomas
... joo's totoro (from the 1988 japanese children's animated film written and directed by hayao miyazaki) as the stl object.
thingiverse
free

Football Gears by whpthomas
... answer is generally some one-off design that is completely unique! this is an afl football with a stand and pla compatible pins.
thingiverse
free
Hexaflexagon by whpthomas
...
if you are not familior with the joys of hexaflexagation, here is viheart's video on the subject http://youtu.be/viviegst81k
thingiverse
free

AluCarriage Bearing Shim by whpthomas
...re materials on the replicator 2. this shim provides something for the grub screws to push against to hold the carriage in place.
thingiverse
free
PLA Companion Cube Gears by whpthomas
...is another object mashup created with my new pla gear kit, this time using landru's companion cube upgrade as the stl object.
thingiverse
free

Customizable Starfish by whpthomas
...the waters off the coast where i live. my kids have rescued many of these starfish when they become stranded during spring tides.
thingiverse
free

School Shoelace Badges by whpthomas
...of shoelace badges. they have turned out to be quite a popular item, printed in batches with two colors to highlight the design.
Replicator
turbosquid
$5

Bucati USB Stick "replic"
... available on turbo squid, the world's leading provider of digital 3d models for visualization, films, television, and games.
3d_export
$75

3D Scania S730 8x4 Recovery SWS Edition
... of work with custom made parts to replicate the real truck unit<br>textures included<br>format available : obj files
3ddd
$1

Restoration Hardware - 1950s Dutch Shipyard Triple Shelving
...right to access the lofty upper shelves. crafted from solid walnut and iron, its antiqued finish replicates an aged, worn patina.
3d_export
$50

3D Scania Vabis 110 Model
...s 110 truck<br>very detailed and accurate replicated model<br>textures included<br>format available : obj files
3d_export
$11

Batman
...eled to replicate the original lego model to meet the highest quality , each part are arranged in hierarchy and parented objects.
3d_export
$85

3D Scania S730T Omars Recovery Truck Model
...ded<br>format available: obj file<br>on request,after purchase,i can offer other file formats the customer is in need
3d_ocean
$10
Star Wars: Anakin Skywalker Lightsaber
...tsaber of anakin skywalker. it contains a fairly high amount of polygons, suitable for semi-close up renders. main focus is it...
3d_ocean
$30

Ashley Jaidyn Poster Bedroom Set
...esser, mirror, chest. all models are made in compliance with the proportions and sizes of real furniture. with the replicated ...
3d_ocean
$10
Ashley Stages Chest
...w x 16”d x 49”h. material: wood products and other. color: replicated pine grain. this model is made in accordance with the pr...
3d_ocean
$6
Ashley Stages Table Lamp
...other. color: replicated pine grain. this model is made in accordance with the proportions and sizes of real furniture. the di...
Upgrade
turbosquid
$15

Upgraded Glock
...e 3d model upgraded glock for download as obj, fbx, and blend on turbosquid: 3d models for games, architecture, videos. (1185950)
3ddd
$1

Calligaris / UPGRADE
...calligaris / upgrade
3ddd
calligaris
c материалом
3d_export
free

cz upgrade
...cz upgrade
3dexport
https://www.buymeacoffee.com/mestrezen3d https://linktr.ee/mestrezen3
turbosquid
$80

Custer Tank upgrade
... available on turbo squid, the world's leading provider of digital 3d models for visualization, films, television, and games.
turbosquid
$39

Domestos 1 upgrade
... available on turbo squid, the world's leading provider of digital 3d models for visualization, films, television, and games.
3d_export
$10

Upgraded tea cup
...upgraded tea cup
3dexport
a cup with an unusual design and a unique shape for a more enjoyable tea experience
3d_export
$8

dixy outlander classic style upgraded poplar wood lounge chair
...utlander classic style upgraded poplar wood lounge chair
3dexport
dixy outlander classic style upgraded poplar wood lounge chair
turbosquid
free

AK-12 + Upgrades low-poly 3D model
...ow-poly 3d model for download as fbx, blend, and unitypackage on turbosquid: 3d models for games, architecture, videos. (1501145)
evermotion
$700

Upgrade from V-ray 1.5 to 3.5 for 3ds max
...here is no need to purchase a new dongle - your current dongles will be reprogrammed to carry v-ray 3. evermotion 3d models shop.
evermotion
$300

Upgrade from V-Ray 2.0 to V-ray 3.5 for 3ds Max
... interface (gui) for editing settings on one machine and one render node for rendering on one machine. evermotion 3d models shop.
Extruder
3ddd
$1

Extruded Chair
...extruded chair
3ddd
extruded , tom dixon
inspired by tom dixon extruded chair
turbosquid
$2

3D Printer Extruder
...d
royalty free 3d model 3d printer extruder for download as on turbosquid: 3d models for games, architecture, videos. (1537359)
turbosquid
$1

Zombie extruded text
...oyalty free 3d model zombie extruded text for download as obj on turbosquid: 3d models for games, architecture, videos. (1322198)
turbosquid
$4

Extruder conical screw
...el extruder conical screw for download as sldpr, ige, and stl on turbosquid: 3d models for games, architecture, videos. (1524433)
turbosquid
$50

3d PRINTER - Extruder
... available on turbo squid, the world's leading provider of digital 3d models for visualization, films, television, and games.
3d_export
$5

world earth extrude map
...world earth extrude map
3dexport
3ddd
$1

Simply Elegant Extruded Tree Coffee Table Design
...ble by link studios. the silhouette of a tree is visible at one angle, extruded from the surface to create the support structure.
3d_export
$13
extruded table
...ed to give you the highest possible quality for up to 4k renders. there is no post-production used on any of the renders you see.
3d_export
$13
extruded chair
...for high-quality render results. no extra plugins are required for this model. lights and cameras are not included in the scenes.
3d_export
$13
extruded table 2
...for high-quality render results. no extra plugins are required for this model. lights and cameras are not included in the scenes.
2
design_connected
$11

No 2
...no 2
designconnected
sibast no 2 computer generated 3d model. designed by sibast, helge.
turbosquid
$99

Smilodon 2 Pose 2
... available on turbo squid, the world's leading provider of digital 3d models for visualization, films, television, and games.
turbosquid
$20

Barrel Barricade 2-2
... available on turbo squid, the world's leading provider of digital 3d models for visualization, films, television, and games.
turbosquid
$6

Wall Trophy (2) (2)
... available on turbo squid, the world's leading provider of digital 3d models for visualization, films, television, and games.
turbosquid
free

Tire label 2 of 2
... available on turbo squid, the world's leading provider of digital 3d models for visualization, films, television, and games.
3ddd
$1

Кровать, 2 тумбочки, 2 светильника
...кровать, 2 тумбочки, 2 светильника
3ddd
кровать, 2 тумбочки, 2 светильника
нормальное качество
формат 3ds max
без текстур
3ddd
free

Кровать, 2 тумбочки, 2 светильника
...кровать, 2 тумбочки, 2 светильника
3ddd
кровать, 2 тумбочки, 2 светильника
нормальное качество
формат 3ds max
без текстур
turbosquid
$19
Loft wooden square box chandelier (2) (2) (2)
... available on turbo squid, the world's leading provider of digital 3d models for visualization, films, television, and games.
3ddd
$1
ALPEREN-2
...alperen-2
3ddd
комод , alperen-2
комод с зеркалом alperen-2
design_connected
$27

Confluences 2 2-Seater Sofa
... 2-seater sofa
designconnected
ligne roset confluences 2 2-seater sofa computer generated 3d model. designed by nigro, philippe.