Thingiverse
Remote Pendant Up Down Hoist by gustafson_cj
by Thingiverse
Last crawled date: 2 years, 10 months ago
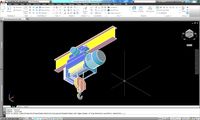
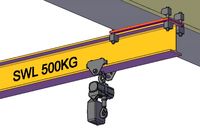
I saw Brian Brocken's YouTube video (https://www.youtube.com/watch?v=d8us3OWgS1A) of a 3D Printed High Torque Gearbox that he used like a Winch to Tow his car, and I wanted to use it to make a Hoist for my garage. Brian's Gearbox has an amazing Gear Ratio of 162:1, and I paid the $5 to download his STEP files - well worth the money. After printing it, I needed a remote control pendant to operate my new hoist.
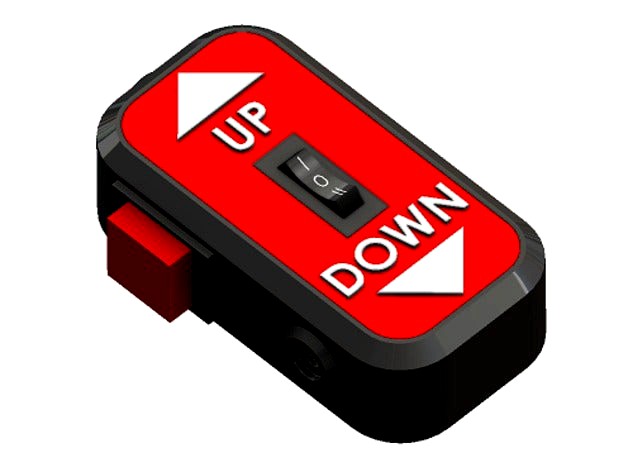
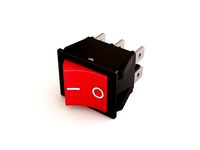
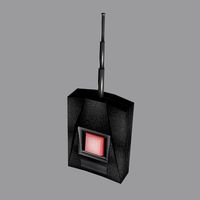
This Remote Control project is a 3D Printed Pendant that includes a rocker switch to control "UP/Down" functions, and a Momentary Push Button switch to activate the Hoist (I Didn't want the hoist to be able to run indefinitely, hence the need for momentary switch). Two push button switches would also work, but I didn't have them on hand.
Printing:
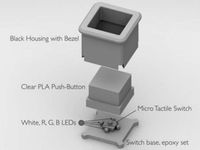
This pendant includes 3 files that are assembled with 5mm screws x8mm long. The Face Plate was printed in Red PLA, with a filament change to White PLA for the top letters. The Letter Faces were finished with "Ironing" setting in PrusaSlicer. The Bottom Plate and Sides were printed in PETG. There are recesses for 5mm nuts.
Prusa i3 MK3S
0.2mm Layer
20% infill
Print the parts with supports "everywhere" and then insert the rocker switch into the face plate. Insert the Face Plate into the Side Wall ensuring it is flush at the surface. Then insert the bottom Plate containing 3 hex nuts. Side walls on the bottom plate press the face plate firmly in place. Insert 3 screws and tighten. Route cabling, solder, and insert the momentary switch to finish it off. The momentary switch "Snaps" into place completing the assembly.
I also made a small project box with 4 relays that take the signals from the remote pendant and send voltage to my DC motor and reverse polarity for UP/DOWN functionality.
This Remote Control project is a 3D Printed Pendant that includes a rocker switch to control "UP/Down" functions, and a Momentary Push Button switch to activate the Hoist (I Didn't want the hoist to be able to run indefinitely, hence the need for momentary switch). Two push button switches would also work, but I didn't have them on hand.
Printing:
This pendant includes 3 files that are assembled with 5mm screws x8mm long. The Face Plate was printed in Red PLA, with a filament change to White PLA for the top letters. The Letter Faces were finished with "Ironing" setting in PrusaSlicer. The Bottom Plate and Sides were printed in PETG. There are recesses for 5mm nuts.
Prusa i3 MK3S
0.2mm Layer
20% infill
Print the parts with supports "everywhere" and then insert the rocker switch into the face plate. Insert the Face Plate into the Side Wall ensuring it is flush at the surface. Then insert the bottom Plate containing 3 hex nuts. Side walls on the bottom plate press the face plate firmly in place. Insert 3 screws and tighten. Route cabling, solder, and insert the momentary switch to finish it off. The momentary switch "Snaps" into place completing the assembly.
I also made a small project box with 4 relays that take the signals from the remote pendant and send voltage to my DC motor and reverse polarity for UP/DOWN functionality.
Similar models
thingiverse
free
Multi LED Switch by Deepsiks
... inner so the button will press down on it and leds are inserted from the bottom so they protrude into the switch body.
have fun.
thingiverse
free

Decora Rocker Switch by thomassmith1969
...set reset button). it has been updated to simply snap together, and be flush. definitely nearing what i had envisioned for it.
grabcad
free

Momentary Push Button Switch
...momentary push button switch
grabcad
momentary push button switch
grabcad
free

switch push button momentary 11138 EA0905
...switch push button momentary 11138 ea0905
grabcad
switch push button momentary 11138 ea0905
grabcad
free

momentary push button switch
...momentary push button switch
grabcad
momentary push button switch, 1a 250v ac spst mini pushbutton switches
grabcad
free

Heady Duty Momentary Push Button Switch
...ush button switch
grabcad
switch components pa2-1b-dc-5 push button switch. drawn in freecad with "reasonable" detail.
cg_trader
$5
Rocker switch
...er switch button rocker switch power switcher electrical push control plastic on off electronics other power switch rocker switch
grabcad
free

Momentary Push Button
...momentary push button
grabcad
momentary switch
grabcad
free

Momentary switch
...momentary switch
grabcad
panel mount momentary push button with retainer nut. .5" mounting hole.
grabcad
free

Up Down Push Button
...up down push button
grabcad
up down button station with hoist stop button for shutter door
Gustafson
3dwarehouse
free

Bowdoin College's Student Aid Office: the Gustafson house
...use provides a home to the student aid and student employment offices. #bowdoin #bowdoin_college #student_aid #student_aid_office
3dwarehouse
free

Convocation Center
...the campus of james madison university (created by eric gustafson #james_madison_university...
3dwarehouse
free

Eastover House
...the campus of james madison university (created by eric gustafson #james_madison_university...
3dwarehouse
free

Cardinal House
...the campus of james madison university (created by eric gustafson #james_madison_university...
3dwarehouse
free

220 University Blvd.
...the campus of james madison university (created by eric gustafson #james_madison_university...
3dwarehouse
free

Driver Drive Modular
...the campus of james madison university (created by eric gustafson #james_madison_university...
3dwarehouse
free
James Madison Admin Complex #6
...the campus of james madison university (created by eric gustafson #james_madison_university...
3dwarehouse
free

Evans Hall
...was the work of james white, and c. l. gustafson #evans #hall...
3dwarehouse
free

Busey Hall
...was the work of james white, and c. l. gustafson its association with charles platt led the building to...
3dwarehouse
free

Ambit Rail Lamp
...its handmade contemporary construction. with the piece, designers gabriella gustafson and mattias ståhlbom of stockholm’s taf studio strived for...
Cj
3ddd
$1
Riperlamp 359B CJ
...riperlamp 359b cj
3ddd
riperlamp
люстра riperlamp 359b cj
3d_export
$5
jeep cj-7 1980
...jeep cj-7 1980
3dexport
jeep cj-7 1980
3ddd
free
Riperlamp 359 N CJ
...riperlamp 359 n cj
3ddd
riperlamp
бра riperlamp 359 n cj
humster3d
$75

3D model of Jeep CJ-5 1954
...uy a detailed 3d model of jeep cj-5 1954 in various file formats. all our 3d models were created maximally close to the original.
3d_export
$15

COMMANDANT 3D Model
...commandant 3d model 3dexport robot commandant 3d model cj animation studio models 34096...
3d_export
$40
DESTROYER R29 3D Model
...r29 3d model 3dexport robot destroyer r29 3d model cj animation studio models 34290...
3d_export
$35

DESTROYER R28 3D Model
...r28 3d model 3dexport robot destroyer r28 3d model cj animation studio models 34095...
3d_export
$7
Grass landscape 3D Model
...3d model 3dexport grass landscapes grass landscape 3d model cj animation studio models 33870...
3d_export
$5

Rock Texture 3D Model
...3d model 3dexport rock texture rock texture 3d model cj animation studio models 41659...
cg_studio
$89

Jeep CJ3d model
...eep cj3d model
cgstudio
.3ds .fbx .max .obj - jeep cj 3d model, royalty free license available, instant download after purchase.
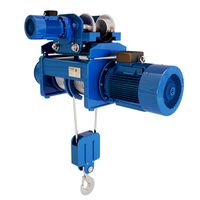
Hoist
3ddd
$1
Hoist
...hoist
3ddd
тренажер
fitness equipment
3d_ocean
$20
Hoist Crane
...hoist crane
3docean
crane industrial lift loader machine outdoor work
3d model crane hoist
turbosquid
$10
Hoist 2
... available on turbo squid, the world's leading provider of digital 3d models for visualization, films, television, and games.
turbosquid
$7

Hoist 1
... available on turbo squid, the world's leading provider of digital 3d models for visualization, films, television, and games.
3ddd
free
тренажер Hoist PTS Ensemble
...тренажер hoist pts ensemble
3ddd
тренажер
hoist pts ensemble
turbosquid
$60

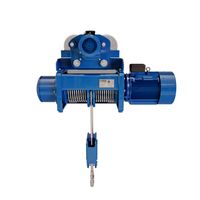
Material Hoist Construction
...free 3d model material hoist construction for download as max on turbosquid: 3d models for games, architecture, videos. (1375181)
turbosquid
$20
HOIST WAY FAN
...quid
royalty free 3d model hoist way fan for download as max on turbosquid: 3d models for games, architecture, videos. (1259868)
3d_export
$10
Crane Hoist Podem 3D Model
...crane hoist podem 3d model
3dexport
crane loader lift work machine hoist
crane hoist podem 3d model genkot27 68607 3dexport
3d_ocean
$20
Crane Hoist Stahl ST50
...crane hoist stahl st50
3docean
crane industrial lift loader machine outoor work
3d model crane hoist stahl st50
3d_export
$10
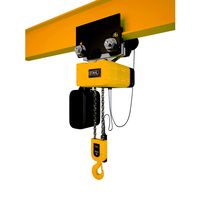
Chain hoist lifting beam 3D Model
...chain hoist lifting beam 3d model
3dexport
chain hoist lifting beam
chain hoist lifting beam 3d model flash 53891 3dexport
Remote
archibase_planet
free

Remote
...remote
archibase planet
tv remote remote controller remote
remote - 3d model for interior 3d visualization.
archibase_planet
free

Remote
...e
archibase planet
remote control remote controller remote
remote n140512 - 3d model (*.gsm+*.3ds) for interior 3d visualization.
turbosquid
$1

Remote
...
turbosquid
royalty free 3d model remote for download as obj on turbosquid: 3d models for games, architecture, videos. (1487515)
3d_export
$5

Tv Remote
...tv remote
3dexport
tv remote
3d_ocean
$7

Remote controller
... control switcher tv remote
remote controller for tv, sound systems etc easy to edit textures photo real rendered with mental ray
turbosquid
$39

remote
...free 3d model remote for download as obj, fbx, blend, and dae on turbosquid: 3d models for games, architecture, videos. (1387531)
turbosquid
$5

remote
...free 3d model remote for download as 3ds, obj, fbx, and blend on turbosquid: 3d models for games, architecture, videos. (1401849)
archive3d
free

Remote 3D Model
...l
archive3d
tv remote remote controller remote
remote - 3d model for interior 3d visualization.
turbosquid
$11
Remote
... available on turbo squid, the world's leading provider of digital 3d models for visualization, films, television, and games.
turbosquid
$10

remote
... available on turbo squid, the world's leading provider of digital 3d models for visualization, films, television, and games.