Thingiverse
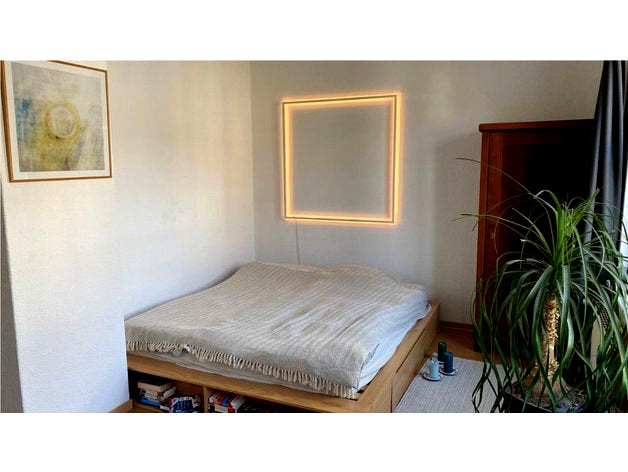
Rectangle halo lamp by brickk
by Thingiverse
Last crawled date: 2 years, 11 months ago
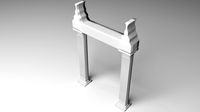
Current Version utilizes 20x20mm u-beams. I will add other dimensions soon.
Please share your builds and let me know if you need different dimensions or have other ideas to improve this design!
Printing
I highly recommend printing all parts in transparent or white PETG or ASA. Especially on the mounting parts, transparent filament looks much nicer.
Construction
To cut the u-beams to the desired length at an 45° angle at the end, you will need either a hack saw with some metal cutting blades and a cutting block of some sort or an adjustable chop saw. The power tool will produce much nicer cutting edges, but the manual saw will work just fine.
After you cut all u-beams to length you could connect all beams using the printed parts. Use superglue to mount the parts in each corner of your rectangle. Make sure the fit is tight and try to avoid gaps between the u-beams.
If you have bad cutting-edges you could use some filler.
Now would be the perfect time to paint your lamp, but this is optional.
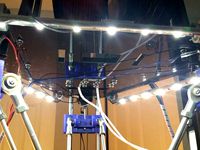
After the glue is cured you can insert the LED-strips and connect it to your power supply and LED-controller (optional).
Mounting
Theres two different spacers and i plan to create more versions to fit your needs.
For mounting you will need to drill two holes to your wall that are horizontally level, theres no need for exact measurements between these holes.
Screw the "spacer" part to the wall and slide in the mounting part. There is no need to glue the mounting part to your u-beam.
Bill of materials
These are affiliate links.
20x20mm alloy u-beam
My local hardware store sells u-beams of 250cm. With two beams you could build a rectangular lamp measuring 124cm*124cm.
5m LED Stripe
I recommend these LED strips, high density strips with high CRI. They produce warm, pleasant light.
I would never use RGB strips since their CRI is very low and i can’t stand colored LEDs. Of course this is subject to your preference.
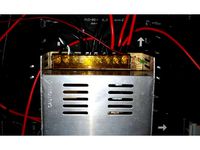
Power supply
Be sure to buy the appropriate power supply for your LED strip. If you use the one i recomment, you could use this 24v power supply.
Optional: LED controller
I use this controller to dim the LED. It is very nice and does not produce flickering or any other unwanted effects.
Optional: Diffusor film
At your local camera rental you can get leftover foil that you need to cut to stripes of 3-5cm width. You can just slide it into the u-beam and theres no need to glue it into place.
Optional: white two wire cable
For better looks i recommend white wires.
Superglue
Almost any glue will do.
Optional: Spraypaint
If you do not like the look of the naked alloy or if you need to cover up untidy cutting edges, you could use spraypaint of your choice.
Please share your builds and let me know if you need different dimensions or have other ideas to improve this design!
Printing
I highly recommend printing all parts in transparent or white PETG or ASA. Especially on the mounting parts, transparent filament looks much nicer.
Construction
To cut the u-beams to the desired length at an 45° angle at the end, you will need either a hack saw with some metal cutting blades and a cutting block of some sort or an adjustable chop saw. The power tool will produce much nicer cutting edges, but the manual saw will work just fine.
After you cut all u-beams to length you could connect all beams using the printed parts. Use superglue to mount the parts in each corner of your rectangle. Make sure the fit is tight and try to avoid gaps between the u-beams.
If you have bad cutting-edges you could use some filler.
Now would be the perfect time to paint your lamp, but this is optional.
After the glue is cured you can insert the LED-strips and connect it to your power supply and LED-controller (optional).
Mounting
Theres two different spacers and i plan to create more versions to fit your needs.
For mounting you will need to drill two holes to your wall that are horizontally level, theres no need for exact measurements between these holes.
Screw the "spacer" part to the wall and slide in the mounting part. There is no need to glue the mounting part to your u-beam.
Bill of materials
These are affiliate links.
20x20mm alloy u-beam
My local hardware store sells u-beams of 250cm. With two beams you could build a rectangular lamp measuring 124cm*124cm.
5m LED Stripe
I recommend these LED strips, high density strips with high CRI. They produce warm, pleasant light.
I would never use RGB strips since their CRI is very low and i can’t stand colored LEDs. Of course this is subject to your preference.
Power supply
Be sure to buy the appropriate power supply for your LED strip. If you use the one i recomment, you could use this 24v power supply.
Optional: LED controller
I use this controller to dim the LED. It is very nice and does not produce flickering or any other unwanted effects.
Optional: Diffusor film
At your local camera rental you can get leftover foil that you need to cut to stripes of 3-5cm width. You can just slide it into the u-beam and theres no need to glue it into place.
Optional: white two wire cable
For better looks i recommend white wires.
Superglue
Almost any glue will do.
Optional: Spraypaint
If you do not like the look of the naked alloy or if you need to cover up untidy cutting edges, you could use spraypaint of your choice.
Similar models
thingiverse
free

Ender-6 Led mount by voltNik
...you need 2pcs. i use two strips 12v leds and connect it in series to use with 24v power supply.
two t-nuts per mount is required.
thingiverse
free

Vision Printer stand by NightPueo
... strips and the foam cushion with this to have enough clearance to mount the power supply under it using my power supply bracket.
thingiverse
free

LED-Strip mount for Ender 3 by AsderKnaster
...r supply. you might want to include a switch to turn of the light if you don't need it.
feedback is very much appreciated :).
thingiverse
free

Fan and led strip mount for printrbot plus v1(version 2) by lucassiglo21
...e last version
this is for m4 screws, the plastic parts are not as forgiving as the lasercut wood when it comes to screw sizes.
thingiverse
free

DJI F550 - LED strip mount by michiwend
...me hot glue to stick the two parts together. to mount it on your copter use small zipties.
work done by total1ty and me
have fun!
thingiverse
free
LED Strip Mount for Geeetech G2S by cmore11
...ights combined with a 3528 5050 led strip dimmer and external power supply. solder some connections and you have disco lighting.
thingiverse
free
P10 LED Panel power supply mount by Ceer123
...trix. i used 16mm m3x0.5 screws to mount to the power supply and the p10 panels. you will need two of these, one for each side.
thingiverse
free

Light Bulb (Sort Of) by Vmtr
...bulb (sort of) by vmtr thingiverse i saw something similar to this on instructables. that one was hand-cut from...
thingiverse
free

Ryobi Tool Power Supply by Bobbyd1
...hat i can now use.
the basic idea could be used for other brands and voltages. would only need adapter and power supply to match.
thingiverse
free
CR-10 Dual LED Strip Mount (Snap-in) by Matt2468rv
...urn the leds on and off, and i routed the wires down the back using pieces of the plastic/rubber strips that come with the cr-10.
Brickk
cg_trader
$23

Brick Wall House Interior
...in the center of coordinates. the model consists of: brickk wall; -wooden floor and ceiling; -wide big window. -no...
3dwarehouse
free

Double Gated Entry
...double gated entry 3dwarehouse curved and sloping brickk wa$$s with wrought iron gates. gate house could be...
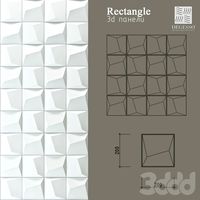
Rectangle
turbosquid
free

Rectangle
...id
free 3d model rectangle for download as max, obj, and stl on turbosquid: 3d models for games, architecture, videos. (1510352)
turbosquid
free

Rectangle
...id
free 3d model rectangle for download as max, obj, and stl on turbosquid: 3d models for games, architecture, videos. (1510341)
turbosquid
free

Rectangle
...id
free 3d model rectangle for download as max, obj, and stl on turbosquid: 3d models for games, architecture, videos. (1509586)
3ddd
$1

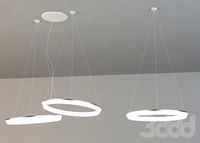
Bocci 28.11 rectangle
...bocci 28.11 rectangle
3ddd
bocci , подвес
люстра bocci 28.11 rectangle.
turbosquid
$10

Coverings rectangle
...d model coverings rectangle for download as max, obj, and fbx on turbosquid: 3d models for games, architecture, videos. (1551747)
turbosquid
$6

Rectangle Desk
...e 3d model rectangle desk for download as obj, blend, and dae on turbosquid: 3d models for games, architecture, videos. (1464456)
turbosquid
$5
Rectangle Gateway
...ctangle gateway for download as 3ds, obj, fbx, blend, and dae on turbosquid: 3d models for games, architecture, videos. (1491067)
turbosquid
$2

Rectangle Table
... available on turbo squid, the world's leading provider of digital 3d models for visualization, films, television, and games.
turbosquid
$5

Rectangle Mirror
...e mirror for download as blend, blend, 3ds, dae, fbx, and obj on turbosquid: 3d models for games, architecture, videos. (1544001)
3ddd
free
3D Панели Degesso (Rectangle)
... degesso , rectangle
декоративные 3d панели из гипса фирмы degesso.модель rectangle.
Halo
3ddd
$1

Halo
...halo
3ddd
halo
бра,диаметр 46см,
3ddd
$1
Vibia / Halo
...vibia / halo
3ddd
vibia
подвес halo от vibia
turbosquid
$5

Halo
... available on turbo squid, the world's leading provider of digital 3d models for visualization, films, television, and games.
3ddd
$1
Halo - Professor
...halo - professor
3ddd
halo
http://homeconcept.ru/catalog/section.php?section_id=18998#tab_0_0
3ddd
free

Artifort Halo
...t halo
3ddd
halo , artifort
в архиве max 2014 / fbx
чертеж с размерами на 3 изображении.
3ddd
$1

Halo Huntington
...--------------------------------------
polygons: 520605
vertices: 525856
единицы измерения - real world size (system units - mm)
3ddd
$1
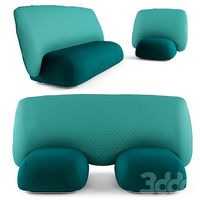
Halo
...r
l 125 d 87 h 109 sh 39 cm
sofa
l 242 d 87 h 109 sh 39 cm
designer
skrivo
year of design: 2015http://www.softline.dk
turbosquid
$3
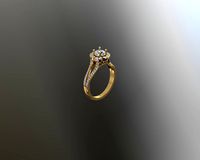
HALO RING
...rbosquid
royalty free 3d model halo ring for download as stl on turbosquid: 3d models for games, architecture, videos. (1355249)
turbosquid
$5

Artemide - Halo
...lty free 3d model artemide - halo for download as max and obj on turbosquid: 3d models for games, architecture, videos. (1159228)
3ddd
$1
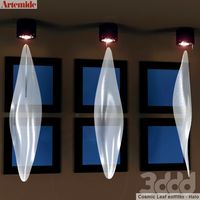
Artemide CLS Halo
...artemide cls halo
3ddd
artemide
artemide cosmic leaf soffitto halo
Lamp
archibase_planet
free
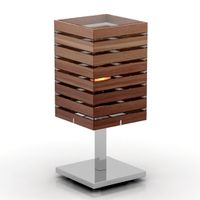
Lamp
...lamp
archibase planet
lamp reading lamp table lamp
lamp - 3d model (*.gsm+*.3ds) for interior 3d visualization.
archibase_planet
free
Lamp
...lamp
archibase planet
lamp reading lamp table lamp
lamp - 3d model (*.gsm+*.3ds) for interior 3d visualization.
archibase_planet
free

Lamp
...lamp
archibase planet
lamp table lamp reading lamp
lamp - 3d model (*.gsm+*.3ds) for interior 3d visualization.
archibase_planet
free

Lamp
...lamp
archibase planet
lamp table lamp reading lamp
lamp - 3d model (*.gsm+*.3ds) for interior 3d visualization.
archibase_planet
free

Lamp
...lamp
archibase planet
lamp reading lamp table lamp
lamp - 3d model (*.gsm+*.3ds) for interior 3d visualization.
archibase_planet
free
Lamp
...lamp
archibase planet
lamp reading lamp table lamp
lamp - 3d model (*.gsm+*.3ds) for interior 3d visualization.
archibase_planet
free
Lamp
...lamp
archibase planet
lamp table lamp reading lamp
lamp - 3d model (*.gsm+*.3ds) for interior 3d visualization.
archibase_planet
free

Lamp
...lamp
archibase planet
lamp table lamp reading lamp
lamp - 3d model (*.gsm+*.3ds) for interior 3d visualization.
archibase_planet
free
Lamp
...lamp
archibase planet
lamp reading lamp table lamp lantern
lamp - 3d model (*.3ds) for interior 3d visualization.
3d_ocean
$6
Lamp
...lamp
3docean
lamp
a high quality lamp.