Thingiverse
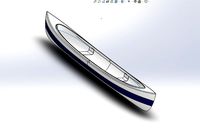
RC Boat - Pump Jet Boat / 遥控船-喷射泵 by N7_Cat
by Thingiverse
Last crawled date: 3 years, 3 months ago
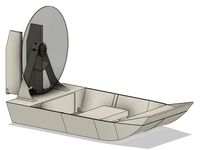
I'm going to preface this by saying that I have no experience in boat design or RC in general. That being said, I am an engineer and I think I figured most of it out...if boat flips, porpoises, or otherwise does a barrel roll don't say I didn't warn you :P. If it does any of the above and you are a clever kitteh and have some tips based on real experience feel free to help me out. I've added air cooling via vortex intakes that "should" eject any water spray. I couldn't decide if the boat wanted to be a trimaran, rigger boat, flat bottom, ground effect vehicle or stepped hull V so I mashed it all together in an unholy union of boat design sacrilege - your welcome.
I modeled water displacement and Fusion 360 calculated the mass, because it is such a narrow hull it is critical to keep the print weight low and rely on the carbon fiber tubes for most of the strength. I am targeting a total weight around 600 grams for everything, motor and batteries included. Printing with low layer count (maybe even single) / low infill should reduce the mass of the boat to acceptable levels, using flexible primer or maybe plastidip on the finished boat should help with water tightness. I'm still experimenting with my prints, I'll let you know results and recommended print settings for each section once finished.
The 2212 motor is a marvel to me, how is something so awesome so affordable? I wanted this boat to be affordable first, performance is secondary. While an outrunner is atypical for boats I think I've designed out the cooling issue via internal airflow and motor cooling impeller. Besides yeeting boats around at 200kph seems like a dangerous way to accidentally impale swimming googies...a project for another day.
Scroll down to post processing pictures for detailed build instructions - currently updating. Certain components can only be installed before melding of the hull sections including the completed battery packs and motor - do not glue hull together before all components are fitted.
Josh at Flite Test did a good vid about waterproofing RC electronics with Peter Sripol (Flite Test | Waterproofing Electronics)
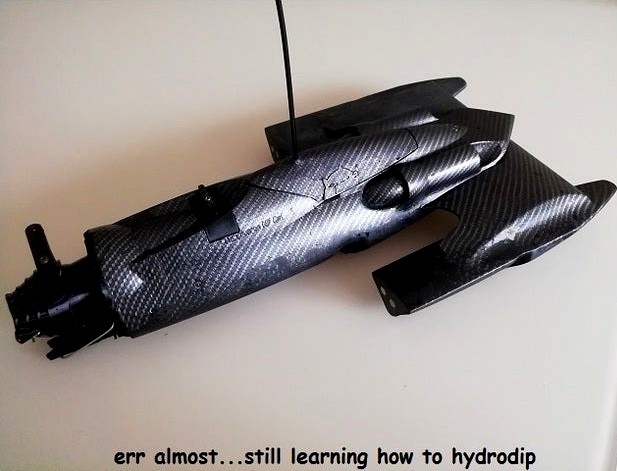
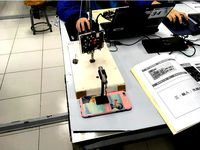
11/6/2020 Performed a submersion test with sanded model - due to the way walls interface with fill there is capillary action between the individual lines of printed material at the base of the sponsons. This causes water to slowly seep into the model. As I plan on priming the boat, hydro dipping, clear coating then waxing these four layers should seal off the capillary gaps. A couple coats of flexible primer would probably do the trick - focus more primer on the flat surfaces that serve as the first layer of Boaty and McBoatface prints. If you plan on running your boat without these coatings I've read that brushing or submerging in melted candle wax (not too hot though - Paraffin starts melting at 37 deg C / 99 deg F) can seal a 3d print, if you are a motorcyclist you likely have a can of Maxima chain wax (best chain lube ever :) - this is essentially parrafin wax with some additives in a carrier fluid and can likely serve the same purpose without the messy melting (though I'd be concerned if any of the additional additives would leach into the water). Along the same thought process I'm thinking that carnauba car wax would likely work too though be less durable. Btw if you do use wax keep fire safety in mind as some FDM plastics are flammable and wax has now made it even more flamable. Another method that I've seen RC airplane makers use for waterproofing is to coat model in a very very thin layer of gorilla glue - it doesn't bubble up too much if the layer is thin enough. A waterproof wood glue like titebond might even work - I'm not sure how well it would adhere to FDM polymers. If anyone in the RC community has any suggestions they would be welcome - maybe when you post your make you can let us know how you waterproofed your model :). I'll post pictures of my own process soon.
BOM:
Motor: 2212 Though, with some work, you can now use an alternate motor with the custom motor plate template "Custom Motor Plate Template.stl" (Dimensions center to center between the 3 mm mounting holes are 49 mm X 23.41 mm. The top surface of the mounting plate (measured from the large flat area not the post) is 18.738 mm below the center-line of the propeller axis). Keep weight and cooling considerations in mind if using an alternate. If using the 2212 just download the original 2212 Motor Mount. (I don't have enough experience to say what KV level is ideal, I am leaning towards lower KV motors as they deliver the same torque at lower amps with higher KT values. We like KTs - get it...KTs?) https://www.aliexpress.com/item/32672300112.html
ESC: SimonK 30A 4S with BEC (you will need to seal or find an alternate water proof ESC) https://www.aliexpress.com/item/32308790386.html
Prop: 32mm with 100 mm shaft (note get the 10 cm one with 3.18 motor as the 2212 shaft is 3.175 mm - I initially tried to model an axial flow impeller but I found this purchased item to be far more sturdy. Advantages are it has built in high speed bearings and replacement props can be purchased from here as well. I also added provisions for a diy 3mm shaft using 623 bearings) https://www.aliexpress.com/item/32714017489.html https://www.aliexpress.com/item/32528668718.html
Servo: 9g servo (important you will want to waterproof or find an alternate waterproof servo) https://www.aliexpress.com/item/33005962141.html
Reinforcement: 6 mm OD 4 mm ID Carbon Fiber Rods https://www.aliexpress.com/item/32310771446.html
Power Source (btw if, like me, you are inexperienced with RC make sure to inform yourself about some of the precautions needed with lithium based batteries especially around charging and storage. Unlike your consumer electronics the LiPo cell is very much exposed in RC and special care must be taken. RC Review and FliteTest do some good youtube vids on the matter) :
Cat Grumpiness
3S LiPo power pack (I was able to find a 1300 mAh one that fits well 3S 1300 mAh 60C LiPo 75 X 34 X 24 mm - The maximum extents of a battery able fit in the front of the boat are 82 X 36 X 26 mm if removal is not needed)
18650 batteries are no longer being supported, battery compartments are left in but I've come to the conclusion that its just not a good idea..I originally thought it would be cheaper owing to relatively inexpensive cells and BMS modules but once you add a constant current power supply for charging, nickle strip welder, and discharge rate / weight / C.G considerations LiPo starts to make a lot more sense...never mind the potential effects of water on Li Ion cells...
Receiver and transmitter: Up to you (and your local regulations), I'm using a Flysky FS-i6X transmitter and FS-GR3E Waterproof receiver (note i6X will need to be in AFHDS mode to work with FS-GR3E) https://www.aliexpress.com/item/32785968777.html https://www.aliexpress.com/item/32892188833.html
M3 X 6 X 5.3 Embedded Nuts (old link no longer works - possible substitution M3 X D5 X L6) https://www.aliexpress.com/item/4000232858343.html
M3 Machine Screws (Button head and Flat head) https://www.aliexpress.com/item/32798146322.html or stainless https://www.aliexpress.com/item/32934186482.html
XT60 connectors, 3.5 mm bullet connectors, grease (marine), filament material compatible glue. The connectors are sold by the same storefront as much of the material above.
Sound system: Bongo Cats
Tentative Print Settings (Cura has a setting under Travel called combing mode which helps reduce stringing in the inaccessible interior). Personally I'm printing in PETG but ABS or ASA might be a good options too if you are setup for that with enclosure and ventilated space (due to easier gluing / reduced density - if using ABS or ASA I would advise against acetone smoothing as thin walls will likely deform). I excluded PLA as it is not as temperature / weather / UV resistant as the above materials and will swell / deteriorate in water unless waterproofed. I print at 30 mm/s or less but it might still print well at more default speeds of 60 mm/s. Thrust vector nozzle and 2212 cooling impeller will be printed in TPU for its reliable layer adhesion as both components will be subject to cyclic loading and high shear stress. STL files are already saved in as print orientation.
PETG/ABS/ASA Parts
Boaty (PETG/ABS/ASA): 0.4mm nozzle, 0.15mm layer height, 1 walls, 3 bottom layers, 3 top layers, 14% grid infill, supports on overhangs over 80% touching buildplate (apx 116 grams)
McBoatface (PETG/ABS/ASA): 0.4mm nozzle, 0.15mm layer height, 1 walls, 3 bottom layers, 3 top layers, 14 % grid infill, supports on overhangs over 80% touching buildplate, brims are helpful for ensuring support adhesion (apx 218 grams)
Cover: TBD (PETG/ABS/ASA) 0.4mm nozzle, 0.15mm layer height, 1 walls, 3 bottom layers, 3 top layers, 14% grid infill, supports on overhangs over 60% touching buildplate (apx 12 grams)
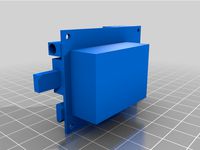
2212 Motor Mount (PETG/ABS/ASA): 0.4mm nozzle, 0.15mm layer height, 5 walls, 3 bottom layers, 3 top layers, 25% grid infill, supports on overhangs over 80% touching buildplate, brims are helpful for preventing warping (apx 30 grams)
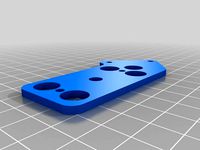
Ride Plate: (PETG/ABS/ASA) 0.4mm nozzle, 0.15mm layer height, 5 walls, 3 bottom layers, 3 top layers, 25% grid infill, supports on overhangs over 80% touching buildplate (apx 6 grams)
Servo Hatch: (PETG/ABS/ASA) 0.4mm nozzle, 0.15mm layer height, 4 walls, 3 bottom layers, 3 top layers, 100% infill, supports on overhangs over 80% touching buildplate, Brim (apx 2 grams)
TPU parts
Thrust Vector Nozzle: (TPU) 0.4mm nozzle, 0.15mm layer height, 3 walls, 3 bottom layers, 3 top layers, 25% cubic subdivision infill, supports on overhangs over 80% touching buildplate (apx 15 grams)
Stator Bowl: (TPU) 0.4mm nozzle, 0.15mm layer height, 3 walls, 3 bottom layers, 3 top layers, 25% cubic subdivision infill, supports on overhangs over 80% touching buildplate (apx 24 grams)
Cooling Impeller: (TPU) 0.4mm nozzle, 0.15mm layer height, 2 walls, 4 bottom layers, 4 top layers, 100% concentric infill, (apx 2 grams). Note this part narrows to a single wall of 0.4mm TPU - slowing down print speed drastically (15 mm/s) is likely needed for successful print
Motor (50 grams), LiPo (129 grams) (18650s are out), ESC (28 grams), servo (9 grams), and receiver (6.5 grams)
A note for early downloaders: I tend to iterate and reiterate a design multiple times before I'm happy with it. Designs subject to change...frequently...
N7 Cat Says: "Dis my bigges and shiniest objec yet, 2020 u cray cray, I jus gonna yeet away from u in mah boat wif mah other kitteh fiends"
Updated: 9/28/2020, Updated files Boaty and Cover, added provisions for gluing a 5mm X 2mm magnet on the cover and boat for magnetic latching
Updated: 9/29/2020, fixed a problem with McBoatnose missing modeled tube for carbon fiber reinforcement.
Updated: 10/2/2020, added a custom motor plate "McBoatface Custom Motor Plate.stl" for anyone wanting to use a motor other than the 2212. Intent is that you will be able to model your own motor housing (and share with others along with recommendations for ESC and battery :) for mounting onto the flat plate. 3 mm dia screws will secure the motor mount to the two sections of the boat, as the mount will be subject to vibration fastening hardware (embedded nuts or lock nuts) is recommended in your design. Like the original requires brims and supports.
Updated 10/4/2020, added battery holder compartments along the length of the hull for an integrated 3S 2P 18650 setup. I'm planing on spot welding the batteries together with pure nickle strips and wiring to BMS. Note there are two battery caps (non symmetric). Added a baffle near the motor cooling impeller to improve airflow and cooling. Additionally minor improvements to printability around the servo mount and filleting of vortex outlet. For custom motor users new battery holders and air baffle might interfere with especially big motors but you can model / clip them out if needed.
Updated 10/6/2020, added built in support for servo hatch opening, improved joints between the three boat hull sections by adding grooves and other features for the expanding polyurethane glue to latch onto. Fixed a printability issue with the fillet that supports the propeller shaft. Started first print of the boat section, may update if issues crop up after print finishes.
Updated 10/7/2020, added a channel in the battery compartment to allow for wire to be routed through.
Updated 10/8/2020, post printing improvements, increased diameter of battery compartment, prop shaft and carbon fiber shaft openings. Improved servo hatch support structure to make it easier to remove.
Update 10/9/2020, Estimated static resting position of the boat in water and calculated rough target mass for finished boat. After a print failure of the protective grid on the intake as well as impact durability test failures I have replaced with a filament heat stake method as shown below in post processing pics.
Insert 1.75 mm filaments into the slots and use a low temp soldering iron to melt the ends into the inlet - you could also use servo wire and glue in place...unless you like grinding baby fish into a pulp...u monster
Updated 10/11/2020, with 18650s looking like less and less of a good idea and mass being more of a concern I trimmed the battery compartments down to two 0.4 mm walls. This reduces mass and print time dramatically.
Update 10/11/2020, realized I derped and forgot to add an access port for servo wiring. I've created an access port on the battery compartment closest to the servo wire (port/left side). As there were some unbridgeable overhangs I made some built in supports that need to be pried or clipped out before use.
Update 10/12/2020, created an alternate path for servo wire on the top of the baffle in case I decide to house all electronics in the cover. After fighting with carbon fiber tube on second print increased the diameter of the carbon tube channel and started printing again :P Ever had a carbon fiber sliver? I haven't nor do I ever want to...make sure to wrap the end of the tube that you are handling in masking tape or something to protect your hands
Updated 10/14/2020, minor improvements to Boaty and McBoatnose to reduce support generation. Trying some new tricks to strengthen servo mount and embedded nut support by creating additional walls in those areas. Improved airflow on McBoatnose 2212. Updated the stator bowl as supports were not properly generating - something to do with angle of one of the pieces aligning with support autogenation void
Updated 10/15/2020, McBoatface 2212 motor mount was a bit of a tight fit, adjusted motor mount. Adjusted joints between sections
Updated 10/16/2020, added receiver tray and antenna port to cover
Update 10/18/2020, added mounting points for turn fin in case they are needed - I couldn't find any info on whether one would be needed for a pump jet nor dimensions for standard mounting points. Converted the fixed ride plate to a variable trim ride plate using 1.5 mm servo wire as the adjustable retention mechanism. Backup retention provided by an embedded nut and M3 X 10 screw + spring. Joint held by filament joint
Updated 10/20/2020, some weird artifacts were cropping up in cooling impeller during slicing, increased to high resolution stl and fixed wall width. Encountered a problem with McBoatnose tips coming off due to single walls and how narrow it becomes. Blunted the tips. Also had to physically clip some of the joints between front and mid section in order to get it to fit, adjusted the model so this is not required. Carbon Fiber tubes now provide most of the support between the front and mid section. Created McBIGface for those of you with Z axis build volume above 280 mm so you can print mid and front sections as one piece #jealouscat (note that this will result in a weaker motor mount as you will still need to balance weight considerations with strength requirements - play around with slicer settings starting from McBoatnose as a baseline)
Updated 10/21/2020, increased prop clearance in stator bowl
Updated 10/22/2020, Major overhaul...N7 cat shredded all the toilet paper...McBoatface and McBoatnose now one part, motor mount now modular for both 2212 and custom motors, added a custom motor mount template, increased sponson size 25%, other minor improvements
Update 10/24/2020, tried to reduce weight of McBoatface by hollowing out the sponsons, turns out a solid object with grid infill doesn't contribute much to weight...who knew...saved 5 grams!
Update 10/26/2020, realized that the cover / McBoatface interface would allow water to seep in at the front seam, updated these two parts to improve water shedding in this area. Added a part called Compatibility Shim For Pre Oct 22 Update Boaty Prints.stl which will allow any prints of Boaty made prior to 10/22 update to be used with new McBoatface
Update 10/27/2020, major iteration work completed - only minor changes from this point on - latest files re-uploaded to sync with my local files. Post processing instructions will be completed once prints are completed
Update 10/28/2020, vortex was breaking during print, strengthened the part with additional walls
Update 11/4/2020, updated servo hatch (missing cutout for gear)
Update 11/5/2020, work in progress status lifted - no major issues encountered during assembly
Updated 11/6/2020, after dropping my completed boat noticed one of the sponsons cracked ;.; strengthened the sponsons with option to add 200 mm carbon fiber tube reinforcement (adds ~35 grams to total weight inc carbon tubes or ~ 15 grams without carbon reinforcement). Thanks to a helpful tip from the community I have added a 5 degree pitch up to the thrust vector nozzle - if your boat has a nose down attitude and the ride plate adjustment is not enough this should hopefully correct that. There is a moment force applied by the thrust which pushes the nose down, this minor tweak will hopefully apply a slight corrective force which allows the boat to get on stable plane. Added a ride plate servo wire retention slot to stator bowl. Increased McBoatface carbon tube clearance. Added a 10 deg pitch nozzle in case 5 deg is not enough, as I'm still waiting on batteries to arrive I haven't had a chance to perform test to determine which will be best. Performed submersion test and posted results near the top of this summary
Update 11/8/2020, moved the Boaty magnet catch to the top surface instead of underside to improve ease of assembly. Closed the opening in the baffle since servo wire was long enough to not need it. Moved the cover magnet closer to the Boat magnet to improve latching strength. Improved McBoatface by filleting the sponson to wing interface and creating water rejection channels near the vortex exits.
Update 11/15/2020, added a version of cover with provisions for 3mm LED navigation lights
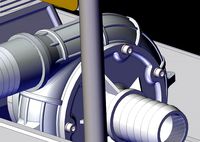
Update 11/18/2020, first functional test of the waterjet, I found that even with TPU gasket air and water would spray out thus sealing the stator bowl to boat body with silicone or glue is necessary. I found an issue with air locking - I don't fully understand the cause but experimentally determined a way to resolve this via a pending modification to the thrust vector nozzle. Update uploaded (Thrust Vector Nozzle Variable Pitch) but untested - I'll hopefully get a chance to print and test by tmw. Testing confirms the air lock issue is resolved with this new nozzle - there is some loss of efficiency. I don't really know why this fixes the air lock but I suspect the stator bowl fins were not redirecting enough of the rotational energy generated by the prop resulting in an area of low pressure which would draw air in from behind the outlet...without high speed cameras or CFD I can't really say. N7 Cat says "wut he trying 2 say iz I putz mah paw ober da nozzle and dat fixes it"
11/21/2020 did some more study on propulsor units and updated the pitch and number of stator vanes - 5 vane stator uploaded - will test later and delete original if testing displays improvement. Test showed marked improvement in both trust and elimination of air lock using the 5 vane stator - original deleted. For anyone else designing or trouble shooting other pump jets on thingiverse the number of stator vanes needs to be a prime number and different than the number of prop blades otherwise a standing wave can develop. At some point in the future I might experiment with a properly designed axial flow prop and stator - salt sintering might be able to create a strong enough part for use as a prop.
11/25/2020 reverted thrust vector nozzle to neutral pitch
I modeled water displacement and Fusion 360 calculated the mass, because it is such a narrow hull it is critical to keep the print weight low and rely on the carbon fiber tubes for most of the strength. I am targeting a total weight around 600 grams for everything, motor and batteries included. Printing with low layer count (maybe even single) / low infill should reduce the mass of the boat to acceptable levels, using flexible primer or maybe plastidip on the finished boat should help with water tightness. I'm still experimenting with my prints, I'll let you know results and recommended print settings for each section once finished.
The 2212 motor is a marvel to me, how is something so awesome so affordable? I wanted this boat to be affordable first, performance is secondary. While an outrunner is atypical for boats I think I've designed out the cooling issue via internal airflow and motor cooling impeller. Besides yeeting boats around at 200kph seems like a dangerous way to accidentally impale swimming googies...a project for another day.
Scroll down to post processing pictures for detailed build instructions - currently updating. Certain components can only be installed before melding of the hull sections including the completed battery packs and motor - do not glue hull together before all components are fitted.
Josh at Flite Test did a good vid about waterproofing RC electronics with Peter Sripol (Flite Test | Waterproofing Electronics)
11/6/2020 Performed a submersion test with sanded model - due to the way walls interface with fill there is capillary action between the individual lines of printed material at the base of the sponsons. This causes water to slowly seep into the model. As I plan on priming the boat, hydro dipping, clear coating then waxing these four layers should seal off the capillary gaps. A couple coats of flexible primer would probably do the trick - focus more primer on the flat surfaces that serve as the first layer of Boaty and McBoatface prints. If you plan on running your boat without these coatings I've read that brushing or submerging in melted candle wax (not too hot though - Paraffin starts melting at 37 deg C / 99 deg F) can seal a 3d print, if you are a motorcyclist you likely have a can of Maxima chain wax (best chain lube ever :) - this is essentially parrafin wax with some additives in a carrier fluid and can likely serve the same purpose without the messy melting (though I'd be concerned if any of the additional additives would leach into the water). Along the same thought process I'm thinking that carnauba car wax would likely work too though be less durable. Btw if you do use wax keep fire safety in mind as some FDM plastics are flammable and wax has now made it even more flamable. Another method that I've seen RC airplane makers use for waterproofing is to coat model in a very very thin layer of gorilla glue - it doesn't bubble up too much if the layer is thin enough. A waterproof wood glue like titebond might even work - I'm not sure how well it would adhere to FDM polymers. If anyone in the RC community has any suggestions they would be welcome - maybe when you post your make you can let us know how you waterproofed your model :). I'll post pictures of my own process soon.
BOM:
Motor: 2212 Though, with some work, you can now use an alternate motor with the custom motor plate template "Custom Motor Plate Template.stl" (Dimensions center to center between the 3 mm mounting holes are 49 mm X 23.41 mm. The top surface of the mounting plate (measured from the large flat area not the post) is 18.738 mm below the center-line of the propeller axis). Keep weight and cooling considerations in mind if using an alternate. If using the 2212 just download the original 2212 Motor Mount. (I don't have enough experience to say what KV level is ideal, I am leaning towards lower KV motors as they deliver the same torque at lower amps with higher KT values. We like KTs - get it...KTs?) https://www.aliexpress.com/item/32672300112.html
ESC: SimonK 30A 4S with BEC (you will need to seal or find an alternate water proof ESC) https://www.aliexpress.com/item/32308790386.html
Prop: 32mm with 100 mm shaft (note get the 10 cm one with 3.18 motor as the 2212 shaft is 3.175 mm - I initially tried to model an axial flow impeller but I found this purchased item to be far more sturdy. Advantages are it has built in high speed bearings and replacement props can be purchased from here as well. I also added provisions for a diy 3mm shaft using 623 bearings) https://www.aliexpress.com/item/32714017489.html https://www.aliexpress.com/item/32528668718.html
Servo: 9g servo (important you will want to waterproof or find an alternate waterproof servo) https://www.aliexpress.com/item/33005962141.html
Reinforcement: 6 mm OD 4 mm ID Carbon Fiber Rods https://www.aliexpress.com/item/32310771446.html
Power Source (btw if, like me, you are inexperienced with RC make sure to inform yourself about some of the precautions needed with lithium based batteries especially around charging and storage. Unlike your consumer electronics the LiPo cell is very much exposed in RC and special care must be taken. RC Review and FliteTest do some good youtube vids on the matter) :
Cat Grumpiness
3S LiPo power pack (I was able to find a 1300 mAh one that fits well 3S 1300 mAh 60C LiPo 75 X 34 X 24 mm - The maximum extents of a battery able fit in the front of the boat are 82 X 36 X 26 mm if removal is not needed)
18650 batteries are no longer being supported, battery compartments are left in but I've come to the conclusion that its just not a good idea..I originally thought it would be cheaper owing to relatively inexpensive cells and BMS modules but once you add a constant current power supply for charging, nickle strip welder, and discharge rate / weight / C.G considerations LiPo starts to make a lot more sense...never mind the potential effects of water on Li Ion cells...
Receiver and transmitter: Up to you (and your local regulations), I'm using a Flysky FS-i6X transmitter and FS-GR3E Waterproof receiver (note i6X will need to be in AFHDS mode to work with FS-GR3E) https://www.aliexpress.com/item/32785968777.html https://www.aliexpress.com/item/32892188833.html
M3 X 6 X 5.3 Embedded Nuts (old link no longer works - possible substitution M3 X D5 X L6) https://www.aliexpress.com/item/4000232858343.html
M3 Machine Screws (Button head and Flat head) https://www.aliexpress.com/item/32798146322.html or stainless https://www.aliexpress.com/item/32934186482.html
XT60 connectors, 3.5 mm bullet connectors, grease (marine), filament material compatible glue. The connectors are sold by the same storefront as much of the material above.
Sound system: Bongo Cats
Tentative Print Settings (Cura has a setting under Travel called combing mode which helps reduce stringing in the inaccessible interior). Personally I'm printing in PETG but ABS or ASA might be a good options too if you are setup for that with enclosure and ventilated space (due to easier gluing / reduced density - if using ABS or ASA I would advise against acetone smoothing as thin walls will likely deform). I excluded PLA as it is not as temperature / weather / UV resistant as the above materials and will swell / deteriorate in water unless waterproofed. I print at 30 mm/s or less but it might still print well at more default speeds of 60 mm/s. Thrust vector nozzle and 2212 cooling impeller will be printed in TPU for its reliable layer adhesion as both components will be subject to cyclic loading and high shear stress. STL files are already saved in as print orientation.
PETG/ABS/ASA Parts
Boaty (PETG/ABS/ASA): 0.4mm nozzle, 0.15mm layer height, 1 walls, 3 bottom layers, 3 top layers, 14% grid infill, supports on overhangs over 80% touching buildplate (apx 116 grams)
McBoatface (PETG/ABS/ASA): 0.4mm nozzle, 0.15mm layer height, 1 walls, 3 bottom layers, 3 top layers, 14 % grid infill, supports on overhangs over 80% touching buildplate, brims are helpful for ensuring support adhesion (apx 218 grams)
Cover: TBD (PETG/ABS/ASA) 0.4mm nozzle, 0.15mm layer height, 1 walls, 3 bottom layers, 3 top layers, 14% grid infill, supports on overhangs over 60% touching buildplate (apx 12 grams)
2212 Motor Mount (PETG/ABS/ASA): 0.4mm nozzle, 0.15mm layer height, 5 walls, 3 bottom layers, 3 top layers, 25% grid infill, supports on overhangs over 80% touching buildplate, brims are helpful for preventing warping (apx 30 grams)
Ride Plate: (PETG/ABS/ASA) 0.4mm nozzle, 0.15mm layer height, 5 walls, 3 bottom layers, 3 top layers, 25% grid infill, supports on overhangs over 80% touching buildplate (apx 6 grams)
Servo Hatch: (PETG/ABS/ASA) 0.4mm nozzle, 0.15mm layer height, 4 walls, 3 bottom layers, 3 top layers, 100% infill, supports on overhangs over 80% touching buildplate, Brim (apx 2 grams)
TPU parts
Thrust Vector Nozzle: (TPU) 0.4mm nozzle, 0.15mm layer height, 3 walls, 3 bottom layers, 3 top layers, 25% cubic subdivision infill, supports on overhangs over 80% touching buildplate (apx 15 grams)
Stator Bowl: (TPU) 0.4mm nozzle, 0.15mm layer height, 3 walls, 3 bottom layers, 3 top layers, 25% cubic subdivision infill, supports on overhangs over 80% touching buildplate (apx 24 grams)
Cooling Impeller: (TPU) 0.4mm nozzle, 0.15mm layer height, 2 walls, 4 bottom layers, 4 top layers, 100% concentric infill, (apx 2 grams). Note this part narrows to a single wall of 0.4mm TPU - slowing down print speed drastically (15 mm/s) is likely needed for successful print
Motor (50 grams), LiPo (129 grams) (18650s are out), ESC (28 grams), servo (9 grams), and receiver (6.5 grams)
A note for early downloaders: I tend to iterate and reiterate a design multiple times before I'm happy with it. Designs subject to change...frequently...
N7 Cat Says: "Dis my bigges and shiniest objec yet, 2020 u cray cray, I jus gonna yeet away from u in mah boat wif mah other kitteh fiends"
Updated: 9/28/2020, Updated files Boaty and Cover, added provisions for gluing a 5mm X 2mm magnet on the cover and boat for magnetic latching
Updated: 9/29/2020, fixed a problem with McBoatnose missing modeled tube for carbon fiber reinforcement.
Updated: 10/2/2020, added a custom motor plate "McBoatface Custom Motor Plate.stl" for anyone wanting to use a motor other than the 2212. Intent is that you will be able to model your own motor housing (and share with others along with recommendations for ESC and battery :) for mounting onto the flat plate. 3 mm dia screws will secure the motor mount to the two sections of the boat, as the mount will be subject to vibration fastening hardware (embedded nuts or lock nuts) is recommended in your design. Like the original requires brims and supports.
Updated 10/4/2020, added battery holder compartments along the length of the hull for an integrated 3S 2P 18650 setup. I'm planing on spot welding the batteries together with pure nickle strips and wiring to BMS. Note there are two battery caps (non symmetric). Added a baffle near the motor cooling impeller to improve airflow and cooling. Additionally minor improvements to printability around the servo mount and filleting of vortex outlet. For custom motor users new battery holders and air baffle might interfere with especially big motors but you can model / clip them out if needed.
Updated 10/6/2020, added built in support for servo hatch opening, improved joints between the three boat hull sections by adding grooves and other features for the expanding polyurethane glue to latch onto. Fixed a printability issue with the fillet that supports the propeller shaft. Started first print of the boat section, may update if issues crop up after print finishes.
Updated 10/7/2020, added a channel in the battery compartment to allow for wire to be routed through.
Updated 10/8/2020, post printing improvements, increased diameter of battery compartment, prop shaft and carbon fiber shaft openings. Improved servo hatch support structure to make it easier to remove.
Update 10/9/2020, Estimated static resting position of the boat in water and calculated rough target mass for finished boat. After a print failure of the protective grid on the intake as well as impact durability test failures I have replaced with a filament heat stake method as shown below in post processing pics.
Insert 1.75 mm filaments into the slots and use a low temp soldering iron to melt the ends into the inlet - you could also use servo wire and glue in place...unless you like grinding baby fish into a pulp...u monster
Updated 10/11/2020, with 18650s looking like less and less of a good idea and mass being more of a concern I trimmed the battery compartments down to two 0.4 mm walls. This reduces mass and print time dramatically.
Update 10/11/2020, realized I derped and forgot to add an access port for servo wiring. I've created an access port on the battery compartment closest to the servo wire (port/left side). As there were some unbridgeable overhangs I made some built in supports that need to be pried or clipped out before use.
Update 10/12/2020, created an alternate path for servo wire on the top of the baffle in case I decide to house all electronics in the cover. After fighting with carbon fiber tube on second print increased the diameter of the carbon tube channel and started printing again :P Ever had a carbon fiber sliver? I haven't nor do I ever want to...make sure to wrap the end of the tube that you are handling in masking tape or something to protect your hands
Updated 10/14/2020, minor improvements to Boaty and McBoatnose to reduce support generation. Trying some new tricks to strengthen servo mount and embedded nut support by creating additional walls in those areas. Improved airflow on McBoatnose 2212. Updated the stator bowl as supports were not properly generating - something to do with angle of one of the pieces aligning with support autogenation void
Updated 10/15/2020, McBoatface 2212 motor mount was a bit of a tight fit, adjusted motor mount. Adjusted joints between sections
Updated 10/16/2020, added receiver tray and antenna port to cover
Update 10/18/2020, added mounting points for turn fin in case they are needed - I couldn't find any info on whether one would be needed for a pump jet nor dimensions for standard mounting points. Converted the fixed ride plate to a variable trim ride plate using 1.5 mm servo wire as the adjustable retention mechanism. Backup retention provided by an embedded nut and M3 X 10 screw + spring. Joint held by filament joint
Updated 10/20/2020, some weird artifacts were cropping up in cooling impeller during slicing, increased to high resolution stl and fixed wall width. Encountered a problem with McBoatnose tips coming off due to single walls and how narrow it becomes. Blunted the tips. Also had to physically clip some of the joints between front and mid section in order to get it to fit, adjusted the model so this is not required. Carbon Fiber tubes now provide most of the support between the front and mid section. Created McBIGface for those of you with Z axis build volume above 280 mm so you can print mid and front sections as one piece #jealouscat (note that this will result in a weaker motor mount as you will still need to balance weight considerations with strength requirements - play around with slicer settings starting from McBoatnose as a baseline)
Updated 10/21/2020, increased prop clearance in stator bowl
Updated 10/22/2020, Major overhaul...N7 cat shredded all the toilet paper...McBoatface and McBoatnose now one part, motor mount now modular for both 2212 and custom motors, added a custom motor mount template, increased sponson size 25%, other minor improvements
Update 10/24/2020, tried to reduce weight of McBoatface by hollowing out the sponsons, turns out a solid object with grid infill doesn't contribute much to weight...who knew...saved 5 grams!
Update 10/26/2020, realized that the cover / McBoatface interface would allow water to seep in at the front seam, updated these two parts to improve water shedding in this area. Added a part called Compatibility Shim For Pre Oct 22 Update Boaty Prints.stl which will allow any prints of Boaty made prior to 10/22 update to be used with new McBoatface
Update 10/27/2020, major iteration work completed - only minor changes from this point on - latest files re-uploaded to sync with my local files. Post processing instructions will be completed once prints are completed
Update 10/28/2020, vortex was breaking during print, strengthened the part with additional walls
Update 11/4/2020, updated servo hatch (missing cutout for gear)
Update 11/5/2020, work in progress status lifted - no major issues encountered during assembly
Updated 11/6/2020, after dropping my completed boat noticed one of the sponsons cracked ;.; strengthened the sponsons with option to add 200 mm carbon fiber tube reinforcement (adds ~35 grams to total weight inc carbon tubes or ~ 15 grams without carbon reinforcement). Thanks to a helpful tip from the community I have added a 5 degree pitch up to the thrust vector nozzle - if your boat has a nose down attitude and the ride plate adjustment is not enough this should hopefully correct that. There is a moment force applied by the thrust which pushes the nose down, this minor tweak will hopefully apply a slight corrective force which allows the boat to get on stable plane. Added a ride plate servo wire retention slot to stator bowl. Increased McBoatface carbon tube clearance. Added a 10 deg pitch nozzle in case 5 deg is not enough, as I'm still waiting on batteries to arrive I haven't had a chance to perform test to determine which will be best. Performed submersion test and posted results near the top of this summary
Update 11/8/2020, moved the Boaty magnet catch to the top surface instead of underside to improve ease of assembly. Closed the opening in the baffle since servo wire was long enough to not need it. Moved the cover magnet closer to the Boat magnet to improve latching strength. Improved McBoatface by filleting the sponson to wing interface and creating water rejection channels near the vortex exits.
Update 11/15/2020, added a version of cover with provisions for 3mm LED navigation lights
Update 11/18/2020, first functional test of the waterjet, I found that even with TPU gasket air and water would spray out thus sealing the stator bowl to boat body with silicone or glue is necessary. I found an issue with air locking - I don't fully understand the cause but experimentally determined a way to resolve this via a pending modification to the thrust vector nozzle. Update uploaded (Thrust Vector Nozzle Variable Pitch) but untested - I'll hopefully get a chance to print and test by tmw. Testing confirms the air lock issue is resolved with this new nozzle - there is some loss of efficiency. I don't really know why this fixes the air lock but I suspect the stator bowl fins were not redirecting enough of the rotational energy generated by the prop resulting in an area of low pressure which would draw air in from behind the outlet...without high speed cameras or CFD I can't really say. N7 Cat says "wut he trying 2 say iz I putz mah paw ober da nozzle and dat fixes it"
11/21/2020 did some more study on propulsor units and updated the pitch and number of stator vanes - 5 vane stator uploaded - will test later and delete original if testing displays improvement. Test showed marked improvement in both trust and elimination of air lock using the 5 vane stator - original deleted. For anyone else designing or trouble shooting other pump jets on thingiverse the number of stator vanes needs to be a prime number and different than the number of prop blades otherwise a standing wave can develop. At some point in the future I might experiment with a properly designed axial flow prop and stator - salt sintering might be able to create a strong enough part for use as a prop.
11/25/2020 reverted thrust vector nozzle to neutral pitch
Similar models
thingiverse
free

Pump Jet (32mm Prop) by N7_Cat
...ntering might be able to create a strong enough part for use as a prop.
11/25/2020 reverted thrust vector nozzle to neutral pitch
thingiverse
free

S800 Reptile addons by slibbinas
...nas
thingiverse
printed in pla or ep-cf (nylon carbon)
0.15mm layer
0.4mm nozzle
printer creality 3d
camera_cover - for runcam3
thingiverse
free
RC swamp boat
...ilament
printed on a prusa mk2
you'll need 4mm shafts and collars for the rudder hardware.
bad pics of some details attached.
thingiverse
free
Nozzle Holder by MaczkanicsG
....4mm nozzle, 0.15mm layer height
3x 0.2mm nozzle
3x 0.3mm nozzle
2x3 0.4mm nozzle
3x 0.5mm nozzle
3x 0.6mm nozzle
3x 0.8mm nozzle
thingiverse
free

PTFE Tube fitting
...tube fitting
thingiverse
printing without supports with a layer of 0.1mm line width 0.4mm. i used a 0.4 mm nozzle. 100% filling.
cg_trader
$3

3d file to print a Key that hold your keys | 3D
...trader
this is a file to 3d print. it can be printed without supports. i printed it with pla, 0.15mm resolution, 0.4mm nozzle.
thingiverse
free

Simple mini planter with drainage - Pentagon version by jphphotography
... plan on updating my other design soon.
designed to print using a 0.4mm nozzle with 0.4mm layer height and 3 top/bottom layers.
thingiverse
free

Canoe Polo Figures by lhammer
...n 50% scale with support.
the paddels break off easily.
i printed them with a 0.4mm nozzle and 0.2 mm layer hight on an anet a8.
thingiverse
free

Fabrikator AutoBed Leveling case and support by CarlDesign
... the head, using the 2 screw on the left.
i hope it will be also useful !
i print this with 0.2mm layer and 0.4mm for the nozzle.
thingiverse
free

9g Servo Linear Actuator (Ball Bearing) by N7_Cat
...20mm rack for those using 360 enabled servos that can be cut to size (for this length carbon tube reinforcement is necessary imo)
N7
turbosquid
$10

N7 Pistol
...rbosquid
royalty free 3d model n7 pistol for download as fbx on turbosquid: 3d models for games, architecture, videos. (1472924)
3ddd
$1
Стол N7 от Casamania
...стол n7 от casamania
3ddd
casamania
футуристичный стол n7 от casamania
evermotion
$8

CASAMANIA N7 AM72
...nia design with all textures, shaders and materials. it is ready to use, just put it into your scene.. evermotion 3d models shop.
turbosquid
$70
Spaceship N7-1
... available on turbo squid, the world's leading provider of digital 3d models for visualization, films, television, and games.
turbosquid
$60

Spaceship N7-3
... available on turbo squid, the world's leading provider of digital 3d models for visualization, films, television, and games.
turbosquid
$50

Spaceship N7-2
... available on turbo squid, the world's leading provider of digital 3d models for visualization, films, television, and games.
3d_export
$12

Clothes n7
...tures are in png format and they are available in these dimensions:<br>dimensions of the 3d model: 0.402m x 0.324m x 0.912m
3d_sky
free
Table N7 from Casamania
...table n7 from casamania
3dsky
casamania
futuristic table n7 from casamania
3dbaza
$3
Coffe Table N7 (154932)
...coffe table n7 (154932)
3dbaza
coffe table 3d model<br>coffe table n7 wood metall
thingiverse
free
weapon-n7-valiant by Worffpack104TH
...on-n7-valiant by worffpack104th
thingiverse
weapon-n7-valiant is for mass effect 3 it is a good gun to use now u can . print it
喷射泵
thingiverse
free
雷射筆架 by genie1125
...雷射筆架 by genie1125
thingiverse
適用雷射筆筆徑13mm。
thingiverse
free

Laser Guide 雷射標線 by ThinkToTo
...laser guide 雷射標線 by thinktoto
thingiverse
thingiverse
free

秦始皇兵馬俑跪射俑 by hkepel3d
...秦始皇兵馬俑跪射俑 by hkepel3d
thingiverse
秦始皇兵馬俑跪射俑
thingiverse
free
CR-8 雷射模組固定板 by smat6177
...cr-8 雷射模組固定板 by smat6177
thingiverse
這是專為cr-8設計用來固定雷射模組用,許多自造者們,改造了噴頭的散熱風扇罩之後,就沒有鐵殼供雷射模組吸附,所以需要自造這個固定板來協助固定雷射模組。
請自備m3螺絲。
thingiverse
free
jet fighter avion de chasse caza de reacción 喷气式战斗机 طائرة مقاتلة by kasraoui
...机 طائرة مقاتلة by kasraoui
thingiverse
jet fighter avion de chasse caza de reacción 喷气式战斗机 طائرة مقاتلة
by kasraoui mohamed hedi
thingiverse
free

ATOM 2.0 雷射模組校正斜塊 by cwting
...atom 2.0 雷射模組校正斜塊 by cwting
thingiverse
這不是針對官方的雷射模組而設計的,是我自己搞的雷射模組。為了方便知道雷射的焦距,讓它在這個斜面的紙上燒很多條水平線,再看那一條水平線最完美,就可以找到相對的高度。
thingiverse
free

CR-8 雷射模組固定板 V2 by smat6177
...verse
這是專為cr-8設計用來固定雷射模組用,許多自造者們,改造了噴頭的散熱風扇罩之後,就沒有鐵殼供雷射模組吸附,所以需要自造這個固定板來協助固定雷射模組。
請自備m3螺絲。
因為第一版用久之後,會彎曲變型,所以第二版增加兩根支撐,讓雷射模組更穩定。
thingiverse
free

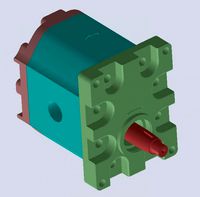
gear pump model 齒輪泵模型 by kmlvli84
...ingiverse
gear pump
uses the gap between gears to pump liquid from left to right, or right to left
利用齒輪中間的縫隙來把液體從左邊打到右邊,或從右邊打到左邊
thingiverse
free

電離放射線マーク付きミニドラム缶 Radioactive sign drum by jet_nasa
...電離放射線マーク付きミニドラム缶 radioactive sign drum by jet_nasa
thingiverse
ペン立てにどうぞ
遥控船
thingiverse
free

鄭和寶船 by hkepel3d
...鄭和寶船 by hkepel3d
thingiverse
鄭和寶船
thingiverse
free
鄭和寶船 by hkepel3d
...鄭和寶船 by hkepel3d
thingiverse
鄭和寶船
thingiverse
free

ATX 電源供應器 控制盒 by pablolee
...atx 電源供應器 控制盒 by pablolee
thingiverse
atx 電源供應器 控制盒
thingiverse
free

日本遣隋使、遣唐使船 by hkepel3d
...日本遣隋使、遣唐使船 by hkepel3d
thingiverse
日本遣隋使、遣唐使船
thingiverse
free

L298N直流馬達控制板(DC motor control board) by OK1289
...l298n直流馬達控制板(dc motor control board) by ok1289
thingiverse
這是直流馬達控制板
this is the dc motor control board
thingiverse
free

RC traffic cone 遙控 交通三角錐 by catstudio
...one can use to any rc construction vehicles drift car excavators car .
此模型交通錐,可用於模擬任何象徵模型或遙控模型做使用。
目前用於遙控工程車、甩尾車場地上,歡迎同好加入設計討論。
thingiverse
free
MiniPlan_TinyPlan_v4.0 by OK1289
...inyplan_v4.0 by ok1289
thingiverse
miniplan_tinyplan_v4.0 這是一塊電子控制板
miniplan_tinyplan_v4.0 this is an electronic control board
thingiverse
free

淡水舢舨船 / Sampan style fishing boat by Anthonylu
......https://www.facebook.com/86duino
喜歡圖檔的好朋友請記得到 86duino filament 3d 列印 / 耗材 - 不正經研究中心 粉絲團給我們按讚哦 https://www.facebook.com/86duino
thingiverse
free

taste of Niagara Falls tour boat by scrap_and_build_lb
...taste of niagara falls tour boat by scrap_and_build_lb
thingiverse
ship objet
double decker
ナイアガラの滝
観光遊覧船
Pump
3d_export
$5
pump
...pump
3dexport
pump
archibase_planet
free
Pump
...pump
archibase planet
petrol pump petrol station gas station
pump - 3d model (*.gsm+*.3ds) for interior 3d visualization.
3d_ocean
$8

Pumps
...ps
3docean
girls heels high kicks pumps shoes stilettos womens
womens high heels, pumps or stilettos. polygon model – no textures
3ddd
free

Pump
...ump
3ddd
pump , versus
производитель: versus
модель: pumphttp://www.versus.as/
turbosquid
$3

Pumps
...s
turbosquid
royalty free 3d model pumps for download as skp on turbosquid: 3d models for games, architecture, videos. (1275250)
3d_export
$5
pump
...pump
3dexport
turbosquid
$39
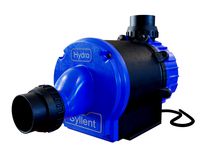
Realistic Water pump SYLLENT PUMP
...realistic water pump syllent pump for download as max and obj on turbosquid: 3d models for games, architecture, videos. (1312864)
turbosquid
$150

Pumpe
...yalty free 3d model pumpe for download as ige, blend, and stl on turbosquid: 3d models for games, architecture, videos. (1284318)
3d_export
$10
gear pump
...gear pump
3dexport
it is a gear pump in iges format
turbosquid
$19

Old Water Pumps Gas Pumps
...pumps gas pumps for download as 3ds, obj, fbx, blend, and dae on turbosquid: 3d models for games, architecture, videos. (1207997)
Rc
3ddd
$1
RC Helicopter
...rc helicopter
3ddd
вертолет
mini rc helicopter
93.329 polys
3d_export
$7
rc helicopter model
...rc helicopter model
3dexport
rc helicopter model
3d_ocean
$25
RC F1
...rc f1
3docean
auto car control f1 formula race rc remote speed
remote control f1 car
turbosquid
$10
rc plane
...lane
turbosquid
free 3d model rc plane for download as blend on turbosquid: 3d models for games, architecture, videos. (1295828)
turbosquid
$100
RC Helicopter
...free 3d model rc helicopter for download as 3ds, max, and obj on turbosquid: 3d models for games, architecture, videos. (1298511)
turbosquid
$75
RC buggy
... available on turbo squid, the world's leading provider of digital 3d models for visualization, films, television, and games.
turbosquid
$30
RC Jet
... available on turbo squid, the world's leading provider of digital 3d models for visualization, films, television, and games.
turbosquid
$30
Rc airplane
... available on turbo squid, the world's leading provider of digital 3d models for visualization, films, television, and games.
turbosquid
$10
RC-Car
... available on turbo squid, the world's leading provider of digital 3d models for visualization, films, television, and games.
turbosquid
$8
RC Airfield
... available on turbo squid, the world's leading provider of digital 3d models for visualization, films, television, and games.
Jet
turbosquid
$1

jet
...jet
turbosquid
royalty free 3d model jet for download as fbx on turbosquid: 3d models for games, architecture, videos. (1659892)
3ddd
free

water jet
...water jet
3ddd
фонтан
water jet fountain
turbosquid
$65

JETS
... available on turbo squid, the world's leading provider of digital 3d models for visualization, films, television, and games.
turbosquid
$10

jet
... available on turbo squid, the world's leading provider of digital 3d models for visualization, films, television, and games.
turbosquid
$10

Jet
... available on turbo squid, the world's leading provider of digital 3d models for visualization, films, television, and games.
turbosquid
$4
jet
... available on turbo squid, the world's leading provider of digital 3d models for visualization, films, television, and games.
turbosquid
$1
Jet
... available on turbo squid, the world's leading provider of digital 3d models for visualization, films, television, and games.
turbosquid
free
Jet
... available on turbo squid, the world's leading provider of digital 3d models for visualization, films, television, and games.
turbosquid
free
jet
... available on turbo squid, the world's leading provider of digital 3d models for visualization, films, television, and games.
3d_export
$5

jet engine
...jet engine
3dexport
this model is a fantasy on a jet engine and has no real prototype. enjoy !!!
Cat
3d_export
$26

Cat
...cat
3dexport
cat
3d_export
$6
Cat
...cat
3dexport
cat
3d_export
$6

cat
...cat
3dexport
this is a cat
3d_export
$5
Cat
...cat
3dexport
cat
3d_export
$5
Cat
...cat
3dexport
cat
3d_export
$5
cat
...cat
3dexport
low poly cat ball
archibase_planet
free
Cat
...cat
archibase planet
cats animals
cat n140208 - 3d model (*.gsm+*.3ds) for interior 3d visualization.
3d_export
$5
cat
...cat
3dexport
a cat that may look like a leopard because of its color.
turbosquid
free
Tidy Cats Cat Litter
...alty free 3d model tidy cats cat litter for download as blend on turbosquid: 3d models for games, architecture, videos. (1206013)
turbosquid
$15

The Battle Cats Cat Base
...odel the battle cats - eraser cat for download as max and ige on turbosquid: 3d models for games, architecture, videos. (1591322)
Boat
3d_ocean
$5
Boat
...boat
3docean
boat game ready boaat low poly boat medi evil boat wooden boat
boat,medi evil boat, 4096* 4096* texture game ready
3d_export
$5
Boat and boat trailer
...boat and boat trailer
3dexport
boat and boat trailer square grid textures in one archive with 3d
archibase_planet
free

Boat
...boat
archibase planet
inflatable boat motor boat
inflatable boat - 3d model (*.gsm+*.3ds) for interior 3d visualization.
archibase_planet
free
Boat
...boat
archibase planet
boat fishing-boat trawler
boat fishing n110113 - 3d model (*.gsm+*.3ds) for interior 3d visualization.
archibase_planet
free
Boat
...boat
archibase planet
boat fishing-boat trawler
boat n310514 - 3d model (*.gsm+*.3ds+*.max) for exterior 3d visualization.
3d_export
$5

Boat
...boat
3dexport
boat with oars
3ddd
$1
boat
...boat
3ddd
лодка
boat
3d_export
$5
boat
...boat
3dexport
this is the full model of boat in solid works with stl file #boat #craft
archibase_planet
free

Boat
...boat
archibase planet
boat fishing-boat trawler
boat fishing 2 n110113 - 3d model (*.gsm+*.3ds) for exterior 3d visualization.
archibase_planet
free

Boat
...boat
archibase planet
boat playground
boat - 3d model (*.gsm+*.3ds) for exterior 3d visualization.