Thingiverse

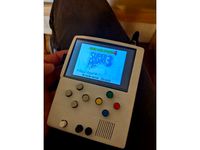
Raspberry PI Zero WH with 3.5" touch screen case by michelluccote
by Thingiverse
Last crawled date: 3 years, 1 month ago
This is my remix of a Raspberry PI Zero WH case. This work was made from scratch but the idea was based on this case:
https://www.thingiverse.com/thing:3952272
I designed it with the following enhancement form the design I saw on Thingiverse.
Place put put the touch screen pointer device so I don't loose it.
A back mount with holes to mount it on either side or on top of an extrusion.
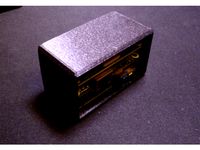
A taller case so I could route the wires even with the USB connector is longer.
Exit hole in the back to help hide the wires better.
Added brackets to mount case in the front of an extrusion. I have not printed and tested these but if they don't fit I can easily adjust them.
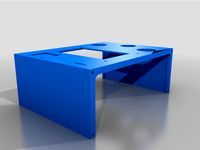
Added mount points inside to align with the PCB holes of the Raspberry PI Zero W board.
Added supports to sit just behind touch screen to hold it in place firmly.
Made cover holes and case holes to easily put it in with M3 bolts.
Made all mounting holes to use with 5mm bolts but smaller bolts with washers should work too.
I designed it all to be printed while standing up with-out the need for supports. The default orientation of the body STL files is not ideal but I've not found a way yet to rotate it for better default placement. Just sit it on its bottom and it should print great.
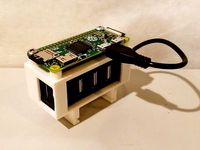
There should be plenty of place to route the USB cable in and even put two in if needed. I used this connector for my installation since it would require two cable.
https://www.amazon.com/gp/product/B07FY9Z9GD/ref=ppx_yo_dt_b_asin_title_o03_s00?ie=UTF8&psc=1
My PI version is this one:
https://www.amazon.com/gp/product/B07B2SK3RK/ref=ppx_yo_dt_b_asin_title_o03_s00?ie=UTF8&psc=1
And here is my touch screen but they have many suppliers of a similar screen.
https://www.amazon.com/gp/product/B01CNJVG8K/ref=ppx_yo_dt_b_asin_title_o09_s00?ie=UTF8&psc=1
One important note. To install it DON'T leave the memory card in the PI. Remove it before installation and then use the slot on the side to re-insert it. I was thinking of adding a slot going down from the top to allow space for the card but I found it fairly easy to put the car in and out. To make it easier to get the card out I use a small pair of needle nose pliers.
Good printing!
https://www.thingiverse.com/thing:3952272
I designed it with the following enhancement form the design I saw on Thingiverse.
Place put put the touch screen pointer device so I don't loose it.
A back mount with holes to mount it on either side or on top of an extrusion.
A taller case so I could route the wires even with the USB connector is longer.
Exit hole in the back to help hide the wires better.
Added brackets to mount case in the front of an extrusion. I have not printed and tested these but if they don't fit I can easily adjust them.
Added mount points inside to align with the PCB holes of the Raspberry PI Zero W board.
Added supports to sit just behind touch screen to hold it in place firmly.
Made cover holes and case holes to easily put it in with M3 bolts.
Made all mounting holes to use with 5mm bolts but smaller bolts with washers should work too.
I designed it all to be printed while standing up with-out the need for supports. The default orientation of the body STL files is not ideal but I've not found a way yet to rotate it for better default placement. Just sit it on its bottom and it should print great.
There should be plenty of place to route the USB cable in and even put two in if needed. I used this connector for my installation since it would require two cable.
https://www.amazon.com/gp/product/B07FY9Z9GD/ref=ppx_yo_dt_b_asin_title_o03_s00?ie=UTF8&psc=1
My PI version is this one:
https://www.amazon.com/gp/product/B07B2SK3RK/ref=ppx_yo_dt_b_asin_title_o03_s00?ie=UTF8&psc=1
And here is my touch screen but they have many suppliers of a similar screen.
https://www.amazon.com/gp/product/B01CNJVG8K/ref=ppx_yo_dt_b_asin_title_o09_s00?ie=UTF8&psc=1
One important note. To install it DON'T leave the memory card in the PI. Remove it before installation and then use the slot on the side to re-insert it. I was thinking of adding a slot going down from the top to allow space for the card but I found it fairly easy to put the car in and out. To make it easier to get the card out I use a small pair of needle nose pliers.
Good printing!
Similar models
thingiverse
free

Ender 3 Touch Screen Enclosure
... to re-locate the touch screen
https://www.amazon.com/gp/product/b07gd2sw11/ref=ppx_yo_dt_b_asin_title_o04_s00?ie=utf8&psc=1
thingiverse
free

LANDZO 7 Inch Touch Screen Case for Raspberry Pi by mdegrazia
...t/b01id5bqtc/ref=oh_aui_detailpage_o07_s00?ie=utf8&psc=1
i plan to add a back to hold the raspberry pi sometime in the future
thingiverse
free
Raspberry Pi Retrogaming Case by Eguin
...for use in future projects, and if you have similar things already can be used in their place. in...
thingiverse
free
Raspberry Pi Enclosure for Pelican Case Vault V100 by loganpettit86
...mp;psc=1
raspberry pi 4 4” screenhttps://www.amazon.com/gp/product/b07xbvf1c9/ref=ppx_yo_dt_b_search_asin_title?ie=utf8&psc=1
thingiverse
free

Turntable
...amp;psc=1
m3 screws m3x6 or m3x8https://www.amazon.com/gp/product/b07twz7x38/ref=ppx_yo_dt_b_asin_title_o03_s00?ie=utf8&psc=1
thingiverse
free
Stacked Raspberry Pi Zero Case (Pi, USB-Hub, ePaper HAT) by Simonmicro
...ple case for a raspberry pi zero (w), with all his ports still accessible and a additional space for the epaper hat by waveshare.
thingiverse
free
Pi Zero DIN rail mount with USB by cdoc83
...duct/b01hyjlzh6/ref=as_li_ss_tl?ie=utf8&psc=1&linkcode=sl1&tag=dtech1c-20&linkid=6c14fa74b8c872f1ad8524053f0c2c57
thingiverse
free

Pi Zero Stacking Hub Case by jmsjgill
...0_s00?ie=utf8&psc=1).
you may need to file the holes or add shims depending on your chose configuration of mounting hardware.
thingiverse
free

12 Function Deep Dish Button Box by coyoteyz13
..._title_o03_s00?ie=utf8&psc=1
https://www.amazon.com/gp/product/b07vhcb1q4/ref=ppx_yo_dt_b_search_asin_title?ie=utf8&psc=1
thingiverse
free

Raspberry Pi screen case by sds5150
... ips 1024x600 with prop stand built-in dual speakers plug and play fpc for raspberry pi 4 3 2 zero b+ model b ios win game device
Michelluccote
thingiverse
free

ThermoPro TP49 Case by michelluccote
...built-in mount can still be used when inserted in this case. has slot in the lower back to help put the tp49 up for easy removal.
thingiverse
free

Filament Shelf Bracket With Divider/Endstop and Labels for USA 1"x2" by michelluccote
...d a blank label if you want to write or stick something on instead. i've included labels for pc, pla, petg, asa, abs and tpu.
Wh
3ddd
free
WH gispen 202 Chair
...wh gispen 202 chair
3ddd
gispen
wh gispen 202 chair
turbosquid
$20

WH Neu Chair
... available on turbo squid, the world's leading provider of digital 3d models for visualization, films, television, and games.
turbosquid
$3
LOFTIT Phone LOFT9993-WH
...ftit phone loft9993-wh for download as 3ds, max, obj, and prj on turbosquid: 3d models for games, architecture, videos. (1467353)
3ddd
free
Кронштейн SMS FLATSCREEN WH 3D
...н по фотографиямhttp://www.hifiklubben.dk/produkter/tilbehor/tv-tilbehor/sms_flatscreen-wh-3d_vagbeslag_smspl101115.htm
3ddd
$1
Elica Capitol WH/F/80
... вытяжка
вытяжка элика, elica capitol wh/f/80
polys: 138840 / 523872 -1 it turbosmooth
max2010/fbx/obj
turbosquid
$7

Falmec Marilyn Isola WH 66
... falmec marilyn isola wh 66 for download as max, obj, and fbx on turbosquid: 3d models for games, architecture, videos. (1216707)
turbosquid
$3

Sconce LOFT IT ROOTS LOFT1714W-WH
... loft it roots loft1714w-wh for download as 3ds, max, and obj on turbosquid: 3d models for games, architecture, videos. (1467363)
3d_export
$10

Oven whirlpool AKP 275-WH 3D Model
...pool akp 275 wh
oven whirlpool akp 275-wh 3d model download .c4d .max .obj .fbx .ma .lwo .3ds .3dm .stl timur1245 103658 3dexport
3d_export
$10
Whirlpool akp 6465 wh Cooker 3D Model
...oker gas hob
whirlpool akp 6465 wh cooker 3d model download .c4d .max .obj .fbx .ma .lwo .3ds .3dm .stl timur1245 106705 3dexport
3ddd
$1
ILLUMINATI MX8098-12A WH
...x8098-12a wh
3ddd
illuminati
люстра итальянского производителя illuminati
модель: mx8098-12awh
сайт: www.illuminati-lighting.com
Zero
3ddd
$1

ZERO, BEAM
...zero, beam
3ddd
zero
поворотная люстра zero , beam
design_connected
$9

Zero-in
...zero-in
designconnected
established & sons zero-in tables computer generated 3d model. designed by jay osgerby .
3ddd
free

Sub-Zero
...sub-zero
3ddd
sub-zero , голова
sub-zero corona render!
3ddd
$1
Metalspot / Zero
...metalspot / zero
3ddd
metalspot
metalspot zero
3ddd
$1
Catalano Zero
...catalano zero
3ddd
catalano , унитаз
catalano zero
3ddd
$1

SUB ZERO
... sub zero
the first and only 3d model of sub zero refrigerator.
the model is very accurate.
turbosquid
free

Zero
... available on turbo squid, the world's leading provider of digital 3d models for visualization, films, television, and games.
turbosquid
free
Zero
... available on turbo squid, the world's leading provider of digital 3d models for visualization, films, television, and games.
turbosquid
free
Zero
... available on turbo squid, the world's leading provider of digital 3d models for visualization, films, television, and games.
3ddd
$1

ZERO / Hide
...zero / hide
3ddd
zero
polys: 25486
wire-spline
Raspberry
3d_export
free

raspberry
...raspberry
3dexport
3d model of a raspberry. i tried to make it realistic.
turbosquid
$27

Raspberries
...y free 3d model raspberries for download as max, obj, and stl on turbosquid: 3d models for games, architecture, videos. (1354176)
turbosquid
$14

Raspberries
...y free 3d model raspberries for download as max, obj, and fbx on turbosquid: 3d models for games, architecture, videos. (1364663)
3d_export
$5

raspberry pi
...raspberry pi
3dexport
carcasa para la raspberry pi
turbosquid
$99

Raspberry
... available on turbo squid, the world's leading provider of digital 3d models for visualization, films, television, and games.
turbosquid
$10

raspberries
... available on turbo squid, the world's leading provider of digital 3d models for visualization, films, television, and games.
archive3d
free

Raspberries 3D Model
...raspberries 3d model archive3d raspberries raspberry raspberries n300911 - 3d model (*.3ds) for interior 3d...
3d_export
$5

raspberry fruit
...raspberry fruit
3dexport
3d_export
$5

raspberry
...y different sizes. their color ranges from light burgundy to pink. there are formats: obj, 3ds, blend, dae, fbx, mtl.<br>:)
evermotion
$12

raspberries 23 am130
...evermotion raspberries 23 am130 evermotion key 23 food fruit raspberry fruits am130 raspberries highly detailed 3d model of raspberries...
Pi
design_connected
$11

Pi
...pi
designconnected
ligne roset pi chairs computer generated 3d model. designed by thibault desombre.
3d_export
$5
raspberry pi
...raspberry pi
3dexport
carcasa para la raspberry pi
turbosquid
$18

pied
... available on turbo squid, the world's leading provider of digital 3d models for visualization, films, television, and games.
3ddd
$1

Emme pi light
...emme pi light
3ddd
emme pi light
люста emme pi light
3ddd
$1

Emme pi light
...emme pi light
3ddd
emme pi light
бра классическое emme pi light
3ddd
$1

Emme Pi Light
...emme pi light
3ddd
emme pi light
3ddd
$1

Emme Pi Light
...emme pi light
3ddd
emme pi light
design_connected
$16

Pi-Air
...pi-air
designconnected
living divani pi-air lounge chairs computer generated 3d model. designed by harry & camila.
3d_ocean
$15

Manneken Pis
...picting a naked little boy urinating into a fountain’s basin. (wikipedia) the model was sculpted in blender 2.70a rendered wit...
3ddd
$1

Emme pi light
...emme pi light
3ddd
emme pi light
люстра классическая фирма: emme pi light
артикул: 3595/5/cot/12/wh
Touch
3ddd
$1

Touch
...touch
3ddd
touch , альфа банк
электронный терминал для очереди
3ddd
$1

GSG / Touch
... ванна
http://www.ceramicagsg.com/sanitaryware-touch/bathtub-touch-free-standing.html
turbosquid
$10

Oculus Touch
...squid
royalty free 3d model oculus touch for download as skp on turbosquid: 3d models for games, architecture, videos. (1462433)
turbosquid
$64

iPod Touch
...ty free 3d model ipod touch for download as 3ds, max, and obj on turbosquid: 3d models for games, architecture, videos. (1299603)
3ddd
$1

iPod Touch 5
...ipod touch 5
3ddd
apple , плеер
модель ipod touch 5
3ddd
$1

Asnaghi "Touch"
...asnaghi "touch"
3ddd
asnaghi , touch
фабрика: asnaghi
модель: touch
3ddd
free

Japanese stone touch
...japanese stone touch
3ddd
фонарь
japanese stone garden touch
японский садовый фонарь
икеокоми-гата
3d_ocean
$15
IPOD TOUCH 5
...apple blender ipad iphone ipod mp3 nano player touch
3d model of ipod touch 5 in 3 colours. available in .3ds, .blend, .obj, .x3d
3d_ocean
$12

iPod touch 5G
...pod jobs nano steve touch
ipod touch 3d model. formats, fbx, obj, max(2010) textures and materials with multiple colors included.
3ddd
$1
HTC Touch HD
...http://www.gsmarena.com/htc_touch_hd-2525.php фото:http://i.smartphone.ua/img/phones/htc-touch-hd/foto_001.jpg
Screen
archibase_planet
free
Screen
...screen radiator screen radiator enclosure lattice
screen radiator n120315 - 3d model (*.gsm+*.3ds) for interior 3d visualization.
archibase_planet
free

Screen
...screen
archibase planet
screen group display
movie screen - 3d model for interior 3d visualization.
3ddd
$1
Screen
...screen
3ddd
screen
modern dressing wall partition
3d_ocean
$15

HP Screen
...test hp screen. it is has different object, so you can use it as a wall mounted screen or a stand on table. hope you all like it.
3d_export
$10
Accessories screen LCD screen 3D Model
...d screen 3d model
3dexport
accessories screen lcd 3d model interior
accessories screen lcd screen 3d model sunupcg 17831 3dexport
turbosquid
$25
SCREEN
... available on turbo squid, the world's leading provider of digital 3d models for visualization, films, television, and games.
turbosquid
$2
Screen
... available on turbo squid, the world's leading provider of digital 3d models for visualization, films, television, and games.
3d_export
$10
Screen metal screen microwave 3D Model
...ave 3d model
3dexport
screen metal microwave oven 3d model interior
screen metal screen microwave 3d model sunupcg 17847 3dexport
3d_ocean
$5
Projector Screen
...hat have presentations. the projector screen consists of an alluminum structure that holds the canvas up. this model can be us...
archive3d
free
Screen 3D Model
...rchive3d
screen folding screen
screen n020811 - 3d model (*.3ds) for interior 3d visualization.
Case
3d_export
$1

case
...case
3dexport
case
archibase_planet
free

Case
...case
archibase planet
showcase show-case glass case
glass-case + cakes - 3d model for interior 3d visualization.
archibase_planet
free

Case
...case
archibase planet
showcase show-case glass case
glass-case for chips - 3d model for interior 3d visualization.
archibase_planet
free

Case
...case
archibase planet
case shelving drawer
case - 3d model for interior 3d visualization.
archibase_planet
free

Case
...case
archibase planet
case rack locker
case - 3d model for interior 3d visualization.
archibase_planet
free

Case
...case
archibase planet
case drawer kitchen furniture
case - 3d model for interior 3d visualization.
archibase_planet
free

Case
...case
archibase planet
case cupboard shelving
glass case - 3d model for interior 3d visualization.
archibase_planet
free

Case
...case
archibase planet
case handbag suitcase
case - 3d model (*.gsm+*.3ds) for interior 3d visualization.
archibase_planet
free

Case
...case
archibase planet
case suitcase
case 5 - 3d model (*.gsm+*.3ds) for interior 3d visualization.
archibase_planet
free

Case
...case
archibase planet
locker case dresser
case - 3d model (*.gsm+*.3ds) for interior 3d visualization.
5
turbosquid
$6

Rock 5-5
...urbosquid
royalty free 3d model rock 5-5 for download as obj on turbosquid: 3d models for games, architecture, videos. (1639063)
3d_export
$5

hinge 5
...hinge 5
3dexport
hinge 5
turbosquid
$10

A-5
... available on turbo squid, the world's leading provider of digital 3d models for visualization, films, television, and games.
turbosquid
$2

A-5
... available on turbo squid, the world's leading provider of digital 3d models for visualization, films, television, and games.
turbosquid
$12

Calligraphic Digit 5 Number 5
...hic digit 5 number 5 for download as max, obj, fbx, and blend on turbosquid: 3d models for games, architecture, videos. (1389333)
3ddd
$1

5 роз
...5 роз
3ddd
5 роз в стеклянной вазе
design_connected
$11

iPhone 5
...iphone 5
designconnected
apple iphone 5 computer generated 3d model.
3ddd
$1

Lola 5
...lola 5
3ddd
miniforms
lola 5 miniforms 300*65*134
3ddd
$1

Nexus 5
...dd
nexus , phone , телефон
google nexus 5 phone
3d_ocean
$15

iPhone 5
...iphone 5
3docean
3d 4d apple cinema iphone model modeling phone screen texture
iphone 5 3d model and texture realistic iphone 5.
3
turbosquid
$10

Mountain Bike 3 -3 of 3
...model mountain bike 3 (#3 of 3) for download as fbx and blend on turbosquid: 3d models for games, architecture, videos. (1438752)
turbosquid
$6

Rock 3-3
...urbosquid
royalty free 3d model rock 3-3 for download as obj on turbosquid: 3d models for games, architecture, videos. (1628065)
turbosquid
$29

Books 150 pieces 3-3-3
...books 150 pieces 3-3-3 for download as max, obj, fbx, and stl on turbosquid: 3d models for games, architecture, videos. (1384033)
turbosquid
$3

Genesis 3 Clothing 3
... available on turbo squid, the world's leading provider of digital 3d models for visualization, films, television, and games.
3d_export
$5

hinge 3
...hinge 3
3dexport
hinge 3
3ddd
$1

Розетка 3
...розетка 3
3ddd
розетка
розетка 3
turbosquid
$50

is-3
... available on turbo squid, the world's leading provider of digital 3d models for visualization, films, television, and games.
turbosquid
$10

Mountain Bike 3 -2 of 3
...model mountain bike 3 (#2 of 3) for download as fbx and blend on turbosquid: 3d models for games, architecture, videos. (1438750)
turbosquid
$10

Mountain Bike 1 -3 of 3
...model mountain bike 1 (#3 of 3) for download as fbx and blend on turbosquid: 3d models for games, architecture, videos. (1438743)
3d_export
$5

3 CATS
...3 cats
3dexport
3 cats pen holder