Thingiverse
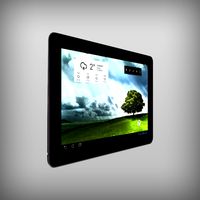
Raspberry Pi 7" Touchscreen Case by jzkmath
by Thingiverse
Last crawled date: 3 years ago
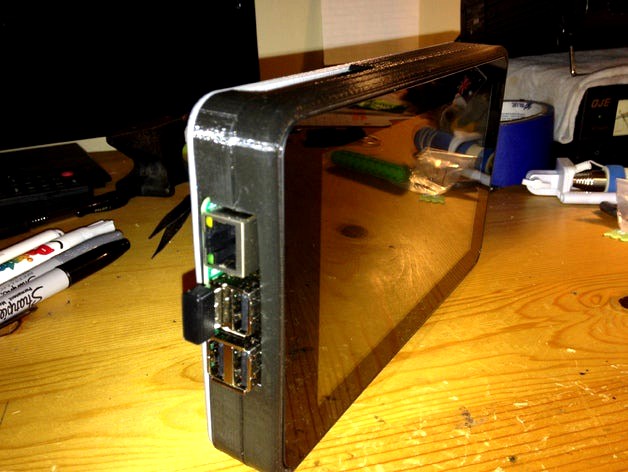
This is another Version of an enclosure for the Raspberry Pi official 7" touchscreen. By inverting the pi and rotating it 180 degrees, the USB/Ethernet ports barely stick out of the case for easy access!
This model was based off the Version made by deisterhold, although I built this design from scratch, using the dimensions of his bottom mount design.
****UPDATE 4/14/2016*****VERSION 2
-After learning how to use SolidWorks, I decided to redo my touchscreen case so that the parts all work together!
-The old version has been consolidated into a ZIP file called "OldRaspberryPi Case"
-I have a ZIP file of the New Solidworks files in "pack and go" format called "Pi Touchscreen 2016"
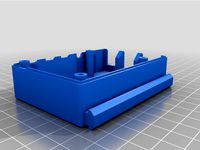
-The STL's with "NewTouchscreen Case" are the updated version.FIXES:
-the slot now fits the USB port perfectly
-Holes now match up
-there is now a border to protect the edge of the touchscreen
This is designed with an external USB Battery in mind, with a small slot for the microUSB cable to fit into.
I made 2 versions of the mounting plate, a plain one and a plate with the Raspberry Pi logo. (I also made one that has my name engraved on it, but y'all don't need that version!)
I will post pics and more details once I start putting it together!
UPDATE 10/14/2015
Thanks to SkyRider, I found that the screw holes did not line up with the case. It has since been fixed, so be sure to print the BottomNew.STL file instead!
UPDATE 10/16/2015
I did a test print of the BottomNew.STL and I need to do some work on it as far as thickness is concerned. I have made another file that should work instead. This is Bottom3.STL
UPDATE 10/17/2015
The parts came in the mail, so I was now able to put them together. First off, I found some long machine screws to find that the holes in the print were too small! I improvised by taking an 1/8" drill bit and redrilling the holes. I then cut the machine screws to length and screwed the enclosure together, completing the project!
This model was based off the Version made by deisterhold, although I built this design from scratch, using the dimensions of his bottom mount design.
****UPDATE 4/14/2016*****VERSION 2
-After learning how to use SolidWorks, I decided to redo my touchscreen case so that the parts all work together!
-The old version has been consolidated into a ZIP file called "OldRaspberryPi Case"
-I have a ZIP file of the New Solidworks files in "pack and go" format called "Pi Touchscreen 2016"
-The STL's with "NewTouchscreen Case" are the updated version.FIXES:
-the slot now fits the USB port perfectly
-Holes now match up
-there is now a border to protect the edge of the touchscreen
This is designed with an external USB Battery in mind, with a small slot for the microUSB cable to fit into.
I made 2 versions of the mounting plate, a plain one and a plate with the Raspberry Pi logo. (I also made one that has my name engraved on it, but y'all don't need that version!)
I will post pics and more details once I start putting it together!
UPDATE 10/14/2015
Thanks to SkyRider, I found that the screw holes did not line up with the case. It has since been fixed, so be sure to print the BottomNew.STL file instead!
UPDATE 10/16/2015
I did a test print of the BottomNew.STL and I need to do some work on it as far as thickness is concerned. I have made another file that should work instead. This is Bottom3.STL
UPDATE 10/17/2015
The parts came in the mail, so I was now able to put them together. First off, I found some long machine screws to find that the holes in the print were too small! I improvised by taking an 1/8" drill bit and redrilling the holes. I then cut the machine screws to length and screwed the enclosure together, completing the project!
Similar models
thingiverse
free
Raspberry PI 4 Case for Ender 3 printers by scottsavarese
...spberry pi, make the case pieces snap together. i don't have screws so the case is open a bit and doesn't look very nice.
thingiverse
free

3,5" Raspberry Pi Touchscreen Case for Ikea Lack
...y pi 3/3b without an riser cable, easy access to the usb ports and cable management hole in the backplate.
best printed as shown
thingiverse
free

Ender 3/Cr-10 Raspberry Pi Case by andr123k
...i. i think it work on every creality machine, but im not sure. the cap is still the same as on the other i only remixed the case.
thingiverse
free

Raspberry Pi 7 Inch Touchscreen Case w/ Power Button by bearclaw40
...t on the touchscreen and removed the one for the slot on the raspberry pi.
added indentation to screw holes on the middle section
thingiverse
free

Raspberry PI 7 Inch Screen CR-10 Rail Mount by zerofear
...instead. i would imagine that this could be mounted to any 3d printer rail.
i did have to have longer screws to put it together.
thingiverse
free

Raspberry Pi Zero USB Stem case by curcuz
...ts for the 40 pin gpio hat, the usb and minihdmi ports.
i attached 2 lid versions, one with the resin.io logo and one without it.
thingiverse
free
7" Waveshare LCD Enclosure Standalone Remix by Paran0ic
...port.
i plan to design a support like normal computer lcd display. now i use very simple support.
openscad source files attached.
thingiverse
free

Raspberry Pi 2 Enclosure(Pietendo) by Ostantric
...ty space in the enclosure so i can put some switches and buttons later. but for now it only has holes for the raspberry pi 2 i/o.
thingiverse
free

Raspberry Pi Zero Snap Together Case by KH6EF
...dmi solder pads for a flush fit. the lid has four posts with holes to snap down onto the case as well as an opening for the gpio.
thingiverse
free

Raspberry Pi 3_Modell B - Sleeve with 3.5 TFT (Updated) by CSD_Salzburg
...ing of the cap)
enlarged the hole for the micro sd card
more width for the screen
additional clip for a better holding of the cap
Jzkmath
thingiverse
free

Beats Case by jzkmath
...beats case by jzkmath
thingiverse
for another student.
thingiverse
free

Moog Music Keychain by jzkmath
...moog music keychain by jzkmath
thingiverse
this is a 3" diameter keychain of the moog music logo.
thingiverse
free

Wood Badge Hatchet and Log by jzkmath
...wood badge hatchet and log by jzkmath
thingiverse
wood badge hatchet and log model designed for scouting.
thingiverse
free

Double Fidget Spinner by jzkmath
...dget spinner by jzkmath
thingiverse
based off 2robotguy's fidget spinner design, but with two outside bearings instead of 3.
thingiverse
free

VT Cookie Cutter by jzkmath
...his is a cookie cutter i made for my graduation party. i will be going there to major in electrical engineering this fall (2017).
thingiverse
free

Resistor Lead Bender by jzkmath
...
thingiverse
a resistor lead bender for getting resistors bent to the correct dimension. sizes range from 0.4" to 1.5"
thingiverse
free

Wood Badge Bear Neckerchief Ring by jzkmath
...wood badge bear neckerchief ring by jzkmath
thingiverse
designed a bear head neckerchief ring for my scoutmaster...
thingiverse
free

Crossfit Pisgah Maker Coin by jzkmath
...th
thingiverse
designed this for my mom, who is a member of crossfit pisgah, near asheville nc.
based off the maker coin design.
thingiverse
free

VT Hillel - Star of David Test Print by jzkmath
...vt hillel - star of david test print by jzkmath
thingiverse
test print designed for hillel at virginia tech.
thingiverse
free

Buddha Enzo- FRC 5854 GLITCH by jzkmath
...nzo- frc 5854 glitch by jzkmath
thingiverse
made a pop buddha with our first robotics team mascot, enzo.
why? because...why not?
Touchscreen
3d_ocean
$10

Touchscreen Phone
...r stand alone renderings. the button as well as speaker on the front are modelled for added realism and depth for those tight ...
turbosquid
$2
Touchscreen Kiosk
... available on turbo squid, the world's leading provider of digital 3d models for visualization, films, television, and games.
3d_export
$35
TF 700 Tablet PC 10 in touchscreen 3D Model
...export
universal tablet pc 10 in touchscreen android notebook
tf 700 tablet pc 10 in touchscreen 3d model plasticv 80776 3dexport
3d_ocean
$10
Sleek Touchscreen Smart Phone
... of multi-touch smart phone designs. the small details such as the buttons, camera lens, speaker and other components have bee...
3ddd
$1
Celular Samsung
...3ddd телефон , samsung samsung s5230 mid level full touchscreen ...
3d_export
$30
LG arena 3D Model
...arena 3d model 3dexport lg km900 arena phone mobile touchscreen lg arena 3d model s.e.3ddd 26566...
3d_export
$30
SONY Xperia Tablet 3D Model
...xperia tablet 3d model 3dexport sony xperia tablet android touchscreen sony xperia tablet 3d model barbarosa222 58716...
3d_export
$15
Iphone Black 3D Model
...black 3d model 3dexport phone electronics iphone cellphone smartphone touchscreen touch screen iphone black 3d model ryleyswan 81168...
3d_export
$40
Google Nexus One 3D Model
...3d model 3dexport google nexus one phone mobile cellular touchscreen google nexus one 3d model h1studio 21421...
3d_export
$45
HTC Flyer Tablet 3D Model
...htc flyer tablet 3d model 3dexport touchscreen tablet htc 3d model 3ds max phone htc flyer...
Raspberry
3d_export
free

raspberry
...raspberry
3dexport
3d model of a raspberry. i tried to make it realistic.
turbosquid
$27

Raspberries
...y free 3d model raspberries for download as max, obj, and stl on turbosquid: 3d models for games, architecture, videos. (1354176)
turbosquid
$14

Raspberries
...y free 3d model raspberries for download as max, obj, and fbx on turbosquid: 3d models for games, architecture, videos. (1364663)
3d_export
$5

raspberry pi
...raspberry pi
3dexport
carcasa para la raspberry pi
turbosquid
$99

Raspberry
... available on turbo squid, the world's leading provider of digital 3d models for visualization, films, television, and games.
turbosquid
$10

raspberries
... available on turbo squid, the world's leading provider of digital 3d models for visualization, films, television, and games.
archive3d
free

Raspberries 3D Model
...raspberries 3d model archive3d raspberries raspberry raspberries n300911 - 3d model (*.3ds) for interior 3d...
3d_export
$5

raspberry fruit
...raspberry fruit
3dexport
3d_export
$5

raspberry
...y different sizes. their color ranges from light burgundy to pink. there are formats: obj, 3ds, blend, dae, fbx, mtl.<br>:)
evermotion
$12

raspberries 23 am130
...evermotion raspberries 23 am130 evermotion key 23 food fruit raspberry fruits am130 raspberries highly detailed 3d model of raspberries...
Pi
design_connected
$11

Pi
...pi
designconnected
ligne roset pi chairs computer generated 3d model. designed by thibault desombre.
3d_export
$5
raspberry pi
...raspberry pi
3dexport
carcasa para la raspberry pi
turbosquid
$18

pied
... available on turbo squid, the world's leading provider of digital 3d models for visualization, films, television, and games.
3ddd
$1

Emme pi light
...emme pi light
3ddd
emme pi light
люста emme pi light
3ddd
$1

Emme pi light
...emme pi light
3ddd
emme pi light
бра классическое emme pi light
3ddd
$1

Emme Pi Light
...emme pi light
3ddd
emme pi light
3ddd
$1

Emme Pi Light
...emme pi light
3ddd
emme pi light
design_connected
$16

Pi-Air
...pi-air
designconnected
living divani pi-air lounge chairs computer generated 3d model. designed by harry & camila.
3d_ocean
$15

Manneken Pis
...picting a naked little boy urinating into a fountain’s basin. (wikipedia) the model was sculpted in blender 2.70a rendered wit...
3ddd
$1

Emme pi light
...emme pi light
3ddd
emme pi light
люстра классическая фирма: emme pi light
артикул: 3595/5/cot/12/wh
Case
3d_export
$1

case
...case
3dexport
case
archibase_planet
free

Case
...case
archibase planet
showcase show-case glass case
glass-case + cakes - 3d model for interior 3d visualization.
archibase_planet
free

Case
...case
archibase planet
showcase show-case glass case
glass-case for chips - 3d model for interior 3d visualization.
archibase_planet
free

Case
...case
archibase planet
case shelving drawer
case - 3d model for interior 3d visualization.
archibase_planet
free

Case
...case
archibase planet
case rack locker
case - 3d model for interior 3d visualization.
archibase_planet
free

Case
...case
archibase planet
case drawer kitchen furniture
case - 3d model for interior 3d visualization.
archibase_planet
free

Case
...case
archibase planet
case cupboard shelving
glass case - 3d model for interior 3d visualization.
archibase_planet
free

Case
...case
archibase planet
case handbag suitcase
case - 3d model (*.gsm+*.3ds) for interior 3d visualization.
archibase_planet
free

Case
...case
archibase planet
case suitcase
case 5 - 3d model (*.gsm+*.3ds) for interior 3d visualization.
archibase_planet
free

Case
...case
archibase planet
locker case dresser
case - 3d model (*.gsm+*.3ds) for interior 3d visualization.
7
turbosquid
$6
Rock 7-7
...urbosquid
royalty free 3d model rock 7-7 for download as obj on turbosquid: 3d models for games, architecture, videos. (1647866)
turbosquid
$8
Rock 7-7
...id
royalty free 3d model rock 7-7 for download as ma and fbx on turbosquid: 3d models for games, architecture, videos. (1693416)
design_connected
$16
No 7
...no 7
designconnected
sibast no 7 computer generated 3d model. designed by sibast, helge.
3ddd
$1
Team 7
...team 7
3ddd
team 7
моделилось с кталога team 7
3d_export
$5
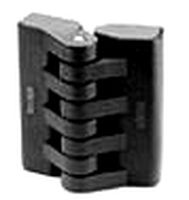
hinge 7
...hinge 7
3dexport
hinge 7
turbosquid
$9
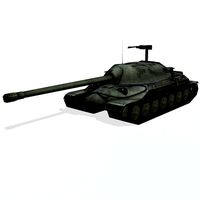
IS-7
... available on turbo squid, the world's leading provider of digital 3d models for visualization, films, television, and games.
turbosquid
$12

Calligraphic Digit 7 Number 7
...hic digit 7 number 7 for download as max, obj, fbx, and blend on turbosquid: 3d models for games, architecture, videos. (1389338)
3ddd
free
team 7
...team 7
3ddd
team 7
стол фабрики team 7.
типы размеров /900,1000/x/1750,2000,2250/x/750/
раздвигается +600 или +1200
3ddd
$1

PLANTS 7
...plants 7
3ddd
цветы , горшок
plants 7.. hope u all enjoying the series
3ddd
$1

Pillows #7
...pillows #7
3ddd
подушка , pillows
pillows #7
3ds max 2011,fbx + textures