Thingiverse
Raspberry Pi 7" Touchscreen Case by jzkmath
by Thingiverse
Last crawled date: 4 years, 8 months ago
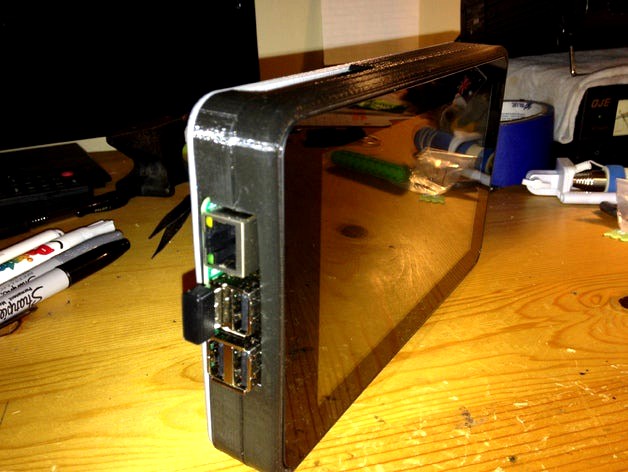
This is another Version of an enclosure for the Raspberry Pi official 7" touchscreen. By inverting the pi and rotating it 180 degrees, the USB/Ethernet ports barely stick out of the case for easy access!
This model was based off the Version made by deisterhold, although I built this design from scratch, using the dimensions of his bottom mount design.
****UPDATE 4/14/2016*****VERSION 2
-After learning how to use SolidWorks, I decided to redo my touchscreen case so that the parts all work together!
-The old version has been consolidated into a ZIP file called "OldRaspberryPi Case"
-I have a ZIP file of the New Solidworks files in "pack and go" format called "Pi Touchscreen 2016"
-The STL's with "NewTouchscreen Case" are the updated version.FIXES:
-the slot now fits the USB port perfectly
-Holes now match up
-there is now a border to protect the edge of the touchscreen
This is designed with an external USB Battery in mind, with a small slot for the microUSB cable to fit into.
I made 2 versions of the mounting plate, a plain one and a plate with the Raspberry Pi logo. (I also made one that has my name engraved on it, but y'all don't need that version!)
I will post pics and more details once I start putting it together!
UPDATE 10/14/2015
Thanks to SkyRider, I found that the screw holes did not line up with the case. It has since been fixed, so be sure to print the BottomNew.STL file instead!
UPDATE 10/16/2015
I did a test print of the BottomNew.STL and I need to do some work on it as far as thickness is concerned. I have made another file that should work instead. This is Bottom3.STL
UPDATE 10/17/2015
The parts came in the mail, so I was now able to put them together. First off, I found some long machine screws to find that the holes in the print were too small! I improvised by taking an 1/8" drill bit and redrilling the holes. I then cut the machine screws to length and screwed the enclosure together, completing the project!