Thingiverse

Raspberry Pi 4 1U rack-mount bracket
by Thingiverse
Last crawled date: 4 years, 3 months ago
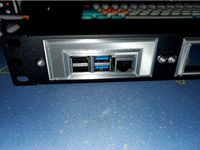
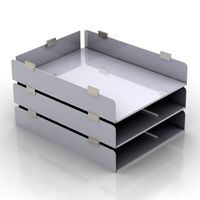
A bracket to mount the Raspberry Pi 4 in a standard 19-inch server rack. This will fit 6 RPi 4 units using Power Over Ethernet (PoE) in a 1U space for a very simple and tidy cluster solution.
This is a variation of a 2U bracket that I worked on earlier:
Raspberry Pi 4 2U rack-mount bracket
and uses the same tray design, so you can move units between these two mounts easily. This design fits 6 units in 1U, and the other fits 12 (or 13) in a 2U space. This 1U design lets you build incrementally, but personally I prefer the 2U design and recommend it over 2 of the 1U racks if you will need more than 6 units total.
Here are all of the parts you will need for a complete 6-Pi cluster:
To print:
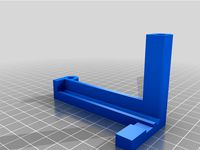
6 frame parts
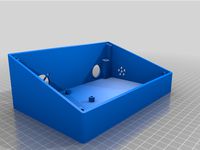
6 tray parts
A pair of ear parts (both ears are in a single file)
Other hardware:
2 threaded rods cut to 17 5/8 inches. I recommend buying a 36-inch rod, which is enough for two finished parts. Cut it with a hacksaw or a Dremel tool with a cutoff wheel. I suggest #10 size in the USA. Not sure which metric sizes are commonly available, but M5 would be a close match (you will need to download the OpenSCAD files and adjust the hole sizes).
4 hex nuts that fit the threaded rods
24 machine screws of size M2.5 x 12 (that's 4 for each Pi). I got a pack of 100 for about $10 from Amazon.
The remaining hardware (spacers and screws) comes with the PoE hat. You will have 4 extra screws from each PoE hat kit that you replace with the M2.5 x 12 screws listed above.
Finally, a PoE switch and a suitable Ethernet cable for each Pi.
The OpenSCAD source files are included to make it easier to customize. The most common things you might want to tweak using the OpenSCAD files are:
Changing the size of the threaded rods that hold it all together, or changing the size of the bolts used to mount it to a standard 19-inch rack.
Adjusting the fit of the tray where it slides into the frame. The fit may vary a bit from printer to printer and depending on the material you use (I use PLA).
This is a variation of a 2U bracket that I worked on earlier:
Raspberry Pi 4 2U rack-mount bracket
and uses the same tray design, so you can move units between these two mounts easily. This design fits 6 units in 1U, and the other fits 12 (or 13) in a 2U space. This 1U design lets you build incrementally, but personally I prefer the 2U design and recommend it over 2 of the 1U racks if you will need more than 6 units total.
Here are all of the parts you will need for a complete 6-Pi cluster:
To print:
6 frame parts
6 tray parts
A pair of ear parts (both ears are in a single file)
Other hardware:
2 threaded rods cut to 17 5/8 inches. I recommend buying a 36-inch rod, which is enough for two finished parts. Cut it with a hacksaw or a Dremel tool with a cutoff wheel. I suggest #10 size in the USA. Not sure which metric sizes are commonly available, but M5 would be a close match (you will need to download the OpenSCAD files and adjust the hole sizes).
4 hex nuts that fit the threaded rods
24 machine screws of size M2.5 x 12 (that's 4 for each Pi). I got a pack of 100 for about $10 from Amazon.
The remaining hardware (spacers and screws) comes with the PoE hat. You will have 4 extra screws from each PoE hat kit that you replace with the M2.5 x 12 screws listed above.
Finally, a PoE switch and a suitable Ethernet cable for each Pi.
The OpenSCAD source files are included to make it easier to customize. The most common things you might want to tweak using the OpenSCAD files are:
Changing the size of the threaded rods that hold it all together, or changing the size of the bolts used to mount it to a standard 19-inch rack.
Adjusting the fit of the tray where it slides into the frame. The fit may vary a bit from printer to printer and depending on the material you use (I use PLA).
Similar models
thingiverse
free

Raspberry Pi 4 2U rack-mount bracket
...th 13 boards, but the default size is now 12. if you want 13 you will need to download the openscad files and change the setting.
thingiverse
free
Pi Rack Mount for Monoprice 1u x4
...with m2.5 screws (or m2.5 standoffs if you mount a fan/cover on the pi).
pi-rack-bottom v2 has larger mounting points for the pi.
thingiverse
free
Raspberry Pi 4 1U Frame - no support and slim by chinomeister
...low use of side ports for those not using poe which also reduces material need.
based on: raspberry pi 4 1u rack-mount bracket
thingiverse
free

Raspberry Pi 1U Rack Tray Version
...1u rack mount for 4 raspberry pi in trays. similar to my early model, but with several improvements: now...
thingiverse
free
Streamdeck XL Pi Case by jschoen93
...se consider donating to help fund more inovative free designs like this at jschoen93@gmail.com for paypal. or jschoen93 on venmo.
thingiverse
free

Raspberry Pi Rack Mount for 1U Decora Bracket
...;t want the bolts to extend beyond the bottom of the base. i had to create the threading for m2.6 on the mounts to avoid tapping.
thingiverse
free

Pi_Modem_Unifi PoE Injectorx3 19" Rack mount by Djumv
..." 1u rack chassis. the parts fit a little tight, but i've got what i need, so i didn't do any additional work on it.
thingiverse
free

Minimal Raspberry Pi Bracket
... thread m2.5 screws directly into it. the flat bracket is meant to be glued, double-stick taped, or velcro-ed to another surface.
thingiverse
free

2u networking rack faceplate for sg1100/RPi/ether switches (thicker trays)
...king 2u faceplate for an sg1100, raspberry pi units and 2 ethernet switches
this has thicker trays for greater manufacturability.
thingiverse
free

Raspberry Pi Rack Mount for 1U Decora Bracket - self threading by rssalerno
...https://www.ebay.com/itm/264097865148. to assemble, self-tap the screws through the panel into the bracket and faceplate/blank.
1U
3ddd
$1
Favourite 1390-1U
...vourite 1390-1u
3ddd
favourite
модель потолочного светильника favourite 1390-1u. в архиве файлы в 2011 и 2014 версиях и obj-файл.
3ddd
free
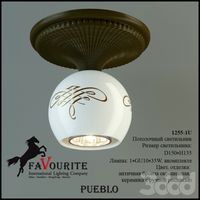
Favourite 1255-1U
...vourite 1255-1u
3ddd
favourite
модель потолочного светильника favourite 1255-1u. в архиве файлы в 2011 и 2014 версиях и obj-файл.
3d_export
$7

servidor
...servidor 3dexport servidor squire technologies 1u ...
3d_export
$10
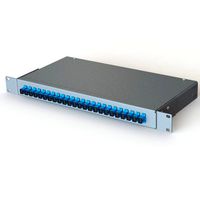
optic cross
...projects. originally modelled in solidworks 2015. - 19 ', 1u 24 fc ports. - all colors can be easily...
3d_export
$10
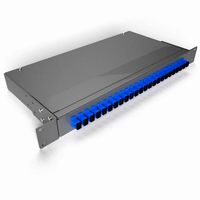
optic cross
...projects. originally modelled in 3ds max 2014. -19 ', 1u 24 fc ports. -all colors can be easily modified....
3d_export
$10
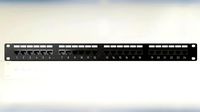
patch panel
...to your it projects.<br>originally modelled in solidworks 2015.<br>-19 ", 1u 24 rj-45 ports.<br>-all colors can be easily modified.<br>-all materials...
3dfindit
free

CSF-1U
...csf-1u
3dfind.it
catalog: harmonic drive systems,inc.
3d_sky
free

Favourite 1255-1U
...favourite 1255-1u
3dsky
favourite
model downlight favourite 1255-1u. the archive files in 2011 and 2014 versions and obj-file.
3d_sky
free

Favourite 1390-1U
...favourite 1390-1u
3dsky
favourite
model downlight favourite 1390-1u. the archive files in 2011 and 2014 versions and obj-file.
thingiverse
free

Netia player 1U server
...netia player 1u server
thingiverse
box for netia player server rack 1u
Raspberry
3d_export
free

raspberry
...raspberry
3dexport
3d model of a raspberry. i tried to make it realistic.
turbosquid
$27

Raspberries
...y free 3d model raspberries for download as max, obj, and stl on turbosquid: 3d models for games, architecture, videos. (1354176)
turbosquid
$14

Raspberries
...y free 3d model raspberries for download as max, obj, and fbx on turbosquid: 3d models for games, architecture, videos. (1364663)
3d_export
$5

raspberry pi
...raspberry pi
3dexport
carcasa para la raspberry pi
turbosquid
$99

Raspberry
... available on turbo squid, the world's leading provider of digital 3d models for visualization, films, television, and games.
turbosquid
$10

raspberries
... available on turbo squid, the world's leading provider of digital 3d models for visualization, films, television, and games.
archive3d
free

Raspberries 3D Model
...raspberries 3d model archive3d raspberries raspberry raspberries n300911 - 3d model (*.3ds) for interior 3d...
3d_export
$5

raspberry fruit
...raspberry fruit
3dexport
3d_export
$5

raspberry
...y different sizes. their color ranges from light burgundy to pink. there are formats: obj, 3ds, blend, dae, fbx, mtl.<br>:)
evermotion
$12

raspberries 23 am130
...evermotion raspberries 23 am130 evermotion key 23 food fruit raspberry fruits am130 raspberries highly detailed 3d model of raspberries...
Pi
design_connected
$11

Pi
...pi
designconnected
ligne roset pi chairs computer generated 3d model. designed by thibault desombre.
3d_export
$5
raspberry pi
...raspberry pi
3dexport
carcasa para la raspberry pi
turbosquid
$18

pied
... available on turbo squid, the world's leading provider of digital 3d models for visualization, films, television, and games.
3ddd
$1

Emme pi light
...emme pi light
3ddd
emme pi light
люста emme pi light
3ddd
$1

Emme pi light
...emme pi light
3ddd
emme pi light
бра классическое emme pi light
3ddd
$1

Emme Pi Light
...emme pi light
3ddd
emme pi light
3ddd
$1

Emme Pi Light
...emme pi light
3ddd
emme pi light
design_connected
$16

Pi-Air
...pi-air
designconnected
living divani pi-air lounge chairs computer generated 3d model. designed by harry & camila.
3d_ocean
$15

Manneken Pis
...picting a naked little boy urinating into a fountain’s basin. (wikipedia) the model was sculpted in blender 2.70a rendered wit...
3ddd
$1

Emme pi light
...emme pi light
3ddd
emme pi light
люстра классическая фирма: emme pi light
артикул: 3595/5/cot/12/wh
Rack
archibase_planet
free
Rack
...ack
archibase planet
rack paper rack rack for paper
rack 6 office n060914 - 3d model (*.gsm+*.3ds) for interior 3d visualization.
archibase_planet
free
Rack
...ack
archibase planet
rack paper rack rack for paper
rack 3 office n060914 - 3d model (*.gsm+*.3ds) for interior 3d visualization.
archibase_planet
free
Rack
...ack
archibase planet
rack paper rack rack for paper
rack 5 office n060914 - 3d model (*.gsm+*.3ds) for interior 3d visualization.
archibase_planet
free
Rack
...ack
archibase planet
rack paper rack rack for paper
rack 7 office n060914 - 3d model (*.gsm+*.3ds) for interior 3d visualization.
archibase_planet
free

Rack
...for magazines rack for notebooks notebooks notebook
rack notebook n120614 - 3d model (*.gsm+*.3ds) for interior 3d visualization.
archibase_planet
free

Rack
...rack
archibase planet
rack umbrella umbrella rack
rack n180811 - 3d model (*.3ds) for interior 3d visualization.
archibase_planet
free
Rack
...rack
archibase planet
rack book rack stand
rack - 3d model (*.gsm+*.3ds) for interior 3d visualization.
archibase_planet
free

Rack
...rack
archibase planet
rack rack for glasses
rack 1 - 3d model (*.gsm+*.3ds) for interior 3d visualization.
archibase_planet
free
Rack
...rack
archibase planet
rack rack for glasses
rack 2 - 3d model (*.gsm+*.3ds) for interior 3d visualization.
3d_export
free
rack
...rack
3dexport
rack
Bracket
archibase_planet
free

Bracket
...bracket
archibase planet
bracket corbel holder
bracket 1 - 3d model (*.gsm+*.3ds) for interior 3d visualization.
archibase_planet
free

Bracket
...bracket
archibase planet
bracket corbel console
bracket 5 - 3d model (*.gsm+*.3ds) for interior 3d visualization.
archibase_planet
free

Bracket
...bracket
archibase planet
corbel holder bracket
bracket 6 - 3d model (*.gsm+*.3ds) for interior 3d visualization.
archibase_planet
free

Bracket
...bracket
archibase planet
bracket corbel console
bracket 8 - 3d model (*.gsm+*.3ds) for interior 3d visualization.
archibase_planet
free

Bracket
...bracket
archibase planet
bracket corbel holder
bracket n280911 - 3d model (*.gsm+*.3ds) for interior 3d visualization.
archibase_planet
free

Bracket
...bracket
archibase planet
holder corbel bracket
bracket 9 - 3d model (*.gsm+*.3ds) for interior 3d visualization.
archibase_planet
free

Bracket
...bracket
archibase planet
corbel holder bracket
bracket 10 - 3d model (*.gsm+*.3ds) for interior 3d visualization.
archibase_planet
free

Bracket
...bracket
archibase planet
corbel console bracket
bracket 11 - 3d model (*.gsm+*.3ds) for interior 3d visualization.
archibase_planet
free

Bracket
...bracket
archibase planet
holder console bracket
bracket 12 - 3d model (*.gsm+*.3ds) for interior 3d visualization.
archibase_planet
free

Bracket
...bracket
archibase planet
bracket corbel holder
bracket 13 - 3d model (*.gsm+*.3ds) for interior 3d visualization.
Mount
3d_export
free

mounting bracket
...mounting plate is the portion of a hinge that attaches to the wood. mounting plates can be used indoors, cabinetry and furniture.
turbosquid
$2

MOUNTING
... available on turbo squid, the world's leading provider of digital 3d models for visualization, films, television, and games.
turbosquid
free

Mounts
... available on turbo squid, the world's leading provider of digital 3d models for visualization, films, television, and games.
turbosquid
free

Mount Fuji
...fuji
turbosquid
free 3d model mount fuji for download as obj on turbosquid: 3d models for games, architecture, videos. (1579977)
3d_export
$5

Headphone mount LR
...headphone mount lr
3dexport
headphone mount l+r
turbosquid
$39

Mount rainier
...quid
royalty free 3d model mount rainier for download as fbx on turbosquid: 3d models for games, architecture, videos. (1492586)
turbosquid
$5

pipe mounting
...quid
royalty free 3d model pipe mounting for download as obj on turbosquid: 3d models for games, architecture, videos. (1293744)
turbosquid
$3

Mounting Tires
...uid
royalty free 3d model mounting tires for download as fbx on turbosquid: 3d models for games, architecture, videos. (1708511)
3d_export
$5

Magnetic GoPro Mount
...pro mount
3dexport
cool magnetic mount for gopro. allows you to mount the camera on flat metal surfaces and get exclusive shots.
turbosquid
$5

Stone Mount
...ty free 3d model stone mount for download as ma, obj, and fbx on turbosquid: 3d models for games, architecture, videos. (1370306)
4
turbosquid
$9

Office Chair 4-4
... available on turbo squid, the world's leading provider of digital 3d models for visualization, films, television, and games.
3d_export
$5

doors- 4
...doors- 4
3dexport
doors 4
3d_export
$5

hinge 4
...hinge 4
3dexport
hinge 4
3ddd
$1

Штора №4
...штора №4
3ddd
штора №4
3d_export
free

playstation 4
...playstation 4
3dexport
playstation 4
turbosquid
$1

re 4-4 electric locomotive
... free 3d model re 4 4 electric locomotive for download as obj on turbosquid: 3d models for games, architecture, videos. (1707845)
3ddd
$1

nexus 4
...nexus 4
3ddd
lg , телефон
nexus 4
3ddd
$1

4 Poufs
...4 poufs
3ddd
пуф
4 soft poufs
turbosquid
$12

Calligraphic Digit 4 Number 4
...hic digit 4 number 4 for download as max, obj, fbx, and blend on turbosquid: 3d models for games, architecture, videos. (1389332)
3ddd
$1

Dauphin 4+
...dauphin 4+
3ddd
кресло
dauphin 4+ конференц кресло