Thingiverse

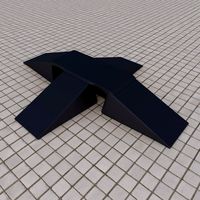
RAMPS & MOSFET Case by 8SquareFeet
by Thingiverse
Last crawled date: 3 years, 1 month ago
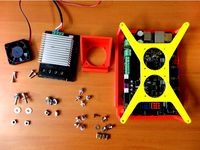
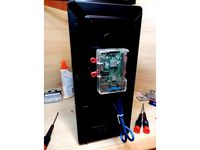
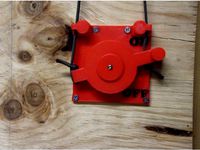
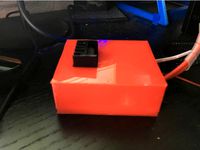
While building my new CoreXY printer, I wanted to consolidate all of the electronics into one case. So, this is my take on that.
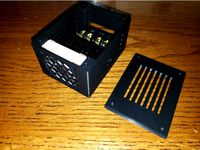
I designed the case so that all of the power and communication lines enter the rear of the case, and the ribbon cables running to the display exit the front.
Air flow is from rear to front, passing over the MOSFET first, then baffled down over the "open" end RAMPS boards, finally exiting the case at the front under the ribbon cables.
The fan is mounted externally. I'm using a single 40mm, high CFM fan I salvaged from a server, so my cooling has been fine. However, if cooling does seem to be an issue, you could easily mount additional fans on the case and drill holes for airflow.
In testing, using a lower CFM fan, I found that while printing (no heatbed), I would see a one or two degree rise above ambient room temperatures (21C in the room, 23C at the exit of the case). If using the MOSFET, I saw a much higher delta. With the heatbed running at 95C, I was seeing 21C in the room, and 40C to 42C in the exit airflow (about 107F). All of the electronics are rated up to about 85C max (so sayeth the Chinese Mfgr's), but that's still quite warm. Hence, the higher CFM fan.
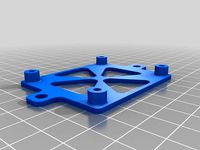
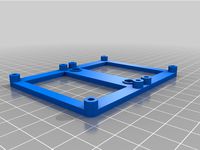
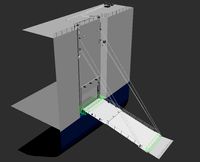
The base and side are one piece each, and they are pretty big (196mm long), so you'll either need a decent size printer, or you will have to edit the STL and make them two-piece parts. I'm busy at the moment, but I'll try and break them apart as soon as I can.
The ends and the tops are small enough that most printers should be able to handle them.
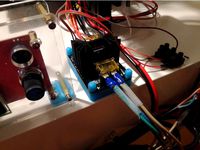
I built in access to the USB and power ports, and some basic cable management by raising the MOSFET board. Power and USB run under the MOSFET, everything else runs around the stand-offs. This keeps wiring out of the airflow for the most part.
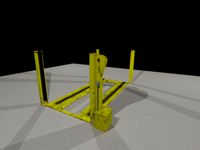
I've included the mounts I'm using to attach the case to my printer. These are designed for 15mm X 15mm MakerBeam XL extrusion. The case could be used without them for any printer. If you use the mounts, leave the mount-side corner screws out on the tops.
The mounts have slots in them to allow velcro to pass thru them, securing the case to the mounts. You could use wire or zip ties. Depending on how they are printed, they will probably need some supports.
I'm using locally sourced hardware for assembly (6mm x 3.4mm countersunk screws). The holes were drilled out using a 3mm drill. It could be assembled using 3mm hardware as well.
Everything was printed in PLA, flat side down, no supports, 3 perimeters and 2 top and bottom layers. Infill was 20% I think.
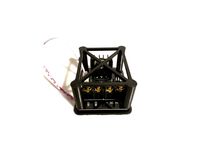
The Mega was mounted using 2mm hardware. The MOSFET uses 3mm X 6mm hardware.
I found attaching all the cabling to the RAMPS prior to installing the MOSFET worked best.
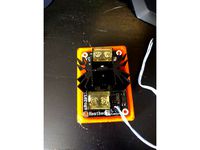
This is the MOSFET I'm using, but the mounting is about the same for all of the units like this one:https://www.amazon.com/gp/product/B01MY50JL3/ref=oh_aui_detailpage_o07_s01?ie=UTF8&psc=1
WARNING!!
I've had two of these type of MOSFET's (different Mfgr's) fail on me now. Both of them failed in the ON mode. The cheapest is often just that..... BE CAREFUL with these things!
I designed the case so that all of the power and communication lines enter the rear of the case, and the ribbon cables running to the display exit the front.
Air flow is from rear to front, passing over the MOSFET first, then baffled down over the "open" end RAMPS boards, finally exiting the case at the front under the ribbon cables.
The fan is mounted externally. I'm using a single 40mm, high CFM fan I salvaged from a server, so my cooling has been fine. However, if cooling does seem to be an issue, you could easily mount additional fans on the case and drill holes for airflow.
In testing, using a lower CFM fan, I found that while printing (no heatbed), I would see a one or two degree rise above ambient room temperatures (21C in the room, 23C at the exit of the case). If using the MOSFET, I saw a much higher delta. With the heatbed running at 95C, I was seeing 21C in the room, and 40C to 42C in the exit airflow (about 107F). All of the electronics are rated up to about 85C max (so sayeth the Chinese Mfgr's), but that's still quite warm. Hence, the higher CFM fan.
The base and side are one piece each, and they are pretty big (196mm long), so you'll either need a decent size printer, or you will have to edit the STL and make them two-piece parts. I'm busy at the moment, but I'll try and break them apart as soon as I can.
The ends and the tops are small enough that most printers should be able to handle them.
I built in access to the USB and power ports, and some basic cable management by raising the MOSFET board. Power and USB run under the MOSFET, everything else runs around the stand-offs. This keeps wiring out of the airflow for the most part.
I've included the mounts I'm using to attach the case to my printer. These are designed for 15mm X 15mm MakerBeam XL extrusion. The case could be used without them for any printer. If you use the mounts, leave the mount-side corner screws out on the tops.
The mounts have slots in them to allow velcro to pass thru them, securing the case to the mounts. You could use wire or zip ties. Depending on how they are printed, they will probably need some supports.
I'm using locally sourced hardware for assembly (6mm x 3.4mm countersunk screws). The holes were drilled out using a 3mm drill. It could be assembled using 3mm hardware as well.
Everything was printed in PLA, flat side down, no supports, 3 perimeters and 2 top and bottom layers. Infill was 20% I think.
The Mega was mounted using 2mm hardware. The MOSFET uses 3mm X 6mm hardware.
I found attaching all the cabling to the RAMPS prior to installing the MOSFET worked best.
This is the MOSFET I'm using, but the mounting is about the same for all of the units like this one:https://www.amazon.com/gp/product/B01MY50JL3/ref=oh_aui_detailpage_o07_s01?ie=UTF8&psc=1
WARNING!!
I've had two of these type of MOSFET's (different Mfgr's) fail on me now. Both of them failed in the ON mode. The cheapest is often just that..... BE CAREFUL with these things!
Similar models
thingiverse
free

Zonestar P802QR2 Case with 120mm Fan & Mosfet Mounts by AdamWP
...motherboard case for the zonestar p802qr2 that could accommodate the smaller mosfets and a fan so i remixed celtico12's case.
thingiverse
free
Anet A8 80mm PSU cooler fan grill by freddan_6
...s should go closes to "+" of the input for the mosfet. i wanted a logo and i like honeycomb pattern, so i remixed them.
thingiverse
free
Lerdge Heatbed/Mosfet Case by Insonic
...dge mosfet/heatbed controller board"
including the mounting options for a 40mm fan.
update : added a 2nd version of the case
thingiverse
free

Ramps Enclosure for AM8 (Vslot) by bufi
...am8
with a 80x80mm cooling fan,
with space for a heatbed mosfet and a 40x60mm custom pcb (in my case mosfets for rgb led stripes)
thingiverse
free
MKS Sbase Mount by iMakebyDesign
...rs as the new pcb are better insulated, however old habits die hard so i still use them under the screws when mounting pcb's.
thingiverse
free

Arduino Mega, Ramps 1,4 Plus Heatbed 210A Mosfet Enclosure by alanpwood
... added spots inside to be able to insert cable ties. i hope it is useful for someone.
i add a stl base for arduino mega 2560 r3.
thingiverse
free

Simple RAMPS 1.4 mount by pefozzy
... and ramps models- i did not create these and unfortunately i can't remember where i sourced them from- i think from grabcad.
thingiverse
free
Mosfet Case with 40mm Fan by 3DAntics
...ware store
lastly, the 4 holes for mounting the fan are sized for use with the self-tapping screws that come with the noctua fan.
grabcad
free

3D Printer Controller Case for RAMPS Board
...r any other 3d printer built with the 2020 aluminum extrusion frame.
in the video instruction below, you can check more details.
thingiverse
free

door glass handle by Axeman410
...
it fits trough a 3mm glass. i'm going to use it for a case for my printer.
the skp file is attached so you could modify it.
8Squarefeet
thingiverse
free
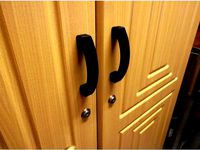
Cabinet Handle (Large) by 8SquareFeet
...mm self-tapping hardware.
it is a bigger handle, so it will hang out 35mm off the door on the outside.
print as many as you need!
thingiverse
free
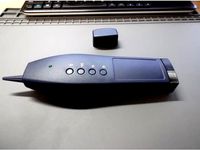
Probe Cap for WSDCAM Cable Tester by 8SquareFeet
...y-security-firmware-upgraded-8600movtsadh-plus/dp/b00zx3b81y/ref=sr_1_2?ie=utf8&qid=1507406397&sr=8-2&keywords=wsdcam
thingiverse
free
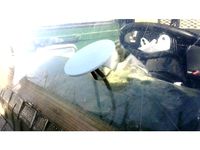
Push out air vent by 8SquareFeet
...strength and heat resistance in the sun.
print with the largest flat side down. you will need some support for the retaining lip.
thingiverse
free
Machine Light Mount by 8SquareFeet
...ref=oh_aui_search_detailpage?ie=utf8&psc=1
i printed in pla with 45 or 50 percent infill, but it could probably do with less.
thingiverse
free
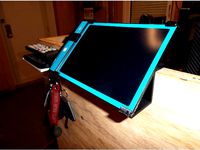
8.5" Boogie Board Mount by 8SquareFeet
...t now. i suspect it would work just as well in pla. i used 15% infill, 3 perimeters and 3 layers, but those are just my defaults.
thingiverse
free

Scraper Replacement Handle by 8SquareFeet
...d the tool rod up and pushed it into the hole.
i've included the sketchup model in case you'd like to make modifications.
thingiverse
free
Raspberry Pi Mount for Mediasonic Enclosure by 8SquareFeet
...ort usb 3 cable, and still provides access to all of the pi's io ports.
i printed this in petg, but any filament should work.
thingiverse
free
Indicator Stand (uses 15 X 15 Extrusion) by 8SquareFeet
...ll hardware is 3mm.
the files should be oriented for proper printing.
i used petg, but that's just what i had loaded already.
thingiverse
free
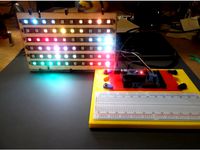
RGB Matrix Stand by 8SquareFeet
...no can power this small matrix without issue, but if you build a bigger one, you may want to run power directly to the led's.
thingiverse
free
Remote Light Switch by 8SquareFeet
...ect, but it works great for me. now i don't have to walk all the way to the back of a dark room to turn the light on and off.
Mosfet
3d_export
$5

IC SMD Package TO263
...used for different types of semiconductors, such as transistor, mosfet voltage regulators and etcetra. a surface mount device for...
thingiverse
free
Support Mosfet
...support mosfet
thingiverse
support mosfet
remplissage 20%
thingiverse
free

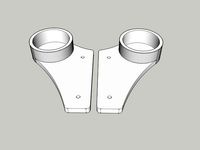
i3 MOSFET Holder / i3 MOSFET Halter by JMDesigns
...i3 mosfet holder / i3 mosfet halter by jmdesigns
thingiverse
i3 mosfet holder / i3 mosfet halter
thingiverse
free
MOSFET Holder / MOSFET Halter 20x20 Extrusion by JMDesigns
...mosfet holder / mosfet halter 20x20 extrusion by jmdesigns
thingiverse
mosfet holder / mosfet halter 20x20 extrusion
thingiverse
free

TO-220 MOSFET Holder
...to-220 mosfet holder
thingiverse
this will hold 3x to-220 mosfets. the mosfets will snap into place.
free3d
free

MOSFET
...mosfet
free3d
metal oxide semiconductor field effect transistor
thingiverse
free
Double Mosfet Holder for Lerdge Mosfet Board by LorDXEO
... board by lordxeo
thingiverse
dual mosfet holder for lergde mosfet modules.
holes for m3 screws, you can also use brass inserts.
thingiverse
free
MOSFET Case by Nbbwarhammer
...mosfet case by nbbwarhammer
thingiverse
a case for mosfet.
thingiverse
free
MOSFET Support
...
2 3mm screws
design
i have uploaded the freecad design that i made, so you can remix it and mod it.
i hope it is useful for you!
thingiverse
free
mosfet holders by paulsonia
...mosfet holders by paulsonia
thingiverse
two mosfet holders
Ramps
turbosquid
$3
Kicker Ramp - Skate Ramp
...ramp - skate ramp for download as 3ds, obj, c4d, fbx, and dae on turbosquid: 3d models for games, architecture, videos. (1153575)
turbosquid
$2
Ramp
...squid
royalty free 3d model ramp for download as obj and fbx on turbosquid: 3d models for games, architecture, videos. (1494204)
turbosquid
$5

ramp
... available on turbo squid, the world's leading provider of digital 3d models for visualization, films, television, and games.
3d_export
$5
Ramp 3D Model
...ramp 3d model
3dexport
ramp jump carjump carramp car
ramp 3d model ryisnelly100 83186 3dexport
turbosquid
$10
Ramp and Barrels
...d
royalty free 3d model ramp and barrels for download as fbx on turbosquid: 3d models for games, architecture, videos. (1263040)
turbosquid
$19
Skate Ramp
...ty free 3d model skate ramp for download as dxf, obj, and fbx on turbosquid: 3d models for games, architecture, videos. (1187602)
turbosquid
$19
Skate Ramp
...ee 3d model skate ramp for download as dxf, obj, c4d, and fbx on turbosquid: 3d models for games, architecture, videos. (1187673)
turbosquid
$80
Hydralic Ramps
... available on turbo squid, the world's leading provider of digital 3d models for visualization, films, television, and games.
turbosquid
$45
ramp door_center
... available on turbo squid, the world's leading provider of digital 3d models for visualization, films, television, and games.
turbosquid
$40
Ramp.3DS
... available on turbo squid, the world's leading provider of digital 3d models for visualization, films, television, and games.
Case
3d_export
$1

case
...case
3dexport
case
archibase_planet
free

Case
...case
archibase planet
showcase show-case glass case
glass-case + cakes - 3d model for interior 3d visualization.
archibase_planet
free

Case
...case
archibase planet
showcase show-case glass case
glass-case for chips - 3d model for interior 3d visualization.
archibase_planet
free

Case
...case
archibase planet
case shelving drawer
case - 3d model for interior 3d visualization.
archibase_planet
free

Case
...case
archibase planet
case rack locker
case - 3d model for interior 3d visualization.
archibase_planet
free

Case
...case
archibase planet
case drawer kitchen furniture
case - 3d model for interior 3d visualization.
archibase_planet
free

Case
...case
archibase planet
case cupboard shelving
glass case - 3d model for interior 3d visualization.
archibase_planet
free

Case
...case
archibase planet
case handbag suitcase
case - 3d model (*.gsm+*.3ds) for interior 3d visualization.
archibase_planet
free

Case
...case
archibase planet
case suitcase
case 5 - 3d model (*.gsm+*.3ds) for interior 3d visualization.
archibase_planet
free

Case
...case
archibase planet
locker case dresser
case - 3d model (*.gsm+*.3ds) for interior 3d visualization.