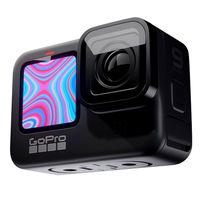
Thingiverse
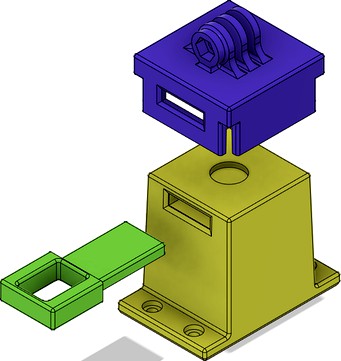
Quick-change GoPro Mount by ALooseSeal
by Thingiverse
Last crawled date: 3 years, 1 month ago
Quick-change GoPro Mount (Magnetic)
I'm currently setting up my workspace, and needed a simple way to mount a GoPro (or any other action cam) on various walls. When starting this project I had two simple design needs.
First, and most importantly, I needed a secure mount that had no chance of falling or wiggling around. Secondly, I needed a way to easily and quickly change angles without having to unscrew the GoPro every time. These design criteria, along with my limited fusion360 skills, has led to the final model posted.
BILL OF MATERIALS
4 x Screws & Anchors (M4)
https://www.amazon.ca/gp/product/B07HQ4YMYY/ref=ppx_yo_dt_b_search_asin_title?ie=UTF8&psc=1
2 x Neodymium Magnets (12.7mm x 2.25mm)https://www.michaels.com/pro-mag-neodymium-magnets-.5%22%22/10382640.html
1 x M5 Nut
Cyanoacrylate (Super Glue)
Desired GoPro Mounting Accessories (I use a standard GoPro long twist extender, with 2 long screws)
PARTS TO PRINT
There are 3 parts to print.
Print Mount-Top.stl once per camera.
Print Mount-Pin.stl twice per camera.
Print Mount-Base.stl as many times as you need. Just remember, you will need 1 magnet per base.
ASSEMBLY
Assembly is pretty straight forward,
Starting with the top, put a drop of super glue in the designated magnet hole.
Followed by firmly inserting the magnet. Wait the recommended amount of time needed for the super glue to set.
Once the glue has hardened, go ahead and drop your second magnet onto the first one that's already in the top. (The polarity of the magnets should self align allowing you to confidently install the other magnet(s) in the base.)
From here, you can apply a drop of super glue into the magnet hole on the Mount-Base.stl,
Followed by squeezing the two pieces together.
Insert the locking keys and wait for the super glue to set.
Repeat steps 3 to 6 for each Mount-Base.stl.
Mount your bases in the desired location.
Now that you're all set, attach your camera to the Mount-Top.stl. This entire assembly should now snap onto the base. The Mount-Pin.stl can be inserted to provide additional stability and peace of mind.
USE
If you're like me and have installed bases all over your workshop, with this print, you can now quickly and effortlessly change angles without disrupting your workflow. Simply remove the locking pin, pull the entire top assembly off the base and snap it into the new location.
I used magnets I had on hand, if you need a different magnet size or screw size, ask nicely and I may be willing to make updates.
REMIX FEATURE WAS NOT WORKING AT TIME OF UPLOAD, CREDIT TO THE ORIGINAL AUTHORhttps://www.thingiverse.com/thing:3335257
Enjoy, and post your makes :)
Similar models
thingiverse
free

DJI MAVIC 2 PRO ZOOM GOPRO BRACKET MOUNT by MaartenMakes
...hold the nuts in place.
printing:
no supports needed.
i used petg carbon fiber for a strong bracket.
pla might soften over time.
thingiverse
free

Magnetic Hex Bit Holder by bcprint3d
...8mm diameter x 2mm thick neodymium magnets. also you will need to pause your print at approximately 3.1mm to insert the magnets.
thingiverse
free
Insta360 Evo - Gopro Mount
...g for printers that can print finer layers and another one is in separated parts which need some assembly and super glue
have fun
thingiverse
free

Magnetic CD Player Mount: iPhone X & iPad Mini by gilosborne
...e ipad mini 2 in landscape.
there are 2 holes to glue in the magnets for this. the magnets needed are 10x3 mm neodymium magnets.
thingiverse
free

Anet A8 - Quick Release Fan by jcurl007
...1in)https://www.homedepot.com/p/master-magnetics-0-3-in-x-0-11-in-neodymium-rare-earth-magnet-discs-10-per-pack-07045hd/202526363
thingiverse
free

JTech - MPCNC Magnetic Mount by sfidler
... mount to the back of the laser and wait for the glue to dry. the laser module will easily attach and detach from the tool head.
thingiverse
free

Anet Easy Magnetic Extruder Access Mod by Cyberlamb
...epot
http://www.homedepot.com/p/master-magnetics-0-3-in-x-0-11-in-neodymium-rare-earth-magnet-discs-10-per-pack-07045hd/202526363
thingiverse
free
Customizable fridge magnet box by eirikso
...these magnets: http://www.banggood.com/20pcs-n52-super-strong-round-magnets-10mm-x-4mm-rare-earth-neodymium-magnets-p-998141.html
thingiverse
free

Basic Small Go-Pro Magnet Base by leetneko
...ium magnets.
3x3 matrix of alternating poles will give the strongest mount, but i found that i only needed 4; one in each corner.
thingiverse
free

Safety Glasses Box, vertical, large by gerthmar
...gerthmar
thingiverse
safety glasses box for bigger glasses.
pin.stl is required 4 times
top.stl needs to be printed with support

Gopro
3d_export
$5
gopro
...gopro
3dexport
turbosquid
$10

GOPRO
...
royalty free 3d model gopro for download as ma, obj, and fbx on turbosquid: 3d models for games, architecture, videos. (1702347)
turbosquid
$6

Gopro
...
royalty free 3d model gopro model for download as ma and obj on turbosquid: 3d models for games, architecture, videos. (1676751)
3d_export
$22

GoPro Hero2 Camera GoPro 3D Model
...waterproof hero kitesurf kiteboard surf sport adventures rc mini
gopro hero2 camera gopro 3d model raphaelwolfeye 51627 3dexport
3d_export
$49
gopro hero 9 black
...gopro hero 9 black
3dexport
gopro hero 9 black (eevee)
cg_studio
$149

GoPro HERO3+3d model
...amera
.max .obj .mb .lwo .fbx .c4d .3ds - gopro hero3+ 3d model, royalty free license available, instant download after purchase.
3d_export
$5

Magnetic GoPro Mount
...pro mount
3dexport
cool magnetic mount for gopro. allows you to mount the camera on flat metal surfaces and get exclusive shots.
3d_export
$149

GoPro HERO3 3D Model
...gopro hero3+ hero plus go pro hd shot photo camera photography digital lens optical
gopro hero3 3d model humster3d 95628 3dexport
turbosquid
$250

GoPro Hero4 camera
... 3d model gopro hero4 camera for download as ma, obj, and fbx on turbosquid: 3d models for games, architecture, videos. (1295092)
3d_ocean
$12

Drone phantom with gopro
...mount, mainly intended for aerial cinematography and photography applications . please rate this file if you downloaded it, th...
Quick
3ddd
$1

Quick-Step / Quadra
...quick-step / quadra
3ddd
quick step
ламинат quick-step, серия quadra. сайт источник -http://www.quick-step.com
3ddd
$1

Quick-Step / Lagune
...quick-step / lagune
3ddd
quick step
ламинат quick-step, серия lagune. сайт источник -http://www.quick-step.com
3ddd
$1
Quick-Step / Classic
...quick-step / classic
3ddd
quick step
ламинат quick-step, серия classic. сайт источник -http://www.quick-step.com
3ddd
$1
Quick-Step / Arte
...quick-step / arte
3ddd
quick step
ламинат quick-step, серия arte. сайт источник -http://www.quick-step.com
3ddd
$1

Quick-Step / Vogue
...quick-step / vogue
3ddd
quick step
ламинат quick-step, серия vogue. сайт источник -http://www.quick-step.com
3ddd
$1
Quick-Step / Rustic
...quick-step / rustic
3ddd
quick step
ламинат quick-step, серия rustic. сайт источник -http://www.quick-step.com
3ddd
$1
Quick-Step / Eligna
...quick-step / eligna
3ddd
quick step
ламинат quick-step, серия eligna. сайт источник -http://www.quick-step.com
turbosquid
$3

Quick Ball
...lty free 3d model quick ball for download as ma, obj, and fbx on turbosquid: 3d models for games, architecture, videos. (1521597)
3ddd
free

Quick-Step / Elite
... ламинат
ламинат quick-step, серия elite. сайт источник -http://www.quick-step.com
turbosquid
$10
Quick Chrome
... available on turbo squid, the world's leading provider of digital 3d models for visualization, films, television, and games.
Change
3d_export
$10
Feed chang
...feed chang
3dexport
turbosquid
$5

Change Dish
... available on turbo squid, the world's leading provider of digital 3d models for visualization, films, television, and games.
design_connected
$29

Basis 25 + Change
...basis 25 + change
designconnected
schramm basis 25 + change computer generated 3d model.
turbosquid
$9

Change black coin
...
royalty free 3d model change black coin for download as max on turbosquid: 3d models for games, architecture, videos. (1494730)
turbosquid
$9

Change gold coin
...d
royalty free 3d model change gold coin for download as max on turbosquid: 3d models for games, architecture, videos. (1494727)
turbosquid
$3

change cup box
...uid
royalty free 3d model change cup box for download as stl on turbosquid: 3d models for games, architecture, videos. (1241132)
turbosquid
$50

110214 da chang
... available on turbo squid, the world's leading provider of digital 3d models for visualization, films, television, and games.
turbosquid
$15

Stove (Color Changing)
... available on turbo squid, the world's leading provider of digital 3d models for visualization, films, television, and games.
turbosquid
$5

Wardrobe Changing Room
...for download as ma, 3ds, max, obj, fbx, unitypackage, and upk on turbosquid: 3d models for games, architecture, videos. (1415915)
3d_export
$9

baby changing table 001
...baby changing table 001
3dexport
modern changing table - chest of drawers for a children room + decor.
Mount
3d_export
free

mounting bracket
...mounting plate is the portion of a hinge that attaches to the wood. mounting plates can be used indoors, cabinetry and furniture.
turbosquid
$2

MOUNTING
... available on turbo squid, the world's leading provider of digital 3d models for visualization, films, television, and games.
turbosquid
free

Mounts
... available on turbo squid, the world's leading provider of digital 3d models for visualization, films, television, and games.
turbosquid
free

Mount Fuji
...fuji
turbosquid
free 3d model mount fuji for download as obj on turbosquid: 3d models for games, architecture, videos. (1579977)
3d_export
$5

Headphone mount LR
...headphone mount lr
3dexport
headphone mount l+r
turbosquid
$39

Mount rainier
...quid
royalty free 3d model mount rainier for download as fbx on turbosquid: 3d models for games, architecture, videos. (1492586)
turbosquid
$5

pipe mounting
...quid
royalty free 3d model pipe mounting for download as obj on turbosquid: 3d models for games, architecture, videos. (1293744)
turbosquid
$3

Mounting Tires
...uid
royalty free 3d model mounting tires for download as fbx on turbosquid: 3d models for games, architecture, videos. (1708511)
3d_export
$5
Magnetic GoPro Mount
...pro mount
3dexport
cool magnetic mount for gopro. allows you to mount the camera on flat metal surfaces and get exclusive shots.
turbosquid
$5

Stone Mount
...ty free 3d model stone mount for download as ma, obj, and fbx on turbosquid: 3d models for games, architecture, videos. (1370306)