Thingiverse
Quest 2 headstrap V1.1 by Mochiguy
by Thingiverse
Last crawled date: 3 years, 3 months ago
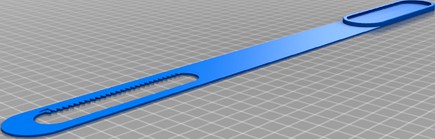
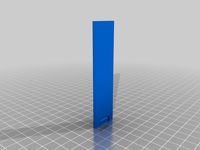
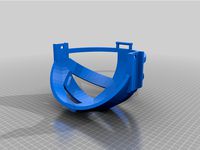
This Headstrap utilises a ratchet mechanism to 'lock' the headstrap in various postions to tighten or release it from one's head. Additionally there is a mechanism to realign the straps incase there is misalignment. Please be aware that this design is based on the use of PETG filament.
To assemble the headstrap:
From the original quest 2 headstrap, separate the side straps from the upper strap.
Insert the two side straps into the main body.
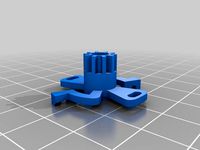
Insert the rear knob - this will take a lot of force, so i would advise pressing the walls from the opposite side to help prevent layer separation.
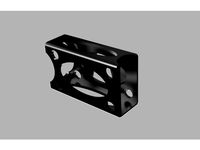
Insert the ratchet into the ratchet housing
Install the ratchet housing +ratchet onto the main body with the help of a flat head screwdriver, turn the knob clockwise to help the parts align.
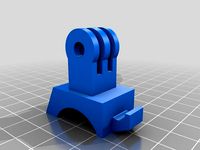
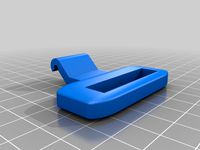
Insert the latch and secure onto the quest 2.
Print settings:
All parts
Material: PETG
0.4 line width
3 walls
4 floors
5 roofs
Main body
sitting vertically on the printbed (top strap latch pointing upwards)
supports enabled
block supports from generating within the hollow cavity (where the side straps go)
a .25 layer height would speed things up, however 0.2 is recommended
15% infill
Fan 30%
Side straps - (prints will vary, but the straps should come out at 1mm thick, any thicker would risk a stiffer mechanism)
0.2 layer height
no supports
100% infill
Fan 30% from 1.2mm
Ratchet housing
0.2 layer height
supports enabled
plain side down on the bed
Fan 30%
Knob
0.2 layer height
Fan 30%
Ratchet
-0.2 layer height
-Fan 20%
Latch
orientation- concave pointing down on bed
0.1 layer height
supports with support roof enabled
V1.1 Improvements
Tighter interference with side straps & quest 2
Functional ratchet system
To assemble the headstrap:
From the original quest 2 headstrap, separate the side straps from the upper strap.
Insert the two side straps into the main body.
Insert the rear knob - this will take a lot of force, so i would advise pressing the walls from the opposite side to help prevent layer separation.
Insert the ratchet into the ratchet housing
Install the ratchet housing +ratchet onto the main body with the help of a flat head screwdriver, turn the knob clockwise to help the parts align.
Insert the latch and secure onto the quest 2.
Print settings:
All parts
Material: PETG
0.4 line width
3 walls
4 floors
5 roofs
Main body
sitting vertically on the printbed (top strap latch pointing upwards)
supports enabled
block supports from generating within the hollow cavity (where the side straps go)
a .25 layer height would speed things up, however 0.2 is recommended
15% infill
Fan 30%
Side straps - (prints will vary, but the straps should come out at 1mm thick, any thicker would risk a stiffer mechanism)
0.2 layer height
no supports
100% infill
Fan 30% from 1.2mm
Ratchet housing
0.2 layer height
supports enabled
plain side down on the bed
Fan 30%
Knob
0.2 layer height
Fan 30%
Ratchet
-0.2 layer height
-Fan 20%
Latch
orientation- concave pointing down on bed
0.1 layer height
supports with support roof enabled
V1.1 Improvements
Tighter interference with side straps & quest 2
Functional ratchet system
Similar models
thingiverse
free

Ratchet Strap Organizer Version 2
...s model as i think of improvements.
only use to support the cylinder sticking out the side, the holes/handle print with out them.
grabcad
free

Bracket for 50mm reservoir on 120mm fan
... reservoir on 120mm fan
grabcad
bracket for 50mm reservoir on 120mm fan
to print without supports in petg with 0.2 layer height
thingiverse
free

Quest 2 Cable Holder by modellermark2
... in total and longer inner legs to grip onto the softer wider strap of the quest 2.
holds really nicely on the top or side straps
thingiverse
free
Dell Visor Ratchet Gear for Head Strap by MIKEYMCC
...r testing (gaming) will need to be done.
i printed this on my haribo at 100% infill and 0.1mm layer height in petg with supports.
thingiverse
free

OPL2 Card ISA Slot Cover and Volume Knob
...ted with petg.
print volume knob upside down.
pot is rk097g from china
http://www.malinov.com/home/sergeys-projects/isa-opl2-card
thingiverse
free

FlosStyle GoPro Mount by add1ct3dd
...se
this is a 30 degree mount, inspired by the bannilite mounting mechanism.
printed at 35% infill, 0.2 layer height and support.
thingiverse
free

D20 Box by TheZexa
...ain body
brim adhesion
lid:
50mm/s speed
0.2 layer height
20% infill
supports used to allow the inside lip to print
brim adhesion
thingiverse
free

90 degree gopro mount by shadow30
...90 degree gopro mount by shadow30
thingiverse
print in petg, nozzle 0.4, layer height 0.2 30%infill
thingiverse
free

Quest 2 Halo Strap Easy Access Battery Holder (Remix) by Azdroid
...n order to print and uses the battery pack itself as a brace.
i hope everyone likes this and don't forget to post your makes!
thingiverse
free

nasa toothpaste squeezer by dav88
...the rod side wont move during print.
the body is gonna need supports as it has to be oriented with the nasa ratcheting side down.
Headstrap
thingiverse
free
Tattu 2500 LiPo Headstrap Holder for Orqa by tobstare
...tattu 2500 lipo headstrap holder for orqa by tobstare
thingiverse
tattu 2500 mah lipo headstrap holder for orqa headstrap.
thingiverse
free
GoPro headstrap mount by Lugge7
...gopro headstrap mount by lugge7
thingiverse
a thing
thingiverse
free
Oculus Quest headstrap slides
...ie through the end and threaded through. it would need to be attached to whatever for a mounting bracket for it to be of any use.
thingiverse
free
Fatshark 1.5in Headstrap adapter
...fatshark 1.5in headstrap adapter
thingiverse
adapter for fatshark goggle for 1.5in gopro head strap. print in tpu
thingiverse
free
Nitecore NU30 headstrap flip by tapka
...делил новый и распечатал.
отрезать два кусочка длиной ~7мм от канцелярской скрепки.
приклеить их в углубления на держателе ремня.
thingiverse
free

contour roam 2 headstrap mount + sliders by Bushwookie
...ount + sliders by bushwookie
thingiverse
headstrap mount for contour roam 2, just add 1" elastic straps. assembly required
thingiverse
free

Stealth headstrap holder for Lenovo Explorer WMR by JnBean
... feel free to ask for another size in the comments.
images of the headstrap on my head will follow as soon as the epoxy is dry :d
thingiverse
free
Battery headstrap oculus quest 2 by freshfish23
...2. to complete this you need some foam, hot glue and velcro ties. this model is only compatible with the anker powercore 10000mah
thingiverse
free
Oculus Quest Headstrap
...nt with supports!
you need:
2x m6x30 with a nut and 4 washers
2x m5x25 with a nut and 2 washers
2x r-28 o-rings
velcro cable ties
thingiverse
free
Oculus Quest Headstrap Buckle Vive DAS
...a nice big fat part for the strap so it won't break into pieces when handling the quest.
(i printed it on a dlp for strength)
Quest
3d_export
$5

malroth dragon quest ii
...malroth dragon quest ii
3dexport
malroth dragon quest ii sprite voxel
3d_ocean
$89

Nissan Quest 2011
...y, in real units of measurement, qualitatively and maximally close to the original. model formats: - *.max (3ds max 2008 scanl...
3d_export
$99

Nissan Quest 2011 3D Model
...n quest minivan van bus 2011 2012 2013 2014 family city 4-door japan japanese
nissan quest 2011 3d model humster3d 52172 3dexport
3d_export
$20

2008 Nissan Quest 3D Model
...2009 low poly lowpoly truck car vehicle van vagon large vario minivan bus famely
2008 nissan quest 3d model be_fast 8181 3dexport
cg_studio
$99

Nissan Quest 20113d model
...
.3ds .c4d .fbx .lwo .max .mb .obj - nissan quest 2011 3d model, royalty free license available, instant download after purchase.
turbosquid
$18

Office chair Orion quest
... available on turbo squid, the world's leading provider of digital 3d models for visualization, films, television, and games.
turbosquid
$15

Office chair Samba quest
... available on turbo squid, the world's leading provider of digital 3d models for visualization, films, television, and games.
humster3d
$75

3D model of Nissan Quest 2011
...a detailed 3d model of nissan quest 2011 in various file formats. all our 3d models were created maximally close to the original.
humster3d
$75

3D model of Nissan Quest 2006
...a detailed 3d model of nissan quest 2006 in various file formats. all our 3d models were created maximally close to the original.
turbosquid
$49

ISS Module - Quest Joint Airlock
... available on turbo squid, the world's leading provider of digital 3d models for visualization, films, television, and games.
V1
turbosquid
$35

v1
... available on turbo squid, the world's leading provider of digital 3d models for visualization, films, television, and games.
3d_export
$10

street tree v1
...street tree v1
3dexport
street tree v1
3d_export
$5
potato v1
...potato v1
3dexport
turbosquid
$20

Kitchen V1
...bosquid
royalty free 3d model kitchen v1 for download as max on turbosquid: 3d models for games, architecture, videos. (1153622)
turbosquid
$12
sofa v1
...turbosquid
royalty free 3d model sofa v1 for download as max on turbosquid: 3d models for games, architecture, videos. (1283267)
turbosquid
$3

Chair V1
...urbosquid
royalty free 3d model chair v1 for download as fbx on turbosquid: 3d models for games, architecture, videos. (1486093)
3d_export
$5
tram v1
...tram v1
3dexport
3d_export
$8
lumber car v1
...lumber car v1
3dexport
lumber car v1 printable, low poly model.
turbosquid
$19

Sofa v1
...oyalty free 3d model sofa v1 for download as ma, fbx, and obj on turbosquid: 3d models for games, architecture, videos. (1696081)
turbosquid
$15

Leprechaun V1
...free 3d model leprechaun v1 for download as max, obj, and fbx on turbosquid: 3d models for games, architecture, videos. (1257064)
1
turbosquid
$15

ring 1+1
... available on turbo squid, the world's leading provider of digital 3d models for visualization, films, television, and games.
turbosquid
$10

chair(1)(1)
... available on turbo squid, the world's leading provider of digital 3d models for visualization, films, television, and games.
turbosquid
$8

Chair(1)(1)
... available on turbo squid, the world's leading provider of digital 3d models for visualization, films, television, and games.
turbosquid
$2

RING 1(1)
... available on turbo squid, the world's leading provider of digital 3d models for visualization, films, television, and games.
turbosquid
$1

Table 1(1)
... available on turbo squid, the world's leading provider of digital 3d models for visualization, films, television, and games.
turbosquid
$1

house 1(1)
... available on turbo squid, the world's leading provider of digital 3d models for visualization, films, television, and games.
turbosquid
$59

Formula 1(1)
...lty free 3d model formula 1 for download as max, fbx, and obj on turbosquid: 3d models for games, architecture, videos. (1567088)
design_connected
$11

No 1
...no 1
designconnected
sibast no 1 computer generated 3d model. designed by sibast, helge.
turbosquid
$2

desert house(1)(1)
...3d model desert house(1)(1) for download as 3ds, max, and obj on turbosquid: 3d models for games, architecture, videos. (1055095)
turbosquid
$50
door 1 darkwood 1
... available on turbo squid, the world's leading provider of digital 3d models for visualization, films, television, and games.
2
design_connected
$11

No 2
...no 2
designconnected
sibast no 2 computer generated 3d model. designed by sibast, helge.
turbosquid
$99

Smilodon 2 Pose 2
... available on turbo squid, the world's leading provider of digital 3d models for visualization, films, television, and games.
turbosquid
$20

Barrel Barricade 2-2
... available on turbo squid, the world's leading provider of digital 3d models for visualization, films, television, and games.
turbosquid
$6

Wall Trophy (2) (2)
... available on turbo squid, the world's leading provider of digital 3d models for visualization, films, television, and games.
turbosquid
free

Tire label 2 of 2
... available on turbo squid, the world's leading provider of digital 3d models for visualization, films, television, and games.
3ddd
$1

Кровать, 2 тумбочки, 2 светильника
...кровать, 2 тумбочки, 2 светильника
3ddd
кровать, 2 тумбочки, 2 светильника
нормальное качество
формат 3ds max
без текстур
3ddd
free

Кровать, 2 тумбочки, 2 светильника
...кровать, 2 тумбочки, 2 светильника
3ddd
кровать, 2 тумбочки, 2 светильника
нормальное качество
формат 3ds max
без текстур
turbosquid
$19
Loft wooden square box chandelier (2) (2) (2)
... available on turbo squid, the world's leading provider of digital 3d models for visualization, films, television, and games.
3ddd
$1
ALPEREN-2
...alperen-2
3ddd
комод , alperen-2
комод с зеркалом alperen-2
design_connected
$27
Confluences 2 2-Seater Sofa
... 2-seater sofa
designconnected
ligne roset confluences 2 2-seater sofa computer generated 3d model. designed by nigro, philippe.