Thingiverse
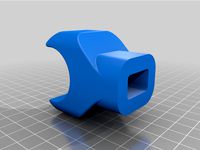
Qidi X-Plus (built and verified) - X-Max potential by jasonfjh23
by Thingiverse
Last crawled date: 3 years ago
All credit to cwills75.
Remix of: https://www.thingiverse.com/thing:4441076 presented a thumb screw to replace the wing nut on the front-left corner of the BIBO bed. It is too wide for the other two positions.
I have created a smaller version to fit the right-front corner and the back-center.
(8) M3-.50 nuts is required.
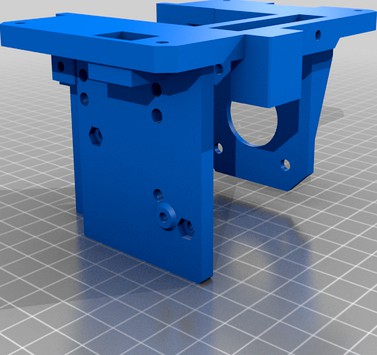
I used the SLA version for the carriage so that I did not have to use heat set threads, opting for M3 nuts as this design allows for. I also raised the extruder by 7.41mm to retain almost all of the Z build volume, and minimized the thickness of the extruder mount to be able to use the supplied hardware with the BMG kit. I did have to lower my X and Y max distances to (X=269.6, Y=194) from the stock (X=270, Y=200).
Hardware used:
Stock extruder stepper (from high temp extruder assembly)
Stock hotend breakout board (from high temp extruder assembly)
5015 blower fan (part cooling) (https://www.amazon.com/gp/product/B079BPS9Q8/ref=ppx_yo_dt_b_asin_title_o01_s04?ie=UTF8&psc=1)
3010 cooling fan (hotend) (https://www.amazon.com/gp/product/B07WFL6944/ref=ppx_yo_dt_b_asin_title_o09_s02?ie=UTF8&psc=1)
CR1 hotend assembly (https://store.3dpassion.com/collections/store/products/cr1-hotend-preorder)
3D passion Starforged V6/M6 RepRap Nozzle - 0.4mm (https://www.amazon.com/gp/product/B08CGBLVW9/ref=ppx_yo_dt_b_asin_title_o06_s01?ie=UTF8&psc=1)
Nova groove mount adapter - longer (https://store.3dpassion.com/collections/store/products/copy-of-nova-groove-mount-adaptor-2?variant=29535946637410)
50W 24V heater (https://www.amazon.com/gp/product/B07MP7XLTC/ref=ppx_yo_dt_b_asin_title_o09_s02?ie=UTF8&psc=1)
3mm thread K-type thermocouple (https://www.amazon.com/gp/product/B07BW81V82/ref=ppx_yo_dt_b_asin_title_o00_s02?ie=UTF8&psc=1)
BMG type extruder, 3:1 reduction - Left hand (https://www.amazon.com/gp/product/B08PYCMPVF/ref=ppx_yo_dt_b_asin_title_o00_s03?ie=UTF8&psc=1)
Misc. M3 BHCS lengths (16mm, 12mm, 8mm)
To make all of the parameter changes, I had to gain access through Octoprint.
For my setup, I used an RPi 4 and a USB to TTL converter (https://www.amazon.com/gp/product/B00LODGRV8/ref=ppx_yo_dt_b_search_asin_title?ie=UTF8&psc=1), make sure to connect Rx from the motherboard to Tx on the USB chip, Tx on the motherboard to Rx on the USB chip, and Ground (GND) on the motherboard to Ground (GND) on the chip. DO NOT CONNECT the 3.3/5V lines, it is not necessary for communications.
For Octoprint, you will need the Plugin - Fix CBD Firmware Plugin. This will allow Octoprint to communicate properly to the Qidi motherboard.
If you do not receive the PID measurements back in the Terminal window, you may need to enable "Force fancy functionality" and "Force terminal output during printing" under the Advance Options in Terminal.
-- Overall Parameter changes: --
// Stepper changes
M8002 I0; // Reverse X motor direction
M8005 I1; // Reverse stepper motor direction
// BMG E-Steps
M8011 S0.0020; // (on the money! 3:1 BMG Extruder)
// New PID values
// tested code in Octoprint
M303 E0 S220 C10;
// returned: bias:105 d:105 Ku: 37.659279 Tu:21.200001
// returned: Kp: 22.595568 Ki:2.131657 Kd:59.878258
// Send updated PID
M301 P22.595568 I2.131657 D59.878258;
// New X, Y, Z - Max Distances
M8024 I269.5; // X Max Distance
M8025 I194; // Y Max Distance
M8026 I201.150000; // Z Max Distance
// Save Changes
M8500;
Remix of: https://www.thingiverse.com/thing:4441076 presented a thumb screw to replace the wing nut on the front-left corner of the BIBO bed. It is too wide for the other two positions.
I have created a smaller version to fit the right-front corner and the back-center.
(8) M3-.50 nuts is required.
I used the SLA version for the carriage so that I did not have to use heat set threads, opting for M3 nuts as this design allows for. I also raised the extruder by 7.41mm to retain almost all of the Z build volume, and minimized the thickness of the extruder mount to be able to use the supplied hardware with the BMG kit. I did have to lower my X and Y max distances to (X=269.6, Y=194) from the stock (X=270, Y=200).
Hardware used:
Stock extruder stepper (from high temp extruder assembly)
Stock hotend breakout board (from high temp extruder assembly)
5015 blower fan (part cooling) (https://www.amazon.com/gp/product/B079BPS9Q8/ref=ppx_yo_dt_b_asin_title_o01_s04?ie=UTF8&psc=1)
3010 cooling fan (hotend) (https://www.amazon.com/gp/product/B07WFL6944/ref=ppx_yo_dt_b_asin_title_o09_s02?ie=UTF8&psc=1)
CR1 hotend assembly (https://store.3dpassion.com/collections/store/products/cr1-hotend-preorder)
3D passion Starforged V6/M6 RepRap Nozzle - 0.4mm (https://www.amazon.com/gp/product/B08CGBLVW9/ref=ppx_yo_dt_b_asin_title_o06_s01?ie=UTF8&psc=1)
Nova groove mount adapter - longer (https://store.3dpassion.com/collections/store/products/copy-of-nova-groove-mount-adaptor-2?variant=29535946637410)
50W 24V heater (https://www.amazon.com/gp/product/B07MP7XLTC/ref=ppx_yo_dt_b_asin_title_o09_s02?ie=UTF8&psc=1)
3mm thread K-type thermocouple (https://www.amazon.com/gp/product/B07BW81V82/ref=ppx_yo_dt_b_asin_title_o00_s02?ie=UTF8&psc=1)
BMG type extruder, 3:1 reduction - Left hand (https://www.amazon.com/gp/product/B08PYCMPVF/ref=ppx_yo_dt_b_asin_title_o00_s03?ie=UTF8&psc=1)
Misc. M3 BHCS lengths (16mm, 12mm, 8mm)
To make all of the parameter changes, I had to gain access through Octoprint.
For my setup, I used an RPi 4 and a USB to TTL converter (https://www.amazon.com/gp/product/B00LODGRV8/ref=ppx_yo_dt_b_search_asin_title?ie=UTF8&psc=1), make sure to connect Rx from the motherboard to Tx on the USB chip, Tx on the motherboard to Rx on the USB chip, and Ground (GND) on the motherboard to Ground (GND) on the chip. DO NOT CONNECT the 3.3/5V lines, it is not necessary for communications.
For Octoprint, you will need the Plugin - Fix CBD Firmware Plugin. This will allow Octoprint to communicate properly to the Qidi motherboard.
If you do not receive the PID measurements back in the Terminal window, you may need to enable "Force fancy functionality" and "Force terminal output during printing" under the Advance Options in Terminal.
-- Overall Parameter changes: --
// Stepper changes
M8002 I0; // Reverse X motor direction
M8005 I1; // Reverse stepper motor direction
// BMG E-Steps
M8011 S0.0020; // (on the money! 3:1 BMG Extruder)
// New PID values
// tested code in Octoprint
M303 E0 S220 C10;
// returned: bias:105 d:105 Ku: 37.659279 Tu:21.200001
// returned: Kp: 22.595568 Ki:2.131657 Kd:59.878258
// Send updated PID
M301 P22.595568 I2.131657 D59.878258;
// New X, Y, Z - Max Distances
M8024 I269.5; // X Max Distance
M8025 I194; // Y Max Distance
M8026 I201.150000; // Z Max Distance
// Save Changes
M8500;
Similar models
thingiverse
free

CR10S PRO - Dragon Hotend Direct Drive by 3DEE_
..._title_o00_s00?ie=utf8&psc=1
https://www.amazon.de/gp/product/b07lbrmq5t/ref=ppx_yo_dt_b_asin_title_o08_s00?ie=utf8&psc=1
thingiverse
free

Sonoff Enclosure by JeffLZ
...title_o00_s00?ie=utf8&psc=1
https://www.amazon.com/gp/product/b00qvb6qpu/ref=ox_sc_saved_title_1?smid=atvpdkikx0der&psc=1
thingiverse
free

X-Carriage Anet Hotend by davidtanis
...?ie=utf8&psc=1
and the wheelshttps://www.amazon.com/gp/product/b07gf9vghd/ref=ppx_yo_dt_b_search_asin_title?ie=utf8&psc=1
thingiverse
free
12 Function Deep Dish Button Box by coyoteyz13
..._title_o03_s00?ie=utf8&psc=1
https://www.amazon.com/gp/product/b07vhcb1q4/ref=ppx_yo_dt_b_search_asin_title?ie=utf8&psc=1
thingiverse
free

Chiron Direct Drive with V6 hotend by Shoots2k
...sc=1
capricorn bowden ptfe tubinghttps://www.amazon.com/gp/product/b086ypdhmf/ref=ppx_yo_dt_b_search_asin_title?ie=utf8&psc=1
thingiverse
free

Desk Fan by NebNorse
...lpages04?ie=utf8&psc=1
motor control: https://www.amazon.com/gp/product/b01cnl6imc/ref=od_aui_detailpages04?ie=utf8&psc=1
thingiverse
free
Ugly Drum Smoker PID Controller Bracket by kd5ahl
...amp;sr=8-5
pipe adapter: https://www.homedepot.com/p/everbilt-1-2-in-copper-ftg-x-mip-fitting-adapter-fitting-c6042hd12/204620308
thingiverse
free

Y-6 Multicopter Frame by ashkip
...azon.com/gp/product/b00tf8uy9a/ref=oh_aui_detailpage_o00_s01?ie=utf8&psc=1
soldering iron, supplies and a lot of patience :-)
thingiverse
free

MK3 Camera Mount by infocus
..._o04_s00?ie=utf8&psc=1
flex cablehttps://www.amazon.com/gp/product/b00m4daqh8/ref=oh_aui_detailpage_o04_s00?ie=utf8&psc=1
thingiverse
free

NEMA 17 Multiplier - Mount by OCD3D
...wzb/ref=oh_aui_detailpage_o06_s01?ie=utf8&psc=1
my steppers are set to 0.9a, 16th step stealthchop, 1.5mm retract @ 40mm/s...

Qidi
thingiverse
free

Qidi XMAX Spool Clamp
...qidi xmax spool clamp
thingiverse
a simple spool clamp for qidi tech xmax or xplus spool holder(30mm diameter).
thingiverse
free
QIDI Upper spool holder by Shibatam
...qidi upper spool holder by shibatam
thingiverse
upper spool holder for qidi.
use this when the back space is narrow.
thingiverse
free

Qidi Z axis brace by mjgrundmann
...qidi z axis brace by mjgrundmann
thingiverse
used to stiffen up the z axis guide rods on a qidi tech i.
thingiverse
free
DEROULEUR BOBINE QIDI by bil26
...i by bil26
thingiverse
bonjour,
c'est un montage pour imprimante qidi xmax .
montage avec 2 x roulements 6002.
cordialement,
thingiverse
free
QIDI Glass Bed Clips by ChrisX35
...idi glass bed clips by chrisx35
thingiverse
qidi glass bed upgrade.
new clips are here https://www.thingiverse.com/thing:2480107
thingiverse
free

Bed level QIDI - Microsoft LifeCam by lemacs
...bed level qidi - microsoft lifecam by lemacs
thingiverse
bed level camera mount for qidi - microsoft lifecam
thingiverse
free

Qidi X-One cooler duct by rpagyc
...qidi x-one cooler duct by rpagyc
thingiverse
extruder cooling duct for the qidi tech x-one
thingiverse
free

Qidi Tech PTFE adapter by sewallman
...h ptfe adapter by sewallman
thingiverse
adapter for a 6mm ptfe tube to fit ontop the qidi tech xmax/xplus/imates extruder cover.
thingiverse
free

QIDI Shadow filter plug by shifter
... by shifter
thingiverse
this is a cap/plug for the qidi tech shadow 5.5s. to cover the spot where the pointless air filter goes.
thingiverse
free

QIDI Door Latch by TobyC84
...i created for the qidi printer. it holds the door open while you print pla or while you remove a print from the print bed! enjoy!
Verified
turbosquid
$9

Verify CRED black coin
...alty free 3d model verify cred black coin for download as max on turbosquid: 3d models for games, architecture, videos. (1634057)
turbosquid
$9

Verify CRED gold coin
...yalty free 3d model verify cred gold coin for download as max on turbosquid: 3d models for games, architecture, videos. (1634033)
3ddd
free
Casamilano Suite
...suite is an armchair with wide seat designed and verified to the last detail from leading italian architect castello...
3d_export
$7
automatic test line
...the mechanism can be edited. the mechanism has been verified and the design is...
3d_export
$99

3D Model Detailed House Cutaway View 3D Model
...3d software programs.every format of this model has been verified in software that is designed for.also check out my...
3d_export
$36
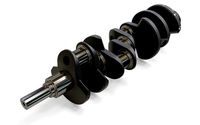
Crankshaft v8
...of the scene.<br>counting polygons obj and fbx format, models verified in 3ds max 2016 and in maya 2017:<br>- obj:...
3d_export
$30

48 Ring Signet Different Size
...easy for you to modify it.<br>-all the meshes are verified<br>- 12 original 1 3dm file . total have 4...
3d_export
$30

48 Ring Signet Different Size
...easy for you to modify it.<br>-all the meshes are verified<br>- 12 original 1 3dm file . total have 4...
3d_export
$30

48 Ring Signet Different Size
...easy for you to modify it.<br>-all the meshes are verified<br>- 12 original 1 3dm file . total have 4...
3d_export
$57
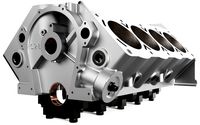
Engine block v8
...in the package.<br>counting polygons obj and fbx format, models verified in 3ds max 2016 and in maya 2017 (3...
Potential
3d_export
$6

face protect mask
...protect mask is a personal protective equipment to from potentialy infectious materials. file formats: sldprt, step,...
3d_export
$7

doom sinful soul
...special energy cage ,and create powerful beam, which demoralised potential ...
3d_export
$5

iphone 13
...3dexport a realistic iphone 13 but the dimensions are potentialy not real, usable for anything! if you pay for...
3d_export
$5

Funny worm
...worm 3dexport the funny worm loves to amuse its potential opponents by making a positive and cheerful coloring of...
3d_export
$5
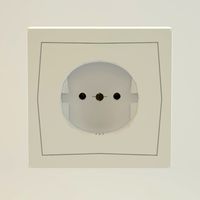
Socket 3D model 3D Model
...electric light outlet wall dimmer decora plug electricity voltage potential architectural socket 3d model 3d model maxxxim 93322...
3d_ocean
$7

Snow Kitten Doll
...spooky white woman this is a model of a potential game character that i created. created in 3ds max...
3d_export
$8

axe tool
...3dexport an axe tool, suitable for a toolshed or potentialy as a game asset.<br>polycount is: 1784<br>download includes .fbx and...
3d_export
$6

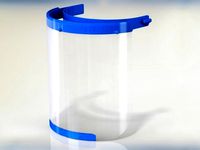
face shield
...road debris, chemical splashes (in laboratory or industry), or potentialy infectious materials (in medical and laboratory environments).<br>file formats: sldprt,...
3d_export
$6
face shield
...road debris, chemical splashes (in laboratory or industry), or potentialy infectious materials (in medical and laboratory environments).<br>file formats: sldprt,...
3d_ocean
$19

Anteater Low-Poly Character Pack
...a fantasy aztec environment, but as has a huge potential as a npc or a set of characters to...
Plus
turbosquid
$2
plus-plus puzzle and lego
...d model plus-plus puzzle and lego for download as stl and obj on turbosquid: 3d models for games, architecture, videos. (1662633)
3ddd
$1
Стенка Plus
...стенка plus
3ddd
plus , модная мебель
фабрика "модная мебель", модель plus
3ddd
$1
Спальня METIS plus
... hulsta , metis , спальня
спальня metis plus
design_connected
$11
be plus B+
...be plus b+
designconnected
blå station be plus b+ chairs computer generated 3d model. designed by börge lindau.
design_connected
$11
Bank Plus
...bank plus
designconnected
röthlisberger kollektion bank plus coffee tables computer generated 3d model. designed by atelier oi.
3ddd
$1

elos Plus
... candela
elos plus — мультифункциональный аппарат для проведения лазерного и ipl лечений
3ddd
$1
Calligaris Even Plus
...calligaris even plus
3ddd
calligaris
calligaris_chair_even plus
design_connected
$29

Basket Plus
...nconnected
photo-realistic 3d models of the basket plus bed from bonaldo for 3d architectural and interior design presentations.
3ddd
free
Artpole Faktum Plus
... артполе , панель
artpole faktum plus
размеры:
высота 625мм
ширина 800мм
глубина 17мм
3ddd
$1
Мария / Jazz Plus
...мария / jazz plus
3ddd
мария
кухня фабрики мария модель__jazz plus
Built
3d_export
$8

Built-in Oven
...built-in oven
3dexport
built-in oven 3d model for interior design
3ddd
free
built in bench
...built in bench
3ddd
built in
very useful bench for sitting next to dining table
turbosquid
$3

Built in desk
...3d model built in desk for download as 3dm, fbx, obj, and stl on turbosquid: 3d models for games, architecture, videos. (1663340)
turbosquid
$40
built-in_oven
... available on turbo squid, the world's leading provider of digital 3d models for visualization, films, television, and games.
turbosquid
$2

cooker built-in
... available on turbo squid, the world's leading provider of digital 3d models for visualization, films, television, and games.
turbosquid
$1

built-in lights
... available on turbo squid, the world's leading provider of digital 3d models for visualization, films, television, and games.
turbosquid
$30

Built In Kitchen Oven
...yalty free 3d model built in kitchen oven for download as c4d on turbosquid: 3d models for games, architecture, videos. (1616039)
turbosquid
$20

Oven / Teka / Built In
...alty free 3d model oven / teka / built in for download as max on turbosquid: 3d models for games, architecture, videos. (1438404)
turbosquid
$6

Built-in bookcase 1500
...odel built-in bookcase 1500 for download as max, obj, and fbx on turbosquid: 3d models for games, architecture, videos. (1469861)
turbosquid
$6

Built-in bookcase 1300
...odel built-in bookcase 1300 for download as max, obj, and fbx on turbosquid: 3d models for games, architecture, videos. (1469858)